
Halltech fitment
 02-18-2017, 12:21 AM
#1
Lifetime NCM Member #2497

Thread Starter
I installed my Halltech today. I guess I am one of the lucky, the fitment was dead on. It took me about an hour and a half. Everything went together well, and the fit and finish looks great, and I have no rubbing on my hood liner. This is the second one that I have installed (first one was on my 2015 Z). I'm still trying to figure out why so many people post how poorly this unit fits.
Thanks Jim for a great product!
URL=http://s290.photobucket.com/user/slacker1201/media/image_2.jpg.html]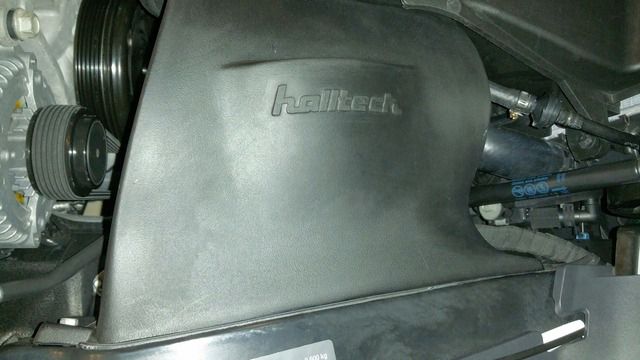 [/URL]
Thanks Jim for a great product!
URL=http://s290.photobucket.com/user/slacker1201/media/image_2.jpg.html]
[/URL]
Last edited by Steve Garrett; 02-19-2017 at 12:18 PM.

The following users liked this post:
Halltech (02-18-2017)
02-18-2017, 03:32 PM
#2
Pro


mine had minor fitment issues, but nothing I couldn't resolve. The power increase was WELL worth it.
02-19-2017, 12:18 PM
#3
Team Owner

Member Since: Oct 2013
Location: Kansas City, Missouri
Posts: 25,362
Received 7,752 Likes
on
4,181 Posts
CORVETTE TODAY Host
St. Jude Donor'15

I had fitment issues, but were able to overcome them with no issues.
02-19-2017, 11:52 PM
#4
I installed my Halltech today. I guess I am one of the lucky, the fitment was dead on. It took me about an hour and a half. Everything went together well, and the fit and finish looks great, and I have no rubbing on my hood liner. This is the second one that I have installed (first one was on my 2015 Z).
Last edited by Al3x_666; 02-20-2017 at 10:32 PM.
02-21-2017, 02:23 AM
#5
Melting Slicks

Are you required to tune if you install this or the AFE intake of a Z06?
Would love to install one of these but don't want issue with the warranty.
Would love to install one of these but don't want issue with the warranty.
 02-21-2017, 11:25 AM
#7
Supporting Vendor
Member Since: Mar 2002
Location: Bristol, Tennessee
Posts: 12,988
Received 583 Likes
on
313 Posts
St. Jude Donor '09

AFE is not a forum vendor, so you will have to contact them directly to answer questions.
We have been a supporting vendor since 1999.
The answer for our system is, that tuning is not required with any of our intakes. We spent 3 months testing, and changed our design originally twice to make sure LTFTs and Lambda fuel enrichment provided power without any issues.
We have sold intakes to 12% of the C7 Z06s that have been made, so it stands to reason, an occasional code would be reported using our intake. That does not mean that our intake is the source of the code. Especially P0106 codes, which are MAP (Manifold Absolute Pressure) codes. https://www.obd-codes.com/p0106
__________________

"World Class Performance for your Corvette"
Intake Design and Engineering since 1999
Halltech Systems, LLC
262-510-7600
For service email:
orders@halltechsystems.com
www.halltechsystems.com
"World Class Performance for your Corvette"
Intake Design and Engineering since 1999
Halltech Systems, LLC
262-510-7600
For service email:
orders@halltechsystems.com
www.halltechsystems.com
Last edited by Halltech; 02-21-2017 at 11:26 AM.
The following 2 users liked this post by Halltech:
Is2scooby (02-28-2017),
SterlingDrive (03-01-2017)
02-25-2017, 05:37 PM
#8
Advanced


I installed my Halltech today. I went slow but so took about two hours but no figment issues.
02-26-2017, 04:32 PM
#10
Drifting

My install went ok; I had to re-position the larger radiator hose a couple of times to get it right and it took more time than what I had planned to get everything positioned but once I did, it fit good.
I bought my car used and I think the previous owner had taken the car into the dealership due to some cooling issues while he owned it. I think the radiator and hoses may have been removed at that time and that may be why I had to reposition some things to get the intake to fit properly.
So far I'm pleased with it and the car feels very strong. The seal around the intake box and intake tube have peeled up after a shake down run and letting it sit over night but that seems to be the only minor issue. Jim Hall makes the best performing intakes.
02-27-2017, 07:35 AM
#11
Leeds.io
Member Since: Sep 2003
Location: Cross River, New York
Posts: 4,594
Received 398 Likes
on
239 Posts
St. Jude Donor '14-'15-'16
NCM Sinkhole Donor

Now that it's getting nice in February these days I think I'm going to take my ported TB off and reinstall the Halltech. The unit is in good shape with the exception of the seal mentioned by the two posters above. What's a good way to get that seal on again? Can I zip tie it?
thanks!
best,
gene
thanks!
best,
gene
02-27-2017, 08:16 AM
#12
Pro
Now that it's getting nice in February these days I think I'm going to take my ported TB off and reinstall the Halltech. The unit is in good shape with the exception of the seal mentioned by the two posters above. What's a good way to get that seal on again? Can I zip tie it?
thanks!
best,
gene
thanks!
best,
gene
I would also try using 3M weatherstrip adhesive to bond the two cut ends together, it seemed awkward to me that the seal wasn't a circular seal.
02-27-2017, 11:03 AM
#13
Leeds.io
Member Since: Sep 2003
Location: Cross River, New York
Posts: 4,594
Received 398 Likes
on
239 Posts
St. Jude Donor '14-'15-'16
NCM Sinkhole Donor
Thanks!
Best,
Gene
02-27-2017, 11:54 AM
#14
Pro
If you let go too soon, it has a way of not adhering well.
The following users liked this post:
phantasms (02-27-2017)
 02-28-2017, 12:38 PM
#16
Supporting Vendor
Member Since: Mar 2002
Location: Bristol, Tennessee
Posts: 12,988
Received 583 Likes
on
313 Posts
St. Jude Donor '09
Now that it's getting nice in February these days I think I'm going to take my ported TB off and reinstall the Halltech. The unit is in good shape with the exception of the seal mentioned by the two posters above. What's a good way to get that seal on again? Can I zip tie it?
thanks!
best,
gene
thanks!
best,
gene
The following users liked this post:
phantasms (02-28-2017)
03-01-2017, 04:04 PM
#17
Melting Slicks

I installed mine today. All went well with the exception it's touching the plastic holding the hood vent in. Is this the typical location that people are experiencing rubbing?
 03-01-2017, 07:30 PM
#19
Pro
1. Make sure to watch Jim Hall's (Halltech) video that shows you how to loosen BOTH radiator clamps (the one on the water neck, and the other on the upper radiator connection), and then rotate the hose so that the lower middle part of the hose moves toward the driver side of the car, then retighten the hose clamps.
2. Loosen the two bolts that attach the CAI housing to the apron, and then push down on the CAI housing, and while holding it down retighten the bolts.
This should help dramatically, if not completely fix your problem.
Andy
03-01-2017, 09:57 PM
#20
Melting Slicks
There are two things that cause this:
1. Make sure to watch Jim Hall's (Halltech) video that shows you how to loosen BOTH radiator clamps (the one on the water neck, and the other on the upper radiator connection), and then rotate the hose so that the lower middle part of the hose moves toward the driver side of the car, then retighten the hose clamps.
2. Loosen the two bolts that attach the CAI housing to the apron, and then push down on the CAI housing, and while holding it down retighten the bolts.
This should help dramatically, if not completely fix your problem.
Andy