ADVICE NEEDED! How do I proceed on my 72???
 06-17-2008, 02:02 AM
#1
Safety Car

Thread Starter

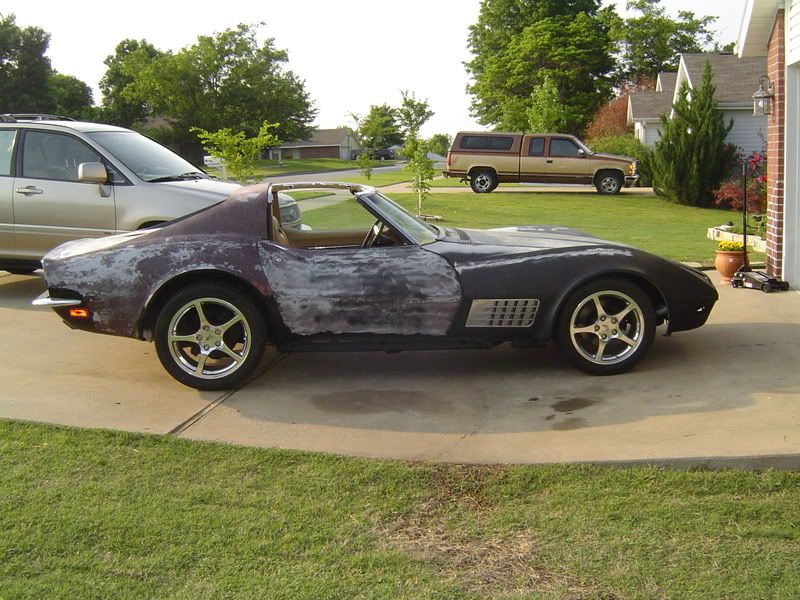
My car is basically sanded down to fiberglass, after removing a repaint with razor blades. The hood surround and right front fender were replaced with press molded panels. Some small imperfections have been filled with body filler. I have some small areas to finish sanding to remove the old paint (around door handles, under the "roof" behind the T tops, etc) I think I have ALL the old paint off, down to original primer or bare fiberglass.
My questions..what now?? I assume my car is not SMC, but plain old fiberglass?? Do I shoot it with epoxy primer and then do any more filling of imperfections or low spots, then block it down, and epoxy primer again...block..etc...?
Then what?? 2k primer, wet sand, topcoat??
I'm a bit confused on the difference between epoxy primer, and primer such as PPG K36(?) whick I think is a 2k primer???
I am retired US Navy, and have access to the auto hobby shop at a local military base. There is a professional painter on staff there, but I dont think he is up on specifics of prepping fiberglass. I have had several paint jobs there and he does a very nice job with "regular" cars, but I want to go in armed with as much info as possible when I talk to him about the corvette.
Heres a few pix of where the car is right now.
Obviously, I AM NOT a painter!!!
Thanks!!
 06-17-2008, 07:20 AM
#2
Drifting

wash well with dawn soap. then with waterbase wax and grease remover. 2 coats of epoxy. do your fill work then recoat with epoxy. from there it depends on you. i dont use 2k primer. i use only spi epoxy for surfacing . then 3 coats of spi universal clear , block with 600 , then 3 more coats of clear, sand and buff. jmo . good luck with it.
06-17-2008, 10:37 AM
#3
Safety Car
Thread Starter
wash well with dawn soap. then with waterbase wax and grease remover. 2 coats of epoxy. do your fill work then recoat with epoxy. from there it depends on you. i dont use 2k primer. i use only spi epoxy for surfacing . then 3 coats of spi universal clear , block with 600 , then 3 more coats of clear, sand and buff. jmo . good luck with it.
Is SPI a brand, like PPG?
Should I do ANY filling prior to spraying the epoxy?
What type/brand of body filler is recommended? I've always used Evercoat(?) products.
I get great prices on PPG line going through the auto hobby shop, wholesale or better. I'm sure PPG makes product types comparable to SPI...?
So you apply the color coats directly over the epoxy primer, after blocking of course??
Obviously ANY body repair is done prior to ANY epoxy primer, correct?
Sorry for all the BASIC questions, but I dont have much of the technical lingo down yet!!
Thanks for the patience and help!
Rob
06-17-2008, 11:36 AM
#4
Drifting
epoxy first to seal the glass. then your filler. i use evercoat. after fill i start building a surface using epoxy. it's just my choice after 40 years of doing it. spi is a truer epoxy than any i've found. if done correctly it will not shrink . i do only 1 coat at a time ( heavy wet coat ). blocking each . i start with 100 grit before epoxy and after first coat. then to 180 ,320 ,600 . i usually block with 180 twice. dont sand all your epoxy off after each coat . just get rid of texture and thing you see. it's 50/50 , fill some , take some off the top. hope this helps.
http://www.southernpolyurethanes.com/homepage.htm
http://www.southernpolyurethanes.com/homepage.htm
06-17-2008, 11:36 AM
#5
Melting Slicks


Hey Rob,
you are a bit ahead of me still! But we are close in where we are at overall. My 72 coupe also had to have a complete new front. I got mine from Eckler's. Did you grind out the front fenders where they were molded or just use filler to cover the slight imperfections? I have a short hair body filler and also resin and glass mat. Our doors are SMC. From what i understand is that in 70 or 71 they started using SMC in some parts of our cars and that they continued to slowly change the entire thing through the next few years. I too am looking at PPG and SPI for the paint products.... So many choices and so many questions... but it'll be worth it when our cars are done.
Sully
here's mine:
06-17-2008, 01:20 PM
#6
Safety Car
Thread Starter
Hey Rob,
you are a bit ahead of me still! But we are close in where we are at overall. My 72 coupe also had to have a complete new front. I got mine from Eckler's. Did you grind out the front fenders where they were molded or just use filler to cover the slight imperfections? I have a short hair body filler and also resin and glass mat. Our doors are SMC. From what i understand is that in 70 or 71 they started using SMC in some parts of our cars and that they continued to slowly change the entire thing through the next few years. I too am looking at PPG and SPI for the paint products.... So many choices and so many questions... but it'll be worth it when our cars are done.
Sully
here's mine:
you are a bit ahead of me still! But we are close in where we are at overall. My 72 coupe also had to have a complete new front. I got mine from Eckler's. Did you grind out the front fenders where they were molded or just use filler to cover the slight imperfections? I have a short hair body filler and also resin and glass mat. Our doors are SMC. From what i understand is that in 70 or 71 they started using SMC in some parts of our cars and that they continued to slowly change the entire thing through the next few years. I too am looking at PPG and SPI for the paint products.... So many choices and so many questions... but it'll be worth it when our cars are done.
Sully
here's mine:
I had the work done locally here in Tacoma. They ground down to the bonding strips and started from there. The new seams on the front look just like the original seams in the rear, if that means anything! Like I said, I'm pretty stupid when it comes to this bodywork thing, so hopefully guys will be VERY BASIC in trying to answer my myriad of questions here!!

One future problem I'll have to tackle...the gaps between the new fenders, surround and the doors are a mess...too wide at the top on the passenger side. I dont think it will be simply an adjustment fix. More like adding some material to either the front of the door edge or to the trailing edge of the fender where it meets the door. Maybe like 1/4" max...I'll address that in a later post!!!
Rob
06-17-2008, 01:23 PM
#7
Safety Car
Thread Starter
epoxy first to seal the glass. then your filler. i use evercoat. after fill i start building a surface using epoxy. it's just my choice after 40 years of doing it. spi is a truer epoxy than any i've found. if done correctly it will not shrink . i do only 1 coat at a time ( heavy wet coat ). blocking each . i start with 100 grit before epoxy and after first coat. then to 180 ,320 ,600 . i usually block with 180 twice. dont sand all your epoxy off after each coat . just get rid of texture and thing you see. it's 50/50 , fill some , take some off the top. hope this helps.
http://www.southernpolyurethanes.com/homepage.htm
http://www.southernpolyurethanes.com/homepage.htm
So what about the filler thats already on the body? Most of it is factory filler over the seams, but there is some you can see on the passenger door where I filled in some imperfections with Evercoat? Does that have to be removed before the epoxy sealer/primer?
Rob
06-17-2008, 02:37 PM
#8
Le Mans Master


Rob,
From the photo, the filler looks good unless there were cracks there. Then I would remove filler and and glass them first.
I sent you our local SPI distributor's email too.
From the photo, the filler looks good unless there were cracks there. Then I would remove filler and and glass them first.
I sent you our local SPI distributor's email too.
06-17-2008, 03:23 PM
#9
Safety Car
Thread Starter
The filler looks rock solid to me. When you say " glass them first" do you mean with cloth and resin or a fiberglass body filler? The areas on the passenger door, for instance, is just skim coated to cover small imperfections..not alot of build up. Or..were you referring to the seams?
Rob
Last edited by MakoShark72; 06-17-2008 at 03:31 PM.
06-17-2008, 05:50 PM
#10
Le Mans Master
Rob,
Referring to the door jams. I just meant that if you added any filler, it should not be used to fill any cracks. Cracks should be glassed with resin and matt and then filled.
Also, if the seams show any evidence of cracking, they typically continue to crack unless you glass them.
Referring to the door jams. I just meant that if you added any filler, it should not be used to fill any cracks. Cracks should be glassed with resin and matt and then filled.
Also, if the seams show any evidence of cracking, they typically continue to crack unless you glass them.
06-17-2008, 06:41 PM
#11
Safety Car
Thread Starter