Garage Paint Job
 11-03-2010, 01:10 AM
#41
Racer

Thread Starter


 11-03-2010, 05:59 PM
#43
Race Director


I know you wrote it with all the best intentions ("Please Hurry").....and I took it in the good spirit as you wrote it.
 ....but "getting in a hurry" is something I am not good at. I thought I had it done about 1 year ago...and realized that it was not as complete as I would want it to be. So many design changes...that I want to try to cover ALL possibilities....and not leave anyone "out-to-dry"...due to lack of specific information for their year model. This book is getting into the "down and dirty"-"really nitty-gritty" stuff that many books I have seen do not cover. Often times leaving an owner to go out on their own and TRY to find the answers. Then there will be the CRITICS who will BLAST it to death...for something....or let me know that I left something out. It has come to the point...where I am deciding on making it a HUGE book...or a series of seperate books, dealing with different areas of the car....but will be grouped together as a unit. The "jury" is still out on that one.
Thanks for all of your interest in it. I thought I was wasting my time for the longest time....but it was something I always wanted to do. Expressing my views on the Corvette restoration/repair business..and those "tricks" and modifications I have found that work out very well....unless you are going for a NCRS restoration standard...which is covered ...somewhat...in the book.
To all, have a blessed day/night.
"DUB"
Last edited by DUB; 11-03-2010 at 06:01 PM.
11-05-2010, 12:15 AM
#44
Melting Slicks


Member Since: Jun 2001
Posts: 3,444
Likes: 0
Received 0 Likes
on
0 Posts

BanGNGearS,
My summer project was to paint my 92 C4. A little bit after I got started I started documenting the project. I posted it here.
http://forums.corvetteforum.com/c4-g...s-of-pics.html
It is VERY detailed with a ton of pictures. I told all the good, bad, and ugly. When I was done, I wound up with an outstanding result. I would think this is the equivalent of a $7K paint job.
Good luck. It's more work than it looks.
11-06-2010, 07:40 PM
#46
Racer
Member Since: Oct 2006
Location: Australia Victoria
Posts: 488
Likes: 0
Received 0 Likes
on
0 Posts
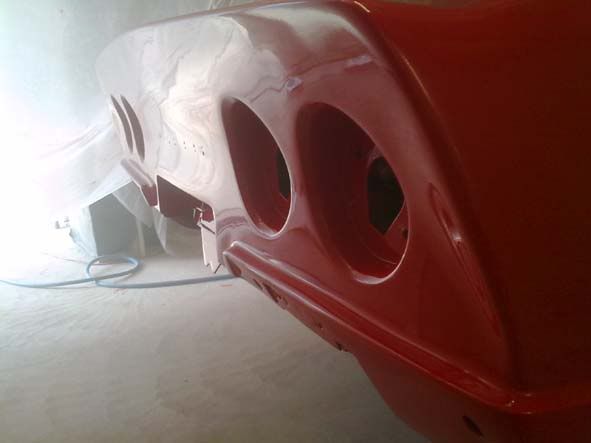
DUST.
Dust is the biggest issue with a home paint job.
Try to do as much of your paint removal and sanding outside the garage to keep it as cklean as possible, as once you have dust in your garage it'll haunt you.
Heres one I'm working on at the moment in my garage:
Dust is the biggest issue with a home paint job.
Try to do as much of your paint removal and sanding outside the garage to keep it as cklean as possible, as once you have dust in your garage it'll haunt you.
Heres one I'm working on at the moment in my garage:
11-07-2010, 10:12 AM
#47
Race Director
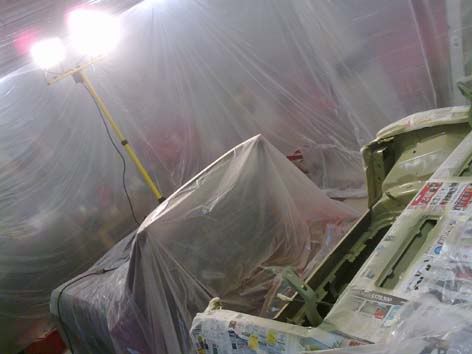
The one thing that I have seen numerous times when I go over to inspect a job someone is doing in their home garage is that they did not take the time to easily build an enclosure in their garage that allows them to perform all body work...and NOT sacrifice the integrity of the garage when completed. AND when it comes time for painting. They often times just jump right into it and created an environment that is not the best for painting. But this can be easily avoided with a little preparation. All it takes is a bit of clear plastic sheeting, duct tape, wire, hooks, some filters and a fan or two.
Doing the work outside is fine as long as local/state EPA regulations...and also "home owners associations" do not come into effect. Just watch out for bad weather and "bird-droppings".
"DUB"
Doing the work outside is fine as long as local/state EPA regulations...and also "home owners associations" do not come into effect. Just watch out for bad weather and "bird-droppings".
"DUB"
11-07-2010, 06:42 PM
#48
Racer
Member Since: Oct 2006
Location: Australia Victoria
Posts: 488
Likes: 0
Received 0 Likes
on
0 Posts
Probably cost me $30 worth of materials from the local hardware store including the rope. This helped reduce dust, but it will not eliminate dust 100%. I looked into fans etc but I decided to shoot without the expense. Fireproof fans were going to cost me over a grand here in Australia and I just didn't want to spend the money. You cannot use normal fans as you have highly flamable chemicals floating around in the air and the electric fans can spark and create an environment you dont want to be standing in if things get nasty.
By sanding outside for the paint removal part I eliminated any of that dust being stuck in my shed. I will admit that once I got to the primer stage I did sand that inside the shed - but I wish I did it outside as it makes one hell of a mess that took me ages to clean up and I still didn't get it all but I spent a whooe day doing my best. The dust gets EVERYWHERE!
You can see what I'm talking about in the background of these pics:
Last edited by demonx; 11-07-2010 at 06:47 PM.
11-08-2010, 11:15 AM
#49
Melting Slicks

I used two Harbor freight fans, 39 bucks apiece to draw out the fumes. The front (face) of the fans were flush with the inside of my enclosure...motors outside. It is my understanding...if you do not draw out the fumes...(the clear especially), will fall out back on your surface and cloud! Sure Dub will chime in...Muddy
11-08-2010, 05:24 PM
#50
Race Director
Chiming in....
"demonx" ...the way you built your enclosure was spot-on! At least you took the time to get an environment that was more paint friendly.
"muddywaters"...you are correct...that the main thing to try to achieve is air movement...and it does not have to be as much as like that of a wind tunnel. As long as the vapors are being removed...then the chance of pulling trash into your spray area is reduced. The fact that if the vapors of the clearcoat are being allowed to fall back onto your surface...which can cloud the look of the once shiny clear when you left the "booth", is due to no air movement or air movement that is not great enough to exhaust these vapors.
"DUB"
11-13-2010, 06:49 PM
#51

Would anyone like to post the estimated cfm of air movement required for the home-built spray booth for the elimination of clear coat mist?
Also, should I place the exhaust high or low and the filtered intake high or low?
Thanks...Alex
Also, should I place the exhaust high or low and the filtered intake high or low?
Thanks...Alex
11-16-2010, 06:15 PM
#52
Race Director
I am not a PRO at this but here are some things to consider.
Without knowing what the cubic foot of interior area of the "booth" is going to be. It is hard to post anything specifically. . The main thing you are trying to achieve is air movement. And not so much that you can actually feel the air rushing by you when you stand there...in the center of your booth with your exhaust fan on. Too much air movement will possibly cause for trash to be pulled into the booth...and yes...through your intake filter(s)....depending on what you choose to use for intake filters. But it is normal to feel air coming in when you stand right at your intake filter(s)
If you want a simple test. And doing this without any flammable fumes present...naturally. Light a cigarette, (as an example) hold it straight up and watch the smoke as it comes off the cigarette when you are standing in the center of your booth with the fan on. It should somewhat migrate towards your exhaust filter(s). Then have someone stand closer to the intake filter(s) area (but not blocking air flow into the booth) and ask them if they can smell smoke. If they do not smell smoke after this has gone on for some time...then you should be OK. Then have them check if they smell smoke at the exhaust filter area (down wind)....and they should. Use incense if you wish....just as long as whatever method/device you use...produces a smoke stream you can see and has an odor you can smell.
AS for the location. I would put the intake filters high and low....and the same for the exhaust filters(s) if possible. IF not. then locate the intake filter(s) high and low...and the exhaust filter (if you plan on using only one....which I would not advise because it can plug up quickly during heavy clearcoating)...I would place it low...due to the vapors will be heavier and settle to the ground. For what it is worth, I have 16 20"x20" intake filters and 12 20"x20" exhaust filters in my booth. And for whatever it is worth....as cheap as power is in this situation...I would leaver the fan on for a long time to better exhaust any vapors. I leave my fan on overnight in most cases.
Last but not least...if you live in a neighborhood...and are planning on shooting it at night...I would NOT advise it. At night...the atmosphere goes through a inversion process. And all exhaust fumes will stay low on the ground and NOT go up as they would during the day....and you can have these fumes actually coming back into the "booth" during spraying. Not only that...you neighbors will get SUPER PISSED OFF.... because the whole neighborhood will stink to high heaven.
"DUB"
11-17-2010, 02:19 AM
#53
Melting Slicks
Member Since: Jun 2001
Posts: 3,444
Likes: 0
Received 0 Likes
on
0 Posts
It's one of those things, the only way of gaining experience is by doing. And... if you�re going to 'do', you better get the advice of those who have 'done.' You�re doing that, so I have high hopes for the outcome.
I got a lot out of watching various youtube videos as well. It took some filtering though as there are a lot of jack ***** out there who have no idea what they are doing and are giving bad advice. But they stick out and can be a good laugh.
You don't need a $50K down draft paint booth to get a good result. I do advise get a good gun and the proper tips. Understand the ratios of the tips and what paint types (primer/builder, sealer, color, clear) are a match.
in addition I was glad I had a guy with 35 years experience doing the cutting and buffing. It is so easy to cut through the fresh paint with the buffer, particularly on the high crown areas. One false move on an edge and your looking at primer.
Good Luck
Jay
11-17-2010, 04:26 PM
#54
Question about fans. If you draw the vapors out with a fan, won't the electric motor ignite the vapors and cause an explosion? or do the filters stop all flammable vapors? should you blow air in instead of drawing it out?
11-19-2010, 07:53 AM
#55
Le Mans Master


Member Since: Jul 2006
Location: charlotte north carolina
Posts: 8,117
Likes: 0
Received 100 Likes
on
92 Posts
years ago i attended a course at the smithsonian museum on antique aircraft restoration(just wanted to get real close to the museum's aircraft). the paint expert had two bits of advice for diy's. use positive pressure with the fan so that dust won't get sucked up out of crevices, and ground the paint gun. the stream of air and paint will cause a static charge to build up on the gun and paint that will attract dust. i taped a wire to the air hose and attached one end to the gun with an alligator clip and grounded the other end to the compressor(which is already grounded). while painting my first car i noticed more and more dust collected as i progressed. after i remembered what i was told and i grounded the gun, the same amount of dust collected at the start and the finish! 
11-19-2010, 06:43 PM
#56
Race Director
Blowing air into your booth is possible. But you will ahve to worry aboout trach being forced through your intake filters. In downdraft paint booths ...that are positive pressure ....like jnb5101 mentioned. there are actually two fans. from what I have seen in the past...one blows air towards the intake filters...which are seriously secured and reinforced...and another than draws out the fumes/vapors. The "air in" fan is forcing much more air into the booth than the exhaust fan can remove. Thus creating a "positive pressure" on the booth. Booths that are positive pressure have serious latches on the doors to keep than from blowing open then the booth is in use. Positive pressure paint booths are the way to go...but that does not guarantee that you have a clean job.
For whoever may care:
Not being In a "Tyvek" paint suit, head sock, gloves and even foot protection...can cause trash specks to get into the job. Straining your paint with a REALLY GOOD paint strainer makes a difference also....if not using more than ONE strainer while straning the paint.. BUT it all boils down to PREP and the amount of time you spend cleaning the car and how you tape it off....and I am not just talking about the surfaces to be painted. Then it also depends on how clean the booth is...and how much walking around you do while you are waiting for paint to flash..and NOT standing in front of the car with the air coming in at your back and you messing around and wondering why these specks are getting in the paint you just shot..ALSO....how well you blew off the car and used your tack rag....which I do numerous times BEFORE I even think about pulling the trigger on the gun. When I start to THINK about painting a car. I will turn my exhaust fans on and they will be on for about 30-60 minutes. During this time...after the car is taped off completely ...I blow/tack the car several times. Giving time in between these blow/tacks to allow the fine lint to get pulled into the exhaust filters and also allow any super small lint specs to settle and do it again and again. And if I have to exit the booth for any reason....I blow off my suit BEFORE I go back into the booth...so just in case something got on it...it will not fall off when I am leaning over the car applying paint....and if the basecoat has flashed off...I tack it again...to aid in reducing the chance that any trash got pulled into the booth when I opened up the door with the fan running. Once I start to clear...I do not exit the booth until the clearing is completed....PERIOD.
For you guys and gals out there that are going to build your own booth and shoot one at home or at a shop...REMEMBER THIS...and this is IMPORTANT. Knowing the direction of your air flow stream in your booth is critical. I am not worried about IF the fumes/vapors are getting out...but HOW they are getting out. This direction of air flow will dictate to your on where you need to start applying color and end applying color. SO...for instance...you pulled your car into your garage...nose first. And the taillight area is at your garage door...where you more than likely will have your intake filters. And your exhaust filter area is being drawn though a filter bank at the nose of the car and leaving your garage somehow. With the fan on...air is being pulled over the car...starting at the taillight panel.. and working it way to the front end. BUT this air stream is not directly blowing onto the lower valance panel area of your front end. THIS is the area (front bumper and lower valance panel) to start painting and working your way back to the taillight panel. This is so when you do complete the taillight panel...the front bumper and lower valance panel has already had time to start flashing off... because it will take little time for the taillight panel to flash off due to air directly blowing onto it. IF you are worried about heavy over spray...you have not correctly chosen the correct reducer/thinner for the paint job....or basically did NO testing to see how the paint is going to react. On the final coat of basecoat....it does not matter. You can start at the taillight panel and work towards the front end...this is because you are going to give it a much longer time to flash BEFORE the clearcoat...and as long as you check the front valance panel area...you should be fine. I let my final coat of base flash for quite a while.
When I go to clear it is the same way. The first coats are front front to rear..and the final coat is from taillight panel to front end. From what I have found it speeds up the process...so I am not waiting on an area of the car that does not get good air flow to it.
Sorry for rambling..I just got into a "groove".
"DUB"


 12-13-2010, 09:43 PM
#58
Thanks for replying and clearing up some of my confusion about air flow. I haven't been back to this subject for awhile but as always, I appreciate your time. Maybe in the summer I can pull the trigger on this painting stuff.
Thanks....Alex
12-13-2010, 09:51 PM
#59
Thanks for replying and clearing up some of my confusion about air flow. I haven't been back to this subject for awhile but as always, I appreciate your time. Maybe in the summer I can pull the trigger on this painting stuff.
Thanks....Alex
01-03-2011, 04:06 PM
#60
Race Director

