


'96 Full Stereo Re-do, Part II (no 56k)
Thread Starter
Safety Car

Joined: Dec 2006
Posts: 4,290
Likes: 6
From: St Marys GA
I'm finally done! For those of who who are just tuning in, here is Part I of my install, where I fabricated the front enclosures: http://forums.corvetteforum.com/show....php?t=2046825
So for this portion, I install all the speakers, new wiring, an amp, and navigation head unit. Much more ambitious than step I!!! But I digress. On to the pictures and comments...
Again, my setup:
HU: Pioneer AVIC-Z3 (actually a Z1 with a 60gb Z3-loaded HDD)
Front Speakers: Boston Acoustics Pro60
Rear Speakers: Boston Acoustics SL65
Amp: Alpine PDX-4.100 driving all speakers
Replacing all wiring
A couple more pictures of the finished enclosures. I cut the holes in the front since they are NOT sealed, so that air whooshing around the tight cracks wouldn't make sounds. In retrospect, if I did it again, I would leave the front intact, and use more MDF and dynamat to MAKE them a sealed enclosure. I just had the system tuned and the fronts can only go down to about 90Hz, which is due to my enclosures. They could probably do 50 with sealed enclosures.


The new positive battery terminal with a ring-terminal attachment screw.


Out with the old!

I forget what this picture is of...but here it is.

Mounting the front components.

Some of the mounting stuff that came with the speakers as well as tools used.

The holes I cut for the tweeters were a bit large, so I glued padding to the tweeter flush-mounts in order to make them bigger, then glued that to the MDF.

Tweeter flush-mount before.

Tweeter flush-mount after.

Front speakers mounted.

Mocking up to make sure the speaker didn't touch the metal of the sill.


I had some of this laying around, so it's what I used to glue the tweeter padding.

Getting ready to mount the other tweeter.

Gluing the tweeter in place.

Other speaker coming together.

Rear Bose speakers with grilles removed.


Mounting the conversion brackets to the speakers. The speakers have 3 mounting screws...the Bose have 4...so I needed this ring.


Mocking up the rear speakers.


So for this portion, I install all the speakers, new wiring, an amp, and navigation head unit. Much more ambitious than step I!!! But I digress. On to the pictures and comments...
Again, my setup:
HU: Pioneer AVIC-Z3 (actually a Z1 with a 60gb Z3-loaded HDD)
Front Speakers: Boston Acoustics Pro60
Rear Speakers: Boston Acoustics SL65
Amp: Alpine PDX-4.100 driving all speakers
Replacing all wiring
A couple more pictures of the finished enclosures. I cut the holes in the front since they are NOT sealed, so that air whooshing around the tight cracks wouldn't make sounds. In retrospect, if I did it again, I would leave the front intact, and use more MDF and dynamat to MAKE them a sealed enclosure. I just had the system tuned and the fronts can only go down to about 90Hz, which is due to my enclosures. They could probably do 50 with sealed enclosures.
The new positive battery terminal with a ring-terminal attachment screw.
Out with the old!
I forget what this picture is of...but here it is.
Mounting the front components.
Some of the mounting stuff that came with the speakers as well as tools used.
The holes I cut for the tweeters were a bit large, so I glued padding to the tweeter flush-mounts in order to make them bigger, then glued that to the MDF.
Tweeter flush-mount before.
Tweeter flush-mount after.
Front speakers mounted.
Mocking up to make sure the speaker didn't touch the metal of the sill.
I had some of this laying around, so it's what I used to glue the tweeter padding.
Getting ready to mount the other tweeter.
Gluing the tweeter in place.
Other speaker coming together.
Rear Bose speakers with grilles removed.
Mounting the conversion brackets to the speakers. The speakers have 3 mounting screws...the Bose have 4...so I needed this ring.
Mocking up the rear speakers.
Last edited by StealthLT4; Aug 16, 2009 at 04:18 PM.
Thread Starter
Safety Car
Joined: Dec 2006
Posts: 4,290
Likes: 6
From: St Marys GA
Starting to remove the stock receiver and jack styrofoam.


Receiver's out!

Had to wrestle the styrofoam out, but it came eventually.


That's a deep hole! I didn't know about the uber-deep half of it, so I'll fabricate something to deal with that later down the page...


Removing trim pieces to get to the radio.

In my '96, I had to remove the center console door in order to remove the trim piece surrounding the shifter. Not hard. 4 screws.

After following the C4Guru's guide to removing the head unit step-for-step, with the exception of the door, it's out! Here I am with the Metra brackets getting an idea of where they need to be on the new unit.


A big hole! Note the plastic bracket in the rear that will be removed later. Don't worry, I have more pictures.

The 4 colors of wire I ran from the stock Receiver harness up to the new H/U. Power, Acc, Power Antenna, and Ground. I also ran an amp turn-on wire to the Amp, which was mounted in the stock Receiver location, which is not pictured here.

Making a nice coil out of things. I don't have a picture, but I twisted them together to make routing easier. Just stick one end of the bundle in a drill, have a friend hold the other end, and drill away! It works.

I wrote down the colors of my wire, the stock wire colors, and what they were to eliminate confusion later.

Routing the wires. I may have been able to do it without removing the Passenger seat, but this made it SO much easier. I probably should have taken the driver's out too, but I'm stubborn like that. I also partially removed the side-panel of the tunnel so I could get down in it from the top. 5 screws, nothing special.

Pic of the seat removed. Just 4 bolts under the bottom cushion.

I just ran the rear driver's peaker wire under the rear carpet to the passenger side, then under the side carpeting, along with the rear pass. speaker, to the grommet behind the passenger seat that goes into the compartment.

I took the speaker wire down the port tubes. That's what they're there for, right?....

Other side.

Routing the amp power cable. I just left some slack in the wire, tucked behind the battery, with the in-line fuse, so I can pull it out far enough to replace it if necessary.

All the wires running back to the amp/stock harness. And my foot. I also had to buy an antenna converter and extension.

Receiver's out!
Had to wrestle the styrofoam out, but it came eventually.
That's a deep hole! I didn't know about the uber-deep half of it, so I'll fabricate something to deal with that later down the page...
Removing trim pieces to get to the radio.
In my '96, I had to remove the center console door in order to remove the trim piece surrounding the shifter. Not hard. 4 screws.
After following the C4Guru's guide to removing the head unit step-for-step, with the exception of the door, it's out! Here I am with the Metra brackets getting an idea of where they need to be on the new unit.
A big hole! Note the plastic bracket in the rear that will be removed later. Don't worry, I have more pictures.
The 4 colors of wire I ran from the stock Receiver harness up to the new H/U. Power, Acc, Power Antenna, and Ground. I also ran an amp turn-on wire to the Amp, which was mounted in the stock Receiver location, which is not pictured here.
Making a nice coil out of things. I don't have a picture, but I twisted them together to make routing easier. Just stick one end of the bundle in a drill, have a friend hold the other end, and drill away! It works.
I wrote down the colors of my wire, the stock wire colors, and what they were to eliminate confusion later.
Routing the wires. I may have been able to do it without removing the Passenger seat, but this made it SO much easier. I probably should have taken the driver's out too, but I'm stubborn like that. I also partially removed the side-panel of the tunnel so I could get down in it from the top. 5 screws, nothing special.
Pic of the seat removed. Just 4 bolts under the bottom cushion.
I just ran the rear driver's peaker wire under the rear carpet to the passenger side, then under the side carpeting, along with the rear pass. speaker, to the grommet behind the passenger seat that goes into the compartment.
I took the speaker wire down the port tubes. That's what they're there for, right?....
Other side.
Routing the amp power cable. I just left some slack in the wire, tucked behind the battery, with the in-line fuse, so I can pull it out far enough to replace it if necessary.
All the wires running back to the amp/stock harness. And my foot. I also had to buy an antenna converter and extension.
Last edited by StealthLT4; Aug 16, 2009 at 04:19 PM.
Thread Starter
Safety Car
Joined: Dec 2006
Posts: 4,290
Likes: 6
From: St Marys GA
Another shot of the cables coming down. If I could do it again, I would leave MORE slack in them. There is a ton of wire stuffed in the back, but I would route this wire around the side of the radio, then in from the back. That would make putting it in MUCH easier.

More passenger wiring.

Behind the driver's seat where the power cable and speaker cable for the driver's speaker were run.

The cables then went just under the rear carpeting, over the center console, and to the grommet.

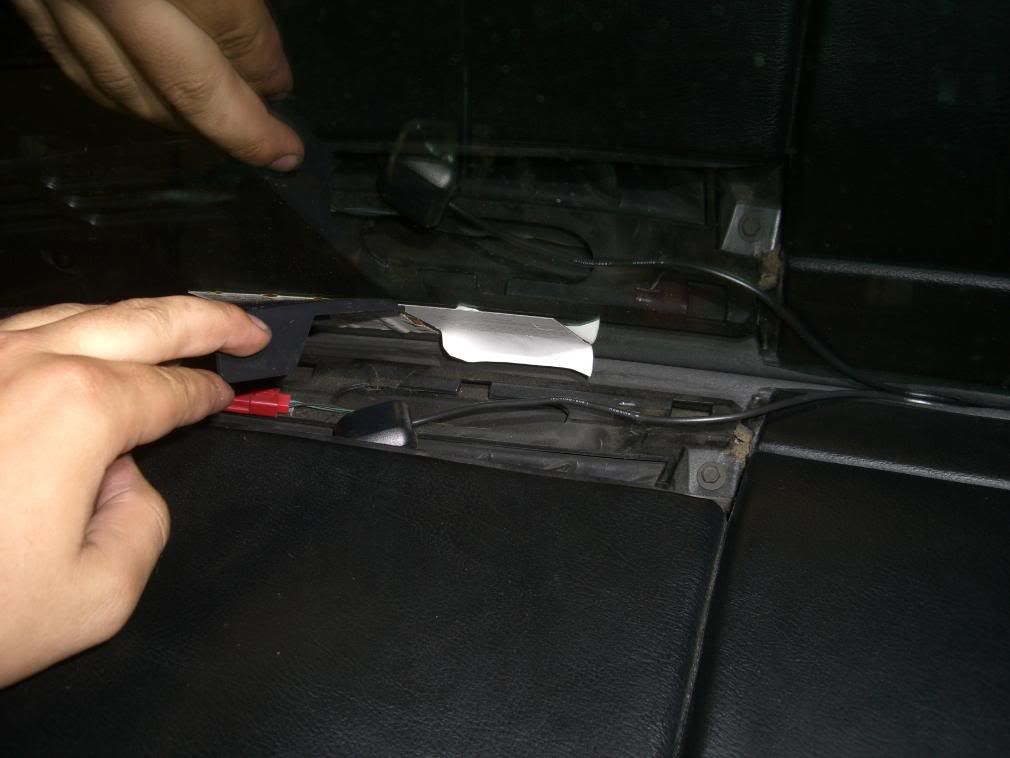
The grommet! And an ***-ton of wires.

I wired in a switch to the power antenna, so that it wouldn't come up at all unless I flip the switch in my center console. It was sort of unnecessary since the head unit has an option to only raise the antenna for AM/FM, but oh well. Now it doesn't pop up when I cycle through them to get from Hard-Drive to CD, or such. I just intercepted the power-antenna wire and ran a switch under the shifter trim to the driver's side of the console. It has an LED, so I also had to tap into ground.

Starting to mass a few wires....that black plastic piece has got to go!


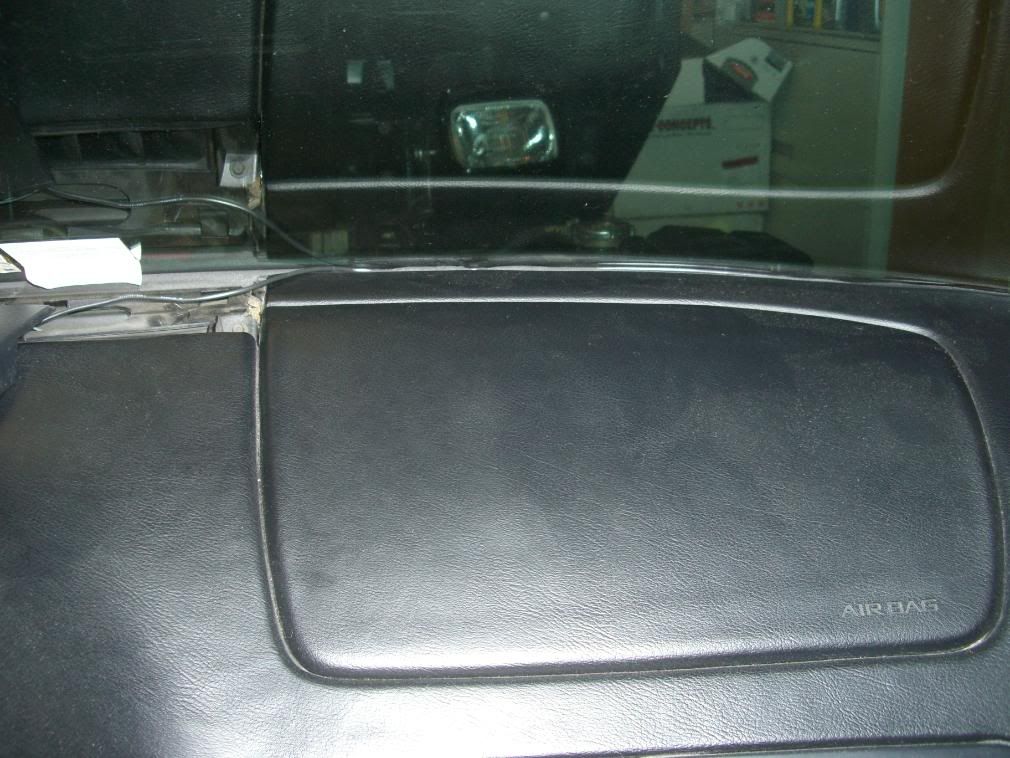
My GPS antenna. It's located under the defroster vent in the center of the dash. It fit's there very nicely under the slots, and has a straight shot up to space. And you can't see it!
I routed the GPS antenna cable across the windshield under the rubber seal, then down and under the passenger carpet.
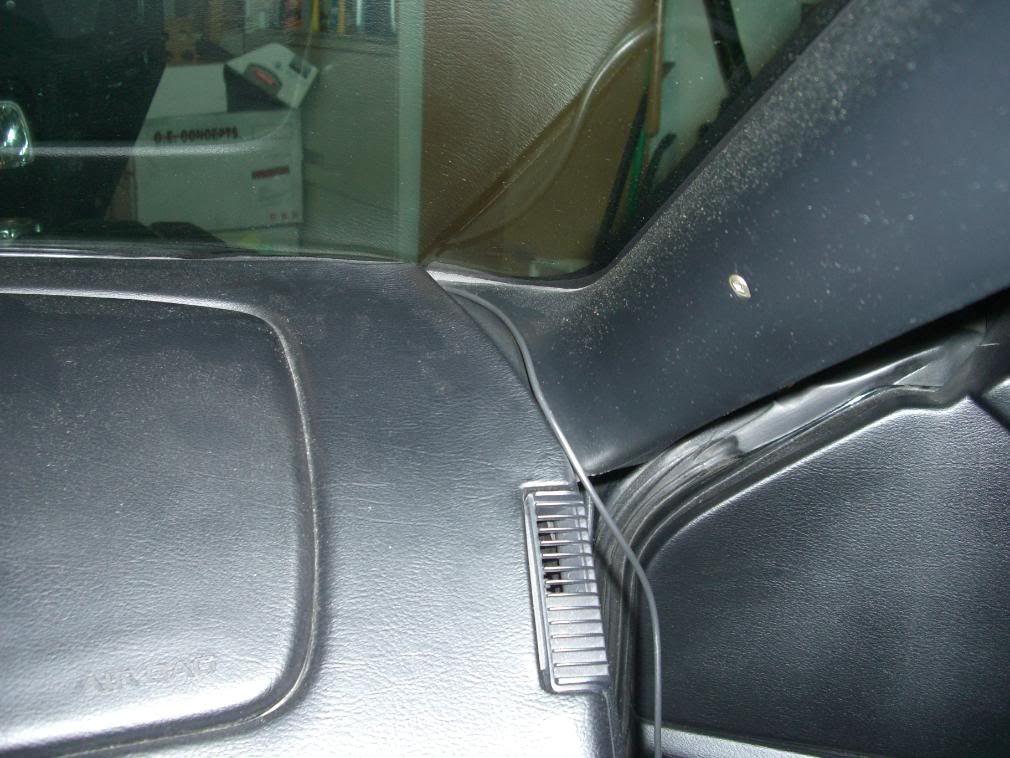
I mounted the bluetooth microphone in the center vent, on the driver's side where it isn't actually functional. DO NOT DO THIS. When getting the system tuned today, I was told that there are noise-cancellation slots on the SIDE of the microphone that need to be exposed to work properly. So, DO NOT flush-mount the microphone. I haven't rerouted it yet, but I'm planning something above/beside the rear-view mirror.

Even more wires...and were nowhere near done.

The bad microphone placement...

I ran a stereo input cable to the front cupholder. I have never found a drink cup that fits there, so it has become the iPod / whatever other people have holder. The cable just went under the shifter trim piece, then up through the large hole in the side of the cupholder.

In the factory harness behind the radio, I had to tap into the VSS wire as well as the illumination wire. The VSS (I think) is pink, while the illumination is BROWN. At first I tried the gray wire. Didn't work. It's currently hooked up to the Gray/Black wire. It goes to night-mode when I turn the dash-lights dimmer all the way down...I just found out that the one I want (hot when lights are on) is brown.

The passenger front enclosure had to be trimmed to fit over a hump there. Note the difference from the driver's one; they started identical (well, reciprocals. Whatever).


It fits now!


Both wires tapped now. Although the wrong both wires...

More passenger wiring.
Behind the driver's seat where the power cable and speaker cable for the driver's speaker were run.
The cables then went just under the rear carpeting, over the center console, and to the grommet.
The grommet! And an ***-ton of wires.
I wired in a switch to the power antenna, so that it wouldn't come up at all unless I flip the switch in my center console. It was sort of unnecessary since the head unit has an option to only raise the antenna for AM/FM, but oh well. Now it doesn't pop up when I cycle through them to get from Hard-Drive to CD, or such. I just intercepted the power-antenna wire and ran a switch under the shifter trim to the driver's side of the console. It has an LED, so I also had to tap into ground.
Starting to mass a few wires....that black plastic piece has got to go!
My GPS antenna. It's located under the defroster vent in the center of the dash. It fit's there very nicely under the slots, and has a straight shot up to space. And you can't see it!
I routed the GPS antenna cable across the windshield under the rubber seal, then down and under the passenger carpet.
I mounted the bluetooth microphone in the center vent, on the driver's side where it isn't actually functional. DO NOT DO THIS. When getting the system tuned today, I was told that there are noise-cancellation slots on the SIDE of the microphone that need to be exposed to work properly. So, DO NOT flush-mount the microphone. I haven't rerouted it yet, but I'm planning something above/beside the rear-view mirror.
Even more wires...and were nowhere near done.
The bad microphone placement...
I ran a stereo input cable to the front cupholder. I have never found a drink cup that fits there, so it has become the iPod / whatever other people have holder. The cable just went under the shifter trim piece, then up through the large hole in the side of the cupholder.
In the factory harness behind the radio, I had to tap into the VSS wire as well as the illumination wire. The VSS (I think) is pink, while the illumination is BROWN. At first I tried the gray wire. Didn't work. It's currently hooked up to the Gray/Black wire. It goes to night-mode when I turn the dash-lights dimmer all the way down...I just found out that the one I want (hot when lights are on) is brown.
The passenger front enclosure had to be trimmed to fit over a hump there. Note the difference from the driver's one; they started identical (well, reciprocals. Whatever).
It fits now!
Both wires tapped now. Although the wrong both wires...
Last edited by StealthLT4; Aug 16, 2009 at 04:20 PM.
Thread Starter
Safety Car
Joined: Dec 2006
Posts: 4,290
Likes: 6
From: St Marys GA
Getting the trim piece ready. This was one of the hardest parts of the project! I had to trim a TON!!!!! Even after it fit in there, when mounted, it would not motorize-down. I have more pictures, but I had to dremel about 1/4 off the top, in the rear-ward direction. Some on the sides, but then a TON on the bottom, in the down-ward direction.

Haha, sanding block. I resorted to a file and dremel quickly.

Wiring up the crossovers in the back.

Labeled properly of course. There wasn't enough room for the crossovers at the speakers, so they chill on top of the amp, and 2 sets of wire run to each front speaker (one for tweeter, one for woofer)

I made a 1/4" MDF box to put in that little hole in the rear to make it a level deck height. 15cmx15cm top, 8cm high.


Assembled. I also added brackets for rigidity, but not in this picture.

The box in the whole. With brackets.

This foam piece came with my head unit, and was the perfect dimension for holding my amp! As hard as it is to get to, I didn't want to make it even harder with fasteners. This sits snugly; that thing's not goin anywhere.

Crossovers wired.

Back of the amp. Ready to get plugged up.

I grounded the amp to the passenger seat rail. Worked like a charm, and you can't see it!


The amp snugly in it's home. With crossovers. They are positioned atop each other at the forward end of the compartment, so that the storage tray still fits with no problem.


Getting ready to cut the plastic piece behind the radio.

Voila, it's gone!

A huge Charlie Foxtrot, if you will, of wires.


Using zip-ties to try to organize everything. It is a VERY tight fit back there. It took a LONG time to get it in. I think routing the wires coming from the back around the side, then in from the back, would help with this. My pain, your gain.

It's in! Notice how far it sticks out. I'll point out in later pictures where I had to trim the mounting brackets to move it farther back so it would clear the bezel. This didn't making slipping it in any easier...


I thought I was done...yeah right...


Haha, sanding block. I resorted to a file and dremel quickly.
Wiring up the crossovers in the back.
Labeled properly of course. There wasn't enough room for the crossovers at the speakers, so they chill on top of the amp, and 2 sets of wire run to each front speaker (one for tweeter, one for woofer)
I made a 1/4" MDF box to put in that little hole in the rear to make it a level deck height. 15cmx15cm top, 8cm high.
Assembled. I also added brackets for rigidity, but not in this picture.
The box in the whole. With brackets.
This foam piece came with my head unit, and was the perfect dimension for holding my amp! As hard as it is to get to, I didn't want to make it even harder with fasteners. This sits snugly; that thing's not goin anywhere.
Crossovers wired.
Back of the amp. Ready to get plugged up.
I grounded the amp to the passenger seat rail. Worked like a charm, and you can't see it!
The amp snugly in it's home. With crossovers. They are positioned atop each other at the forward end of the compartment, so that the storage tray still fits with no problem.
Getting ready to cut the plastic piece behind the radio.
Voila, it's gone!
A huge Charlie Foxtrot, if you will, of wires.
Using zip-ties to try to organize everything. It is a VERY tight fit back there. It took a LONG time to get it in. I think routing the wires coming from the back around the side, then in from the back, would help with this. My pain, your gain.
It's in! Notice how far it sticks out. I'll point out in later pictures where I had to trim the mounting brackets to move it farther back so it would clear the bezel. This didn't making slipping it in any easier...
I thought I was done...yeah right...
Last edited by StealthLT4; Aug 16, 2009 at 04:21 PM.
Thread Starter
Safety Car
Joined: Dec 2006
Posts: 4,290
Likes: 6
From: St Marys GA
It looked kinda chewed up in the photos, but it looks good in real-life.

Now it's seated right! Way back in thurr.


Updating the unit (via GPS) after installing the z3-loaded HDD.


What do you think of my background?

All in all a HELL of a job. About 30 man-hours total, and a lot of curse-words thrown around. But well worth it.
I just got it tuned professionally today, and here's basically what they did:
The front speakers 'flop' at about 90Hz, which means that they work really hard and don't make any sound. So, he used the amp's High-Pass-Filter (HPF) to cut them off at about 110Hz. So the fronts play 110 -> way up there.
The rears, in order to get decent bass, had to be turned up so high that the treble overpowered that of the fronts. So he cut those of with a Low-Pass-Filter (LPF) at 400Hz.
Also, everything under 50Hz made no good sound, and just threatened to damage speakers. So, the head-unit HPF is set at 50Hz. So the rears just play 50Hz - 400Hz.
For the Eq, it's basically just a reverse-bell curve. Lots of bass, low mid, high treble. Sounds great! I really need a sub for GREAT sound, but I don't have the room. Oh well.
A comment on the front speakers: my open enclosures are the reason they have to be cut off at 110Hz. If they were closed and properly dynomatted, they could go down to 50Hz no problem. I may fix that if I find time in the future, but it sounds good right now.
Now it's seated right! Way back in thurr.
Updating the unit (via GPS) after installing the z3-loaded HDD.
What do you think of my background?
All in all a HELL of a job. About 30 man-hours total, and a lot of curse-words thrown around. But well worth it.
I just got it tuned professionally today, and here's basically what they did:
The front speakers 'flop' at about 90Hz, which means that they work really hard and don't make any sound. So, he used the amp's High-Pass-Filter (HPF) to cut them off at about 110Hz. So the fronts play 110 -> way up there.
The rears, in order to get decent bass, had to be turned up so high that the treble overpowered that of the fronts. So he cut those of with a Low-Pass-Filter (LPF) at 400Hz.
Also, everything under 50Hz made no good sound, and just threatened to damage speakers. So, the head-unit HPF is set at 50Hz. So the rears just play 50Hz - 400Hz.
For the Eq, it's basically just a reverse-bell curve. Lots of bass, low mid, high treble. Sounds great! I really need a sub for GREAT sound, but I don't have the room. Oh well.
A comment on the front speakers: my open enclosures are the reason they have to be cut off at 110Hz. If they were closed and properly dynomatted, they could go down to 50Hz no problem. I may fix that if I find time in the future, but it sounds good right now.
Last edited by StealthLT4; Aug 16, 2009 at 04:22 PM.
Racer

Joined: May 2006
Posts: 283
Likes: 0
From: Pace Florida
does your unit let you change navigation controls or watch dvd's while rolling? I had a jumper soldered on my avic n2 so it would. Granted watching dvd's is not safe traveling but changing navigation is easy and as safe as using a cell phone IMO.
Thread Starter
Safety Car
Joined: Dec 2006
Posts: 4,290
Likes: 6
From: St Marys GA
I have the video bypass, and just got the connector for the nav bypass yesterday, but somehow messed up the install....when I take it back apart to fix the illumination wire, I'll look into that as well. I probably just pulled out a tap splice when I was shoving everything into place.
Corvette Stories
The Best of Corvette for Corvette Enthusiasts

Top 10 Most Expensive Corvettes Ever Sold on Bring A Trailer
Brett Foote
10 Things Every Corvette Owner Needs (2026 Edition)
Michael S. Palmer
8 Most "Only Corvette Owners Understand" Quirks and Problems
Pouria Savadkouei
10 Reasons the C6 Z06 is Still A Performance Benchmark After 20 Years
Joe Kucinski
How Much Horsepower Every Corvette Engine "LOST" in 1972
Joe Kucinski
Top 10 DOs and DON'Ts for Protecting Your Convertible Top!
Michael S. Palmer
Top 10 Most Explosive Corvettes Ever Made: Power-to-Weight Ratio Ranked!
Joe Kucinski
150 hp to 1,250 hp: Every Corvette Generation Compared by the Specs That Matter
Joe Kucinski
8 Coolest Corvette Pace Cars (and Replicas) of All Time
Verdad Gallardo


Thread Starter
Safety Car
Joined: Dec 2006
Posts: 4,290
Likes: 6
From: St Marys GA
It sounds great! I'm very happy with the install, especially after it got tuned so I don't worry about blowing the speakers.
I got the head unit from eBay. $750 for the factory-refurbished AVIC-Z1, then $150 for a 60gig hard-drive that converted it to the Z3-software, since the only differences are minor software changes and updated maps. I later found out that you can download the Z3-image from avic411.com and put it on the factory hard-drive, or buy yourself a blank hard-drive for a lot less than $150, but oh well. It was easy at least.
I got the head unit from eBay. $750 for the factory-refurbished AVIC-Z1, then $150 for a 60gig hard-drive that converted it to the Z3-software, since the only differences are minor software changes and updated maps. I later found out that you can download the Z3-image from avic411.com and put it on the factory hard-drive, or buy yourself a blank hard-drive for a lot less than $150, but oh well. It was easy at least.


Safety Car
Joined: Sep 2006
Posts: 4,129
Likes: 1
From: Pasadena CA
Thanks so much for taking the time to do this! How does it sound?
A few interesting points/ questions -
A few interesting points/ questions -
- Your new positive battery terminal looks nice - Where d'ya get it?
- Are you going to do the 'Big 3'? Do you anticipate a need for it - what's your amp's RMS rating?
- Vented boxes - thanks for the heads up re sealing/ not sealing the front boxes - I've been thinking a lot about this when building mine. The MDF boxes have such a complex shape and the structure they bolt to so un-flat, that I'm not sure how hard it will be to seal them.
- I notice the ports in the rear Bose boxes - cool! I have the stock Delco - it's just a single 6x9 hole.
- Altho we have the same year car, my receiver is in the driver side compartment - storage bin is behind the passenger
- Which wires from receiver loom? Do you have any pics showing which wires you tapped from the reciever loom - which group of wires? This is the only part I'm not sure of and this detail seems to be missing on the other threads I've seen.
- You have strange feet
- You need to vacuum your car

cheers!
-Eaks
Thread Starter
Safety Car
Joined: Dec 2006
Posts: 4,290
Likes: 6
From: St Marys GA
Thanks guys. It sounds amazing! I can turn the volume to max with no distortion and no damage to the speakers. It's great!
Eakster:
-I got the battery terminal from my local audio store. It's just a "GM side-post battery adapter" or something like that. It just replaces the screw in the positive battery terminal.
-Big 3? I don't know what that means...My amp is putting out 125w RMS to each channel.
-For sealing, I think just adding several layers of dynamat (or knockoff) to the back edges of the box, as well as lining the metal behind it, would create a sealed enclosure. If I try it in the future, I'll definitely take some more pics.
-I should actually probably plug those holes, since they're tuned for the Bose speakers. I was thinking of just stuffing some cotton ***** down them to prevent air movement, which would at least deaden them.
-Really? I mean, my storage bin is behind the passenger too, but this is BELOW the storage bin, with the jack. Hmm. Maybe due to the Delco vs Bose differences.
-For the wires to tap, it's really too small to take a picture, and you would just see a jumble of wires anyway. I used this website for all the wire tapping: http://www.corvetteradios.com./Page.html
The wires that need tapped are Constant Power, Acc Power, Ground, and Power Antenna. While there are like 4 connectors going to my receiver, only one of them had all these colors on it, and I think these 4 were the ONLY wires in the connector. Don't quote me on that though.
-Meh, I do what I can.
-It NEEDED to be vacuumed. Not any more


Safety Car
Joined: Sep 2006
Posts: 4,129
Likes: 1
From: Pasadena CA
Thanks for the extra info
I had printed out the stuff from that link but each table seems to be different. I guess I'll figure it out
Did you have to do the resistor fix? - Did you get the Sys light coming on?
The Big 3 - I read about this on Audi/Electronics and other sites - it's basically beefing up the wiring from alternator to battery and battery to ground. Dimming headlights when you have the sounds pumped up is a symptom of the need for it.. I think it's generally only super big amps/ subs etc that needs it done.
I decided to try for a sealed box - I have to wait till I can buy some sound deadening anyway, so might as well keep working on the boxes.
Thread Starter
Safety Car
Joined: Dec 2006
Posts: 4,290
Likes: 6
From: St Marys GA
For the wiring, I just used the '1979-current' cable, and it worked. The power-antenna wire might be a different color, but like I said, they're all on one connector, so it's pretty easy.
I don't think I have enough power to need to beef up the electrical system. I haven't experienced dimming of the headlights, but then again....the headlights are on at night, and I generally turn it down at night so I car hear better, since I can't see as well.
I didn't do the resistor fix; I think that was only for pre-94 or something like that. No SYS light.
