
My '76 restoration (long post)
 10-15-2010, 01:20 AM
#1
Drifting


Thread Starter
Member Since: Aug 2010
Location: Kanuckistan
Posts: 1,617
Received 127 Likes
on
68 Posts
2022 C3 of the Year Finalist - Modified

Quick Link to relevant posts in the thread:
1-Trailing arm removal
2-Electrolysis rust removal
3-Sending parts to Gary, some progress
4-Differences in tank crossmember support location
5-Engine swap
6-Gary's work on my rear spindle
6-Update on frame rebuild
7-New body for parts
8-Seatbelt support repair
9-Interior rebuilt (part 1)
10-Interior rebuilt (part 2)
11-Fresh air door rebuild
12-Bearing tool, front clip removal, some bad news
13-Willcox does much better rust electrolysis than me
14-bad bad front clip
15-Johnny Joint Mod
16-Better Seatbelts for cheap
17-Trailing arm spindle installation
18-Johnny Joint installation follow-up
19-Hydroboost mod (part 1)
20-Hydroboost mod (part 2)
21-Got my new front clip
22-Removed windshield
23-Front wheels done
24-Headlights done
25-Windshield frame cleaning, ghetto style frame leveling
26-LED taillight test
27-Parking break bracket moved, Trailing arms done
28-Wheel arch cleaning, Fuel tank installation
29-Body drop, ghetto TA shimming.
30-Engine plumbing (fuel, heater)
31-AC box removal
32-Steering column bad news, fuel line done
33-M/C and Hydroboost installed
34-I bought a T5!!!
35-And a scattershield
36-T5 gear inspection
37-Manual Pedal installed, T5 rebuild started
38-Redoing that trashed steering wheel
39-Redoing that trashed steering wheel (pt2)
40-Steering wheel done
41-Rebuilding the T5
42-Turn a Ebay short throw shifter into a pricey one
43-Clutch installation
44-Custom transmission support
45-Redoing the doors
46-How to remove door glass
47-Rebuilding door hinges
48-Gilmer Belt setup
49-Gimer Belt setup done
50-Steering column rebuild
51-Fuel lines, Gilmer Belt, carputer
52-Bleeding brakes
53-Fitting door shapes
54-Radiator support repair
55-Hood hinge support repair
56-Hood cable repair
57-Fitting rear bumper
58-Fitting everything together, new taillight, DarkPatrol logo
59-Installing front clip
60-More on led taillights
61-Headlight installed
62-Door fitted, fender seems glassing
63-Seams glassing explained (with diagram)
64-Glassing holes
65-Holes glassed, glassing rear fender
66-Rear fender glassed, glassing rear deck holes
67-Rear deck glassed, cut front bumperette, body sharpening experiment
68-More on body sharpening
69-Rear bumper glassed, ghetto laser level, rear window mod, carputer enclosure
70-3 pieces front spoiler fitting.
71-Fender Job, 1 piece front spoiler fitting
72-Rear fiberglass spring installed
73-Front bumper glassed in
74-First startup (video)
75-Dashpad repair, speaker installation, door panel repaint.
76-Interior detailing
77-DIY leather shifter boot
78-Custom shifter ****
79-Enhanced led bulb
80-Trim polishing work
81-Door jamb switch removal
82-Mirror installation
83-Fender flare job
84-Door gap job
85-Driver side wrap-up
86-Passenger side flare job
87-Flare job done
88-Taillight design experiment
89-3D rendering
90-New rear suspension installed
91-Final stance of the back
92-New font suspension installed
93-Beginning of the rear window mod
94-Starting to gather parts for the LS
95-LS head porting
96-Making custom hood vent
97-Custom taillight
98-Glass T-top fitting
99-Paint time!
100-Preparing part for a new differential
101-More post paint assembly
102-Refurbishing the wheels
103-Custom emblems
104-LS engine build
105-Engine goes in
106-intank fuel pump fabrication
Hi guys.
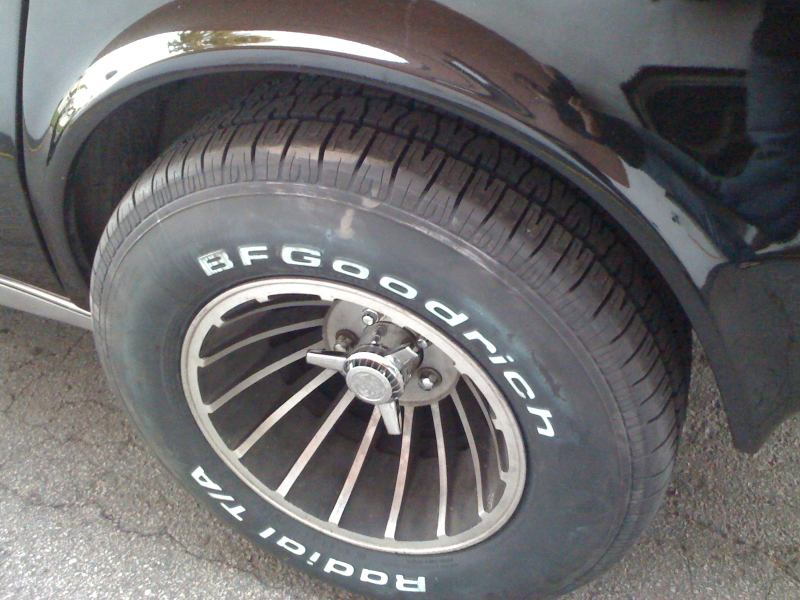
Here is my first actual post on the forum, if you please I may share with you my still short but already rich experiences with those 4 wheels sharks we call C3's.
Bought my first vette this Spring, a black on black '76. I got this car relatively cheap, but I bought it like a noob. You'll see later.
Those cars are so visually amazing, they make you go nuts.
Let's call it the First Vette buying Syndrome.


I never experienced such a powerfull car. I found stock vette to be severely under powered, I mean for a sport car,
but this one...holly s***t..
Sure enough, the guys had poured a lot of money on the engine and trans... for drag racing.
Imagine that, I'm a french who lives in Quebec, grown up with sticks on small econo car. Not enough you discover car in the past has 350ci engine and 3 speed automatic (only 3 wtf), but this one comes with a shift kit, and a line lock. I can tell you, this a f***ing culture shot.
Paint was so so, black but over a original corvette orange, there was no "spiderwebs", but crack at some random point of the body.
The interior was original but baked, a new carpet (not completely installed).
The engine was very clean, aledgedly no more than 5k miles, a 350 ci bored .30 with pretty much everything forged, hi perf head, High CR, agressive cam, carb 850 cfm, hi-flow oil pump, electric fan, alum radiator ... The usual for a drag setup.

The trans has been rebuilt 500bhp-capable.
The frame looked, from what a knew, pretty good, dirty but solid.
Some leaks in the steering.
All in all the car was a work in progress still drivable. I knew I could learn how to fix a steering leaks, so the car would keep on getting better.
So I bought it.
And started my weekend-by-weekend restoration job.
My first fix/mod was the electric headlight actuator conversion. I got inspiration from mcspeed design, but simpler


The rubber hoses looked aged, and with the timing of the cam, I was not sure I would even get enough vacuum.
And it was in sync with my conception of the C3's, a stunning look that need upgrades.
Salvaged a hydroboost at the scrapyard for pennies, because at idle there was not much vac for the brakes neither.
Installed a Borgeson/Cheroke steering box. The steering system was leaking from everywhere, since I had to put some money on it anyway I opted for an upgrade. Rack system was too expensive and radical for me at the time and would have immobilized the beast for too long.
I then start the interior restoration:
-rechecking all the wiring to figure out why I didn't have interior lights. -Brought the tach to live, changed dash lights to led.
-tin-soldered a lot of crappy connections.
Dismantled and cleaned he vent system (and yet another missing part here)
-Bought on ebay pretty much every trim, because everything was broken, bubba-repaired and was holding by a-screw-or-two.
Took me some time to realize that I may have overestimated the quality of the car.
The interior was coming along nicely, but the more I upgrade/repair the car, the more I discover the true state of the metal below the car. I had to get to the conclusion: the frame is shoot
After some time of discouragement, I decided to put the trigger : I'm gonna do a complete frame off restoration, in a 1 car wide, 1 3/4 car long garage, no less.
Bought a nice and cheap POR-15ed rust-free frame on Ebay, turned out this is from a forum member (thx again tsarno!)
put it in my garage:

yeah, I know the place is messy, but it's getting better
Then put two hoist on my not-that-high ceilling
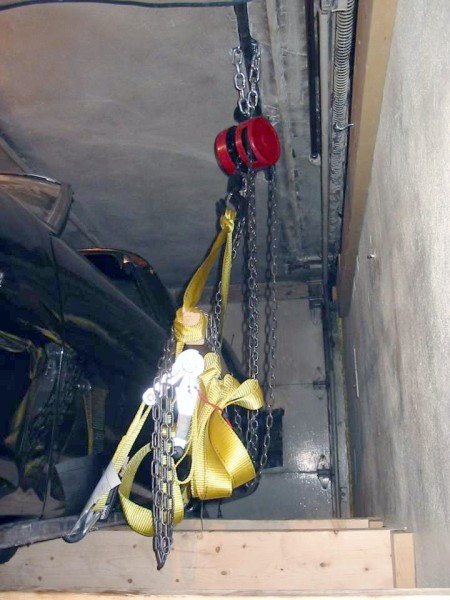
No way I could use a single hoist setup of a engine hoist and still getting enough clearance below to dismantle the frame. I had to raise the car as high as possible.
Disconnected all that needed to be (their is a text file on the net/forums that list them all, invaluable)
Invited a couple of friends, and f***ing did it!

You see the new frame a the bottom of the picture, you get a idea of the space, of lack of.
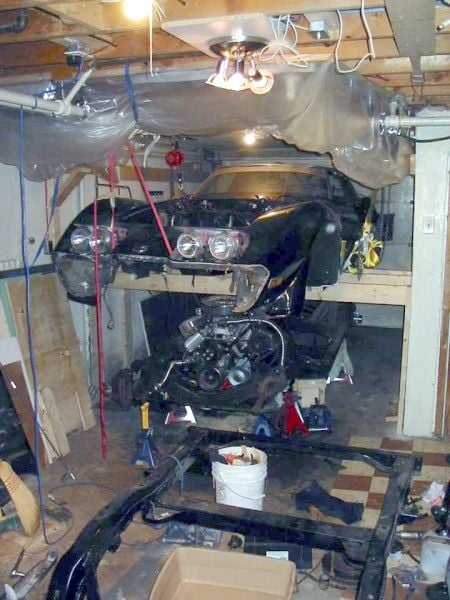
Watching your car separating itself in halves gives you a eery feeling.
Here is where I should have learn more about C3 before buying it.
Doh!

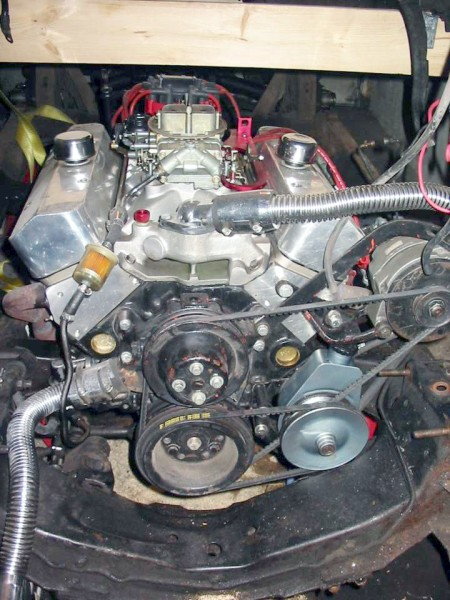
On the other hand, the engine is cool
Then I started the rebuilt process with the front train.
Since you always forget something, I opted to restore one side at a time, a Frame swap is so much cooler than a frame resto for this.
So I would start dismantle one side, and upon reconstrution I would still have a mirror copy on the old frame. Even with the AIM I found this setup very handy.
-new moog balljoints
-VBP steering rebuilt
-Moog 470lbs coil spring, bilstein shock, poly bushings.
Everything have been grinded to metal/etched/POR15ed.
SS-sleeved O-ring calipers on their way.
Here's the result:


A lot of these part have been bought from forum member, thanks a lot to them.
Here is a first draft spreader bar, not sure I won't have to change it.

Now I'm on the trailing arm, bitchy thing, lot of rust.
After screwing a couple of sawzall blade I took my grinder and cut both end of the T/A bolt, then drill out a couple of millimeter on the outer side. Then out can twist out the arm.
Will get the bearing setup rebuilt in the near future by a famous forum member while I'm installing the Johnny joint I bought.
Wow, and 6 month ago I didn't know shiat about cars... except which one is the sexiest.
Sidenote: A couple of things a newbie like me learned (sometimes the hard way):
-Join and use the vette forums
-Get the AIM!
-Get a impact wrench
-Get a torque wrench
-mark everything you remove from the car
-mark down every wire/cable you disconnect
- this site is awesome
Thanks for reading.
That's all for now, I'll keep updating with the progress.
1-Trailing arm removal
2-Electrolysis rust removal
3-Sending parts to Gary, some progress
4-Differences in tank crossmember support location
5-Engine swap
6-Gary's work on my rear spindle
6-Update on frame rebuild
7-New body for parts
8-Seatbelt support repair
9-Interior rebuilt (part 1)
10-Interior rebuilt (part 2)
11-Fresh air door rebuild
12-Bearing tool, front clip removal, some bad news
13-Willcox does much better rust electrolysis than me
14-bad bad front clip
15-Johnny Joint Mod
16-Better Seatbelts for cheap
17-Trailing arm spindle installation
18-Johnny Joint installation follow-up
19-Hydroboost mod (part 1)
20-Hydroboost mod (part 2)
21-Got my new front clip
22-Removed windshield
23-Front wheels done
24-Headlights done
25-Windshield frame cleaning, ghetto style frame leveling
26-LED taillight test
27-Parking break bracket moved, Trailing arms done
28-Wheel arch cleaning, Fuel tank installation
29-Body drop, ghetto TA shimming.
30-Engine plumbing (fuel, heater)
31-AC box removal
32-Steering column bad news, fuel line done
33-M/C and Hydroboost installed
34-I bought a T5!!!
35-And a scattershield
36-T5 gear inspection
37-Manual Pedal installed, T5 rebuild started
38-Redoing that trashed steering wheel
39-Redoing that trashed steering wheel (pt2)
40-Steering wheel done
41-Rebuilding the T5
42-Turn a Ebay short throw shifter into a pricey one
43-Clutch installation
44-Custom transmission support
45-Redoing the doors
46-How to remove door glass
47-Rebuilding door hinges
48-Gilmer Belt setup
49-Gimer Belt setup done
50-Steering column rebuild
51-Fuel lines, Gilmer Belt, carputer
52-Bleeding brakes
53-Fitting door shapes
54-Radiator support repair
55-Hood hinge support repair
56-Hood cable repair
57-Fitting rear bumper
58-Fitting everything together, new taillight, DarkPatrol logo
59-Installing front clip
60-More on led taillights
61-Headlight installed
62-Door fitted, fender seems glassing
63-Seams glassing explained (with diagram)
64-Glassing holes
65-Holes glassed, glassing rear fender
66-Rear fender glassed, glassing rear deck holes
67-Rear deck glassed, cut front bumperette, body sharpening experiment
68-More on body sharpening
69-Rear bumper glassed, ghetto laser level, rear window mod, carputer enclosure
70-3 pieces front spoiler fitting.
71-Fender Job, 1 piece front spoiler fitting
72-Rear fiberglass spring installed
73-Front bumper glassed in
74-First startup (video)
75-Dashpad repair, speaker installation, door panel repaint.
76-Interior detailing
77-DIY leather shifter boot
78-Custom shifter ****
79-Enhanced led bulb
80-Trim polishing work
81-Door jamb switch removal
82-Mirror installation
83-Fender flare job
84-Door gap job
85-Driver side wrap-up
86-Passenger side flare job
87-Flare job done
88-Taillight design experiment
89-3D rendering
90-New rear suspension installed
91-Final stance of the back
92-New font suspension installed
93-Beginning of the rear window mod
94-Starting to gather parts for the LS
95-LS head porting
96-Making custom hood vent
97-Custom taillight
98-Glass T-top fitting
99-Paint time!
100-Preparing part for a new differential
101-More post paint assembly
102-Refurbishing the wheels
103-Custom emblems
104-LS engine build
105-Engine goes in
106-intank fuel pump fabrication
Hi guys.
Here is my first actual post on the forum, if you please I may share with you my still short but already rich experiences with those 4 wheels sharks we call C3's.
Bought my first vette this Spring, a black on black '76. I got this car relatively cheap, but I bought it like a noob. You'll see later.
Those cars are so visually amazing, they make you go nuts.
Let's call it the First Vette buying Syndrome.
I never experienced such a powerfull car. I found stock vette to be severely under powered, I mean for a sport car,
but this one...holly s***t..
Sure enough, the guys had poured a lot of money on the engine and trans... for drag racing.
Imagine that, I'm a french who lives in Quebec, grown up with sticks on small econo car. Not enough you discover car in the past has 350ci engine and 3 speed automatic (only 3 wtf), but this one comes with a shift kit, and a line lock. I can tell you, this a f***ing culture shot.
Paint was so so, black but over a original corvette orange, there was no "spiderwebs", but crack at some random point of the body.
The interior was original but baked, a new carpet (not completely installed).
The engine was very clean, aledgedly no more than 5k miles, a 350 ci bored .30 with pretty much everything forged, hi perf head, High CR, agressive cam, carb 850 cfm, hi-flow oil pump, electric fan, alum radiator ... The usual for a drag setup.
The trans has been rebuilt 500bhp-capable.
The frame looked, from what a knew, pretty good, dirty but solid.
Some leaks in the steering.
All in all the car was a work in progress still drivable. I knew I could learn how to fix a steering leaks, so the car would keep on getting better.
So I bought it.
And started my weekend-by-weekend restoration job.
My first fix/mod was the electric headlight actuator conversion. I got inspiration from mcspeed design, but simpler
The rubber hoses looked aged, and with the timing of the cam, I was not sure I would even get enough vacuum.
And it was in sync with my conception of the C3's, a stunning look that need upgrades.
Salvaged a hydroboost at the scrapyard for pennies, because at idle there was not much vac for the brakes neither.
Installed a Borgeson/Cheroke steering box. The steering system was leaking from everywhere, since I had to put some money on it anyway I opted for an upgrade. Rack system was too expensive and radical for me at the time and would have immobilized the beast for too long.
I then start the interior restoration:
-rechecking all the wiring to figure out why I didn't have interior lights. -Brought the tach to live, changed dash lights to led.
-tin-soldered a lot of crappy connections.
Dismantled and cleaned he vent system (and yet another missing part here)
-Bought on ebay pretty much every trim, because everything was broken, bubba-repaired and was holding by a-screw-or-two.
Took me some time to realize that I may have overestimated the quality of the car.
The interior was coming along nicely, but the more I upgrade/repair the car, the more I discover the true state of the metal below the car. I had to get to the conclusion:
the frame is shoot After some time of discouragement, I decided to put the trigger : I'm gonna do a complete frame off restoration, in a 1 car wide, 1 3/4 car long garage, no less.
Bought a nice and cheap POR-15ed rust-free frame on Ebay, turned out this is from a forum member (thx again tsarno!)
put it in my garage:
yeah, I know the place is messy, but it's getting better
Then put two hoist on my not-that-high ceilling
No way I could use a single hoist setup of a engine hoist and still getting enough clearance below to dismantle the frame. I had to raise the car as high as possible.
Disconnected all that needed to be (their is a text file on the net/forums that list them all, invaluable)
Invited a couple of friends, and f***ing did it!
You see the new frame a the bottom of the picture, you get a idea of the space, of lack of.
Watching your car separating itself in halves gives you a eery feeling.
Here is where I should have learn more about C3 before buying it.
Doh!
On the other hand, the engine is cool
Then I started the rebuilt process with the front train.
Since you always forget something, I opted to restore one side at a time, a Frame swap is so much cooler than a frame resto for this.
So I would start dismantle one side, and upon reconstrution I would still have a mirror copy on the old frame. Even with the AIM I found this setup very handy.
-new moog balljoints
-VBP steering rebuilt
-Moog 470lbs coil spring, bilstein shock, poly bushings.
Everything have been grinded to metal/etched/POR15ed.
SS-sleeved O-ring calipers on their way.
Here's the result:
A lot of these part have been bought from forum member, thanks a lot to them.
Here is a first draft spreader bar, not sure I won't have to change it.
Now I'm on the trailing arm, bitchy thing, lot of rust.
After screwing a couple of sawzall blade I took my grinder and cut both end of the T/A bolt, then drill out a couple of millimeter on the outer side. Then out can twist out the arm.
Will get the bearing setup rebuilt in the near future by a famous forum member while I'm installing the Johnny joint I bought.
Wow, and 6 month ago I didn't know shiat about cars... except which one is the sexiest.
Sidenote: A couple of things a newbie like me learned (sometimes the hard way):
-Join and use the vette forums
-Get the AIM!
-Get a impact wrench
-Get a torque wrench
-mark everything you remove from the car
-mark down every wire/cable you disconnect
- this site is awesome
Thanks for reading.
That's all for now, I'll keep updating with the progress.
Last edited by Denpo; 10-30-2019 at 03:18 PM. Reason: Edited quick links

The following users liked this post:
Jud Chapin (09-21-2015)

Popular Reply
06-26-2022, 11:11 AM
Drifting
Thread Starter
Member Since: Aug 2010
Location: Kanuckistan
Posts: 1,617
Received 127 Likes
on
68 Posts
2022 C3 of the Year Finalist - Modified
Here we go, I'm lagging again. With all those nice words I wanted to reply with something fancy, like a POV driving, but it's not ready yet.
So Thanks Thanks Thanks to you all for being around during all those years, there's been ups, downs and downtimes, mistakes were made, but you guys stuck to it.
Since last post I managed to drive the Vette back to the speed shop that helped me get the engine running last years, now that the car don't overheat anymore they had time to adapt the tune so I can put the break-in miles down safely.
The speedshop appointment had been booked a month ago, they were swamped like every summer so it was that day of never. Guess what? That day was a big thunderstorm day, the kind that the gov send warning message to everyone's phone, so on the way back I had it all : 1 foot deep water puddles on the highway, rain so dense it rains inside (reminding me my t-top weatherstrips are junk) and even hail! Hopefully there was no damage, but hail hitting the glass t-top is something I'm not in a hurry to experience again.
The day after I drove it to Michel1 home, that drive have been planned for years, and guess what, heavy rain again, hopefully without hail this time, but conditions were so bad I was not in the mood for picture or video.
One thing I'm sure is that the car is capable of withstanding copious amount of water, that's a start.
One thing I noticed was the fact the car felt rather squirrely at speed, especially on roads with uneven surface we're so found of in Quebec it seems. So the next week I took it an alignment shop and I also took the time to tighten the steering box. Now it tracks nicely.
I still have issue with my idle, speedshop blamed it on old gas in the tank, and it's true it's getting a bit better as I put more fresh gas in, but I'm not entirely sold on that, I suspect my scrapyard-source IAC valve to be on its last leg also.
I'm starting to put miles on it, 600 then I flush the breakin oil, 600 more on regular oil then it will be time to put it on the dyno.
Apart from the climate control/fan not working (it seems to be grounding directly at the fuse box) my only big problem is a faulty 3rd speed synchro. I have to be super slow to engage it. So the gearbox will have to come down at some point eventually.
I'm not complaining, given that short of the rear end all have been hand build by me, it's a pretty good score so far.
Not it's time to hit the car shows, first in the list is the weekly Laval meeting happening every Friday evening. Last friday was Quebec national holiday, so attendance was lower than usual, but ambience was friendly, lots of people checking on the car and asking questions.
Attachment 48333125
Attachment 48345566
Attachment 48333126
Now that the car drives like it should I can start filming, stay tuned.

 Keep it up! You're much more brave than I
10-15-2010, 06:21 PM
Keep it up! You're much more brave than I
10-15-2010, 06:21 PM
#5
Team Owner

Member Since: Sep 2006
Location: Westminster Maryland
Posts: 30,173
Likes: 0
Received 2,878 Likes
on
2,515 Posts

Hi Den,
It looks like you know what you're doing, and things are moving along!
Good Luck, and thanks for the pictures.
It's always interesting to see what people are working on.
Regards,
Alan
It looks like you know what you're doing, and things are moving along!
Good Luck, and thanks for the pictures.
It's always interesting to see what people are working on.
Regards,
Alan
10-15-2010, 08:44 PM
#6
Safety Car

Member Since: Jan 2007
Location: Omaha NE
Posts: 4,988
Received 1,805 Likes
on
819 Posts
2023 C3 of the Year Finalist - Unmodified
2022 C3 of the Year Finalist - Unmodified
2020 C3 of the Year Finalist - Unmodified
Helluva first post Denpo.........
Welcome '76 brother.....
Welcome '76 brother.....

 10-20-2010, 04:11 PM
#8
Racer

Member Since: Jul 2010
Location: Manahawkin NJ
Posts: 261
Likes: 0
Received 0 Likes
on
0 Posts
Denis,
Real nice job. This is encouragement to sell the parts that I had hoarded away so others can enjoy them. Hope the frame serves you well, it deserves a second chance at greatness.
Tom
Real nice job. This is encouragement to sell the parts that I had hoarded away so others can enjoy them. Hope the frame serves you well, it deserves a second chance at greatness.
Tom
10-20-2010, 04:35 PM
#9
Instructor
How did I miss this post????
Salut Denis, mon ami
I've been to Denis' garage and let me tell you, the pictures don't do justice to the cramped working space and ingenuity that went into organizing such limited space into a workable rebuild environment.
I'm several inches shorter than Denis and I reeeaaally had to squat-down to get under the body to check out the original frame. Kudos to your determination and perseverance buddy!
I'm kind of tempted to grab a six pack and come over to check out your progress... you working on her tonight?
Andre
The following users liked this post:
Art17 (08-08-2021)
10-20-2010, 11:56 PM
#10
Drifting
Thread Starter
Member Since: Aug 2010
Location: Kanuckistan
Posts: 1,617
Received 127 Likes
on
68 Posts
2022 C3 of the Year Finalist - Modified
Thanks a lot guys for this heartwarming welcome.
Sorry Andr�, wasn't in my man cave tonight, some social duties kept me away from my vette, but tomorrow I'll be there, if you come you'll see the result of my rust electrolysis (pictures soon).
This technique is amazing, and fit perfectly my work-a-little-every-evening pattern, you put parts to derust every night and come back the day after for the result. It just does all the nasty job for you.
Outside is getting way too cold anyway to do grinding in the backyard.
Stay tuned.
10-24-2010, 09:24 PM
#11
Drifting
Thread Starter
Member Since: Aug 2010
Location: Kanuckistan
Posts: 1,617
Received 127 Likes
on
68 Posts
2022 C3 of the Year Finalist - Modified
Hi Everyone, here's some update.
This weekend have been very productive, apart from finishing my front and rear bumper assembly put back together, I managed to remove my second trailing arm. Since this operation is a major PITA, I thought I should document my method which is, IMHO, simpler and faster that the usual sawzall method.
Here the nasty bugger:

The cotter pin just felt into dust, the bolt came off gently, this will be the only one to collaborate :

Disclaimer : I'm not planning to reuse this frame, so I went a little berseck on it. I'm confident that you can operate with much less damages made to the frame itself.
The first step is to grind off both side of the TA bolt :
outer side

inner side

Then center punch and drill the outer side :

I first drilled with a small bit then when to bigger ones

The vibration of the drilling and a small crowbar allowed me to rotate the aligment shims. They eventually poped out.

Once you've drilled out the bit of the bolt that holds the TA to the frame, you just have to twist the arm, and it will come off easely.


This weekend have been very productive, apart from finishing my front and rear bumper assembly put back together, I managed to remove my second trailing arm. Since this operation is a major PITA, I thought I should document my method which is, IMHO, simpler and faster that the usual sawzall method.
Here the nasty bugger:
The cotter pin just felt into dust, the bolt came off gently, this will be the only one to collaborate :
Disclaimer : I'm not planning to reuse this frame, so I went a little berseck on it. I'm confident that you can operate with much less damages made to the frame itself.
The first step is to grind off both side of the TA bolt :
outer side
inner side
Then center punch and drill the outer side :
I first drilled with a small bit then when to bigger ones
The vibration of the drilling and a small crowbar allowed me to rotate the aligment shims. They eventually poped out.
Once you've drilled out the bit of the bolt that holds the TA to the frame, you just have to twist the arm, and it will come off easely.
10-24-2010, 10:10 PM
#12
Drifting
Thread Starter
Member Since: Aug 2010
Location: Kanuckistan
Posts: 1,617
Received 127 Likes
on
68 Posts
2022 C3 of the Year Finalist - Modified
I'd like to share with you my experience of electrolytic derusting since I'm pretty happy with it.
Here's my trailing arm treatment:

The setup is ghetto, but you don't need to have it fancy, I will eventually get disgusting anyway.
Used a old laptop charger, the positive wire is tied to the metal bar, the negative wire to the part you want to treat.
In the bucket I have water and sodium carbonate (washing soda). 1 spoon per gallon of water.
If you don't have sodium carbonate, take sodium bicabonate (backing soda) and heat it in the oven at 200� F for one hour.
Before putting it into the bath I roughly cleaned it with a wire brush. The aim was not cleaning it, rather expose as much rust as possible.
If the electrolysis can reach the inner layer of rust, the crap that sits on it will go at the same time.
12h later :

Now that's what I call gross.
I ran the setup outside, I don't think that the quantity of hydrogen released by the process is enough to be a threat, but this is not a risk I want to take.
It's almost freezing outside, and surprisingly it didn't stopped the process. So far so good, I bet in the middle of the Quebec winter I won't be the same.
Here's the arm once washed :

The picture don't do justice to the result, the clear spot on the treated side of the arm are bare metal showing up. The black is
One dried, the treated part will re-rust in a matter of hour, I wire brush it quickly and treat it with phosphoric acid spray.
The good thing with this method is that is goes everywhere, the TA has a lot of unreachable areas, like the inner of it or all the gaps between the crappy point-welds. With elecrolysis ALL the rust will be eaten.
Disclaimer: this is not a actual guide, get yourself documented, I might be wrong.
Here's my trailing arm treatment:
The setup is ghetto, but you don't need to have it fancy, I will eventually get disgusting anyway.
Used a old laptop charger, the positive wire is tied to the metal bar, the negative wire to the part you want to treat.
In the bucket I have water and sodium carbonate (washing soda). 1 spoon per gallon of water.
If you don't have sodium carbonate, take sodium bicabonate (backing soda) and heat it in the oven at 200� F for one hour.
Before putting it into the bath I roughly cleaned it with a wire brush. The aim was not cleaning it, rather expose as much rust as possible.
If the electrolysis can reach the inner layer of rust, the crap that sits on it will go at the same time.
12h later :
Now that's what I call gross.
I ran the setup outside, I don't think that the quantity of hydrogen released by the process is enough to be a threat, but this is not a risk I want to take.
It's almost freezing outside, and surprisingly it didn't stopped the process. So far so good, I bet in the middle of the Quebec winter I won't be the same.
Here's the arm once washed :
The picture don't do justice to the result, the clear spot on the treated side of the arm are bare metal showing up. The black is
One dried, the treated part will re-rust in a matter of hour, I wire brush it quickly and treat it with phosphoric acid spray.
The good thing with this method is that is goes everywhere, the TA has a lot of unreachable areas, like the inner of it or all the gaps between the crappy point-welds. With elecrolysis ALL the rust will be eaten.
Disclaimer: this is not a actual guide, get yourself documented, I might be wrong.

 10-25-2010, 12:50 AM
#14
Drifting
Mr. Denpo,
Thats one hell of a first post on the forum and thank you for sharing.
Welcome to the forum. For someone thats never restored a car before, your doing a awesome job. Keep up the good work and throw in the progress pic's as well.
Thats one hell of a first post on the forum and thank you for sharing.
Welcome to the forum. For someone thats never restored a car before, your doing a awesome job. Keep up the good work and throw in the progress pic's as well.


 10-25-2010, 08:33 PM
#17
Drifting
Thread Starter
Member Since: Aug 2010
Location: Kanuckistan
Posts: 1,617
Received 127 Likes
on
68 Posts
2022 C3 of the Year Finalist - Modified
Thanks again to all of you, I really appreciate your encouragement, it helps setting off my bad news of the day.
First here the result of the trailing arm treatement after a first pass of phosphoric acid to stop any re-rerust from happening.
I'd wire brush is later... if it's worth doing...

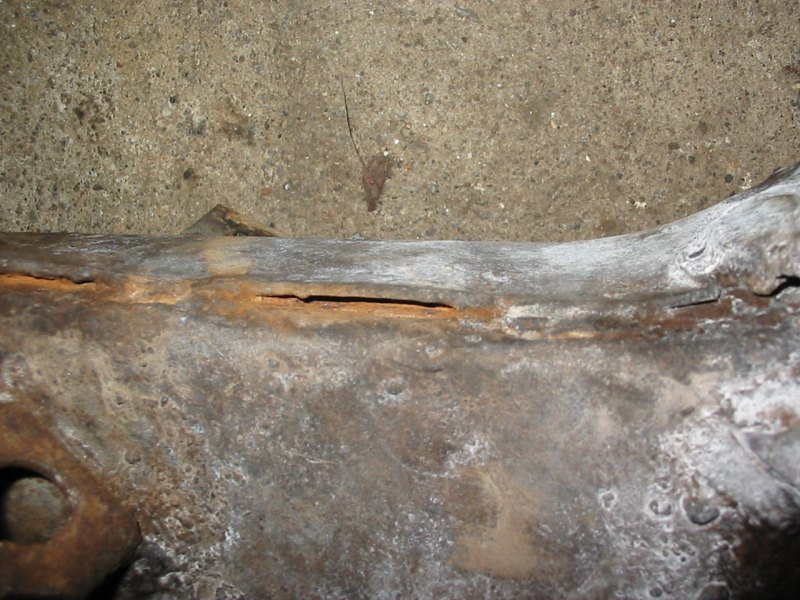
Turns out the rust have done a fair amount of damage to the TA.
A loft of seams have swelled badly.

Here, all the welding point vanished, leaving a hefty gap that goes all the way thru

Some more swelling
I'm facing a dilemma, I planned installing johnny joints and having the arms welded properly (point weld, no thanks). Do you think those are salvageable of I should I start off with better used arms?
Did I told you I'm on a budget? a tight one.
I'm having the same thoughts about my spindle flange, I could clean them, but they are so pitted I'm wondering if they still have the same structural integrity.
Let me know what you think, did someone repaired TAs in such state?
First here the result of the trailing arm treatement after a first pass of phosphoric acid to stop any re-rerust from happening.
I'd wire brush is later... if it's worth doing...
Turns out the rust have done a fair amount of damage to the TA.
A loft of seams have swelled badly.
Here, all the welding point vanished, leaving a hefty gap that goes all the way thru
Some more swelling
I'm facing a dilemma, I planned installing johnny joints and having the arms welded properly (point weld, no thanks). Do you think those are salvageable of I should I start off with better used arms?
Did I told you I'm on a budget? a tight one.
I'm having the same thoughts about my spindle flange, I could clean them, but they are so pitted I'm wondering if they still have the same structural integrity.
Let me know what you think, did someone repaired TAs in such state?
10-26-2010, 10:18 AM
#18
Drifting
Thread Starter
Member Since: Aug 2010
Location: Kanuckistan
Posts: 1,617
Received 127 Likes
on
68 Posts
2022 C3 of the Year Finalist - Modified
I decided to make an independent thread regarding the state of my TA since it's a subject on its own.
Here : http://forums.corvetteforum.com/c3-g...lvageable.html
Here : http://forums.corvetteforum.com/c3-g...lvageable.html


