C7 Tech/Performance Corvette Technical Info, Internal Engine, External Engine, Tech Topics, Basic Tech, Maintenance, How to Remove & Replace
Sponsored by:
Sponsored by:

How -To: Remove/Replace the Radiator

Thread Tools
 
Search this Thread
 
Old 05-08-2015, 09:32 PM
  #1  
Theta
Tech Contributor
Thread Starter
 
Theta's Avatar
 
Member Since: Jan 2006
Location: Saint Louis MO
Posts: 4,761
Likes: 0
Received 219 Likes on 110 Posts
St. Jude Donor '14-'15
Default How -To: Remove/Replace the Radiator

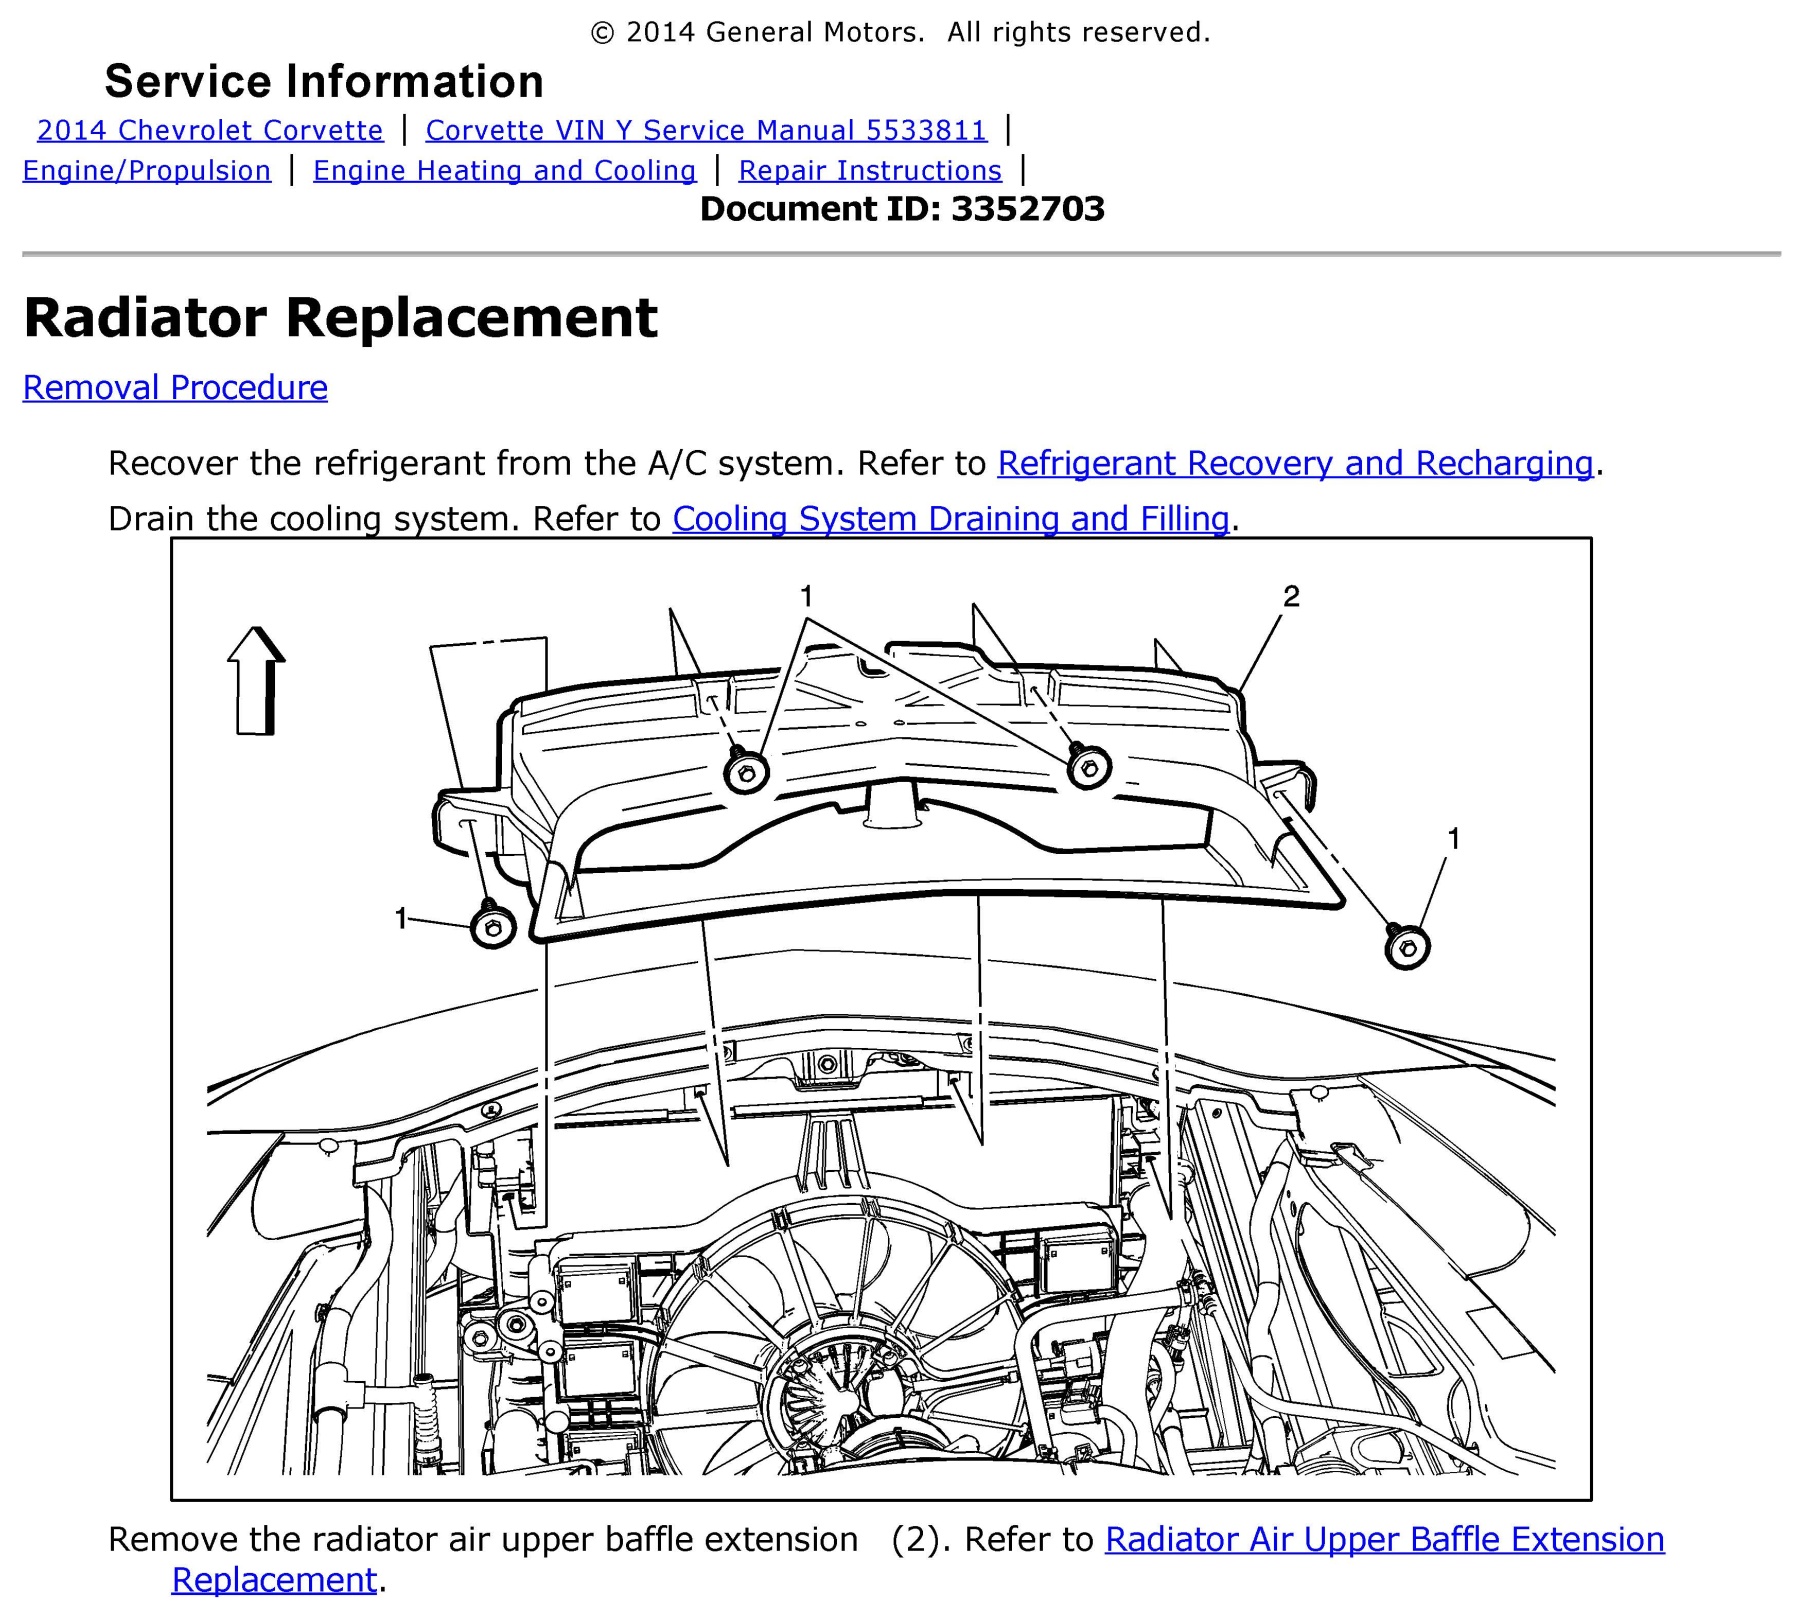
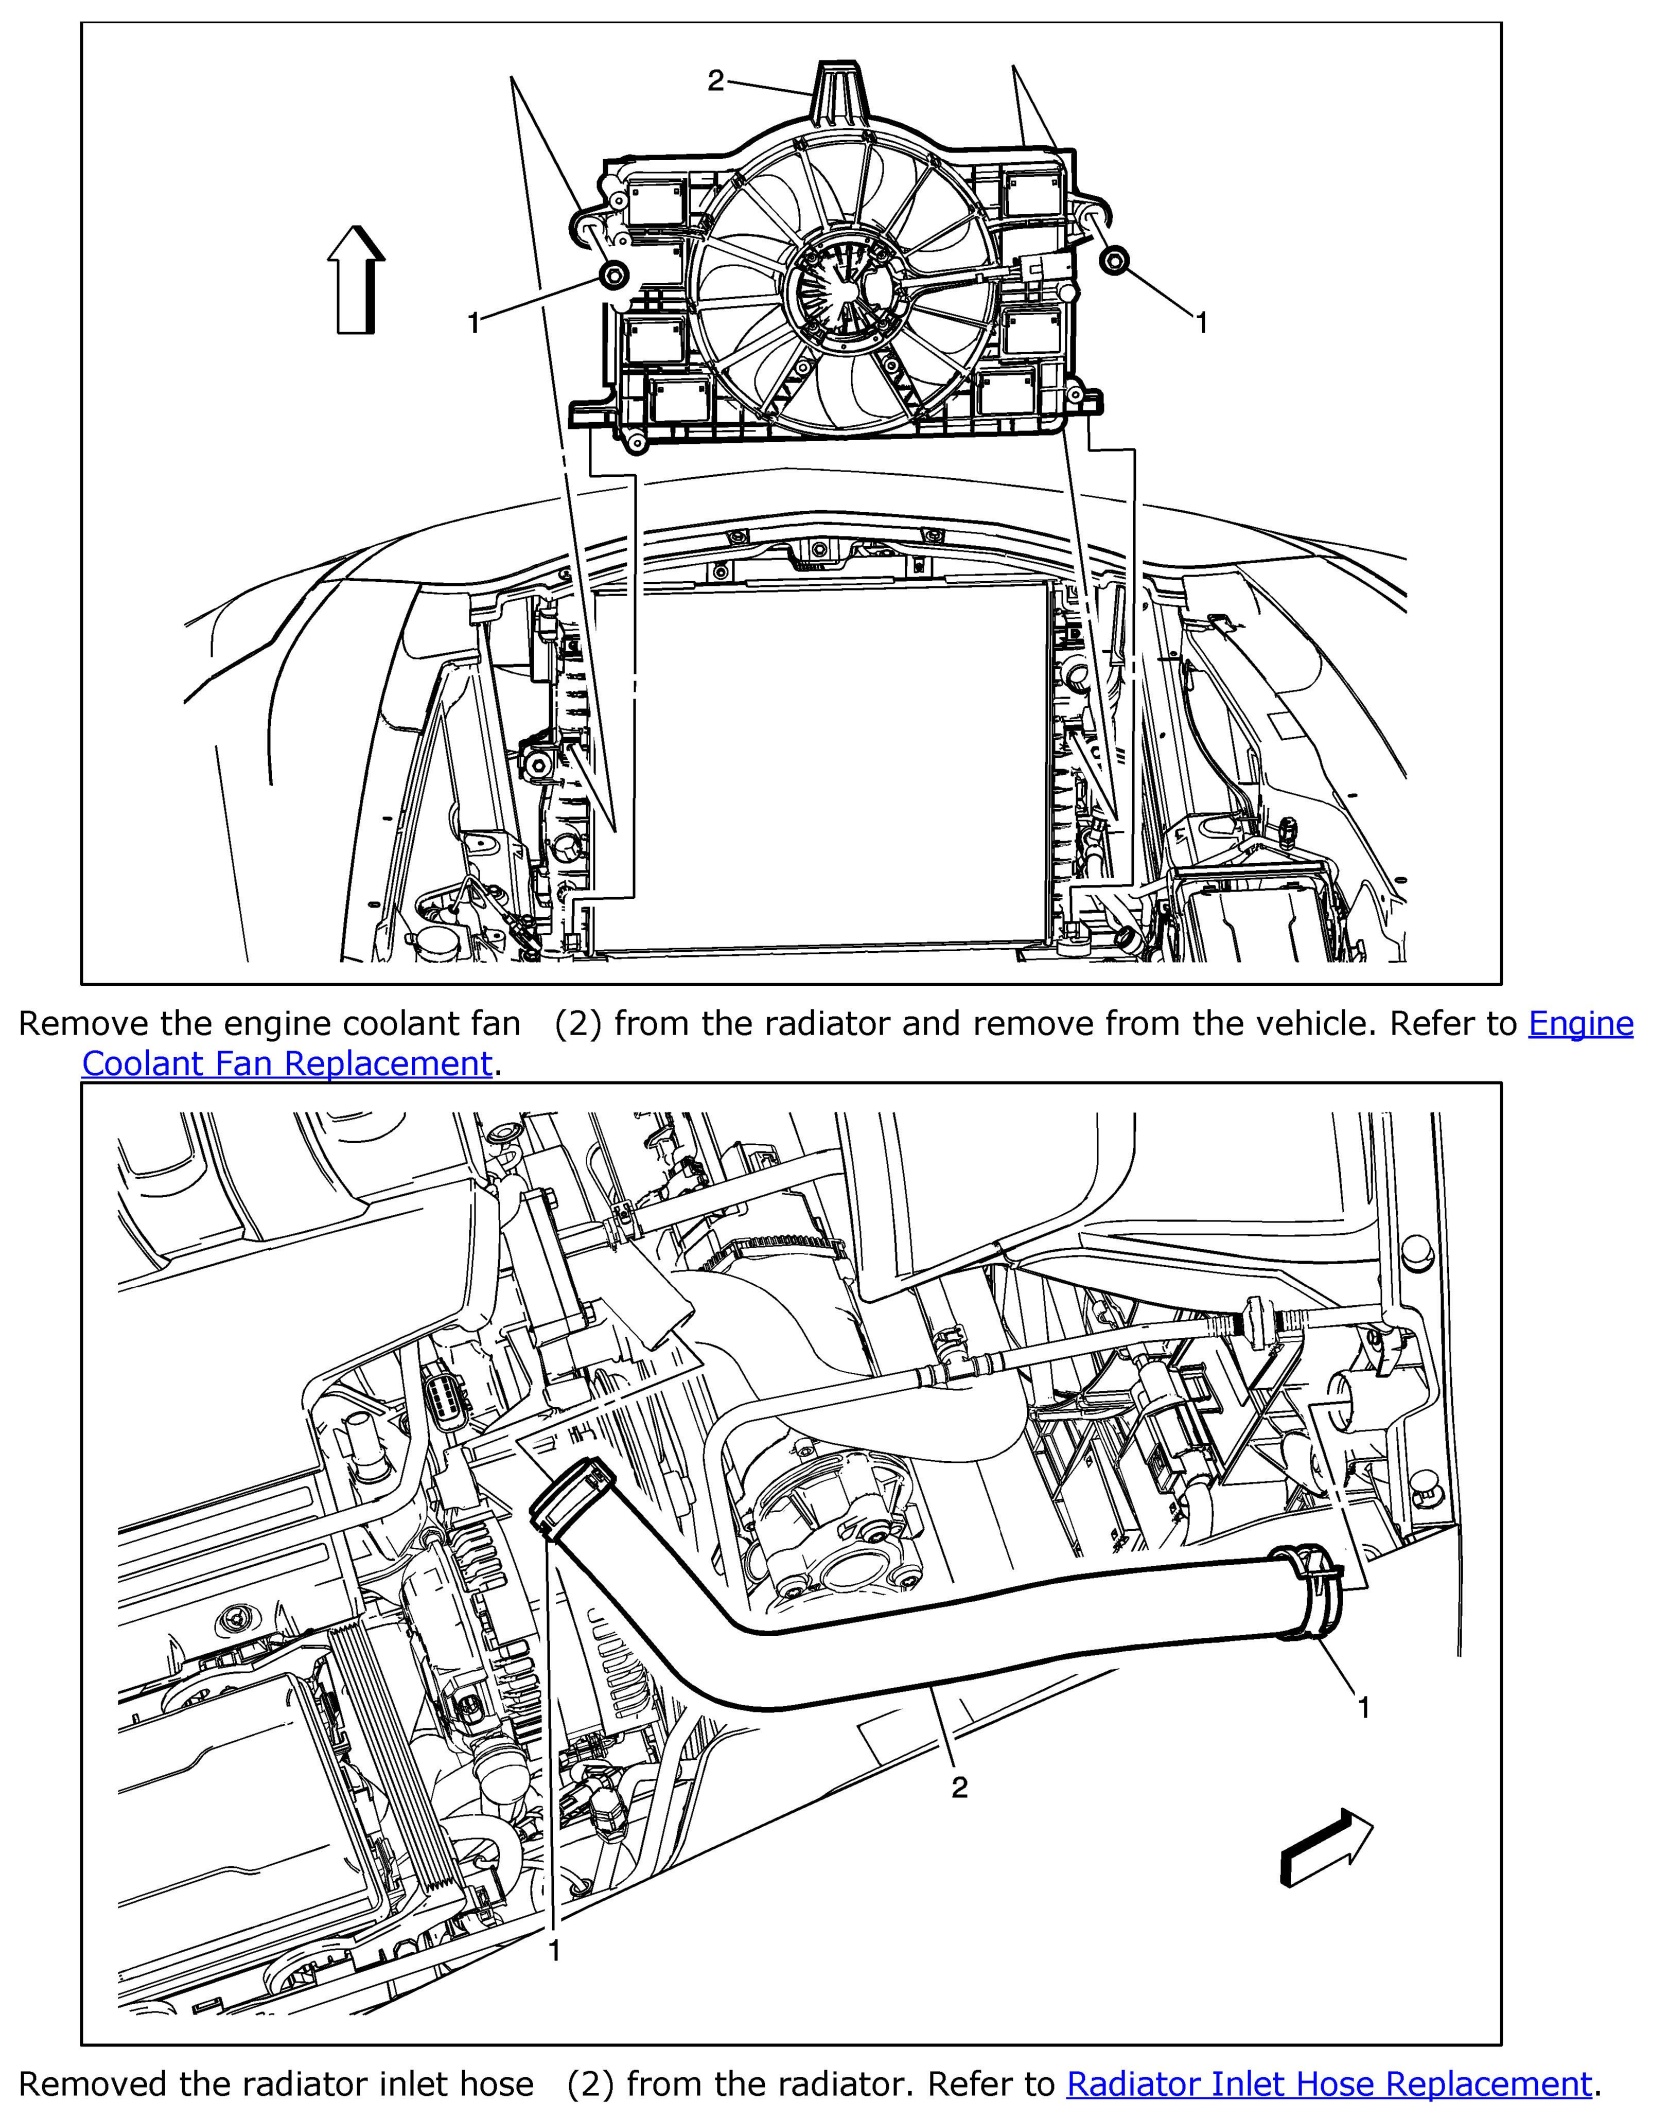
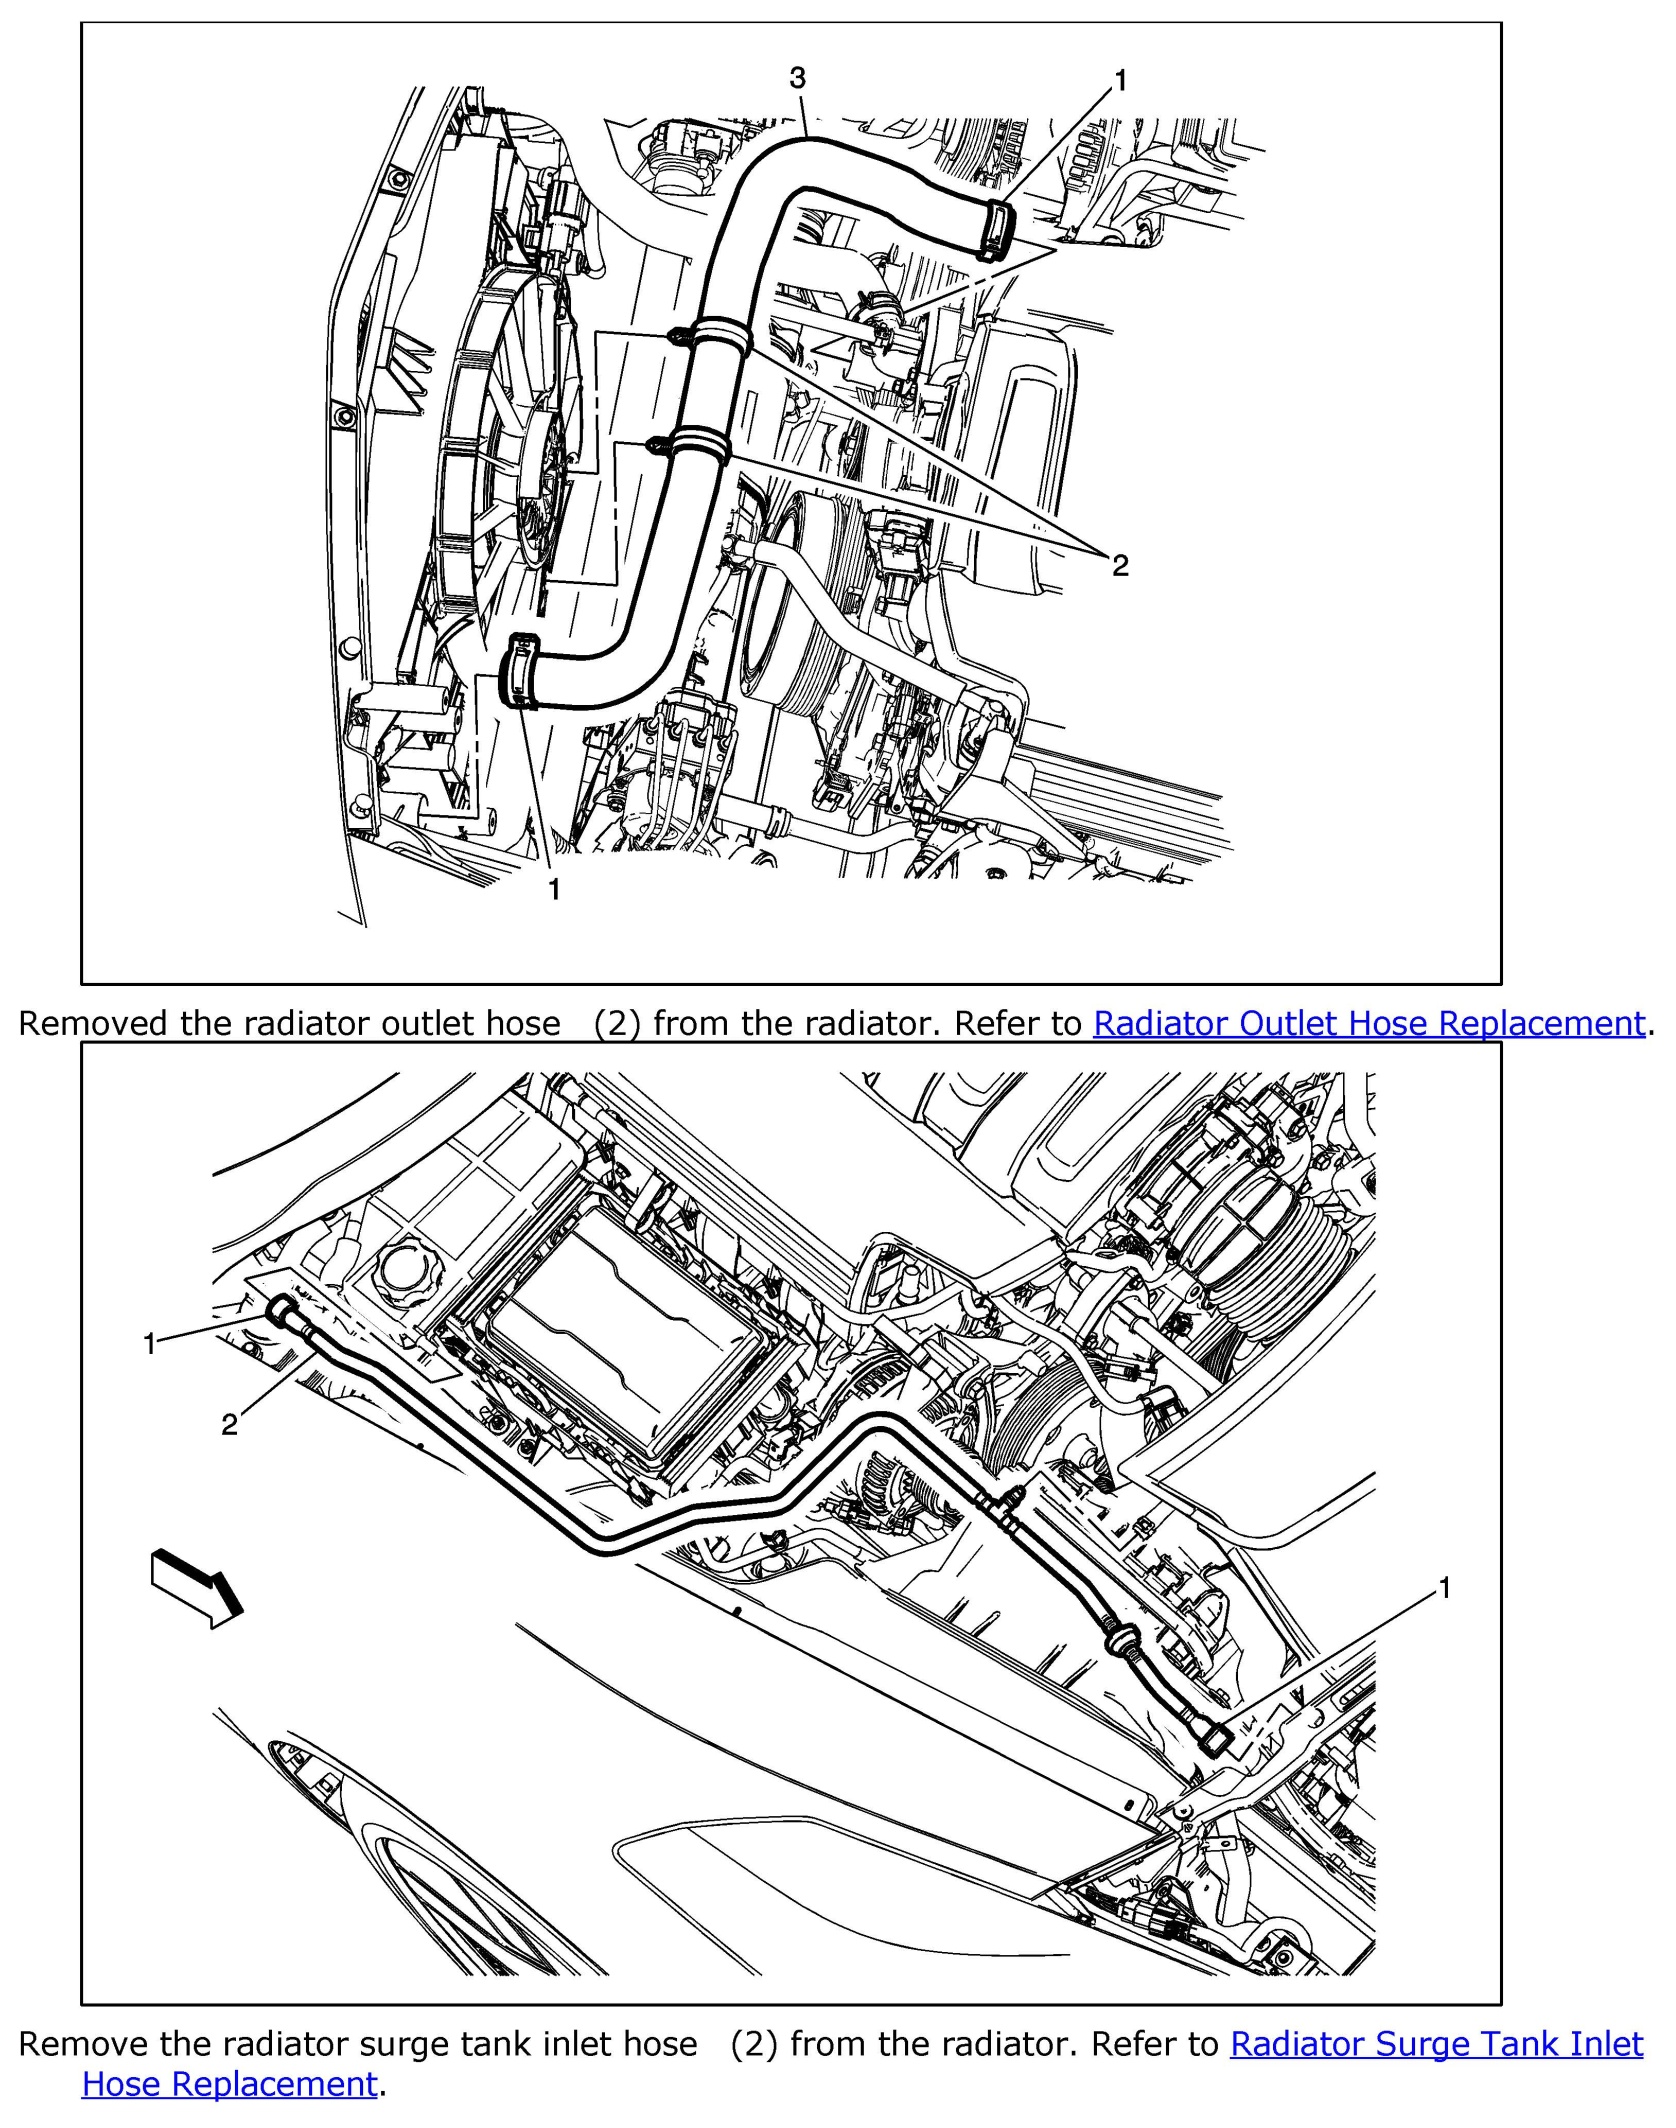
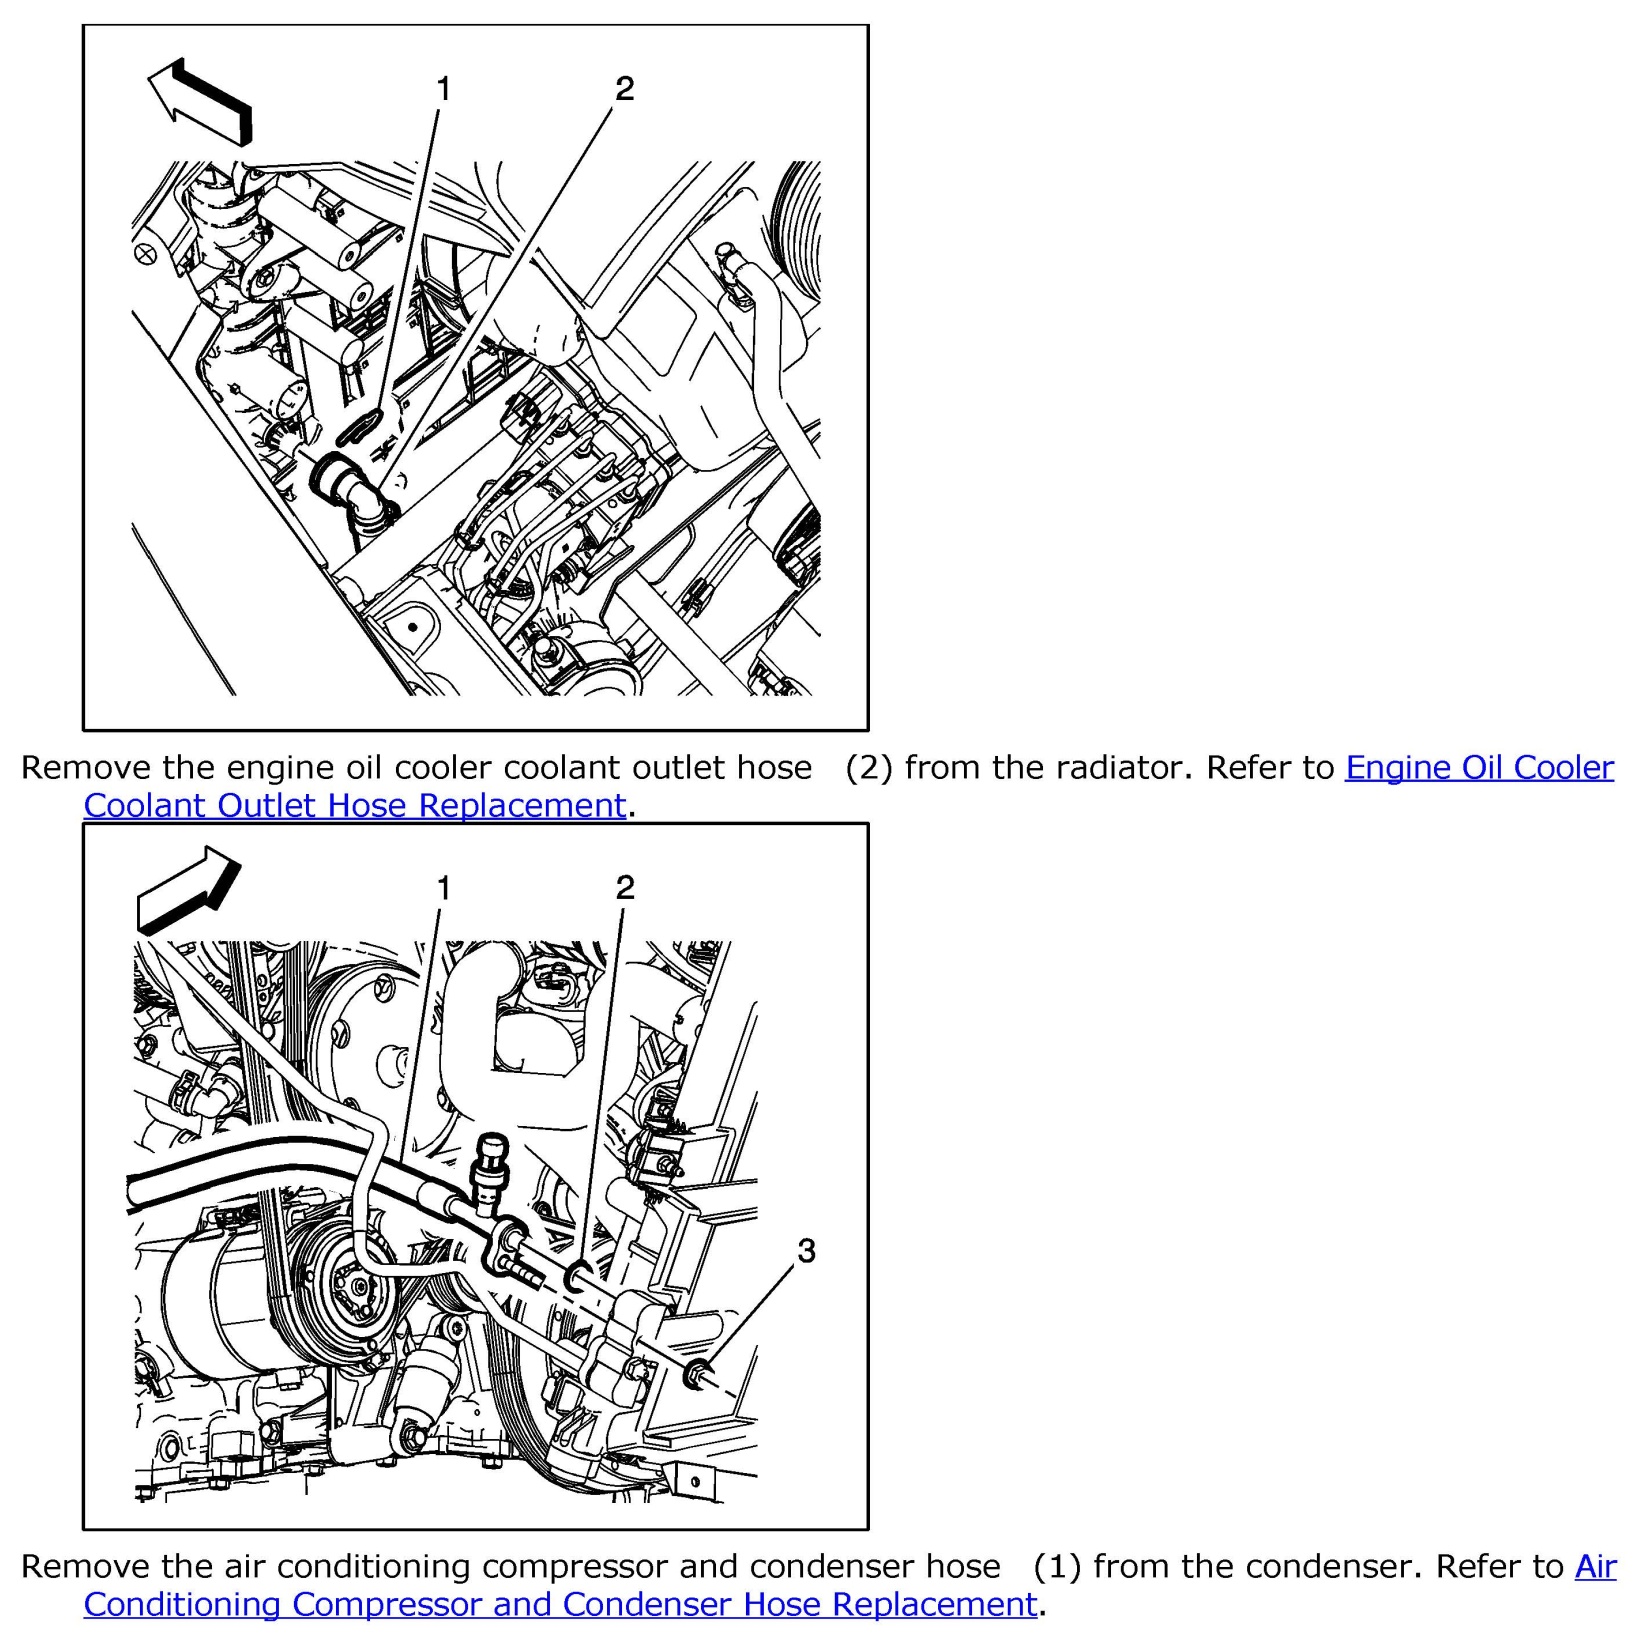
The following How-To covers the explanation of how to Remove/Replace the Radiator and includes specifications, schematics, etc.

These How-To guides are neither endorsed by or property of Corvette Forum or myself in any way/shape/form. All liability stemming from any actions taken in relation to these guides is solely placed upon the user.

We hope you will find these guides useful.
Old 05-08-2015, 09:32 PM
  #2  
Theta
Tech Contributor
Thread Starter
 
Theta's Avatar
 
Member Since: Jan 2006
Location: Saint Louis MO
Posts: 4,761
Likes: 0
Received 219 Likes on 110 Posts
St. Jude Donor '14-'15
Default

Name:  sltlyh0.jpg
Views: 332
Size:  570.2 KB

Name:  yrdW9uu.jpg
Views: 268
Size:  741.8 KB

Name:  24v57vv.jpg
Views: 253
Size:  808.0 KB

Name:  pWzfWFF.jpg
Views: 235
Size:  486.5 KB
Old 05-08-2015, 09:32 PM
  #3  
Theta
Tech Contributor
Thread Starter
 
Theta's Avatar
 
Member Since: Jan 2006
Location: Saint Louis MO
Posts: 4,761
Likes: 0
Received 219 Likes on 110 Posts
St. Jude Donor '14-'15
Default

Name:  7E1wEw1.jpg
Views: 247
Size:  408.4 KB

Name:  4bRjtVt.jpg
Views: 236
Size:  416.0 KB

Name:  fj6a0sR.jpg
Views: 231
Size:  422.3 KB

Name:  tw0agd5.jpg
Views: 239
Size:  484.0 KB
Old 05-08-2015, 09:33 PM
  #4  
Theta
Tech Contributor
Thread Starter
 
Theta's Avatar
 
Member Since: Jan 2006
Location: Saint Louis MO
Posts: 4,761
Likes: 0
Received 219 Likes on 110 Posts
St. Jude Donor '14-'15
Default

Name:  iPQmA01.jpg
Views: 247
Size:  809.0 KB

Name:  lYZDeSl.jpg
Views: 228
Size:  737.2 KB

Name:  W9CzgKC.jpg
Views: 224
Size:  485.4 KB
Old 05-08-2015, 09:33 PM
  #5  
Theta
Tech Contributor
Thread Starter
 
Theta's Avatar
 
Member Since: Jan 2006
Location: Saint Louis MO
Posts: 4,761
Likes: 0
Received 219 Likes on 110 Posts
St. Jude Donor '14-'15
Default

Pre-Requisites 1:

Name:  y8ITIlJ.jpg
Views: 231
Size:  358.5 KB

Name:  Pu52Xci.jpg
Views: 235
Size:  335.4 KB

Name:  58VMlfJ.jpg
Views: 237
Size:  403.7 KB

Name:  kszm9vr.jpg
Views: 230
Size:  396.1 KB

Name:  a09Yn2b.jpg
Views: 230
Size:  397.2 KB

Name:  IG5PhD1.jpg
Views: 228
Size:  432.9 KB

Last edited by Theta; 05-08-2015 at 09:49 PM.
Old 05-08-2015, 09:33 PM
  #6  
Theta
Tech Contributor
Thread Starter
 
Theta's Avatar
 
Member Since: Jan 2006
Location: Saint Louis MO
Posts: 4,761
Likes: 0
Received 219 Likes on 110 Posts
St. Jude Donor '14-'15
Default

Pre-Requisites 2:
Old 05-08-2015, 10:26 PM
  #7  
Theta
Tech Contributor
Thread Starter
 
Theta's Avatar
 
Member Since: Jan 2006
Location: Saint Louis MO
Posts: 4,761
Likes: 0
Received 219 Likes on 110 Posts
St. Jude Donor '14-'15
Default

Here's a picture of mine being installed last year:

Name:  arftOPhh.jpg
Views: 220
Size:  112.1 KB
Old 05-09-2015, 11:27 AM
  #8  
axr6
Pro
 
axr6's Avatar
 
Member Since: Jan 2014
Location: Sierra Nevada Foothills CA
Posts: 585
Received 64 Likes on 51 Posts
Default

Originally Posted by Theta
Here's a picture of mine being installed last year:

Thanks very much for posting the procedures.
Old 05-09-2015, 11:51 AM
  #9  
descartesfool
Burning Brakes
 
descartesfool's Avatar
 
Member Since: Dec 2013
Posts: 1,037
Received 296 Likes on 155 Posts

Default

Does the AC have to be purged and then re-charged to replace just the radiator?
Old 05-09-2015, 04:31 PM
  #10  
Theta
Tech Contributor
Thread Starter
 
Theta's Avatar
 
Member Since: Jan 2006
Location: Saint Louis MO
Posts: 4,761
Likes: 0
Received 219 Likes on 110 Posts
St. Jude Donor '14-'15
Default

Originally Posted by descartesfool
Does the AC have to be purged and then re-charged to replace just the radiator?
I believe so - I'm getting confirmation on that before posting the second part, which is entirely for discharging/disconnecting and reconnecting/re-charging the AC system/evap.
Old 06-23-2019, 07:09 PM
  #11  
JCSIII
Instructor
 
JCSIII's Avatar
 
Member Since: Nov 2016
Posts: 215
Received 62 Likes on 50 Posts
Default

Best way I found to remove the AC condenser from the radiator is to use a tie wrap to hold back the two top tab locks. Then just reach back and lift the condenser out of the radiator slots. Bottom two hooks on the radiator do not have tab locks. Really easy only took a couple of minutes.


Top driver side

Tab pulled back to free condenser

Top driver side tab lock shown lower left side of radiator in pic, bottom no lock tab shown lower right side of radiator in pic.
The following users liked this post:
Mikey_T (05-10-2020)
Old 06-23-2019, 07:34 PM
  #12  
badhabit_wb
Safety Car
 
badhabit_wb's Avatar
 
Member Since: Sep 2014
Location: in the country North Carolina
Posts: 4,248
Received 911 Likes on 727 Posts
Default

You don't have to purge the A/C. I've removed and replaced 2 now and it's much better not to remove the condenser.
Old 06-23-2019, 08:50 PM
  #13  
JCSIII
Instructor
 
JCSIII's Avatar
 
Member Since: Nov 2016
Posts: 215
Received 62 Likes on 50 Posts
Default

Originally Posted by badhabit_wb
You don't have to purge the A/C. I've removed and replaced 2 now and it's much better not to remove the condenser.
I didnt remove the condenser, purge it or unhook it. I just removed the radiator. People had said detaching it from raditor was hard and time consuming. Couple of zip ties and it slides right up. Then pull the radiator out.
Old 06-23-2019, 09:46 PM
  #14  
badhabit_wb
Safety Car
 
badhabit_wb's Avatar
 
Member Since: Sep 2014
Location: in the country North Carolina
Posts: 4,248
Received 911 Likes on 727 Posts
Default

Originally Posted by JCSIII
I didnt remove the condenser, purge it or unhook it. I just removed the radiator. People had said detaching it from raditor was hard and time consuming. Couple of zip ties and it slides right up. Then pull the radiator out.
Exactly! I actually pinched it with my fingers and slid the radiator away from the condenser.
Old 06-27-2019, 02:33 AM
  #15  
Vegas Vette
Melting Slicks

Support Corvetteforum!
 
Vegas Vette's Avatar
 
Member Since: Sep 2002
Location: Las Vegas NV
Posts: 2,782
Received 137 Likes on 91 Posts

Default

Great info thanks for sharing getting ready to swap my radiator out on my 17 Z06. Went with the CFS Triple Pass Radiator.
Old 06-28-2019, 07:45 PM
  #16  
JCSIII
Instructor
 
JCSIII's Avatar
 
Member Since: Nov 2016
Posts: 215
Received 62 Likes on 50 Posts
Default

I did the DeWitt 70mm radiator. One thing to check is lower drivers side radiator hose. Mine was touching the abs box. It could suffer from wear, I trimmed the hose off 3/4" fits perfectly now.

70mm DeWitt is a beast

Proper vacuum fill using gm service tool

Installed
The following users liked this post:
Tom@Dewitt (06-28-2019)

Get notified of new replies

To How -To: Remove/Replace the Radiator


Quick Reply: How -To: Remove/Replace the Radiator


All times are GMT -4. The time now is 10:00 AM.