C3 General General C3 Corvette Discussion not covered in Tech
Sponsored by:
Sponsored by:

Iiiiiitttttttsssss back!!

Thread Tools
 
Search this Thread
 
Old 06-07-2015, 07:20 PM
  #1  
The Phantom
Drifting
Thread Starter
 
The Phantom's Avatar
 
Member Since: Nov 2012
Posts: 1,712
Likes: 0
Received 583 Likes on 384 Posts

Default Iiiiiitttttttsssss back!!

I was thinking of putting a hat on it just to try and make it different from all the others .... oh well the exciting part is that its back home from its date with the frame rack and in the garage, now painted and once dry ready for components and I have been collecting and cleaning!!

The wet look just after the spray ....


... and sataining down after a little cure time.


So I've turned off the lights and closed the door, tomorrow is another day, and speaking tomorrow well that's another post.

Dave

Last edited by The Phantom; 09-01-2017 at 06:40 PM.
The following 10 users liked this post by The Phantom:
AIejandro (01-03-2021), Artarmy (03-09-2024), bobbarry (03-13-2020), Dad/Chris (08-15-2022), killain (02-26-2024), MISTERZ06 (06-20-2017), OLE442 (10-31-2021), Pegan2261 (06-22-2021), qwank (08-09-2023), silvvette (05-06-2020) and 5 others liked this post. (Show less...)

Popular Reply

10-11-2021, 09:13 PM
The Phantom
Drifting
Thread Starter
 
The Phantom's Avatar
 
Member Since: Nov 2012
Posts: 1,712
Likes: 0
Received 583 Likes on 384 Posts
Default

OK, panel correction was a pretty short lived process and moved to ... could it be ... is it possible ... OMG ONE COLOUR ... YES ... HIGH BUILD PRIMER!!!


As much work as I've done, the primer just magnifies how much correction is left to do, let the blocking begin!

... and the beat, it goes on ...

Dave
Old 06-07-2015, 07:36 PM
  #2  
Ibanez540r
Drifting
Support Corvetteforum!
 
Ibanez540r's Avatar
 
Member Since: Oct 2012
Location: Medina Ohio
Posts: 1,523
Received 61 Likes on 60 Posts

Default

That's a fun point in the build to assemble and get to a rolling chassis. I enjoyed it.

I'm often jealous seeing everyones car done, but looking back through old threads the same guys we admire now were at the same point at a prior time.

So, today, you made me feel good. (Although still a long way off!)

Enjoy!
Old 06-07-2015, 09:01 PM
  #3  
The13Bats
Race Director
 
The13Bats's Avatar
 
Member Since: Mar 2003
Location: Eustis ( Area 51 Bat Cave ) Fl
Posts: 11,608
Received 772 Likes on 645 Posts

Default


I was so thrilled to get mine home, the part I dig about about it going back together is it's so much cleaner...
The following users liked this post:
killain (02-26-2024)
Old 06-08-2015, 02:03 PM
  #4  
HOOAH
1969/1971/1976 Coupes

Support Corvetteforum!
 
HOOAH's Avatar
 
Member Since: Jan 2008
Location: Port Huron MI
Posts: 2,206
Received 72 Likes on 56 Posts
St. Jude Donor '09-'10-'11-'12-'13-'14-'15

Default

It is exciting. My problem after that point is that I didn't want to put "any" of the old stuff back on (including bolts).

Good luck as you progress.

Terry

The following users liked this post:
MISTERZ06 (06-20-2017)
Old 06-08-2015, 10:35 PM
  #5  
The Phantom
Drifting
Thread Starter
 
The Phantom's Avatar
 
Member Since: Nov 2012
Posts: 1,712
Likes: 0
Received 583 Likes on 384 Posts

Default

And the beat goes on, I have assembled the front left suspension I was all excited about having the whole kit and kabuttle ready to roll when I opened that box with the x drilled and slotted rotor that I bought 2 years back. Ready to pop in the new wheel bearings and seals ... as I said, the beat goes on.


Dave

Last edited by The Phantom; 09-01-2017 at 07:10 PM.
Old 06-10-2015, 07:58 PM
  #6  
The Phantom
Drifting
Thread Starter
 
The Phantom's Avatar
 
Member Since: Nov 2012
Posts: 1,712
Likes: 0
Received 583 Likes on 384 Posts

Default

More work ...
A tie down strap loop was added as you just never know with old cars!


The added gussets applied for that extra support, ahh if Jane Russell could see her now!!


... and the beat goes on.

Dave

PS and Bats is right, this is just way cleaner than dissassembly!

Last edited by The Phantom; 09-01-2017 at 07:09 PM.
The following 2 users liked this post by The Phantom:
JohnRR (03-11-2022), MISTERZ06 (06-20-2017)
Old 06-10-2015, 09:39 PM
  #7  
3JsVette
Race Director
 
3JsVette's Avatar
 
Member Since: Jan 2007
Location: NYC NY
Posts: 13,378
Received 2,466 Likes on 1,641 Posts

Default

Nice working with clean parts huh? You'll have a real nice foundation when you're done.
Old 06-11-2015, 12:17 AM
  #8  
stubek
7th Gear
 
stubek's Avatar
 
Member Since: Jun 2015
Posts: 7
Likes: 0
Received 0 Likes on 0 Posts
Default

I hope this is me in about 2 years from now. Looks great so far.
Old 06-11-2015, 07:20 PM
  #9  
530planeman
Drifting
 
530planeman's Avatar
 
Member Since: Jan 2014
Location: Sadieville Kentucky
Posts: 1,866
Received 145 Likes on 129 Posts
Default


Originally Posted by The Phantom
I was thinking of putting a hat on it just to try and make it different from all the others .... oh well the exciting part is that its back home from its date with the frame rack and in the garage, now painted and once dry ready for components and I have been collecting and cleaning!!

The wet look just after the spray ....


... and sataining down after a little cure time.


So I've turned off the lights and closed the door, tomorrow is another day, and speaking tomorrow well that's another post.

Dave
Dave
I get the advantage as I do all of my work her at home 100% so if I mess something up I just get to do it again no one to blame but me
Wes
The following users liked this post:
MISTERZ06 (06-20-2017)
Old 06-11-2015, 09:58 PM
  #10  
The Phantom
Drifting
Thread Starter
 
The Phantom's Avatar
 
Member Since: Nov 2012
Posts: 1,712
Likes: 0
Received 583 Likes on 384 Posts

Default

We all mess up Wes, it's how we recover that sets us apart! LOL

It was differential night in the OL garage tonight ... and with little finesse it went into place , I'm very happy! More pic's to follow.

Dave
Old 06-14-2015, 04:30 PM
  #11  
The Phantom
Drifting
Thread Starter
 
The Phantom's Avatar
 
Member Since: Nov 2012
Posts: 1,712
Likes: 0
Received 583 Likes on 384 Posts

Default

Ok a little catch up moved to the rear and been busy on the drivers side ....


OK Mr Bats, I remember a post where you were looking for trailing arm shim and cotter pin info, maybe its late but here you go. Mine on the left took on the outboard frame side one thick, one medium and three thin ones. On the inboard differential side it took one thick and one medium. The cotter pin is 4.5" long.


... and the beat goes on.

Dave

Last edited by The Phantom; 09-01-2017 at 07:14 PM.
Old 06-15-2015, 07:19 PM
  #12  
The Phantom
Drifting
Thread Starter
 
The Phantom's Avatar
 
Member Since: Nov 2012
Posts: 1,712
Likes: 0
Received 583 Likes on 384 Posts

Default

and the new spring is in ....


and the beat ....

Dave

Last edited by The Phantom; 09-02-2017 at 07:21 AM.
Old 07-07-2015, 08:46 PM
  #13  
The Phantom
Drifting
Thread Starter
 
The Phantom's Avatar
 
Member Since: Nov 2012
Posts: 1,712
Likes: 0
Received 583 Likes on 384 Posts

Default

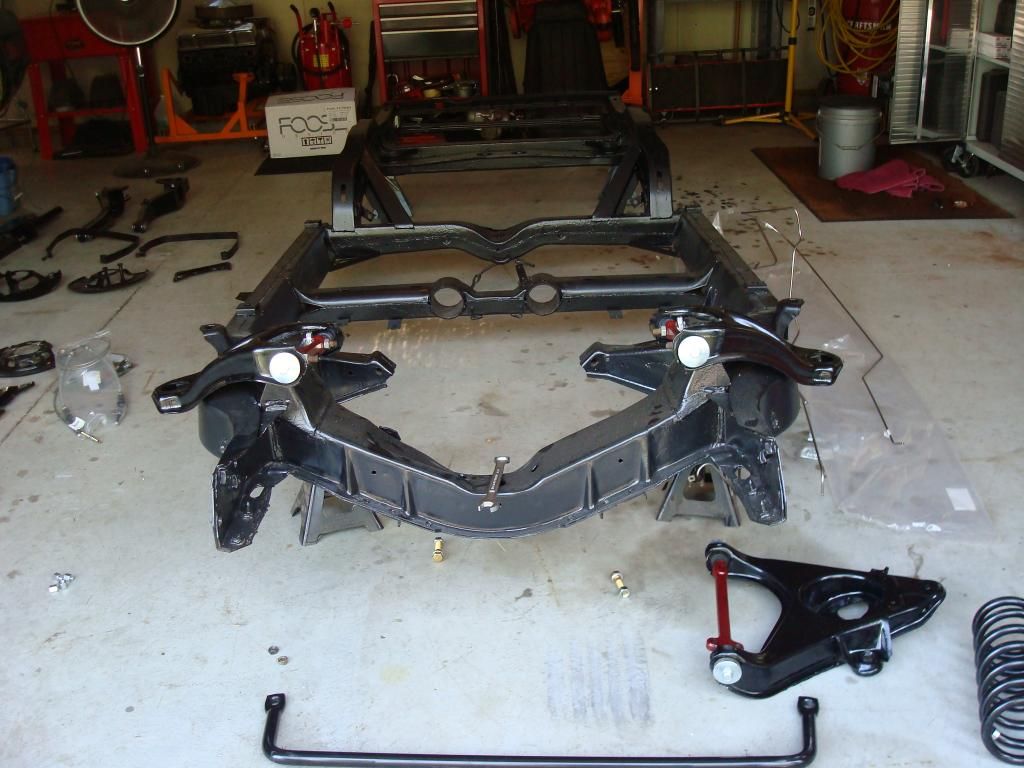
Ok here's a little update, the Steeroids rack is in (an easy user freindly install I have to say) and the brakes are on all four corners. The chassis is a roller for the first time in just under a year, I'm happy with the progress up to now.


More updates to follow.

Dave

Last edited by The Phantom; 09-02-2017 at 07:25 AM.
The following 2 users liked this post by The Phantom:
commander_47 (09-10-2023), MISTERZ06 (06-20-2017)
Old 07-07-2015, 08:58 PM
  #14  
Mooser
Race Director
 
Mooser's Avatar
 
Member Since: Apr 2011
Location: North of Toronto - Ontario
Posts: 10,854
Received 3,136 Likes on 2,069 Posts

Default

Looking great

Quick question, manual or auto?
M
Old 07-08-2015, 08:55 PM
  #15  
The Phantom
Drifting
Thread Starter
 
The Phantom's Avatar
 
Member Since: Nov 2012
Posts: 1,712
Likes: 0
Received 583 Likes on 384 Posts

Default

She's a roller yeah .... so I broke out the good camera and took some outdoor shots, she's sitting high and in dire need of an alignment but she is ready for the motor and tranny ... and dare I say the body reinstall. I know I'm getting a little ahead but the #4 body mount bolts had to be cut, has anyone been successful in removing them after cutting or is it easier to replace the cage and nut.


... and the beat goes on!

Dave

Last edited by The Phantom; 09-02-2017 at 07:34 AM.
The following users liked this post:
MISTERZ06 (06-20-2017)
Old 07-08-2015, 08:59 PM
  #16  
The Phantom
Drifting
Thread Starter
 
The Phantom's Avatar
 
Member Since: Nov 2012
Posts: 1,712
Likes: 0
Received 583 Likes on 384 Posts

Default

Originally Posted by Mooser
Looking great

Quick question, manual or auto?
M
The car had a TH400 in it factory, I am updating to a Monster 200r4 behind the 355ci.

Dave
Old 07-08-2015, 09:03 PM
  #17  
530planeman
Drifting
 
530planeman's Avatar
 
Member Since: Jan 2014
Location: Sadieville Kentucky
Posts: 1,866
Received 145 Likes on 129 Posts
Default


Originally Posted by The Phantom
I was thinking of putting a hat on it just to try and make it different from all the others .... oh well the exciting part is that its back home from its date with the frame rack and in the garage, now painted and once dry ready for components and I have been collecting and cleaning!!

The wet look just after the spray ....


... and sataining down after a little cure time.


So I've turned off the lights and closed the door, tomorrow is another day, and speaking tomorrow well that's another post.

Dave


They go back together easy and clean


Every rubber piece in the chassis and very easy to install unless you want 100% original

Get notified of new replies

To Iiiiiitttttttsssss back!!

Old 07-08-2015, 09:40 PM
  #18  
Mooser
Race Director
 
Mooser's Avatar
 
Member Since: Apr 2011
Location: North of Toronto - Ontario
Posts: 10,854
Received 3,136 Likes on 2,069 Posts

Default

Originally Posted by The Phantom
The car had a TH400 in it factory, I am updating to a Monster 200r4 behind the 355ci.

Dave
Cool
If I may just throw this out there. Careful with the trans coolant lines, the gusset on the outside of the lower control arm mount really closes in where the lines can run. Not bad if your bending your own but not great if your using pre-bent


I didn't find out until after the motor was in, would have been much easier earlier

M
The following users liked this post:
MISTERZ06 (06-20-2017)
Old 07-08-2015, 09:52 PM
  #19  
Mooser
Race Director
 
Mooser's Avatar
 
Member Since: Apr 2011
Location: North of Toronto - Ontario
Posts: 10,854
Received 3,136 Likes on 2,069 Posts

Default

Originally Posted by The Phantom
....I know I'm getting a little ahead but the #4 body mount bolts had to be cut, has anyone been successful in removing them after cutting or is it easier to replace the cage and nut.
....
Dave

If you can hold the nut and there is enough of the bolt that got cut off to get a hold of you may be able to work it out,

IIRC 1-1/2" square socket would fit over the cage for the nut, I couldn't find one when I needed it so I had to improvise (cage rivets sheared off so this was 1-1/4 sqr tube, just over an inch inside and fit the nut but you get the idea)


Second time around I didn't want to risk breaking the cage rivets again so made up my version of a sqr socket


M
Old 07-13-2015, 06:06 PM
  #20  
The Phantom
Drifting
Thread Starter
 
The Phantom's Avatar
 
Member Since: Nov 2012
Posts: 1,712
Likes: 0
Received 583 Likes on 384 Posts

Default

Filling up the frame rails ... I think it looks pretty good, if I do say so myself!


... and the beat goes on ...

Dave

Last edited by The Phantom; 09-02-2017 at 07:38 AM.
The following users liked this post:
MISTERZ06 (06-20-2017)


Quick Reply: Iiiiiitttttttsssss back!!


All times are GMT -4. The time now is 10:43 AM.