When you click on links to various merchants on this site and make a purchase, this can result in this site earning a commission. Affiliate programs and affiliations include, but are not limited to, the eBay Partner Network.
Welcome to my build thread! I probably have much more information than necessary in my first post to start the thread, apologies in advance!
I’ve specifically wanted a blue 1969 Corvette Stingray Coupe since I was about 12 years old. I've lurked on the C3 section for a long time. Once I saved up the cash, I sold the C4 I had and went searching for a '69. After much patient research, shopping, research, shopping, research, second guessing, and research, I found it!
I was looking for a driver, not a pristine numbers-matching show car (nothing wrong with that! I love perfect NCRS cars too), small block stick shift. Just wanted something that wouldn’t be a sin to modify, and something to have fun with and take to the track without being scared of hurting it.
I found my car in upstate New York, it’s a blue 1969 350/300hp 4 speed coupe with black interior, side pipes, manual brakes, manual steering. The guy had bought it in the 80’s with 2x,xxx on the odo, claims to have only driven it in the summer, and parked it in a garage 2001 where it had sat since. It’s at ~28,000 miles now but the odometer doesn’t work, so who knows what it really is at, doesn’t matter to me. The tires that are on it supposedly came were on it when he bought it, and there’s a ton of tread left so I don’t think he’s being dishonest. He put the ad up for a price that I thought was too good to be true so I jumped on it, made the 11 hour drive, went and looked at the car, and bought it!
It’s a very early ’69, the trim plate shows Sept 26th ’68 as the build date. Originally fathom green, it was repainted at some point before the previous owner bought it. They painted it a color close to le mans blue, but with a bit more metal flake. The paint shows its age and has a few knicks and scratches, but that doesn’t bother me for what I want this car for. The previous owner rebuilt the engine after he says a piston ring broke.
He claimed he’s only put about 3,500 miles on it since he rebuilt it, but there’s no way to prove it. Perhaps somebody has an idea of how to roughly gauge age of an engine since it was rebuilt? Anyway, he says it was bored 0.030 over, that he put 1.6:1 roller tip rockers on it and the 350hp engine cam from eckler’s. Looking on their site now I can’t find 1.6 rockers on ecklers, I do see a 350hp cam. Not sure if anyone has information on how I could tell what exact rockers and cam it has? And a rough estimate on the horsepower it has now? (it started life as a stock 350/300). It has headers on it as well but otherwise appears stock.
Most importantly, the frame appears to be in great shape, with very little rust, only some light surface rust (I think…) in a few spots. The common “bad” areas on C3’s seem fine, in front of the trailing arms at the rear kick ups, the areas of the bird cage that I can see, etc.
The previous owner put a rancho suspension kit on it, doesn’t look like they make that any more. The springs on it are seriously stiff, and the shocks are bad (which doesn’t help the stiff springs). The sway bars from that kit are 1 1/4” front and 3/4” for the rear. Based on what many people on the forum say, that rear bar may be a bit big, but I may as well try it first. I’ll be replacing the rest of the suspension (covered later).
Based on my calculations from driving it and recording engine speed at various vehicle speeds, I think the Muncie is a close ratio, which I found surprising considering it’s a base engine car. Because it’s an early ’69 the transmission case number doesn’t show which ratio set it is, so I’ll have to check the input shaft rings when I can. It has a 3.36 posi rear end.
Phew, ok background information overload is over. Here’s my tentative plans for this car, and what I’ll be tracking in this thread.
I want to make the car into a fun track day but still streetable car. Yes, I am crazy. Yes, I know a C5 Z06 is probably the best bet for your money to have a track day yet streetable Corvette and it would be much faster… but its just not a ’69 vette. I’ve done competitive wheel to wheel racing, I’ve done drag racing, I’ve done track days. So I have an idea of what I’m getting into. I don’t need to be the fastest guy out there fighting for tenths, I’m just in it for the fun.
I have 3 build stages planned for this car, though we all know how plans go..
Stage 1: Make it track ready. Resist the need for speed! Time Frame: To be completed this winter
• VBP big daddy kit (BOM slightly modified)
o Their full performance plus system, minus sway bars as I already have a set, and with single-adjustable shocks instead of the bilsteins.
o Rack and pinion power steering
o Hydroboost power brake system
o Offset rear trailing arms
o Brake lines
o VBP Treated steel and hawk pads (I already have a new set of C3 calipers)
• Scattershield… just in case.
• Take the body off, replace the cracket aftermarket rubber mounts with new mounts, strip and re-paint frame. Inspect frame for any areas that might need repair. No plans for any crazy body off restoration or anything, I just want to make sure everything looks good and get it painted before I put a roll bar/cage in and can’t take the body off.
• Roll bar/cage. I’m still undecided on a 4 point (roll bar with two back braces) or full 6 or 8 point. A 4 point would be the least intrusive.
• 18x10’s all around, looking like with 285/35r18s. Based on Felming23’s post: https://www.corvetteforum.com/forums...4-corners.html I think I can fit them, though I am slightly concerned they’ll stick out of a ‘69’s fenders compared to his ’71. (By the way, I had already planned much of what I wanted to do before I found his car, my build is very much inspired-by/similar-to his car, and danny popp’s as well). I’m not the biggest fan of large diameter wheels on older cars, but the reality is that there’s just not many/if-any performance tire choices in the smaller diameters for the width I want.
• Road-race oil pan or accu-sump (advice on either would be great!).
• Better seats. I’d love to have something vintage looking, but haven’t found ones that have great lateral support and aren’t very expensive, with the exception of kirkey seats… but they look uncomfortable for anything longer than a 20 minute track session. Does anyone have these and are they comfortable? Otherwise I’m considering Corbeau Forza’s.
• Odds and ends to repair/fix/replace in the car (carpet, rebuild carb, radiator, etc).
• Better side pipes if the budget allows by the time I’m done.
I’d love to do the ride-tech suspension as it seems very well done, but the VBP big daddy comes with so much more stuff that also happens to be stuff I needed anyway, for less than the ride-tech, that I went with that. The Ride-tech would have put me over budget anyway not even considering the other items the VBP kit has.
Stage 2:
500whp n/a LS3 and T-56 swap, big brakes (willwood, bear, something else, I’m undecided). More details when the time comes for that. Time frame: Maybe next winter (’17-18), probably the winter after that.
If the current small block blows up it may force my hand into just doing a stock LS swap to get me back on the road. If the vbp treated rotors and good track pads still don’t cut it I may have to do a brake kit earlier as well.
Stage 3:
Paint, fender flares, even wider tires, interior upgrades. Time frame: A few seasons out realistically.
Bonus Round Stage 4!:
SRIII or similar tube-frame chassis. Time frame: when I win the lottery?
I plan to document as much as I can here and on you tube. There’s not a whole lot of C3 stuff out on you tube, so I’d like to get things on there to help the next guy/gal in line looking to do things with C3 Corvettes.
So that’s it to get me started. Please feel free to ask questions, and I’m always open to advice and learning something new! Time to get to work, I've got a lot to do!
Last edited by supervette64; 12-11-2016 at 05:58 PM.
Reason: Edited, spelling and formatting
I spent tuesday making a Body Dolly. Its largely based on the drawing Alan71 posted, so credit goes to him! Because I don't plan on needing to move it around, I did not put wheels on it, and instead made the 4x4's 2' tall so I can get under the body easier to clean it. I think I need to strengthen it up a bit more though. While I have decent mechanic's skills, I am by no means a carpenter, so its not a stiff as I'd like, I'm a little bit nervous that the 2x3's aren't strong enough to hold it? One of them split a bit as I screwed it onto the 2x6 (I used lag screws that claimed no need to pre-drill).
Alan71's drawing did not include front supports, though in one of the threads he posted in I think he mentioned he added them when he went to move the body. I think I'd like to still support the front, so if Alan71 or anyone else who may read this knows, what/where are the dimensions for the nose supports?
If you look at Alan71's diagram there is what appears to be 1/2" plywood triangles mounted at the top of each corner. The 90 degree angles appear to be approximately 12" triangles. The plywood would give the dolly the support to help with the twist. I plan to build mine using Alan's diagram and add 1/2" plywood or 2 X 4 studs placed at 45 degree angles between the 2" X 6" frame and the support legs, front, rear and all sides. I'll probably use 2" X 4" instead of the 2" X 3", and possibly 2" X 8" frame rails. But I tend to over build everything. Add the wheels, I've had bodies on dollies before, and as soon as you set the body on top you'll want or need to move it. The last dolly I built I designed it so the chassis sat under the body. When I wanted to work on the chassis, I simply pushed the body to the other side of the garage. Doubled my working room when I was working on the engine and other items.
Here's an oil pan very similar to the one I use (mine is the 1pc rear main seal version with the dipstick on the right side vs. the left for earlier SBC's). I use 8 quarts of 20W-50 with it and it has served me well.
Also, I have a Kirkey "Pro Street" seat that I mounted an inboard shoulder support to. This allows me to still put my windows up when needed. I wouldn't want to drive for hours in it, but if you mount their lumbar support it's not too bad comfort wise. Makes getting in and out a bit more challenging though . Since my car is a dual purpose car full of compromises, I installed a 4-point roll bar along with a DOT approve 4-point SCHROTH harnesses. I'm a fairly large guy at 6'3" so space considerations were a priority that eliminated most aftermarket seats.
Last edited by Jason Staley; 11-05-2016 at 07:05 PM.
Hi OCB,
I also needed a place to store the body for many years while I restored the chassis and running gear.
My garage is narrow so I built a 'rack' similar to the one I see in your photo.
This allowed me to move the body forward and backward and have room to work on the chassis next to it.
It interesting to see that folks facing similar 'situations' come up with similar 'solutions'!
Regards,
Alan
Hi s64,
I'm pleased my 'plan' was of use to you.
Here's a photo of the body on the dolly and the 2 front uprights in place.
Their location and height was really determined by where that double front crossmember is.
Good Luck as you get going on your project!
Regards,
Alan
Of course I wish you were doing a nice original type restoration on that 69! BUT, I realize that's not for everyone, and it appears right for maybe even fewer and fewer owners!
If you look at Alan71's diagram there is what appears to be 1/2" plywood triangles mounted at the top of each corner. The 90 degree angles appear to be approximately 12" triangles. The plywood would give the dolly the support to help with the twist. I plan to build mine using Alan's diagram and add 1/2" plywood or 2 X 4 studs placed at 45 degree angles between the 2" X 6" frame and the support legs, front, rear and all sides. I'll probably use 2" X 4" instead of the 2" X 3", and possibly 2" X 8" frame rails. But I tend to over build everything. Add the wheels, I've had bodies on dollies before, and as soon as you set the body on top you'll want or need to move it. The last dolly I built I designed it so the chassis sat under the body. When I wanted to work on the chassis, I simply pushed the body to the other side of the garage. Doubled my working room when I was working on the engine and other items.
Not sure how I missed those in his drawing, I'll have to add that. I was able to stand on the 2x3's with no issue (as far as the 2x3 itself was concerned) but I did feel like there was twsit/flex like you say. I'll add corner braces, and if need be a second set of posts (probably 2x4) in the middle.
BTW, the frame for that hot rod in your photos is beautiful!
Here's an oil pan very similar to the one I use (mine is the 1pc rear main seal version with the dipstick on the right side vs. the left for earlier SBC's). I use 8 quarts of 20W-50 with it and it has served me well.
Also, I have a Kirkey "Pro Street" seat that I mounted an inboard shoulder support to. This allows me to still put my windows up when needed. I wouldn't want to drive for hours in it, but if you mount their lumbar support it's not too bad comfort wise. Makes getting in and out a bit more challenging though . Since my car is a dual purpose car full of compromises, I installed a 4-point roll bar along with a DOT approve 4-point SCHROTH harnesses. I'm a fairly large guy at 6'3" so space considerations were a priority that eliminated most aftermarket seats.
Good to know that the oil pan works well! The only reason why I was/am considering an accu-sump instead is for future proofing so that I can also use it on the LS swap when it happens. However, I'm nervous that the stock sump would cause issues even with an accu-sump. Maybe I'm being too cautious?.
I do like the look of that kirkey. Does it use the stock floor pan mounts/bolt-holes? If so, I've thought of maybe keeping the stock seats for the street as they're comfortable enough and swapping out to the kirkey's for when I go to the track. It seems to me the seats are pretty quick to take out with only 4 bolts?
Also, did you make the 4 point yourself or did you buy it? Is it weld in or bolt in?
Thanks!
Last edited by supervette64; 11-06-2016 at 06:43 AM.
Hi s64,
I'm pleased my 'plan' was of use to you.
Here's a photo of the body on the dolly and the 2 front uprights in place.
Their location and height was really determined by where that double front crossmember is.
Good Luck as you get going on your project!
Regards,
Alan
Of course I wish you were doing a nice original type restoration on that 69! BUT, I realize that's not for everyone, and it appears right for maybe even fewer and fewer owners!
Ah, I see it now. Thanks!
I totally-get the whole thing about original-restorations, no worries! Thus I tried to find a C3 that had already been modified/changed/etc so that I wasn't molesting an nice factory car. I would like to do/have an original type restoration on a '61 some day.
Good to know that the oil pan works well! The only reason why I was/am considering an accu-sump instead is for future proofing so that I can also use it on the LS swap when it happens. However, I'm nervous that the stock sump would cause issues even with an accu-sump. Maybe I'm being too cautious?.
That pan is marginal with multiple trap doors, so I doubt the stock pan would work at all on a road coarse. I started off using 7 quarts of 10W40, but was having some low oil pressure issues. After talking to an engineer that use to race C3's back in the day, he said that they ran 8 quarts of 50 wieght oil to help with oil issues in corners so I gave it a try and it worked for now.
Even with that pan I am going to add an accu-sump to it. I already removed the windshield washing fluid tank and intend to mount a 2 quart unit behind the drivers front wheel. Once I get into the project more I'll post some pictures, but that wont be for a while since I'm still working on my new garage at the moment.
I do like the look of that kirkey. Does it use the stock floor pan mounts/bolt-holes? If so, I've thought of maybe keeping the stock seats for the street as they're comfortable enough and swapping out to the kirkey's for when I go to the track. It seems to me the seats are pretty quick to take out with only 4 bolts?
I made an adapter bracket between the Kirkeys standard side mount and the floor. I still use the factory 4 bolts and am working on adding a back brace to the roll bar.
Also, did you make the 4 point yourself or did you buy it? Is it weld in or bolt in?
I made it myself and it is a bolt in since this car does see street duty. I used 16 170ksi bolts to mount it. I fab it myself because I wanted it mounted as close to the back window as possible and I couldn't mount it to the frame side rails next to the seat due to space constraints. I mounted mine after the rear kickup so the whole thing is behind the passenger area.
buy yourself an early version of the Chevy Power Book, you can find them on ebay, make sure it has the Corvette chassis section it will be an invaluable resource.
Got the corner braces in, they made a massive difference in the rigidity of the body dolly. Also put in another set of posts in the center, just to be safe.
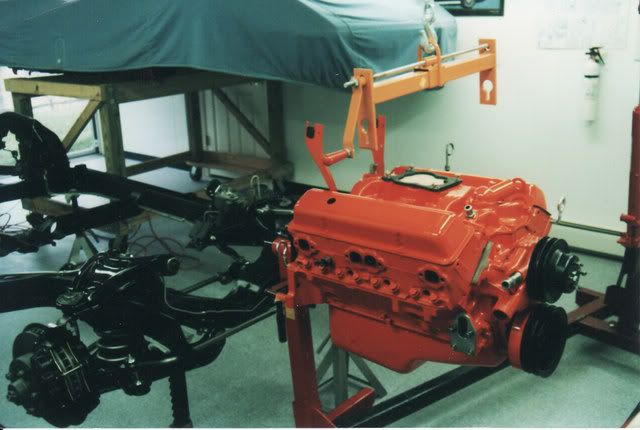
I bought a used SFI bellhousing / scattershield thats for a SBC with muncie 4 speed (hopefully it fits like the seller claims!..). Perhaps its overkill for a nearly stock 350, but better safe than sorry. Physically its in great shape, it just needed a repaint job. Since you can't really see it unless you're under the car I just used rattle can engine paint "Chevy Engine Red-Orange" from the local autoparts store.
When I bought the car the calipers were leaking and not in the best of shape, hindisght being 20/20 I should have rebuilt them, but it was the only thing stopping me from driving the car for the fall, so I bought a set reman'd calipers locally... and of course they were different colors. So while I was getting the paint for the scattershiled I bought the duplicolor caliper paint kit that uses a brush on enamel (I think?) paint.
Here they were before , the front right / left rear were silver and the front left / right rear were gray.
Here they are after the paint. It's not perfect, but I'm ok with it. They only need to last a track day season or two before I upgrade to a big brake kit, so its temporary anyway.
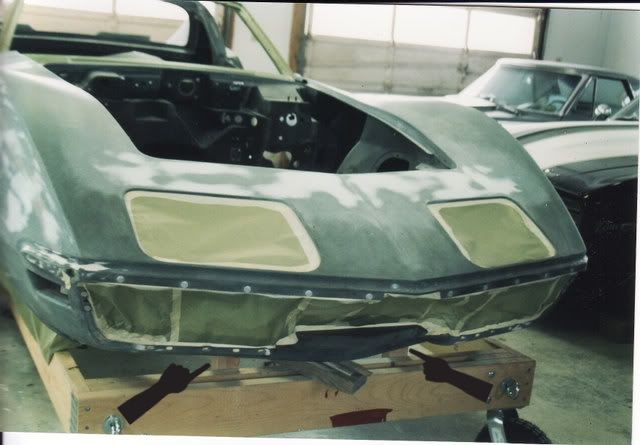
Well, its been about a month, but finally got the body off today!!! I'll post a how-to type video on youtube that has more details, hopefully this coming weekend, but for now here's a photo of it off!
Overall the body-off really wasn't too bad. Lots of little/small things to take care of, but nothing notably difficult. The only struggles I had along the way were a few rusty chrome bumper nuts/bolts (which is strange as thankfully there's really not much rust on the rest of car), the passenger rear body mount ripped/spun through the fiberglass and the driver side rear body mount just spun freely so I had to take an angle grinder to it. I'm sure those will be a bit of a pain to repair.
I had myself and 6 other buddies come over and we lifted the body off the frame and onto the body dolly. I had the the rear two body mount posts about an inch too short, which was probably my own fault, but otherwise Alan71's body dolly design worked perfectly! Much thanks to him.
Here's a few of the frame, quite dirty and a few evicted mouse homes, but thankfully very little rust!
Next up, remove engine/trans, clean and repaint the chassis. Half of my suspension and other parts are here, the rest is hopefully shipping soon, so that will be next. I'll also crack open the trans and dif and give them a good once over and new fluid. Hopefully they won't need to be rebuilt.
Any recommendations for stiffening/bracing/modifying the frame? I can't do anything too crazy/custom, but I have some friends who are reasonably good at welding.
I like your plan, I'm looking at doing a multi-use C3 as well. I have an Accu-sump in my SBC Jet Boat and I wouldn't consider doing a build without one (preluber and pressure protection, I don't see a downside beyond space constraints). I looked a LSx as an option as well, but with a new Dart or Motown Block and some Alum. Heads 500-600ish Crank HP seems readily doable so thats the direction I'm headed (but I'm thinking it'll be a handful on a Road Course). Glwb
Well, its been about a month, but finally got the body off today!!! I'll post a how-to type video on youtube that has more details, hopefully this coming weekend, but for now here's a photo of it off!
Overall the body-off really wasn't too bad. Lots of little/small things to take care of, but nothing notably difficult. The only struggles I had along the way were a few rusty chrome bumper nuts/bolts (which is strange as thankfully there's really not much rust on the rest of car), the passenger rear body mount ripped/spun through the fiberglass and the driver side rear body mount just spun freely so I had to take an angle grinder to it. I'm sure those will be a bit of a pain to repair.
I had myself and 6 other buddies come over and we lifted the body off the frame and onto the body dolly. I had the the rear two body mount posts about an inch too short, which was probably my own fault, but otherwise Alan71's body dolly design worked perfectly! Much thanks to him.
Here's a few of the frame, quite dirty and a few evicted mouse homes, but thankfully very little rust!
Next up, remove engine/trans, clean and repaint the chassis. Half of my suspension and other parts are here, the rest is hopefully shipping soon, so that will be next. I'll also crack open the trans and dif and give them a good once over and new fluid. Hopefully they won't need to be rebuilt.
Any recommendations for stiffening/bracing/modifying the frame? I can't do anything too crazy/custom, but I have some friends who are reasonably good at welding.
I'll be very interested in the Video, I'll be pulling the BB out of my 68 this winter and I'm considering doing the full body off. Do you have a guess at number of hours you put into the body removal prep/operation?
I'll be very interested in the Video, I'll be pulling the BB out of my 68 this winter and I'm considering doing the full body off. Do you have a guess at number of hours you put into the body removal prep/operation?
Great question, I'd say I spent two or three solid saturdays working on it, plus a an hour here and there during the working weeks after work. In total I'd guess ~32 hours of labor. This includes building the chassis dolly, as well as filming which slowed me down. I'd consider myself fairly adept at mechanical work, but I'm not professional wrencher. I had very little rust issues to deal with as well which I'm sure saved some time.
Good advice on the accusump as well, thanks!
Good luck with the BB, your '68 427 is kick ***, I hope you enjoy it!
You may find there are better/different suspension options than the VBP setup...
Yeah I certainly don't disagree. I spent quite a while looking at all the different options. I really had my eye on ride tech but it just wasn't in the budget, especially considering the VBP kit had practically everything I need to replace anyway (rack and pinion power steering conversion, hydraulic power brakes, brake rotors/hardware/lines/etc, and more) and still came in several thousand dollars cheaper than the ride tech which is only suspension. The Detroit Speed kit that's coming looks incredible too, we'll see what the price is though.
Don't get me wrong I'm not at all saying the ride tech and perhaps others aren't better, I'm sure they are, but I'm not looking to beat people on the track, just to have a great time. Besides the money saved gets me closer to an LS+tremec swap too.

 11-04-2016, 11:07 PM


 . Since my car is a dual purpose car full of compromises, I installed a 4-point roll bar along with a DOT approve 4-point SCHROTH harnesses. I'm a fairly large guy at 6'3" so space considerations were a priority that eliminated most aftermarket seats.


 Have fun.


 So while I was getting the paint for the scattershiled I bought the duplicolor caliper paint kit that uses a brush on enamel (I think?) paint.