
1980 Corvette rear yokes replacement
 04-25-2017, 01:07 PM
#1
Heel & Toe

Thread Starter

Hi, just wondering if you have any information or instructions on how to replace the rear yokes on a 1980 Corvette. Thx
 04-25-2017, 01:41 PM
#2


A general description is you have to remove the differential from the vehicle in order to remove the cover and remove the clips holding the yokes in. You have determined yours are worn?
Last edited by MelWff; 04-25-2017 at 01:42 PM.
The following users liked this post:
Tunupa2013 (04-25-2017)
04-25-2017, 02:38 PM
#3
Heel & Toe
Thread Starter
Just bought the car and I was told before that the yokes are done. So yes they need to be replaced, btw would you know what could cause them to be worn out to the degree that they have to be replaced? I'm new here and just getting into the car restoring world. Thx
04-25-2017, 03:07 PM
#4
When you turn a corner, the side thrust is transfered to the yoke tips.
The following users liked this post:
Tunupa2013 (04-25-2017)
04-25-2017, 04:21 PM
#5
Heel & Toe
Thread Starter
How big of a job is it to change the yokes? I'm not expert but I've done a bunch of basic mechanical work, I'm trying to learn more and I'm good at figuring things out if I have some good instructions. You have videos in youtube and that's good, but they can also be deceiving and wouldn't want to learned the hard way that it's a bigger job than what I can handle. Thx.
04-25-2017, 07:32 PM
#6
Safety Car

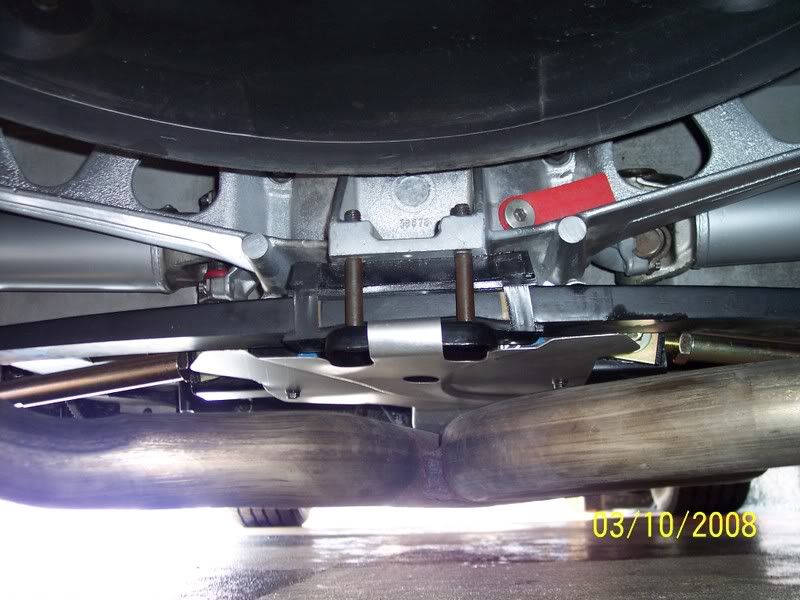
I would remove rear tire carrier, makes it much easier
Disconnect Drive shaft at diff
Disconnect half shafts at diff
Remove alignment rods to pull half shafts away from diff
Remove rear spring
Remove from mount on diff and and the two in the rear
Lower diff with floor jack
Remove rear cover 10 bolts and alignment rod mount
Remove snap ring on each yoke and pull them out
Install new yokes and replace snap ring on each
Install rear cover with new gasket
Remount diff and fill with new fluid and a bottle of GM posi fluid
Hook up half shaft
Reinstall rear spring
Hook up alignment rods
Hook up drive shaft
I would check all u joints for smooth operation, replace if needed. Now it the time to do it.
I have side pipes, no exhaust to deal with, if you have exhaust that will also need to be removed


The following 2 users liked this post by spedaleden:
Grumpy 427 (04-26-2017),
Tunupa2013 (04-26-2017)
04-25-2017, 08:18 PM
#7
Melting Slicks


If you look at the way the rear suspension on these cars works, you will see that the weight of the car is transferred to the rear yokes in the form of pressure inward on the case. When you combine this with the differential rotation of the yokes when you turn a corner, there is tremendous friction on the ends of the yokes. Eventually they wear out.
The following users liked this post:
Tunupa2013 (04-26-2017)
04-26-2017, 06:43 PM
#9
Melting Slicks
After reading this thread, i called the guys swapping the gear set out on mine and asked them to look into this as well. He said they do lots of them and will check for me.
04-27-2017, 11:36 AM
#10
Have you mechanic confirm they are worn out rather than tell him to change them. With no weight on the suspension and puling the wheels on both sides there should be very minimal movement of the yoke in and out of the differential case.
04-27-2017, 12:21 PM
#11
Burning Brakes


You can do this. If you have basic hand tools, good jackstands, floor jack and a garage. YouTube videos by Gary Vosberg at Vtech Corvettes are excellent.
The following users liked this post:
Tunupa2013 (04-27-2017)
 04-28-2017, 08:47 AM
#13
Heel & Toe
Thread Starter
04-28-2017, 11:04 AM
#14
Le Mans Master

From Gary Ramadei who is a diff expert: I asked the question to him on email....
"Next look at the diff axles. I know you don't want to pull the diff and I don't want you to but you have to check since the '72-79 axles were soft faced and worn out up against the posi cross shaft. There was no GM spec for the axle endplay, none that I ever found or heard of from some of the "Old Timers". If you have an indicator or even a dial caliper, push the axle in, -0- the tool and pull the axle out. That will tell you what you have for endplay. I set mine up for 005-007" because I polish and tune every posi I build. Going by the factory posi setup with the springs can also give you a false reading but see if you can measure, somewhat closely, what yours are. If there is excessive play we can go over options. The important thing is to see if there is still a gap between axle and housing lip with the axle pushed in. What happens a lot with original axles in the 72-79's is the axle face wears down, the dust gets mixed in the oil, the endplay opens up, this affects the handling of the car, and the axle will continue to grind into the lip until it hits the seal and wrecks it, possibly wrecking the housing."
"Next look at the diff axles. I know you don't want to pull the diff and I don't want you to but you have to check since the '72-79 axles were soft faced and worn out up against the posi cross shaft. There was no GM spec for the axle endplay, none that I ever found or heard of from some of the "Old Timers". If you have an indicator or even a dial caliper, push the axle in, -0- the tool and pull the axle out. That will tell you what you have for endplay. I set mine up for 005-007" because I polish and tune every posi I build. Going by the factory posi setup with the springs can also give you a false reading but see if you can measure, somewhat closely, what yours are. If there is excessive play we can go over options. The important thing is to see if there is still a gap between axle and housing lip with the axle pushed in. What happens a lot with original axles in the 72-79's is the axle face wears down, the dust gets mixed in the oil, the endplay opens up, this affects the handling of the car, and the axle will continue to grind into the lip until it hits the seal and wrecks it, possibly wrecking the housing."
04-28-2017, 12:57 PM
#15
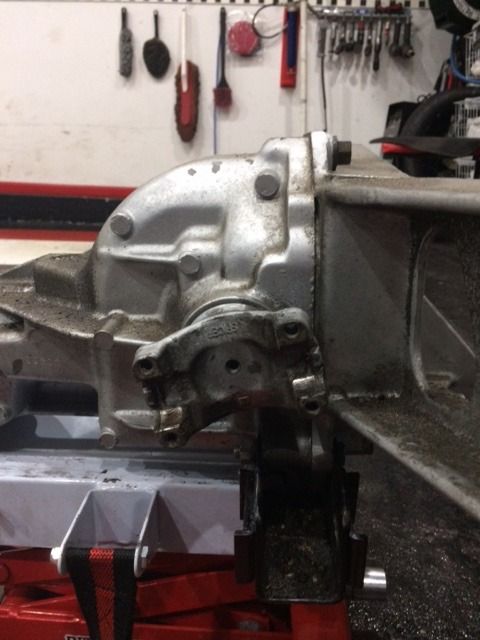
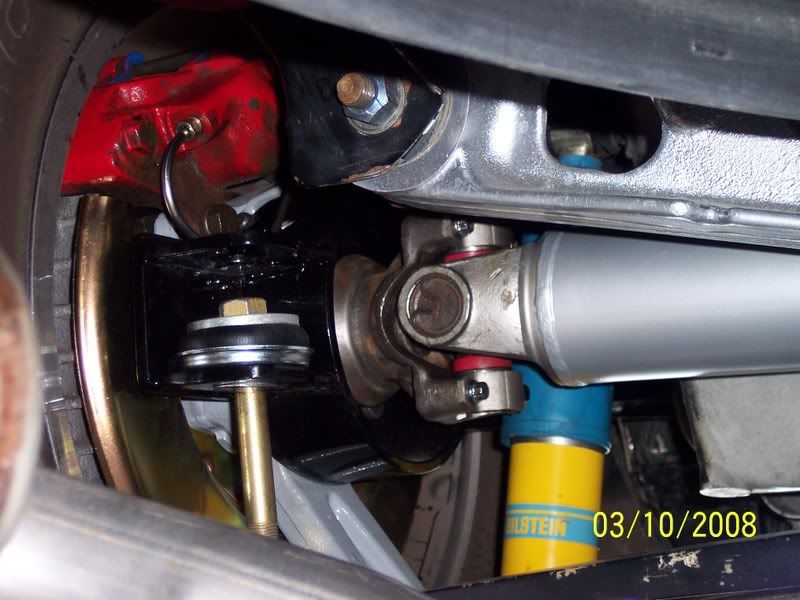
That picture is the axle yoke.
If that is your issue, disconnect the half shaft from the axle yoke.
Remove the retaining nut and pull off the yoke.
Install the new yoke and torque the nut to 75 ft/lbs.
Reattach the halfshaft
Last edited by MelWff; 04-28-2017 at 01:01 PM.
05-01-2017, 02:59 PM
#16
Heel & Toe
Thread Starter
MelWff you are right, I should've mentioned that before. It is the axle yoke on both sides. Pretty difficult part to find, no stores in my area has them (Hamilton, Ontario); we had to get used ones.

The following users liked this post:
Tunupa2013 (05-02-2017)
05-02-2017, 11:29 AM
#18
Heel & Toe
Thread Starter
05-02-2017, 09:21 PM
#19
Melting Slicks

These are generally called a Pinion Flange and not a Yoke. These are not a normal wear part so there probably is not a reason to replace it just because the other one failed. The one in the picture looks as though the U-Joint failed and thats what did the damage. Pinion Flanges are easy to get for 68-79 but the 80-82 might be a bit more difficult. The Corvette Vendors would be where to look.
The following users liked this post:
Tunupa2013 (05-03-2017)