When you click on links to various merchants on this site and make a purchase, this can result in this site earning a commission. Affiliate programs and affiliations include, but are not limited to, the eBay Partner Network.
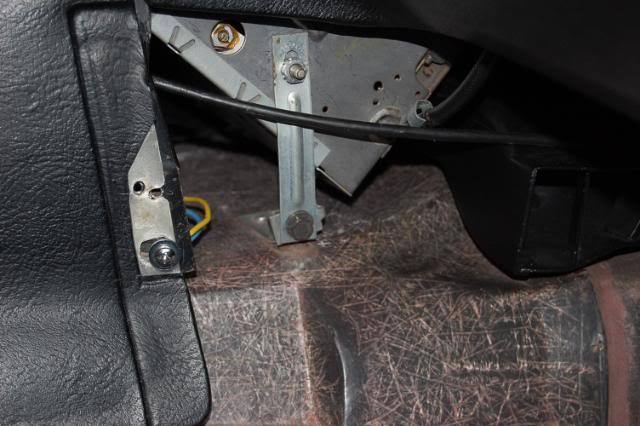
I have the forward console completely butted up to the instrument gauge bezel. The rear console is butted against the rear deck attachment fitting. Is this overlap normal? It would appear the forward console would need to move further forward but I don't see how. My previous consoles where bubba-fied so they are bad examples to judge from. The AIM page J98 seems to indicate the two consoles should abutt at the flanged end of the forward console. It's kind of like trying to stuff 1 ounce of cream in a half ounce puff...it ain't going to fit! What say you?
No. If the ebrake console is all the way back, the shifter console has to go forward. Are you getting the forward console past the studs on the center bezel?
No. If the ebrake console is all the way back, the shifter console has to go forward. Are you getting the forward console past the studs on the center bezel?
Easy Mike,
I, snif, snif, took a dremel to the forward console to enlarge the slots that that engages the studs. I also slotted the metal reinforcement bracket that engages the studs to allow max forward movement of the console. From the photo below, you can see the forward console appears to be fully engaged forward. I don't see what else I have to work with.
Where does the floor shifter (auto or manual?) sit within the console opening? That should also tell you how far forward it would need to still move.
I'm guessing something is holding your center cluster and radio rearward.
Looks like you've got one of those retro-look modern radio units which will have a lot more wires behind it. When I installed mine, it took a lot of extra care and wire organizing to make sure it all fit as far forward as possible. I think the heater duct is the forward limit to the whole cluster module's position.
With the exception of the radio auxiliary adapter occupying the cigarette lighter hole, all the radio wiring is behind the radio. But you gave me an idea...I'll unload the center gauge bezel by dropping the radio and perhaps that will give me the clearance I need to mover the console forward.
Hi Tom,
In order to end up with things fitting I suggest that:
the parking brake console go in first... we know that it needs to be tight back against the seat bulkhead.
Then the shifter console.... ensuring that the fit between the FRONT of the parking brake console and the REAR of the shifter console is satisfactory.
Then the center gauge cluster bezel can be positioned.
IF the shifter console isn't in place first the bezel tends to slip down and rearward when it's installed
Having the shifter console where it needs to be helps with positioning the gauge bezel between the lower dash pads and in starting the screws through the sides of the bezel into the dash pads.
I do this WITHOUT the radio in place because the weight of the radio pulls the gauge cluster bezel down and to the rear.
Be extra careful pushing on the gauge bezel... it's extremely easy to break.
I put the right side lower dash pad in place last... after the rest of the dash parts are in place and the gauges and lights have all been tested.
Regards,
Alan
Perhaps these will help you with locating the shifter console.
Thanks Alan...I'll re-energize myself with lunch...then get to work as you suggest.
Tom,
I just happen to have my factory console out right now so I thought I'd post a measurement just so you can clarify.
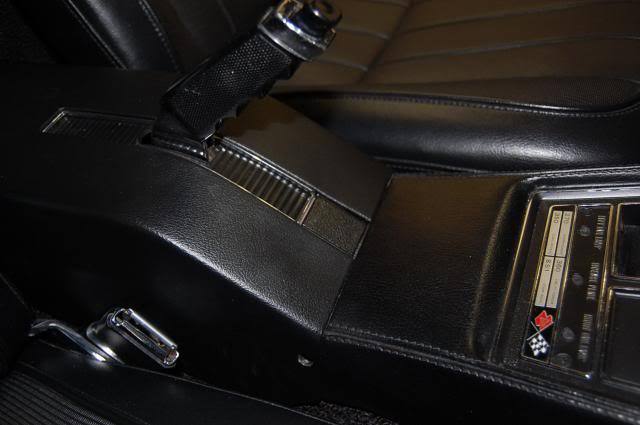
I measured from the first indentation where the small forward cover fits to the rear indentation where the E brake console fits. I thought this would be more accurate than an overall length which could vary. As you can see, measurement is just under 19 inches. Hope this helps.
Greg
I can't really offer any help, however if the early models are like the later ones, apparently the whole console provides the support for the center dash. I had my gauges, radio, shifter console, and parking brake cover out all one winter. When I went to put it back together, nothing seemed to fit. All I replaced was the shifter console. I did some research and learned the 80-82 dash has a tendency to sag if it's left unsupported for very long. Doing as Alan71 suggested, starting at the back and working forward, I finally got it all back in and lined up. IIRC I took a couple of 2x4s and wedged up under the center dash and left it for a week till the next weekend to take some of the sag out when I finally got it to fit. Still was a dickens. YMMV. Good luck.
Oh man, putting all of that back together is a huge pain. I have a 69 also. And I�m actually planning to take it all apart again to fix up the dash and console areas. I think what Alan said is probably the best process. Certainly measure your console against the old one. Is that the same radio you had in there previously? Is your gauge cluster going back in all the way? If not figure out why first. That was my big problem. But it�s a huge pain for sure.
Do you have the correct console? I believe the 68-69 consoles are 1/2" shorter than the 70-72 consoles. I could be wrong but I know they have different part numbers in the catalogs.
Hi,
"Do you have the correct console? I believe the 68-69 consoles are 1/2" shorter than the 70-72 consoles."
This is an interesting question!
I thought the difference between the 68-69 and 70+ shifter console was in the added stitching detail that 70+ consoles have, not in it's size.
IS there a difference in length?
If there is, WHAT ELSE changed to allow for that?
you have to really push the console forward big time, do not bolt the radio strap
on yet, if you have ac its even tighter in there, 68,69 consoles are the same size
as 70-72
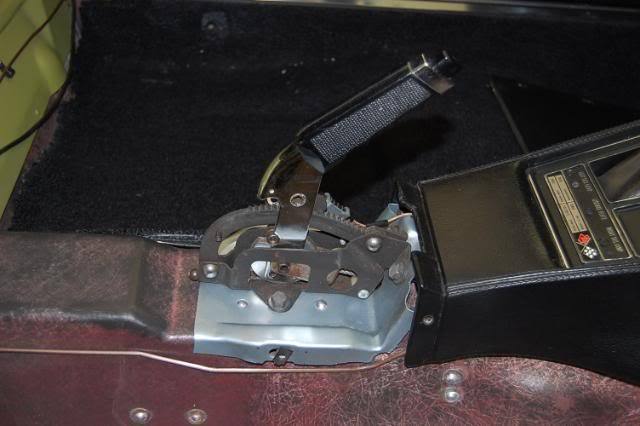
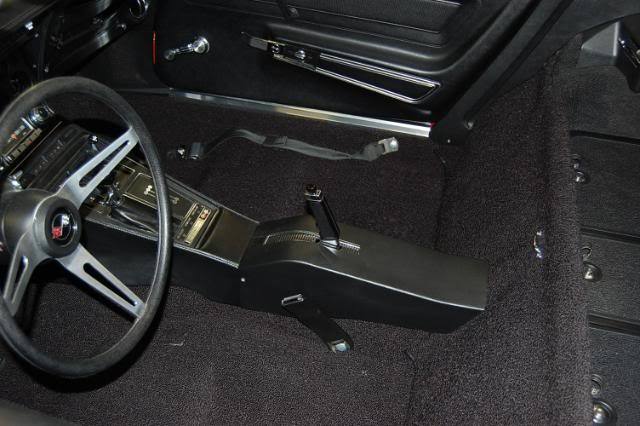
This is on my 68. It looks like your gauge bezel has to go in a lot further. The points on the bottom outer edges of the bezel should line up with the points on the lower dash pads. Do the holes on the sides of the front of the shifter console line up with the tabs on the transmission tunnel?
In your photos it appears to me the gauge bezel is not situated correctly. Looks like the radio is sitting low and the gauge bezel needs to be higher in the dash and further in toward the engine compartment. It seems that would effect the location of the locating studs for the center console thus allowing the center console to fit further toward the engine compartment. Not sure that's correct maybe other members can comment.
Tom,
I just happen to have my factory console out right now so I thought I'd post a measurement just so you can clarify.
I measured from the first indentation where the small forward cover fits to the rear indentation where the E brake console fits. I thought this would be more accurate than an overall length which could vary. As you can see, measurement is just under 19 inches. Hope this helps.
Greg
Measurement checks
Originally Posted by cabman72
Do you have the correct console? I believe the 68-69 consoles are 1/2" shorter than the 70-72 consoles. I could be wrong but I know they have different part numbers in the catalogs.
You may be correct. My Al Knoch invoice says "68-69 Red Forward Console"
Originally Posted by LT-1 kid
you have to really push the console forward big time, do not bolt the radio strap
on yet, if you have ac its even tighter in there, 68,69 consoles are the same size
as 70-72
Hate to admit this to such an esteemed group, but I had to bubba my radio strap...I fabricated a kick stand that supports the rear of the radio on the transmission tunnel. The back of the radio had a convenient fitting to attach a support bracket.
I also have ac.
Originally Posted by sullyman56
...Do the holes on the sides of the front of the shifter console line up with the tabs on the transmission tunnel?
Not quite...it is a little short of the tabs. The reinforcement bracket attached to the underside of the leading edge of the forward console (side rivet not installed yet) does not hang flush with the leading edge of the console...it extends forward. I question pushing the bracket to the flush position to accept a rivet because it places too much tension on the top attachment points.Good luck on interpreting what I just said!
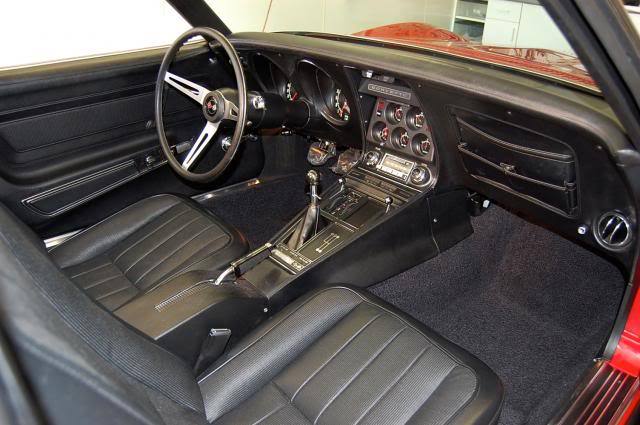
So yesterday I started the installation process per Alan's recommendations. Had to run out to Home Depot to get some fresh u-nuts. The mounting screws for the rear console were barely bitting into the nuts. May need longer screws...which implies something else may be wrong or perhaps cut away more carpet. The center gauge cluster is out.
Here is the preliminary fitting before I started playing with the console mounting hardware.
Once again, thank you everyone for your wonderful support.
Hi Tom,
It looks like you're making considerable progress!
A couple of things:
I get all the pieces (except the right-side lower pad) in place with all the screws started, but not tightened.
I then begin to tighten the screws gradually and in sequence making sure that the screws are NOT pulling any of the parts out of position.
When the screws are tight I then get the right lower pad in place... it seems to be the easiest and causes the least problems.
DON'T, DON'T, DON'T push on the top of the gauge bezel.... breaking it will spoil your day!
I may be crazy but it looks to me your 2 lower dash pads are of different years. The gauge pad has a stubby tip, (post 70), and the map pocket side has a long tip. (pre 71)

 02-20-2018, 11:36 AM