When you click on links to various merchants on this site and make a purchase, this can result in this site earning a commission. Affiliate programs and affiliations include, but are not limited to, the eBay Partner Network.
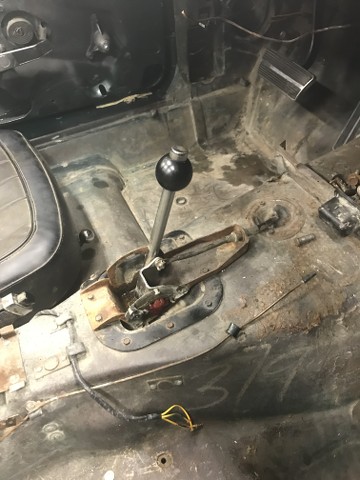
1. I have just found some numbers on my firewall below the heater core under the heat shield "378" . Do these mean anything in particular?
2. Is the firewall fiberglass. It almost seems like plastic. But i assume it is just regular fiberglass like the body. Someone cut out my firewall (I presume to get in a new heater core) I have to rebuild it back to the original shape . Can anyone tell me the width of the rectangular hole for the heater core and how far down on the right the two cut outs are for the two heater lines.
(See problem area on the right of the heater core cut out)
3. Does anyone know what the rubber line is for that is above and to the right of the heater core cutout. Someone has plugged it with silicone. I can't find it in the AIM. I presume it is some type of vent line.
4. I removed the heat shield stuff from the firewall as in the pic from just below the heater core. Does anyone reproduce this stuff with foil on both sides. I am not into the NCRS level of restoration but would like to be in the ball park of factory correct when possible.
Thanks for any help, Pete
Last edited by VancouverL71; 02-24-2018 at 10:42 AM.
1. chalk marks are made by assembly line workers, others will chime in, forgot ha, part of the vin # or options?
2. heater core cutout damage: I would use the cover as a pattern and just fiberglass back the missing/damaged portions. I used glass cloth/resin sandwiched between blue painters tape to build it back up on my 68 with similar damage. It took a few iterations of sanding/fiberglassing to get the thickness I wanted. Then use a Dremel tool to cut the edge of the opening back where original.
3. do not know offhand.
4. I have pulled that "nasty foil, yellow insulation" off a couple of 68's. Better to go back with the vendor tunnel insulation (see link:
between the bell housing and tunnel plus I like to use reflectix (looks like bubble wrap with foil layers, ck Lowe's) under the carpet. Do a search on tips to reduce cockpit heat too.
Hi Pete, I can get you the measurement of the heater core opening when I get to the shop if no one responds. Most of the vendors supply double backed foil insulation.
RVZIO
First 2 picture are of the original type insulation used, hope this helps. All the above is 69 stuff.
For replacing missing fiberglass. You get a piece of duct work for HVAC. Wax it with something like Johnson's paste wax. Duct tape or rivet to the original glass that you need to add to. Fiberglass up against it it'll stay put. Then you can peel the sheet metal off when it cures and your new glass is in the shape that the ductwork was holding it in. It won't sag like tape.
Hi Pete,
(1)
At the St.Louis plant each car was assigned a 'job number' from 1-500 to help identify on the production line.
This number was written in 'crayon' on several places on the car and in pencil on the Build Sheet... almost always seen on the passengers side 'toe' area of the under body as in your photo and in the interior on the right side of the transmission tunnel.
(3)
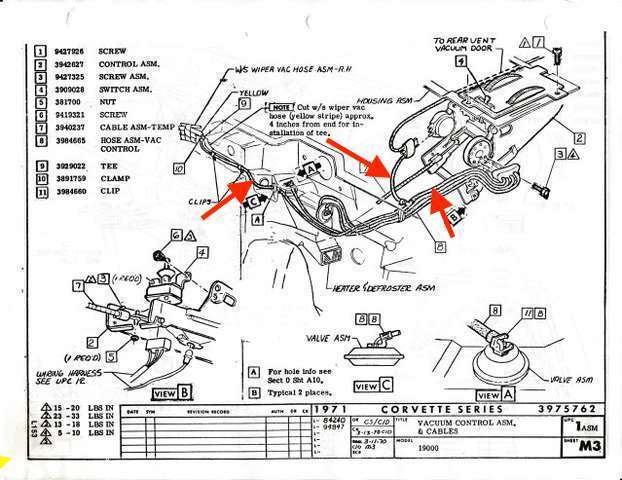
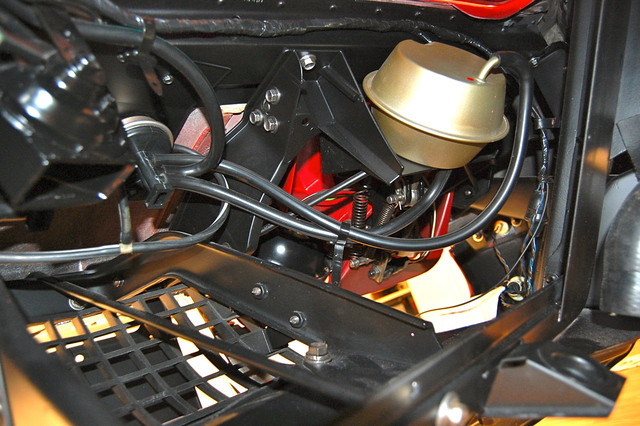
The small diameter hose is the the vacuum supply for the heater/defroster controller and the several parts of the heater defroster system that operate with vacuum 'pods'.
In the engine compartment the end of the hose is hooked to the large hose (yellow striped ?) that supplies vacuum to the wiper door vacuum system using a small 'T".
Were this connection is made varies somewhat and depenson where the wiper door vacuum relay is mounted... it moved a bit from year to year.
Regards,
Alan
A typical 'job number' on the tunnel. (Al T)
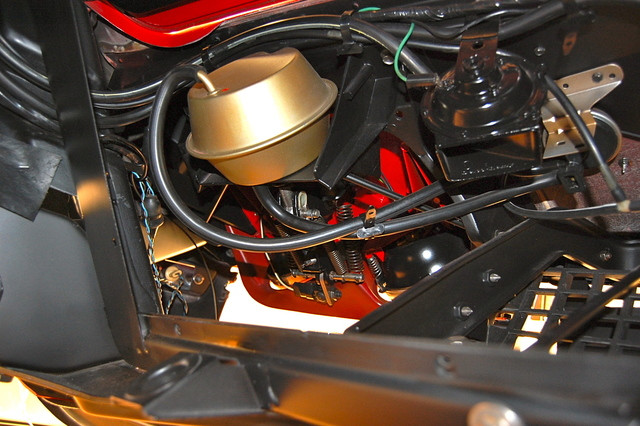
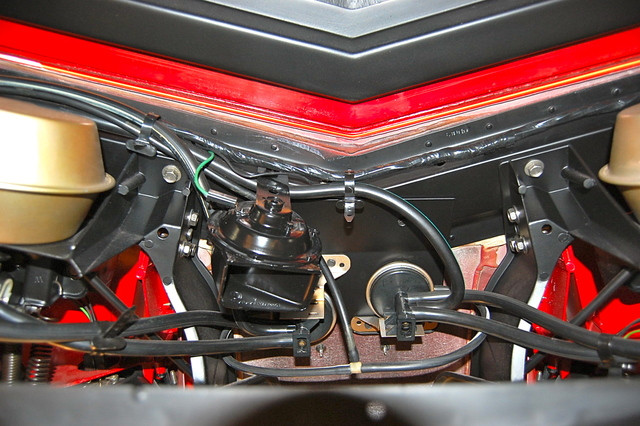
Here's the type of 'T' that was used and the connection in the large vacuum hose near the right side hood latch.... on a 71.
Mercury,
Thanks for the info, very much appreciated on this and the Muncie M21 post.
Roger,
Your pictures are perfect. Don't worry about measuring, I can pretty much tell the size based on your picture and how it lines up with the screws above. I also appreciate your pictures of the heat shields. I had not realized that there was both a metal heat shield under the car and a plastic one on the firewall. It is all crystal clear to me now. I have parts of each but can now make sense of it.
Alan,
I was wondering about that number. I will have a look on my passenger foot well to see if it matches. My tank sticker is only partially legible as you may remember. It was you that found that I once had the red stripe tires.
Your time and effort on this forum is very much appreciated.
Alan, you are saying the vacuum line drives my heater/defroster selection valve. That looks like its own private nightmare which I have not yet dealt with. All my vacuum lines were removed from the car before I bought it so I hope to deal with that this summer.
Hi Pete,
Yes.
Although the source of the vacuum is in the wiper door vacuum supply, the small hose supplies the vacuum for the heater/defroster operation in the interior.
On a/c cars it's the source of vacuum for that system too.
Regards,
Alan
This is the 71 routing diagram for the heater /defroster.
I 'believe' yours will be similar.
Hi Pete & Doug,
I've found that it helps to understand the vacuum hoses and their routing if you can separate them both physically, and in your head, to:
wiper door hoses,
headlight door hoses,
and, under the dash hoses.
It also helps to understand that:
Large diameter hoses are what OPERATE the actuators.
Yellow striped hose SUPPLY the vacuum to the relays.
Green, (as in Go), striped hoses OPEN the doors
Red, (as in Stop), striped hoses CLOSE the doors.
And
Small diameter hoses are what CONTROL the switches and vacuum relays.
White striped
Blue striped
and
Plain black
Both large and small hoses run TO the relays, and only large green and large red striped hoses run FROM the relays TO the actuators.
Under the dash are small hoses for the :
Headlight switch
Headlight door override
Wiper door override
Wiper door solenoid switch.
Regards,
Alan
Here is are some photos showing the vacuum lines at the headlight relays and actuators. (This system has a relay (2) for each actuator), some systems have one relay that controls both actuators).
Once you understand what does what, and what is required, the routing becomes easier.
Large diameter hoses are what OPERATE the actuators.
Yellow striped hose SUPPLY the vacuum to the relays.
Green striped hoses OPEN the doors
Red striped hoses CLOSE the doors.
And
Small diameter hoses are what CONTROL the switches and vacuum relays.
White striped
Blue striped
and
Plain black
Alan,
Thats a great summary. I will bookmark this for future use. I wish I was dealing with this now but it is still a little way off in the future for me! I have all the new hoses in a box, just need more time!
You needing to close in the area of your firewall. As you can see ...you are not missing much. So...using tape can be successfully done if you attempt to use other methods and fine that you are fighting it.
If you do choose to use only tape...make sure you mask it out farther than you really need so the tape has body to it in the area you are applying it to. Just saying.
In the link to the thread below. Look at POSTS #1 thru #11
Thanks Dub,
Your link to the heater cutout repair is perfect. Rather than asking you a bunch of dumb questions you have already covered, I will do a bit of reading in the paint and bodywork section first and then post a couple of pictures as I proceed with that repair.
Pete
Rather than asking you a bunch of dumb questions you have already covered, I will do a bit of reading in the paint and bodywork section first and then post a couple of pictures as I proceed with that repair.
Pete
Pete,
I would much rather you ask a question instead of make a decision that you might feel is correct but may not if you are still not quite sure. It is up to you and it is not a bother at all if you post your question, PM me if you want or call my shop.
I know this repair is not rocket science....but when people do this type of repair work...making sure the area is correctly prepped and the material being used are being used correctly will make the repair be on its way to being successful.
Actually carefully using the VPA and fiberglass may method would work in this areas due to it is not a really serious area of the car. With this area not moving/flexing and being sandwiched between to parts...it is more of a visual thing.
Preform a small test and see how well the VPA and fiberglas mat works if you follow what I showed in the thread.

 02-24-2018, 01:07 AM