
Gettin' stuff together for a Harmonic Damper fix...
 05-21-2018, 08:24 AM
#1
Advanced

Thread Starter

New-to-me 2002 Z06 threw the belts and started dumping oil on our first drive after getting her home. Reached down and the harmonic damper bolt is loose. Read a number of threads and watched a few vids since it happened last week, and starting to aquire what I need to do the job. Started this thread so I can get my thoughts in one place and potentially document the repairs.
- Low profile HF jack - hadn't bought one yet so now's the time
- Build some wood lifting blocks to help get her off the ground.
- Pucs - Already have them and I'll need to put jackstands under 'em for this job even though GM lifting specs says not to do so. Can't use the cradle for the lift on this project.
- Harmonic Damper install tool from Summit - already have one for an LS engine
- ARP Harmonic Damper bolt - Already bought this one even though the torque-to-fit GM bolt would have probably been fine
- SacCityVette timing cover alignment tool - Already bought and it's on the truck to my house
- 3-4' pipe for my breaker bar - need to pick one up.
- New crank seal for the timing cover
- New belts
Once I get things tore down:
Evaluate which Harmonic Damper is on there and whether it's damaged. If stock or damaged replace with Powerbond unit.
Pull timing cover to see if I can get the cam numbers off the front of the cam - just so I know what was installed
Check out timing cover for damage - replace if necessary
Check out end of crank for damage - repair/smooth if necessary
Well, we'll see how things go from here...

The following 2 users liked this post by hobobiker:
ArmchairArchitect (06-21-2018),
CorvetteBrent (06-12-2018)
05-21-2018, 12:00 PM
#2
Burning Brakes

While you've got everything off, it's a great time to check any idler pulleys for resistance/noise. Mine were all fine, but add it to your list of things to do and replace as necessary (especially the AC ones).
Depending on how much of a project you want, it's also a great time to swap the power steering pulley from the fragile plastic one to an LS2 metal one if it hasn't already been done. The plastic ones are known to fail (and crack apart). It's way easier to get to this with the fans/radiator/rack out.
I also found crow's feet to be immensely helpful with removing the lines to the steering rack. I bought a set of metrics ones cheap from Amazon and they've come in handy a number of times working on the car. Not a requirement, but can be handy.
The following users liked this post:
CorvetteBrent (06-12-2018)
05-21-2018, 12:11 PM
#3
Race Director


Member Since: Dec 2010
Location: Atlanta, GA
Posts: 10,426
Received 1,260 Likes
on
1,055 Posts
2020 Corvette of the Year Finalist (performance mods)
C5 of Year Winner (performance mods) 2019

cam numbers are on the back of the cam so you won't be able to tell with the front cover off
The following users liked this post:
CorvetteBrent (06-12-2018)
05-21-2018, 12:59 PM
#4
Advanced
Thread Starter
I guess now the question is...do I trust that the last person aligned the cover correctly or do I pull it anyway and align it with the tool before I put in the new seal. I'll probably go that direction for peace of mind.
Thanks for the info on the cam numbers. I don't want to know what it is bad enough to pull the intake, lifters, etc...
05-21-2018, 01:06 PM
#5
Race Director
Member Since: Dec 2010
Location: Atlanta, GA
Posts: 10,426
Received 1,260 Likes
on
1,055 Posts
2020 Corvette of the Year Finalist (performance mods)
C5 of Year Winner (performance mods) 2019
I would probably pull it anyway and take a peek... since the car has been cammed you might verify that they upgraded the chain and see if you can tell what kind of oil pump is in there as well... if for some reason there is a stock chain I would highly consider something like the katech c5r, the chain is under a lot of stress especially on a car that is cammed with stiff valvetrain and if it ever lets go then your motor is done
The following 2 users liked this post by neutron82:
ArmchairArchitect (06-21-2018),
CorvetteBrent (06-12-2018)
05-21-2018, 01:10 PM
#6
Advanced
Thread Starter
I would probably pull it anyway and take a peek... since the car has been cammed you might verify that they upgraded the chain and see if you can tell what kind of oil pump is in there as well... if for some reason there is a stock chain I would highly consider something like the katech c5r, the chain is under a lot of stress especially on a car that is cammed with stiff valvetrain and if it ever lets go then your motor is done
Thanks again.
05-22-2018, 07:58 AM
#7
Advanced
Thread Starter
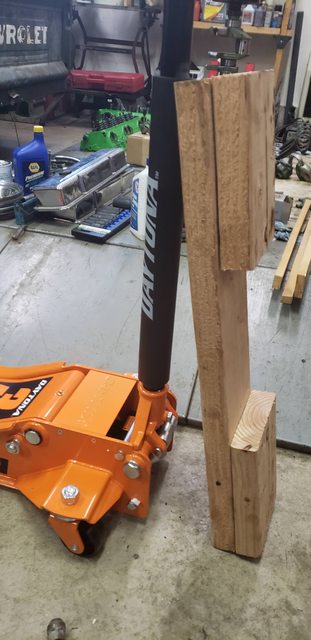
Well, picked up a low-profile jack today at lunch and one of the first things my son and I did was build a 26" jacking board with 8" pieces on each side. Drove her up on some stacked 2x6 boards that we put together and the jack/boards worked like a charm.
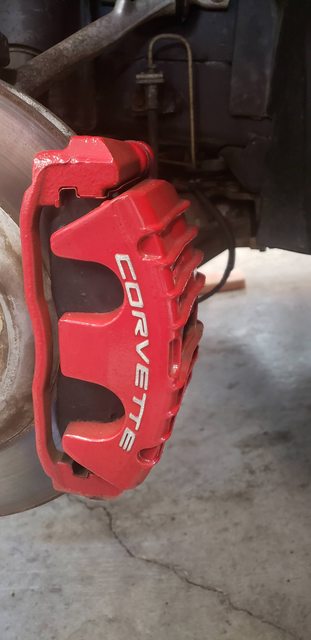
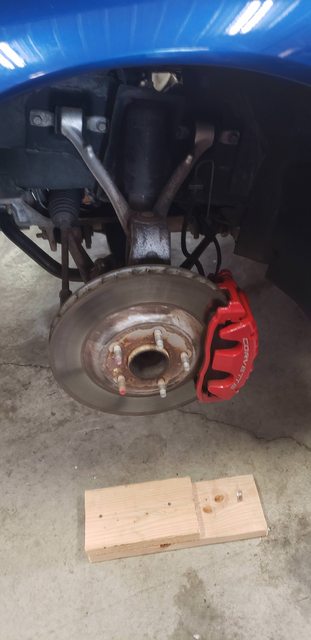
Looks like someone has given the brake calipers some love since the car is just under 100k miles...
Looks like someone has given the brake calipers some love since the car is just under 100k miles...
05-24-2018, 08:00 AM
#8
Advanced
Thread Starter
Got some work done last night. Power steering cooler bolts, rack bolts, tie rod ends all removed. Steering column clamp removed. Two power steering lines removed from rack. Engine cradle lowered. Pushed some of the brake lines outta the way, but the rack seems to be hanging on a forward brake line. By then it was 11:30pm and I was getting tired and didn't want to break anything. Tonight I hope to get the rack out and pull the harmonic damper, check out the timing cover, etc.
Pics to follow.
Pics to follow.
The following users liked this post:
CorvetteBrent (06-12-2018)
 05-24-2018, 10:50 AM
#10
Advanced
Thread Starter
My thoughts today while at work:
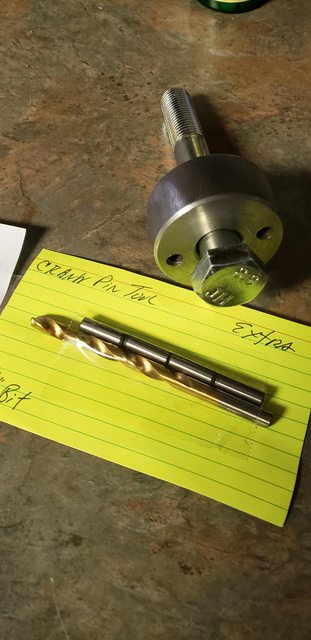
1.) Buy a crank pinning kit and get that done while I'm in there. Not sure what HP/TQ I'm making, but it's definitely more than a stock Z06. Okay, just bought the LS crank pin kit off of fleabay so I'll see how it works. Looked pretty similar to the ATI kit.
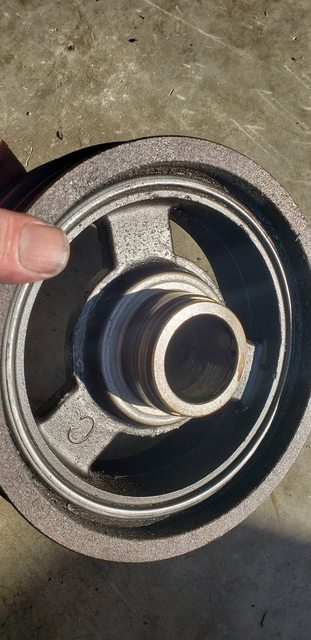
2.) I was going to wait and see if it was a stock HD vs. aftermarket before I purchased a new one. Now I'm thinking that if the bolt came loose and it walked on the crank the inner diameter might be fubar'd a little anyway. Might just go ahead an buy a new Powerbond HD and have some peace of mind. Already bought the ARP bolt and now the pinning kit.
3.) Now I still need to check the oil pump and chain/gears to see if they need replaced.
I should really stop "thinking" about my car projects while at work.
1.) Buy a crank pinning kit and get that done while I'm in there. Not sure what HP/TQ I'm making, but it's definitely more than a stock Z06. Okay, just bought the LS crank pin kit off of fleabay so I'll see how it works. Looked pretty similar to the ATI kit.
2.) I was going to wait and see if it was a stock HD vs. aftermarket before I purchased a new one. Now I'm thinking that if the bolt came loose and it walked on the crank the inner diameter might be fubar'd a little anyway. Might just go ahead an buy a new Powerbond HD and have some peace of mind. Already bought the ARP bolt and now the pinning kit.
3.) Now I still need to check the oil pump and chain/gears to see if they need replaced.
I should really stop "thinking" about my car projects while at work.
The following users liked this post:
ArmchairArchitect (06-21-2018)
05-24-2018, 12:13 PM
#11
Race Director


Member Since: May 2003
Location: Iowa
Posts: 13,995
Received 2,705 Likes
on
1,667 Posts
St. Jude Donor '03-'04-'05-'06-'07-'08-'09-'10-'11-'12-'13-'14-'15-'16'-'17-�18-'19-'20-'21-'22-
'23-'24


interesting so 
 05-24-2018, 02:23 PM
#12
Advanced
Thread Starter
A few pics from last night:
ABS Unit pushed up. I held it in place by putting a bolt through the lower hole on the bracket but into the upper hold in the frame.
Power steering lines weren't TOO bad to get off, but be prepared to be patient. Small turns, flipping the wrench, yada yada yada. The reinstall will likely be harder just because I need to get them lined back up without stripping them.
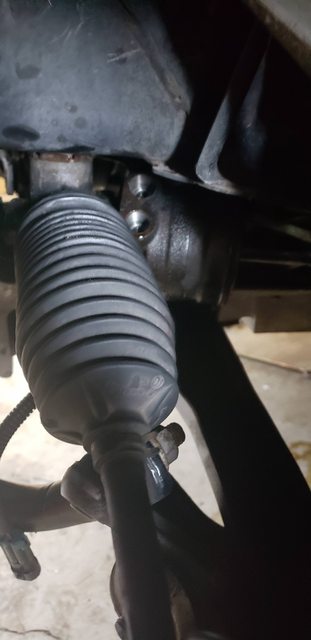
Tie rod ends removed. Both of these little buggers decided to spin on me while removing them. Had to add a little pressure to the knuckle in various ways to keep the bolt in place while I removed the nut. Going back on a jack underneath should provide enough pressure to torque the nuts without the bolt spinning. We'll see.


ABS Unit pushed up. I held it in place by putting a bolt through the lower hole on the bracket but into the upper hold in the frame.
Power steering lines weren't TOO bad to get off, but be prepared to be patient. Small turns, flipping the wrench, yada yada yada. The reinstall will likely be harder just because I need to get them lined back up without stripping them.
Tie rod ends removed. Both of these little buggers decided to spin on me while removing them. Had to add a little pressure to the knuckle in various ways to keep the bolt in place while I removed the nut. Going back on a jack underneath should provide enough pressure to torque the nuts without the bolt spinning. We'll see.
The following users liked this post:
CorvetteBrent (06-12-2018)
05-24-2018, 07:46 PM
#13
Race Director
Member Since: Dec 2010
Location: Atlanta, GA
Posts: 10,426
Received 1,260 Likes
on
1,055 Posts
2020 Corvette of the Year Finalist (performance mods)
C5 of Year Winner (performance mods) 2019
the oem balljoints and tie rod ends have a hex in the end of them and you can use an allen wrench or hex socket to keep the joint from spinning and an open ended wrench (ratcheting is even better) to remove the nut
The following users liked this post:
CorvetteBrent (06-12-2018)
05-25-2018, 07:59 AM
#14
Advanced
Thread Starter
Thanks! I noticed that on one of them AFTER I had them both off and cleaned them up a little. First C5 for me...live and learn. At least I'll know how to tighten them up without a jack now! LOL
05-25-2018, 08:05 AM
#15
Advanced
Thread Starter
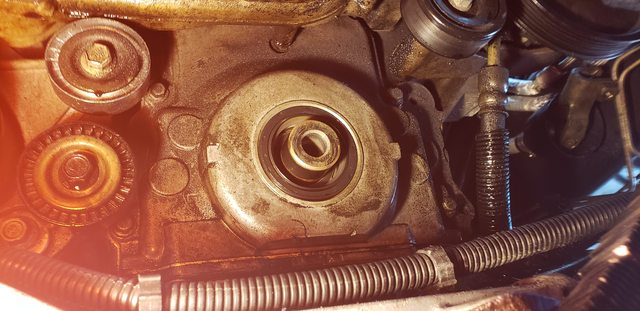
Rack is out. What a PITA. At least after having done it once now the next time should be easier and faster...
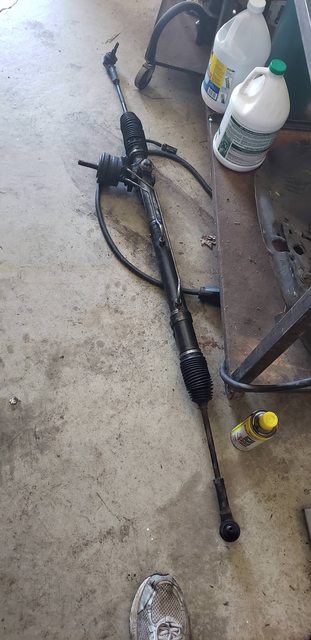
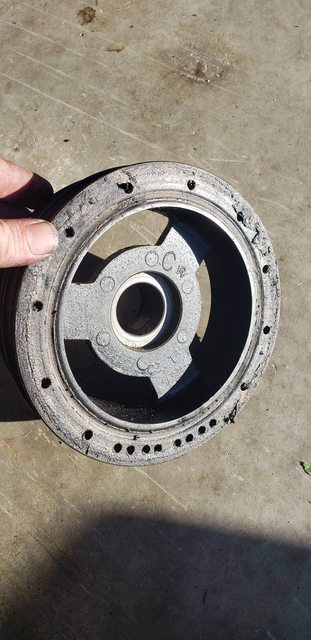
Looks like whoever put the cam in used the original harmonic damper again...I would bet the HD bolt was the original and reused as well, which is probably why it came loose.
Time for a lot of cleanup and a seal replacement. Still debating on yanking the timing cover and taking a peek at what's inside...
The following users liked this post:
CorvetteBrent (06-12-2018)
05-25-2018, 11:14 AM
#16
Advanced
Thread Starter
Since she's approaching 100k miles, definitely makes sense to replace the water pump while I'm knee-deep in this project. Adding those parts to my list, and thinking about the 160-degree thermostat swap I've been reading about. Not sure on that one yet, since she didn't run hot on my 2.5 hour drive home but I've only driven her once since that time.
The following users liked this post:
CorvetteBrent (06-12-2018)
05-25-2018, 01:07 PM
#17
Team Owner

I would not pull the timing cover, if you are not trying to fix any gasket leaks or otherwise have a reason to pull it. IMO it increases the chance you'll have to reseal something. Timing chains are pretty solid in OEM operation or even cammed. If it has solid oil pressure I see no reason to verify what pump you have.
I did see you bought the SAC City tool if you do pull it.
I did see you bought the SAC City tool if you do pull it.
Last edited by 93Polo; 05-25-2018 at 01:10 PM.
The following users liked this post:
CorvetteBrent (06-12-2018)
05-25-2018, 01:16 PM
#18
Advanced
Thread Starter
I would not pull the timing cover, if you are not trying to fix any gasket leaks or otherwise have a reason to pull it. IMO it increases the chance you'll have to reseal something. Timing chains are pretty solid in OEM operation or even cammed. If it has solid oil pressure I see no reason to verify what pump you have.
I did see you bought the SAC City tool if you do pull it.
I did see you bought the SAC City tool if you do pull it.
Thanks for the input...
05-29-2018, 08:04 AM
#19
Advanced
Thread Starter
Well, curiosity got the best of me. I pulled the cover to check the chain and oil pump since I was this far into the project and waiting on parts anyway.
Chain looks to be the stock unit or a stock replacement. I get over a half inch deflection, so I ordered a Katech C5R chain just in case.
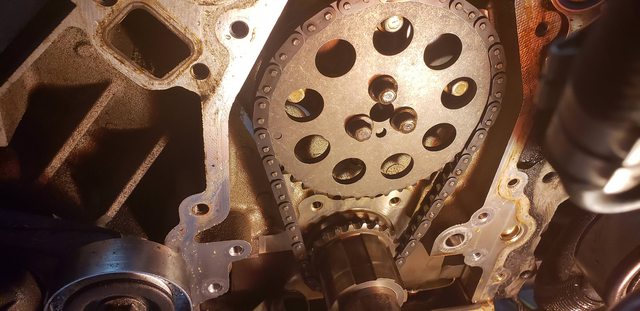
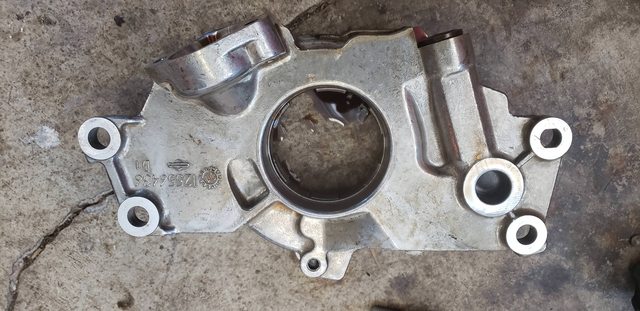
Oil pump is a stock unit as well. At almost 100k on the clock, I decided to replace with a Melling standard replacement pump.
These two items, along with my crankshaft pinning tool, should arrive tomorrow. Then I'll start trying to put Humpty Dumpty back together again...
Chain looks to be the stock unit or a stock replacement. I get over a half inch deflection, so I ordered a Katech C5R chain just in case.
Oil pump is a stock unit as well. At almost 100k on the clock, I decided to replace with a Melling standard replacement pump.
These two items, along with my crankshaft pinning tool, should arrive tomorrow. Then I'll start trying to put Humpty Dumpty back together again...
The following users liked this post:
CorvetteBrent (06-12-2018)
05-30-2018, 08:33 AM
#20
Advanced
Thread Starter
Crankshaft pinning tool arrived, but still waiting on the new timing chain and oil pump - hopefully today.
I also decided to put a timing spring tensioner/damper in since my block looks to be drilled for it. Ordered one from Bryan Tooley Racing. Looks like it's scheduled to arrive tomorrow, so the work should start soon.
I'll try to keep the pics coming of the rebuild. This LS/C5 stuff is all new to me, so learning as I go...
Last edited by hobobiker; 06-01-2018 at 07:57 AM.
The following users liked this post:
CorvetteBrent (06-12-2018)

