When you click on links to various merchants on this site and make a purchase, this can result in this site earning a commission. Affiliate programs and affiliations include, but are not limited to, the eBay Partner Network.
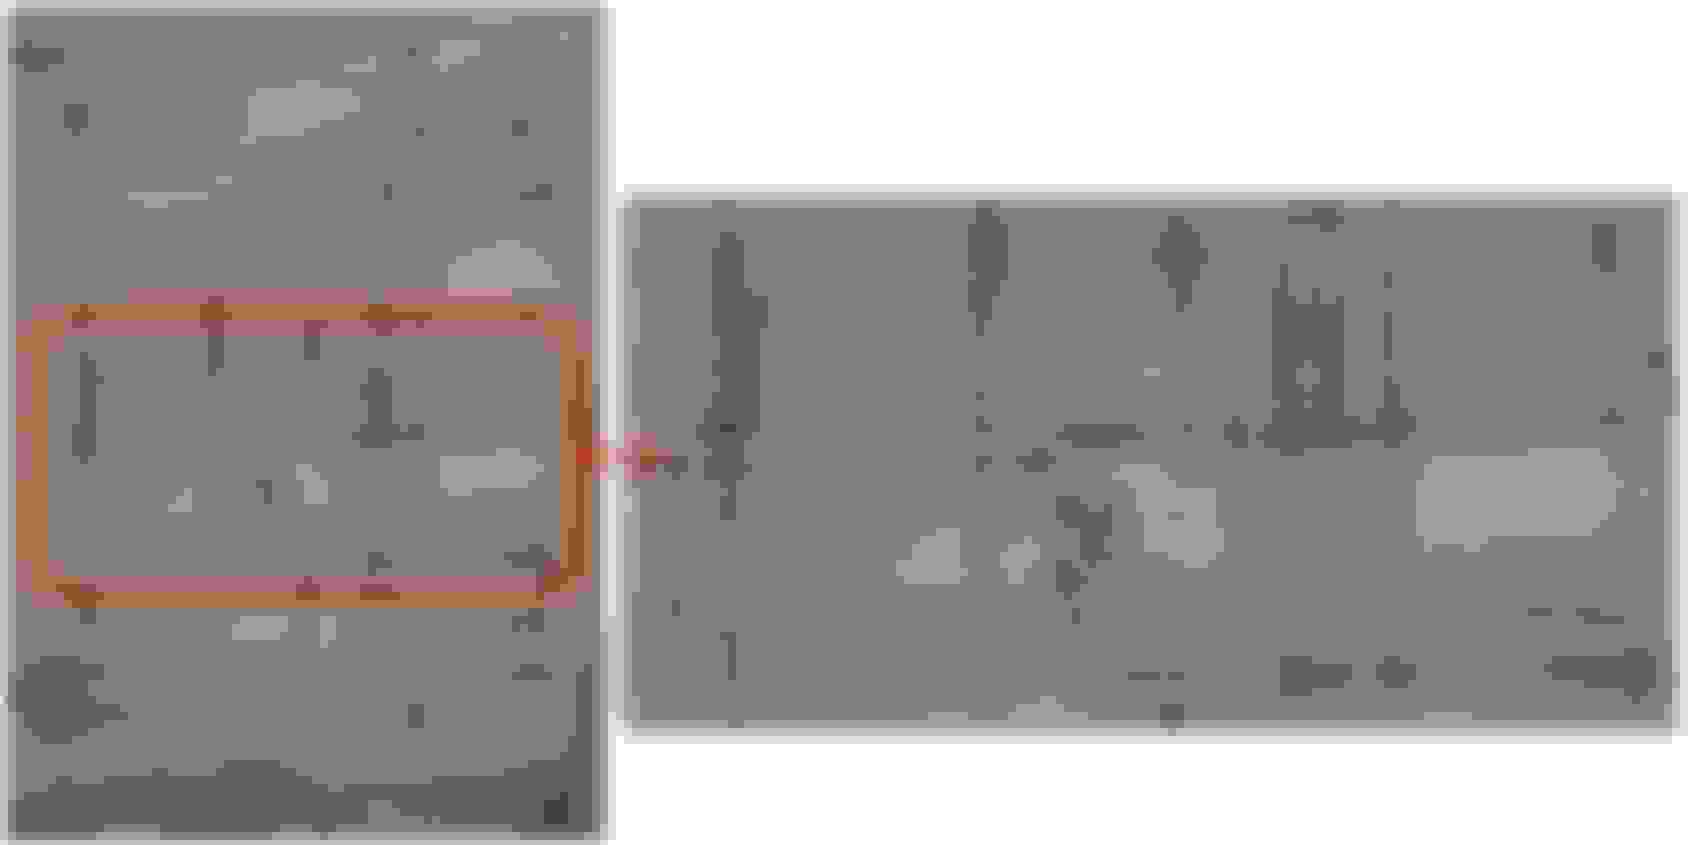
Here is how to stitch the AIM wiring diagram together.
When I first bought my Corvette in 1999 the forum and the internet in general was in it's infancy so the easiest way I could find to get an accuracy wiring diagram was to make one myself using the Assembly Instruction Manual. I'm cheap and I've also found mistakes using other wiring diagrams at that time. I've never found and issues with the AIM wiring diagram.
This is for all the DYI'ers out there:
Here is how to stitch the AIM wiring diagram together. As you see (pictures below) it makes a real nice, big diagram and I know it's correct because it came from the factory AIM. I do have other diagrams that I've accumulated over the years and I've found this is the most accurate one other than the official GM service manual.
I have a paper copy of the AIM that I bought years ago so my copy is really good and clear. I know some have found that theirs can be hard to read after being copied many times so this may not be a good solution for all. I�m not sure if you can print from the CD�s as I only own a paper copy.
Also, you must decode the color code but that�s not hard at all.
1. Make copies or print (from CD) all 8 pages from the AIM.
2. Make note of the adjoining sheet number key at the bottom right of each page (if visible)
3. Each sheet has these number on them. Example: D1
4. Looked at the adjoining sheet number key and arrange all the sheets in that pattern.
5. Where the wire traces end on each sheet cut off the excess paper. You can see in mine I left everything but where the traces end.
6. Do each sheet one at a time and keep trimming until the adjacent sheets traces line up.
7. Use whatever you want to connect all the sheets together. I used packing tape.
It�s easy and fun (to me anyway) to do and I know I have an accurate wiring diagram for nothing. Another thing is I can make as many copies as I want!!!
This is a closeup of the rear lighting harness and how well this method works. This is my original attempt so some of the traces are a little misaligned but not bad that it can't be used. Also, the color code is not that hard to figure out.
All in all it took about 30 minutes. I have made 3 copies this way and the last one I sat down and took my time with a nice straight edge and exact-o knife and that one is perfect and it only took an hour or so.
I am installing an aftermarket harness in the entire car and it only came with one 8 1/2 x 11 diagram. I went to staples and had it enlarged and laminated. Had 2 copies made since I plan on using an erase able marker on one as I go along. Extra benefit to enlarging is I can sort of read the writing.
I thought that maybe laminating one would be a good idea as my various books and printed pages with tones of manual edits on them are becoming a PITA. Checked my AIM on disk and I guess 71 had the wiring in it but in 72 it's not there anymore. Just a reference to see 6270629 for wiring diagram.
A quick search for that resulted in nothing
That's strange. Wonder why the '72 AIM doesn't have the wiring diagram? I can't think of a reason why Chevy would leave that out. Maybe it's just the CD version that may be missing some stuff?
I have thought about going through mine and making it nicer with colored pencils then getting it laminated but that's where my lazy kicks in.
In most cases I've done the same thing only in my paint program.
We keep them in the service department in the paint program because we can trace out a wire or circuit at will. Then lets say we traced out a headlamp issue, we then save that to the main server for later if needed.
But... again in most cases.... I have these already put together on the tech site for free to anyone. I do realize that this is too large to print out, but boy it sure comes in handy when tracing a circuit in your paint program.
The way to save this is to click on the picture below twice (or if on the site, same thing) then right click on the picture, select copy and then open your paint program. Then paste it into that program and save it to your desk top. I save them as PNG files when I do them.
The only other issue are the mistakes in the AIM drawings like say... 1968 where the wire shows changing colors when it didn't or the 1974 schematic that is missing a wire completely... but I'll take the (what we call "tracers") schematics any day over using one from another book.
E
Last edited by Willcox Corvette; 06-14-2018 at 01:39 PM.
Doing it this way you get a big printout instead of having to scroll around your computer screen. I'm going to get your copy and try it though. I've used scans of my sheets but never stitched them together on the computer.
That's strange. Wonder why the '72 AIM doesn't have the wiring diagram? I can't think of a reason why Chevy would leave that out. Maybe it's just the CD version that may be missing some stuff?
I have thought about going through mine and making it nicer with colored pencils then getting it laminated but that's where my lazy kicks in.
My old printed version (pre-CD was also without the electrical. Just that note about seeing whatever the other document was. Guess they split church and state in 71 or 72
M
A window or sliding glass door makes it easy to overlay one drawing on another. Make your cut mark on the top one and tape the 2 together. Now take it to the table and x-acto on the cut mark.
A window or sliding glass door makes it easy to overlay one drawing on another. Make your cut mark on the top one and tape the 2 together. Now take it to the table and x-acto on the cut mark.
Good idea! Never thought of that. I guess it's like using one of those light tables.
Good idea! Never thought of that. I guess it's like using one of those light tables.
Yes. A poor man's light table. You can splice numerous sheets with this process. I use small pieces of masking tape to stitch the top drawing to the bottom drawing. Make a pencil mark for a cut line. After the cut, stitch the top together with masking tape, turn it over and magic tape the seam on the back side. Flip it face up, remove the stitch tape and magic tape the front seam.
Hey Ernie, you got a 72 on the site (looked but don't see one) and save me an hour or two of putting one together???
M
Mooser, riverracer au
For some reason the 72 schematic disappeared from the tech site... I believe it happened when we migrated from the old site to the new one about 2 years ago. I'm out of town until the 16th of July but when I get back I'll get a new copy posted up for you guys.
Funny thing. I was working on my cousin's 1972 Chevelle and he has the AIM for it. It's exactly like our AIM's. Anyway I wanted to look at some under dash wiring and I went to the AIM. Guess what. The 1972 Chevrolet Chevelle Assembly Instruction Manual does not contain the wiring diagram. I wonder it that was a Chevy thing for that year. I would almost think they had a separate document for wiring in in the final assembly area in 1972.
Funny thing. I was working on my cousin's 1972 Chevelle and he has the AIM for it. It's exactly like our AIM's. Anyway I wanted to look at some under dash wiring and I went to the AIM. Guess what. The 1972 Chevrolet Chevelle Assembly Instruction Manual does not contain the wiring diagram. I wonder it that was a Chevy thing for that year. I would almost think they had a separate document for wiring in in the final assembly area in 1972.
GM stopped putting the factory wire diagrams in the AIM's in 1972... sad but true. I have them all so once I get home I'll see if I can post up another copy.
if i'm ever over that way i'll have to buy you a or many....
enjoy your holiday
Thank you.... I'm heading to South Maine to kill lobsters.. lol.. I love the dang things and in York Beach you can't get it any better and from a place called Off the Boat Lobsters... You call it in at 3 to be ready by 6.. you pick it up and it's cooked ready to eat.... Take it back to the condo and feast away.... Normally.... 5.99 to 6.99 a lb. Combine that with a trip to the Boston Farmers Market on Friday, the no sales tax booze in NH... it doesn't get any better for me... Oh.. we also make a trip to a place every year called Mary Anne's in New Londondary....
You ever get over here you look me up.. we've entertained 2 Aussies in the past few years... While Louisville is hot and miserable in the summer, it's a nice place to visit in the spring or fall. I'd be honored to have you as a guest.

 06-09-2018, 04:53 PM


 or many....