When you click on links to various merchants on this site and make a purchase, this can result in this site earning a commission. Affiliate programs and affiliations include, but are not limited to, the eBay Partner Network.
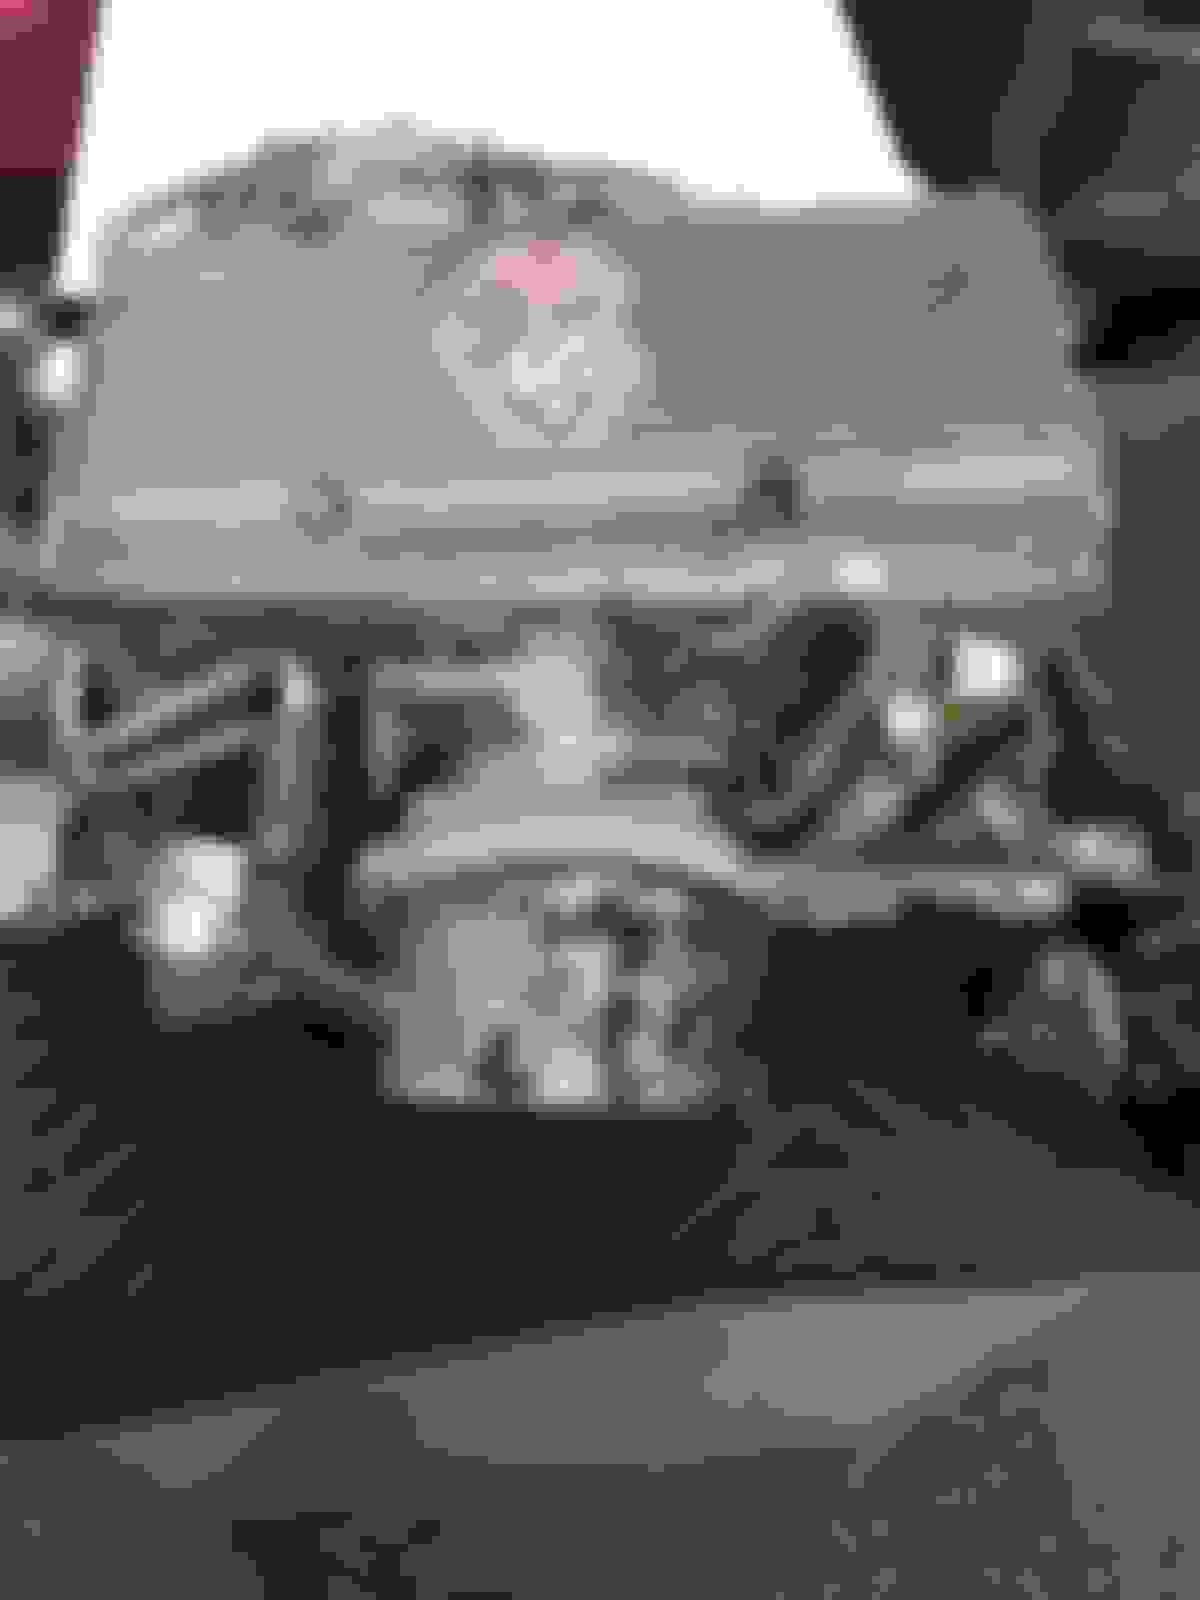
I posted an ad in the parts for sale section looking for some 63-65 FI parts. The ad included a couple of pictures, with numbered parts.
I am trying to identify those numbered parts, and also determine if other year FI parts will work in their place.
I am working on a Electronic Fuel Injection conversion of a 63-65 style Rochester FI system. The only parts that are necessary for this conversion are the lid, plenum, and base adapter (manifold). I have these three parts, and a few other parts as well.
So, here is the two part question...for those parts that I have not identified, what are they called. And for all of the parts, what year parts will "bolt up ", "attach", etc. and at least appear to be correct. The fuel meter and air meter will both be basically empty (no internal parts).
I am definitely interested in any reproduction parts that might also fill my requests.
My goal is not a 100% authentic look, or a system that will fool a knowledgeable Corvette enthusiast. I am looking to create a system that will "look the part" to a casual observer.
Here are the pictures, with the list of parts below the pictures. For those parts with no description, please tell me what it is. For all of these parts, please tell me what other year / application parts will physically attach and "look correct"?
Rochester FI parts
Part Description
1 Brass fitting with PCV attached (this one should be easy)
2 Fuel Meter bowl / housing (what other year fuel meters will physically attach?)
3 Fuel Meter lid (what other year lids will work?)
4 Metal tube from fuel meter to ???
5 Chrome tube from ??? to ???? (what is this tube called?)
6 Choke assembly (just need the housing and cover, inside can be empty)
7 Chrome tube from air meter to ??? (what is this tube called?)
8 Throttle linkage bell crank (I need this part)
9 Fuel Meter mounting bracket (Is there another one on the bottom as well?)
10 ????? (NO idea what this is called, but it appears to have a diaphragm in it?)
11 Throttle linkage bell crank axle??? (I guess this is what it is called).
OK, you all know the drill. What parts will physically fit (they do not have to actually work), and what are the parts called. Many thanks in advance.
Ed,
1. For what you are doing, just get a 45 degree, 1/4" pipe threaded elbow at your FLAPS
2. Any die cast fuel meter bowl will bolt up. There are evolutionary plumbing differences as FI design was improved but these don't matter if the bowl is cosmetic in your application.
3. For what I think you are doing, any fuel meter lid will attach to the FM bowl. That said, some early '57 lids are unique and would be better utilized on correct restorations. In the unlikely event you end up with one of these early lids, you ought to consider trading it. Repop lids are available.
4. Cranking Signal Valve tube.... I just made that up. It has no particular name. If you aren't planning to attach a Cranking Signal Valve, you don't need it.
5. Forward balance tube. I didn't make that up.
6. Choke housing - there are carburetor housings which look approximately correct and cost less than FI castings.
7. Vacuum advance tube for ported vacuum, used only in '63.
8. Throttle bell crank - the one in the picture is a '63 only part altho '64 - '65 is backward compatible.
9. Upper Fuel Meter bracket. Repro is available. '63 - '65 are all the same
10. Enrichment Diaphragm cover. '63 is unique. You can use any cover from '57 on if you don't plan to attach a Cranking Signal Valve. Like the Fuel Meter lids, tho, early '57 covers are different and deserve to be used on early '57 FI.
11. Bell Crank Stud
Jim
Thanks Jim. I concur with not using any hard to find parts on this effort, should I come across them.
Don't know if this info is still valid but there was a post a couple of years back about a repro fuel meter by John's Fuel Injection in Paramount CA. John helped me with my rebuild in the early 80's. phone 562-663-8060. john@johnsfi.com
The casual observer isn't gonna have a clue what they
are supposed to look llike anyway, so I am going with the clean look..
Yep, I hear you. I suspect that I will end up with something close to that, but not chromed or polished. I like the natural aluminum look. I have a nice lid, 2 plenums (one has welded feet), and a base plate (manifold). The base plate appears to have been chromed or polished in the past...way in the part. I'll get that undone.
But having said all of this, I also have most of the Air Meter, and I want to use whatever parts I can that keep it looking "stock". So I am going to hang an empty fuel meter on the side of the plenum, hang the appropriate chrome tubes where they should go, etc. I will NOT be using a stock style air cleaner. I have always thought the C2 FI Air Cleaner was just butt ugly (my opinion), so I will do something else.
Since my 300hp car will also have A/C, I can't use the factory air cleaner anyway. I sort of anticipate an air cleaner setup sort of like those used on 1958 to 1962 cars. A nice big round aluminum tube running from the air intake port to "something" hung under the fender or perhaps a tube that goes up to the front of the vehicle. To be determined.
The lid that we used had been modified to have the fins cut off prior to me getting it. And like yours, my plenum had been repaired for a broken leg, and the manifold had been hogged out for a felpro 1206 gasket, so there were no stock FI parts sacrificed in the building of this efi. That is something that was important. Having said that, I wish I had all the FI units that I saw setting over in the corner of many gas station/repair shops gathering dust for a hundred dollars a pop complete.
Last edited by vettsplit 63; 12-21-2018 at 06:23 PM.
To get air to the throttle body
I did a sorta air box tribute and built an air duct from behind the grill over the tire to the back of the inner fender. I mounted an air filter and connected it by alum tube to the throttle body.
To get air to the throttle body
I did a sorta air box tribute and built an air duct from behind the grill over the tire to the back of the inner fender. I mounted an air filter and connected it by alum tube to the throttle body.
Yeah, nice. That is sort of the idea I am think about. I love the way your system looks, but I still think it needs a "fuel meter" on the side of the plenum.
By the way, did you do the EFI conversion yourself or have someone do it? I know this has been done enough times that the kinks have been worked out.
The lid that we used had been modified to have the fins cut off prior to me getting it. And like yours, my plenum had been repaired for a broken leg, and the manifold had been hogged out for a felpro 1206 gasket, so there were no stock FI parts sacrificed in the building of this efi. That is something that was important. Having said that, I wish I had all the FI units that I saw setting over in the corner of many gas station/repair shops gathering dust for a hundred dollars a pop complete.
That is also my goal, to not modify any valuable, hard to locate parts. I have a nice lid, that I will have restored and use it, but it will not be modified. I hope to use the plenum that has had the feet welded. My intake (base adapter) looks like it has either been chromed or polished in the distant past. I'll get that cleaned up as use it as well.
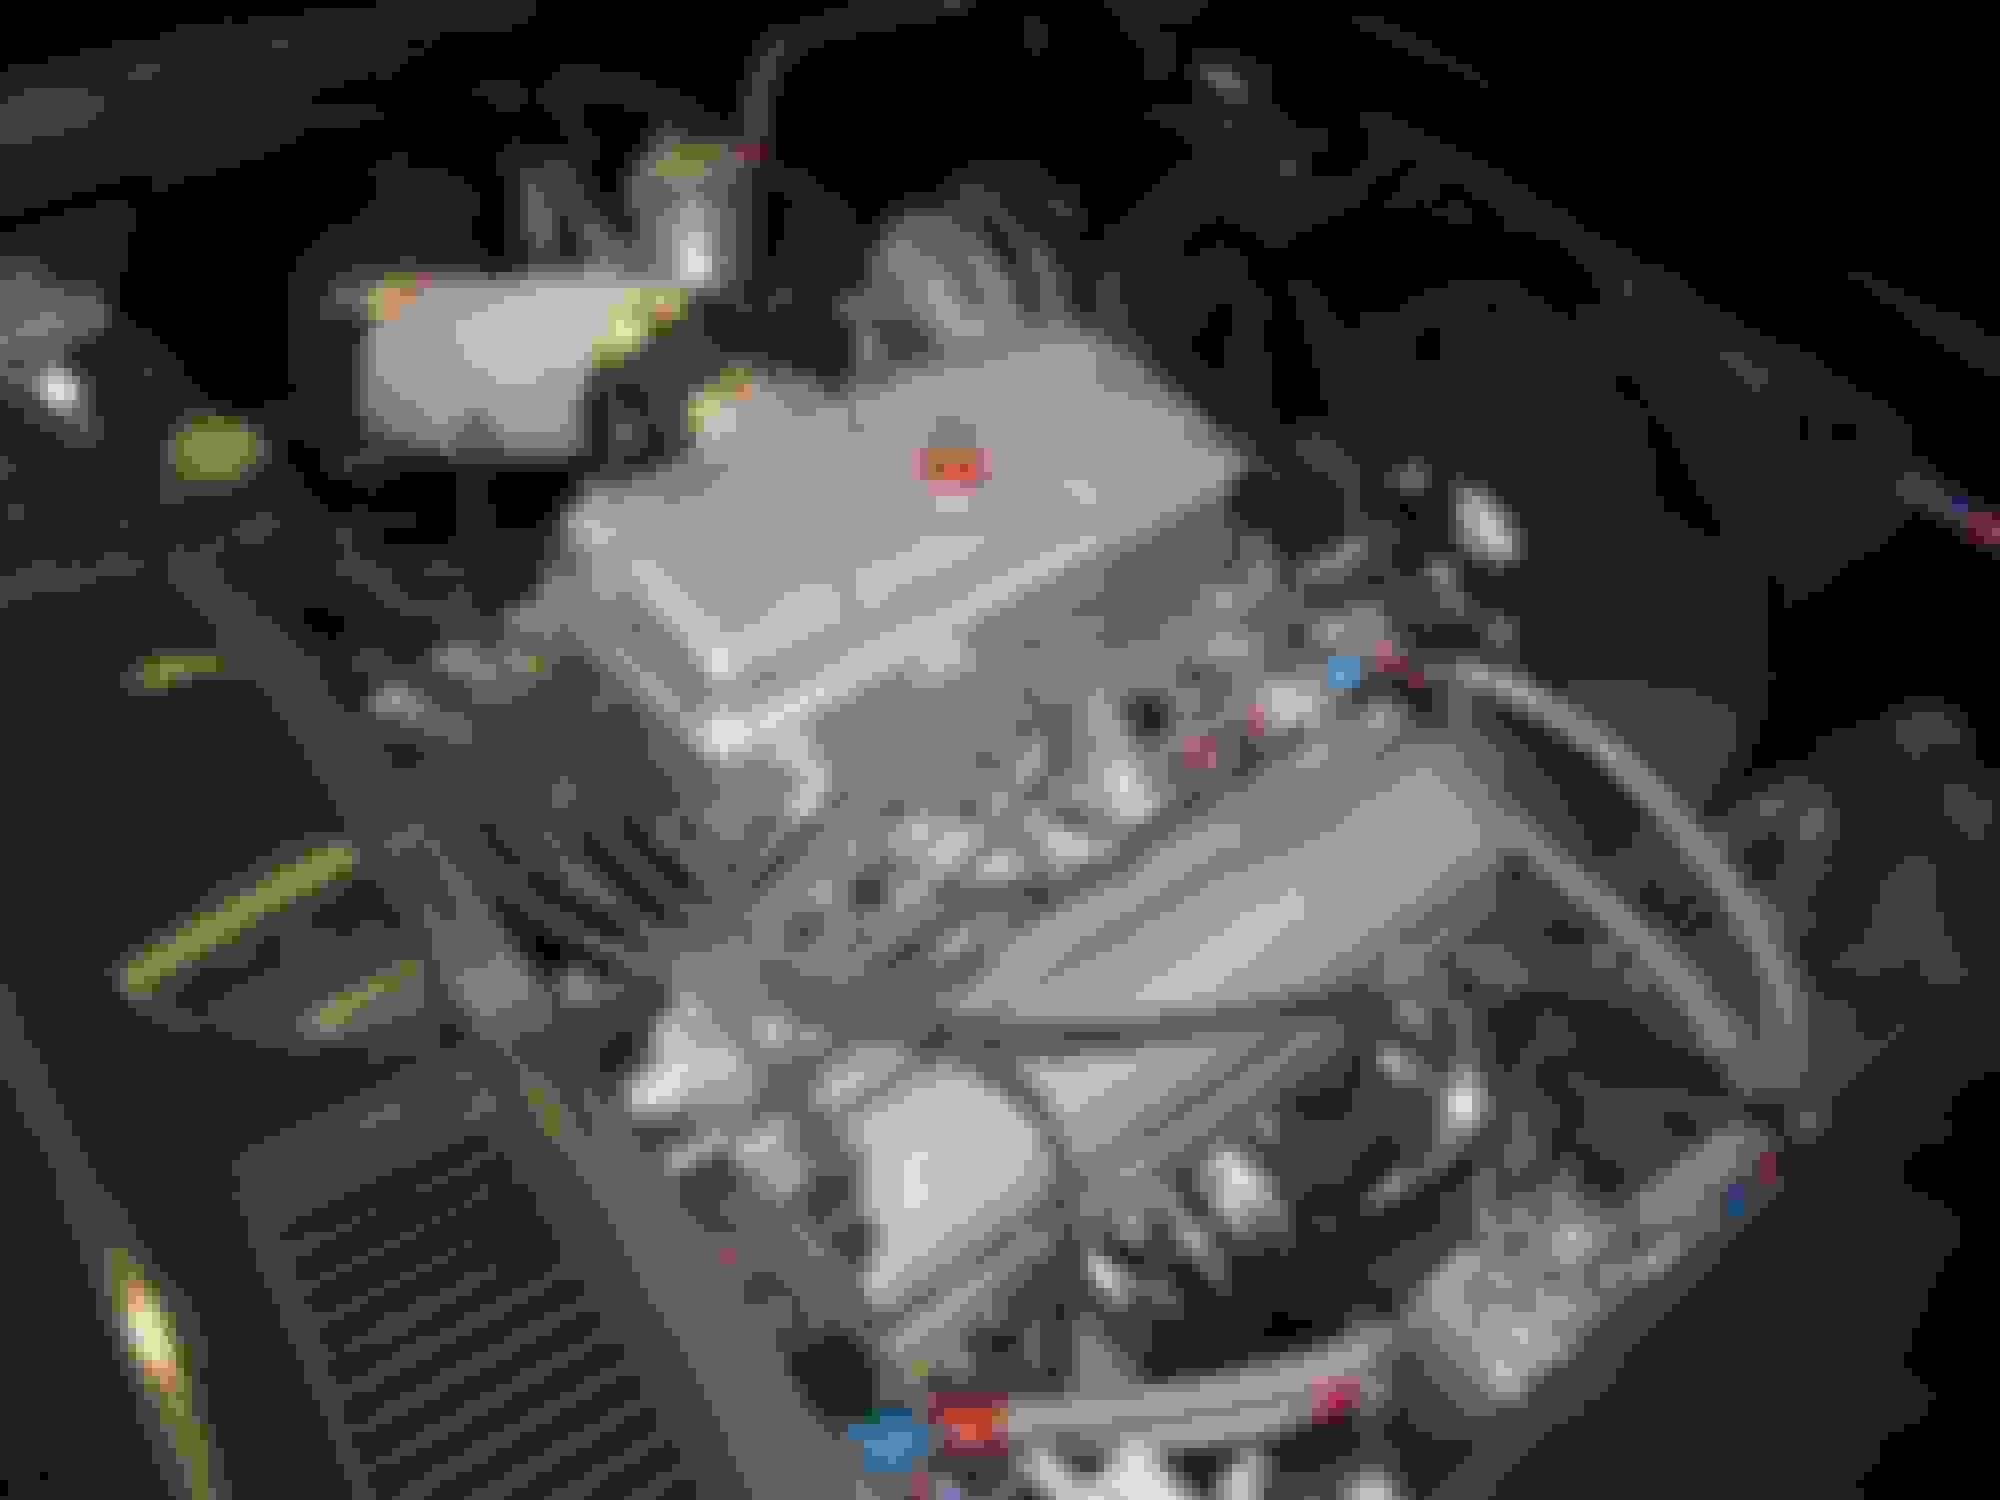
I did the conversion myself. Fortunately I have access to machine tools and a great TIG welder.
I had the mechanical injection since the late 70's. I wanted to do this conversion for a long time but started the project around 2009 when second gen ECUs were released. I was helped a lot by the advice of a few of the folks that had gone before me. It is mostly an exercise in packaging. You have to fit the sensor suite and the wiring and I wanted to hide as much of the conversion as practical to keep the engine bay tidy. The only mod to the original RP unit is to open the injector bores 0.031 to fit the electronic injectors. This mod does not prevent you from reverting back to a stock mechanical injector. I machined/fabbed all the bits needed except the throttle body adapter which I did the CAD work but subbed the CNC part. Everything is in stainless, aluminum or fiberglass.
Well, it is nice work, it turned out beautifully.
I am hoping to find someone who can do the conversion for me, and provide me with essentially a turn key solution.
Has anyone written up a document that describes the entire process from start to finish, including a list of parts needed?
I don't know of a "how to". Each conversion is likely a little different solution to the problem. There will surely be custom fabrication required.
You will have to decide the basic setup of your system. Do you want the benefits of timed injection or are you going to use batch (one squirt all cylinders at the same time). Are you going to let the computer control timing. Do you hope to retain the stock distributor. These questions will determine crankshaft position sensor and cam position sensor needs.
Since you want to use mostly original bits you'll have a few more challenges than adapting modern components. I think most conversions use the GM LS series sensor suite - throttle position sensor, manifold absolute pressure sensor, coolant temp sensor, air inlet temp sensor, crank position sensor and cam position sensor. You will need to devise a way to mount/hide all of these. Normally the TPS mounts on the throttle body but as you want to use the original air valve you'll need a sensor mount and linkage that tie the motion of the throttle to the sensor. There is also the idle control valve that normally mounts to the throttle body. You'll have to design an idle control mount so the idle control air is introduced behind the throttle blade. You are going to hide the injectors in the plenum so all that is new territory. You will have 2 water temp sensors the original one for the gage and a new one for computer input so you need another pipe thread opening near the thermostat. The MAP sensor needs a mount and to be connected to a manifold vacuum source. The easiest way to get the crank and cam position sensors is to use a dual sync type distributor. All these sensors have electrical connections and wires that feed the ECU. You will most likely want the wires to be as invisible as possible.
There are a lot of posts about the fuel system - pumps,regulators, return line etc. You'll need a high pressure pump and fuel pressure regulator. Just remember that unlike a carb that has a float bowl of reserve fuel if the EFI pump sucks air everything sputters or stops for a while - think MECO POGO.
Get your plan together and ask questions as you find them. You should also check the EFI forum at ChevyTalk
Don't know if this info is still valid but there was a post a couple of years back about a repro fuel meter by John's Fuel Injection in Paramount CA. John helped me with my rebuild in the early 80's. phone 562-663-8060. john@johnsfi.com
Good to hear that John Marquardt is still out there keeping FI units on the road. He dialed in my 63 Fuelie back in 1974 --- so he's been doing this stuff for almost 50 years --- and I remember him as a pleasant and generous guy. He even gave me a set of NOS hood "cookie sheets" for free when I was tapped out for funds.
 12-17-2018, 08:58 AM