C7 Corvette: How to Replace Your Side Mirrors
Driving with functional side mirrors is a must in a C7 since visibility is drastically reduced without one or both in place. Replacing the cracked or broken glass in a side mirror is a fairly easy job, even for a novice DIY'er.
This article applies to the C7 Corvette (2014-current).
However easy it is to accidentally break the glass in one or both side mirrors, replacing the glass is almost just as easy. You can do it alone, likely already have the tools you need, and can do it for far less than a professional will charge you. You can follow these same steps when replacing the driver's side mirror or the passenger's side mirror. Look in your owner's manual or talk to your dealer about the glass you need. Be sure to have this information before you order replacement glass for one or both of your side mirrors.

Materials Needed
- 7mm socket
- 10mm socket
- Ratchet with extension
- Socket wrench
- T-15 Torx wrench
- Small pry bar (or plastic pry tool)
- Small slotted screwdriver
- New mirror glass
Step 1 – Prepare to replace mirror
Open the driver’s side door and lower the window. Use a small slotted screwdriver to pry up and push down the locking tab so you can remove the small plastic cover behind the door handle. Use a T-15 Torx wrench to remove the two screws behind the door handle. Disengage the door-opening control.

Figure 1. Use T-15 Torx wrench to remove two screws. 
Figure 2. Disengage door opening control.
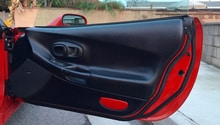
Step 2 – Remove door panel
Find the slot on the lower outboard perimeter of the door panel. Insert a pry bar into this slot and pry up, and then continue prying up around the door panel perimeter until it separates from the door frame. Be sure to disconnect any console wiring connectors behind the door panel before you remove it.

Figure 3. Pry up door panel. 
Figure 4. Disconnect wiring connector(s) (if any) behind door panel.
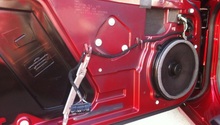
Step 3 – Remove housing
- Use a 7mm socket to remove four speaker screws. Disconnect speaker harness and then remove the speaker. Remove the rubber grommet in the door jamb area.
- Remove sill plate.
- Disconnect the green connector in the kick panel area. Carefully pull this connector through its access hole and rubber grommet.
- Remove plastic insulation.
- Disconnect the mirror wire harness (if there) and remove two wire clips from within the door frame.
- Use 10mm socket to remove three mirror-mounting nuts. Be sure to hold the mirror housing at the same time. Once you’ve removed these three nuts, remove the mirror housing from door frame and set it on a covered surface.


Step 4 – Remove mirror glass
Push on the lower inboard edge of glass. The mirror glass will pivot outward. Insert a small pry bar between motor mount and motor actuator. Pry up on mirror glass until it pops off.

Step 5 – Install mirror glass
Insert mirror glass and push into place. Start by pushing top edge into place, and then push in bottom edge. You should hear it snap into place.

Step 6 – Replace housing
- Use 10mm socket to replace three mirror-mounting nuts. Be sure to hold the mirror housing at the same time.
- Reconnect mirror wire harness (if there) and replace two wire clips from within door frame.
- Replace plastic insulation.
- Reconnect green connector in kick panel area.
- Replace sill plate.
- Use 7mm socket to replace four speaker screws. Reconnect speaker harness and then replace the speaker. Replace rubber grommet in door jamb area.
Step 7 – Complete re-installation
- Replace door panel.
- Re-engage door-opening control.
- Use T-15 Torx wrench to replace two screws behind door handle.
- Replace plastic cover behind the door handle.
Related Discussions
- How to Replace the Driver's Side Mirror - CorvetteForum.com
- Side Mirror Replacement Instructions - CorvetteForum.com