C6 Corvette: How to Repair Your Wiggling Rear view Mirror
If your C6's rear-view mirror is wiggling, wobbling, or drooping, it may only get worse if you don't address the problem.
This article applies to the Corvette C6 (2005-2013).
The rear-view mirror on a C6 Corvette provides more than just a convenient view of what's being left in your dust. Depending on the type of mirror you have, it is an information center that provides you with data on a wide number of things such as outside temperature, OnStar connection, compass, auto-dim, and radar detection. If your mirror is facing the floor, or wiggling around, using it becomes somewhat problematic. Here are some suggestions on how to bring stability to your rear-view mirror.
If you want to do it yourself, this fix is fairly straightforward, although care must be given to avoid forcing anything. You are dealing with a part that is rather expensive to replace if you break it. If you want to replace the faulty mirror with a good, used one, expect to pay $100-$160 online. Depending on the type of mirror features you want, a new mirror can cost $400 and up. The other option is to take your Corvette to a Chevrolet dealer. Depending on the severity of the mirror problem, the fix could cost just a few dollars up to $450+ for a new mirror. It's suggested to go the DIY route first.

Materials Needed
- #8 Torx screwdriver
- Pair of pliers
Step 1 – Remove the mirror
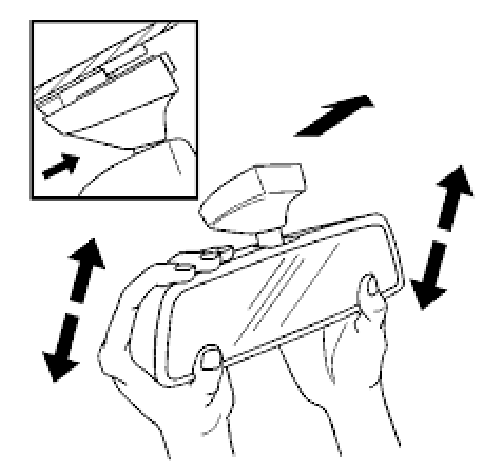
The mirror assembly in this generation of Corvette uses a particularly fidgety cam-lock system, and it can be a bit annoying to deal with. Depending on your patience level here, you can either take a flat head screwdriver to the hinge and gently pry as you twist the mirror, or you rotate the mirror a 1/4 turn or so in a clockwise direction, then twist the connection behind the mirror to pop it off. The plate glued to the window should remain.

Step 2 – Ensure the engine is turned off and disconnect the wiring harness
Be sure the engine is turned off. Once the mirror is off, you will have to disconnect the wiring harness from the mirror socket as you make the fix. Disconnect the wiring by depressing the plastic clip in the socket.

Warning
If the engine is on and you disconnect the harness, you might have some nasty microchip reboots to deal with.
Step 3 – Remove tension plate
On the back of the mirror assembly, you will see an opening surround by three Torx screws and three small pins. Beneath them, you will see three small tension rods. Unscrew the three Torx screws and lift the tension plate off of the rods.

Step 4 – Straighten bent rods and re-assemble the coupling
Figure 4 shows that the tension rods are somewhat bent. This is probably your culprit! Using pliers and a vice if needed, straighten the rods. After they are straight, re-assemble the coupling and secure it with the Torx screws.

Step 5 – Re-install wiring harness and mirror
Re-insert the wiring harness into the back of the mirror. Holding the assembled mirror at the 1/4 turn angle it had when you removed it, line up the triangle shapes of the window mount with the coupling on the mirror. Join the two pieces and rotate the mirror in the opposite direction from the removal. It should click into place.

Related Discussions
- How to Fix Your C6 Wiggling Rear-view Mirror - Corvetteforum.com
- C6 Rear-view Mirror Wiggling - Corvetteforum.com
- C6 A Different Fix for Loose Rear-view Mirror - Corvetteforum.com


