Corvette: How to Install Wheel Spacers
Before you go slipping a bunch of 7/16 inch washers on all of your wheel studs, there are some things to know about wheel spacers.
This article applies to the C5, C6, and C7 Corvette (1997-current).
Most Corvette enthusiasts love the look of shiny wheels, fat tires, and a wide, racy stance. One way to widen a Corvette’s stance is with thicker tires or new wheels with less back spacing than the original wheels. The other option is to put spacers on the wheels. Learn what you need to know before installing new spacers below.
Materials Needed
- Jacks and jack stands
- Torque wrench
- 1/2-inch socket set and lug-nut size sockets
- Breaker bar
- Lug wrench or T-wrench
- Thread sealer
Step 1 – Pick a spacer type
As a place to start this discussion, let’s take a look at the tires and wheels that came on a C6 2006 Z06 Corvette from the dealer. Note that the Coupe and Convertible model had different tire and wheel sizes.

2006 Z06 Corvette Front Wheels |
2006 Z06 Corvette Rear Wheels | |
|---|---|---|
Wheel size |
18 x 9.5 inches | 19 x 12 inches |
Offset |
+40 mm | +59 mm |
Tire size |
275/35/18 | 325/30/19 |
Back spacing |
6.82 inches (173.35 mm) | 8.82 inches (224.09 mm) |
Bolt pattern |
5/4.75 inches (120.65 mm) | 5/4.75 inches (120.65 mm) |
Not only are the front wheels 2 1/2 inch narrower than the rear wheels; they have different offsets and back spacing, too.
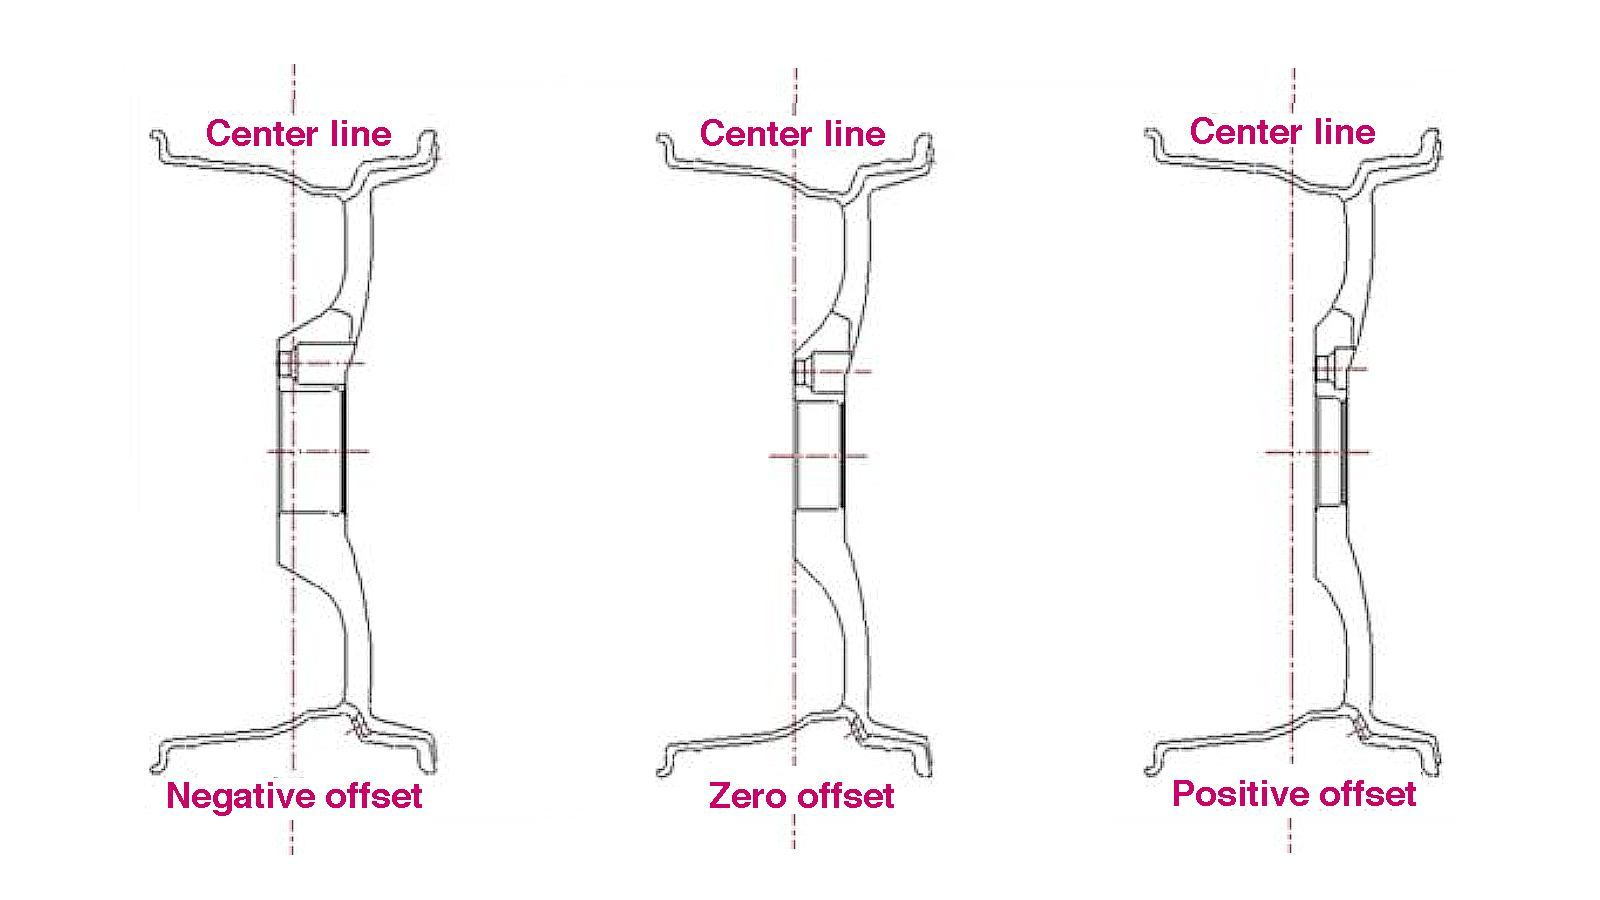
“Wheel offset” is the distance from the hub’s mounting surface (with no wheel on) to the center line of the wheel. The center line is the distance between the wheel's inner and outer rim, divided in half. This offset is typically measured in millimeters, and will result in either a positive, a negative, or a “zero” number. As the drawing in Figure 2 shows, a positive offset moves the center of the wheel further under the fender well, and a negative offset moves it further out of the fender well. A “zero” offset centers the wheel’s center directly over the hub mounting surface. The Z06 having positive offsets for both the front and rear wheels indicates both wheel centers are set back into the fender wells, with the front wheels less offset because they need room to pivot outward and inward to steer.
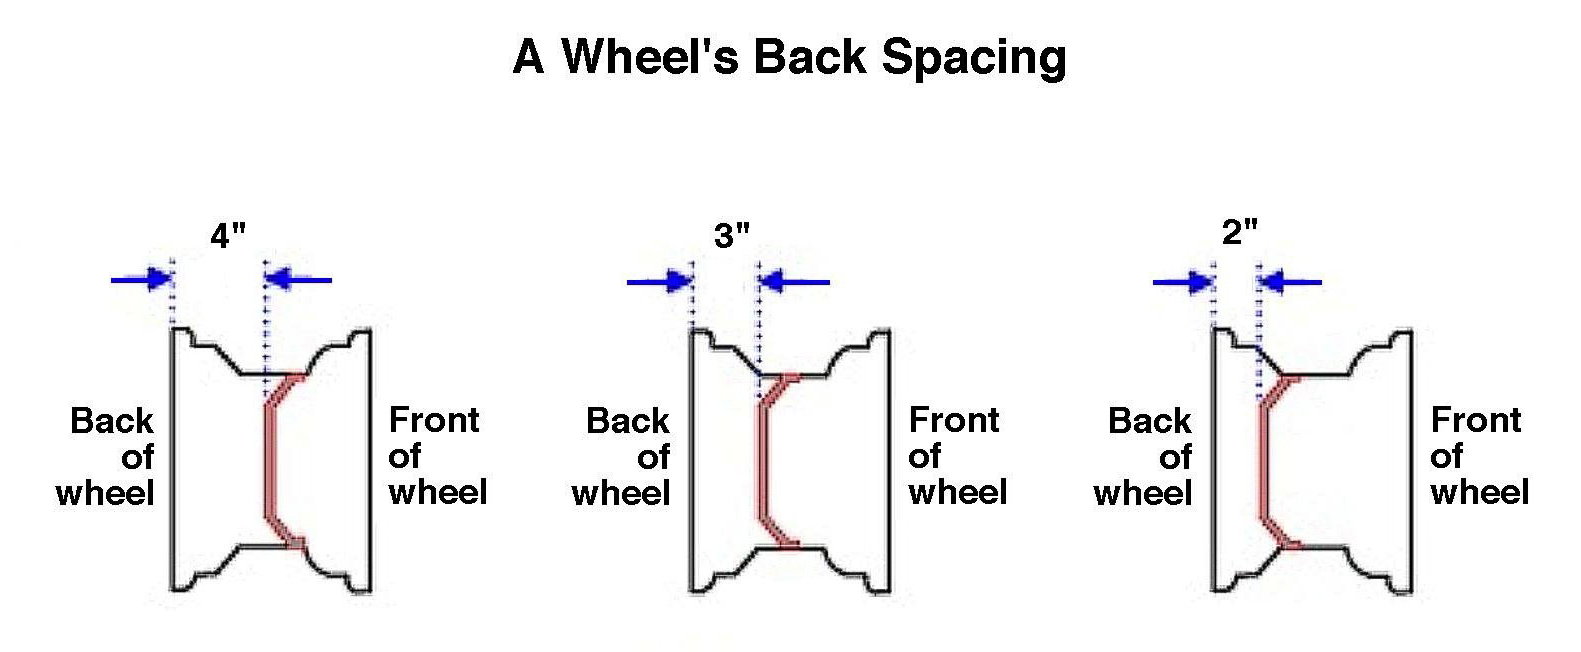
“Back spacing” is the distance between a wheel’s inner rim and the surface of its mounting flange. With the Z06 having a positive offset, the back spacing will be quite large — for the rear wheels, only about 25% of the tire’s tread surface is on the outside of the hub mounting surface; the rest fits back over the brakes.
Offset, back spacing, wheel width, and tire size combined together are determining factors for a wheel, tire, and spacer to fit a car. Which brings us to the spacers. With most of the tire’s width behind the hub mounting plate, there’s typically room for a spacer, but the question then becomes what kind of spacer? And how thick can or should it be?
Two key dimensions here are the the amount of top space you have available between the tire surface and the inside of the wheel-well, as well as the gap between the front edge of the tire and the fender opening. You can measure the top space with a ruler held straight up at the outside edge of the tire, lifting it until it touches the inside of the wheel well.
The gap between the front edge of the tire and the fender opening is an important consideration for picking a spacer’s width. Laying your ruler atop the tire and moving it out until it reaches the inside of the fender-well-lip will give you an inkling about how wide of a spacer you can use before your tire top starts rubbing against the fender liner; also, before the gap reduces to the point where the edge of the tire starts rubbing the top edge of the fender opening when driving on rough surfaces.

The simplest type of spacer is the “slip-on” spacer. Slip-on spacers simply go between the wheel and the hub's mounting plate. Some are called “universal” spacers, as they have cutouts to handle just about any bolt pattern as well as number of studs.
Most wheel experts warn away from the universal spacers, because they really can’t be much more than 1/4-inch thick, and if the lugs loosen, the spacers might move around, causing excess hub and wheel wear, vibration, and noise.
Other slip-on spacers are made specifically for your particular bolt pattern. These will stay put. But to order or buy these spacers, you will need to know your bolt pattern.
The Z06 has a bolt pattern of 5/4.75 inches (120.65 mm), which means its wheels have five lug bolts spaced out in a circular pattern with a diameter of 4.75 inches. This circular pattern is called its Pitch Circle Diameter, or PCD.

However, as we’ve seen, thickness can become an issue. Most wheel experts warn that any spacer thicker than 1/4 inch needs to have longer studs installed in the wheel hubs — which, as mentioned, is not a quick or simple procedure. The reason for this is because the stock wheel studs are 2 inches (50 mm) long, with a thread size of M12-1.5. But only 1 and 5/8 inch (41.5 mm) extends out of the mount hub to attach a lug nut onto. Subtract 1/4-inch from the mount bolt length because of the spacer, minus the thickness of the wheel’s mount flange, and you’re losing about 1/3 of the usable thread length for this critical bolt.
Spacers thicker than 3/8-inch not only need longer studs, but should also have an integral hub “lip” for the wheel to center on, also called a wheel-centric spacer or hub-centric spacer with a lip. This hub lip is a critical component — it’s what the wheel rests on. Many people believe that the weight of a vehicle is supported by the wheel studs and lug nuts, but it’s actually the hub lip that supports the car. That’s why a spacer must be:
- Thin enough for the hub lip to extend through it to sufficiently center and support the wheel, or
- Thick enough to have a recess cut into its back side for the hub lip to fit into, and another hub lip machined onto the front of the spacer to center and support the wheel. The car’s hub can’t come any closer to the spacer’s wheel mount surface than 1/4-inch, because if the hub sticks farther out than that, there isn’t enough metal to hold a hub lip on with the strength that’s required.
Hub-centric spacers also help eliminate vibration and imbalance issues that non-hub-centric spacers can suffer from.

The other type of spacer is bolt-on. These are typically machined out of a solid billet of aluminum. Note that if you attempt to use a spacer thinner than the length of your lug studs, the ends of the studs will protrude beyond the new wheel mounting surface of the spacer, making it unusable. Some cut or grind down the length of the wheel studs to accommodate such spacers, which is fine, but going back to stock specs would mean replacing the wheel studs with OEM lengths which, again, is not a quick or simple procedure.

Using a spacer of two inches can solve this problem, as the OEM stud bolts won’t extend beyond the spacer’s wheel mount surface, and there is enough space to get a lug nut to fit into, without extending beyond, the wheel mount surface as well.
Of course, the spacer attached to your wheels and your tires will have to fit under the wheel well. If you want to widen your car’s stance, and you’re going to get new tires anyway, you might want to consider going with lower-profile tires to get more room under the wheel well.
Step 2 – Install the wheel spacers
Installing bolt-on spacers is straightforward. The lug nuts for attaching the spacer to your hub come with the spacer. Make sure the hub surface is clean, and attach the spacer in a cross-pattern, just as you would a tire. Most users put thread lock on the studs. Check with the spacer manufacturer or reseller regarding the torque to apply to the spacer’s lug nuts. Some specify 70 lb/ft of torque, while the C6 Corvette lists 100 lb/ft of torque for attaching the wheels.
Before tightening your spacers and wheels to spec, put them in place only finger-tight to make sure everything fits, and that you’ll have enough space under your fender wells. Be aware that most wheel spacer dealers won’t accept returned spacers that have been attached to a car and tightened down.
Pro Tip
Long-term users of spacers strongly recommend that, after you do install your spacers, you check the torque of the spacer’s lug nuts at least three times at 25-mile intervals.
Related Discussions and Site
- Wheel Spacer Installed - CorvetteForum.com
- C6 Wheel Help Please - Is1tech.com
- Changing Rear Wheel Studs on a C6 Z06 - CorvetteForum.com
- ARP C5 Wheel Studs - CorvetteForum.com