Frame sandblasted
 10-29-2014, 06:11 AM
#21
Drifting

Member Since: Jan 2012
Location: Limerick Pa, Saint James City Fl
Posts: 1,625
Received 228 Likes
on
169 Posts

I'm sure at this point you will check that frame out closely, and completely. After it's repaired and primed take it to a frame shop and have it checked to make sure it is straight and square. also check out eastwoods site for internal frame treatment, cause if there was rust on the outside there is rust on the inside. Chip
 10-29-2014, 01:01 PM
#22
Drifting
Thread Starter
Really hoping for more advice on how to deal with this rust, guys. I've ruled out powder coating. So please chime in with the best approach for dealing with these specs of rust. I am planning to go back to the sandblaster and have them do over these areas. Is the SEM etching primer ok to leave as a first coat before using epoxy primer?
 10-29-2014, 01:41 PM
#23
Advanced


Member Since: Jul 2013
Location: Rocky Hill Connecticut
Posts: 70
Received 0 Likes
on
0 Posts
I'm sure at this point you will check that frame out closely, and completely. After it's repaired and primed take it to a frame shop and have it checked to make sure it is straight and square. also check out eastwoods site for internal frame treatment, cause if there was rust on the outside there is rust on the inside. Chip
10-29-2014, 02:38 PM
#24
Drifting
Member Since: Jan 2012
Location: Limerick Pa, Saint James City Fl
Posts: 1,625
Received 228 Likes
on
169 Posts
Eastwood Internal Frame Coating, comes in a rattle can with 24" flex hose and conical nozzle, just shove the hose in any and all openings and spray, cover the floor cause it also runs out the bottom of frame and makes a mess, check web site there is a video of a guy using and explaining it. Chip
10-29-2014, 03:51 PM
#25
Drifting
Thread Starter
I'm sure at this point you will check that frame out closely, and completely. After it's repaired and primed take it to a frame shop and have it checked to make sure it is straight and square. also check out eastwoods site for internal frame treatment, cause if there was rust on the outside there is rust on the inside. Chip
10-29-2014, 04:20 PM
#26
Drifting
Member Since: Jan 2012
Location: Limerick Pa, Saint James City Fl
Posts: 1,625
Received 228 Likes
on
169 Posts
Check out the After Blast by eastwood, that is what I used, then 2 part epoxy, if it's going back to the blaster anyway, and I do not work for, or sell for eastwood, but they are right up the road from me. Chip
10-29-2014, 07:15 PM
#27
Race Director


Do you happen to have an air compressor? If so, the investment in a small sandblasting unit and a few bags of sand is not much. Get a respirator and hood, spread some plastic out on the driveway and just have at it, concentrating on the areas that have a little breakout rust showing or that you remember were not as near white metal as you expected. Since all the hard work has been done it won't take much to get it in good shape. You may want to do the front in one section, clean it off and prime it and then set up and do the rear the next day. It will amaze your neighbors, give them something to talk about for days and cement your reputation as a die-hard car guy.
10-29-2014, 08:00 PM
#28
Advanced
Member Since: Jul 2013
Location: Rocky Hill Connecticut
Posts: 70
Received 0 Likes
on
0 Posts
Eastwood Internal Frame Coating, comes in a rattle can with 24" flex hose and conical nozzle, just shove the hose in any and all openings and spray, cover the floor cause it also runs out the bottom of frame and makes a mess, check web site there is a video of a guy using and explaining it. Chip
10-29-2014, 08:13 PM
#29
Drifting
Thread Starter
Do you happen to have an air compressor? If so, the investment in a small sandblasting unit and a few bags of sand is not much. Get a respirator and hood, spread some plastic out on the driveway and just have at it, concentrating on the areas that have a little breakout rust showing or that you remember were not as near white metal as you expected. Since all the hard work has been done it won't take much to get it in good shape. You may want to do the front in one section, clean it off and prime it and then set up and do the rear the next day. It will amaze your neighbors, give them something to talk about for days and cement your reputation as a die-hard car guy.
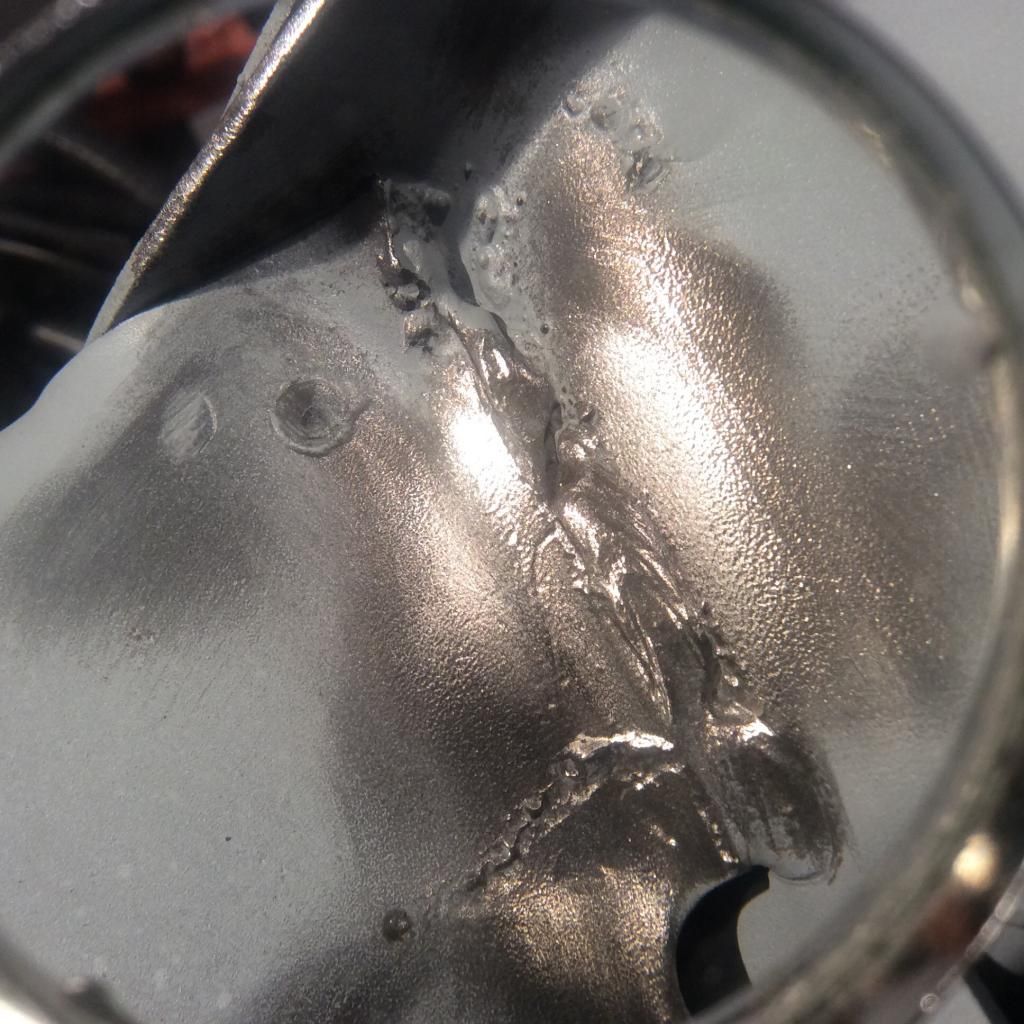
Meanwhile, about that crack!! Here it is. After I wire brushed it down to weld. This is a good reminder to not jump to conclusions based on posted photos online. There are shadows and such that fool you vs. seeing it in real life. The crack is just a trail from the factory welding process. There is no crack, the welds are solid. I took this picture after cleaning the area through a magnifying glass. It's not the prettiest GM weld on this frame but it will do. While it may not seem like it, I am thankful for having this pointed out to me. I learned something from it.

 10-29-2014, 08:49 PM
#30
Drifting
Member Since: Jan 2012
Location: Limerick Pa, Saint James City Fl
Posts: 1,625
Received 228 Likes
on
169 Posts
Boy it sure looked like a crack, glad it's not, and those ugly welds are great I love them, especially when you see the drag line between welds were they didn't pick the rod up completely. Chip
10-29-2014, 08:58 PM
#31
Drifting
Member Since: Jan 2012
Location: Limerick Pa, Saint James City Fl
Posts: 1,625
Received 228 Likes
on
169 Posts
Tip...... when I was blowing the sand out of the inside of the frame, I found there was more mouse bedding than sand, that stuff will hold moisture and create rot. I adapted my blow nozzle down to a scrap piece of steel brake line and shoved it in every where til I was sure it was all out. Chip
10-29-2014, 09:20 PM
#32
Drifting
Thread Starter
Tip...... when I was blowing the sand out of the inside of the frame, I found there was more mouse bedding than sand, that stuff will hold moisture and create rot. I adapted my blow nozzle down to a scrap piece of steel brake line and shoved it in every where til I was sure it was all out. Chip
10-29-2014, 10:26 PM
#33


I have done much sandblasting on aluminum and acrylic in the past.
There are many grits of sand and other types of media that will not eat into the frame.
The company I buy from is New Jersey Pulverizing and it's on Close Avenue, Bronx, NY,
10472. I know the address because it's down the block from my shop.
There are many grits of sand and other types of media that will not eat into the frame.
The company I buy from is New Jersey Pulverizing and it's on Close Avenue, Bronx, NY,
10472. I know the address because it's down the block from my shop.
10-29-2014, 10:50 PM
#34
Safety Car


Member Since: Feb 2007
Location: Northern California CA
Posts: 4,501
Received 1,901 Likes
on
883 Posts

Do you happen to have an air compressor? If so, the investment in a small sandblasting unit and a few bags of sand is not much. Get a respirator and hood, spread some plastic out on the driveway and just have at it, concentrating on the areas that have a little breakout rust showing or that you remember were not as near white metal as you expected. Since all the hard work has been done it won't take much to get it in good shape. You may want to do the front in one section, clean it off and prime it and then set up and do the rear the next day. It will amaze your neighbors, give them something to talk about for days and cement your reputation as a die-hard car guy.
 10-30-2014, 08:18 AM
#35
Race Director
Meanwhile, about that crack!! Here it is. After I wire brushed it down to weld. This is a good reminder to not jump to conclusions based on posted photos online. There are shadows and such that fool you vs. seeing it in real life. The crack is just a trail from the factory welding process. There is no crack, the welds are solid. I took this picture after cleaning the area through a magnifying glass. It's not the prettiest GM weld on this frame but it will do. While it may not seem like it, I am thankful for having this pointed out to me. I learned something from it.
If you do re-sandblast yourself, I would invest in a good quality rust converter/pre-treatment and wipe the frame down which will take care of anything left in the deeper pits. With a good primer and topcoat it should not cause you any problems in the future.
Good luck.
10-30-2014, 08:45 AM
#36
Melting Slicks

"Skip welding" is a commom pratice on welding frames. It is not nessary to have an 100% weld along the seam so they run the weld quickly for a space and then hesitate for a while to get good penetration and then "skip weld" for a space and then hesitate again.
This saves time in restarting the arc a second time.
It is not a bad weld, just a quick process.
This saves time in restarting the arc a second time.
It is not a bad weld, just a quick process.
10-30-2014, 09:07 AM
#37
Drifting
Member Since: Jan 2012
Location: Limerick Pa, Saint James City Fl
Posts: 1,625
Received 228 Likes
on
169 Posts
"Skip welding" is a commom pratice on welding frames. It is not nessary to have an 100% weld along the seam so they run the weld quickly for a space and then hesitate for a while to get good penetration and then "skip weld" for a space and then hesitate again.
This saves time in restarting the arc a second time.
It is not a bad weld, just a quick process.
This saves time in restarting the arc a second time.
It is not a bad weld, just a quick process.
People urged me to grind it all smooth and pretty, I refused, cause thats part of the beauty of these old girls