
The Inner Workings of Seat Tracks - Post 1 of 3
 04-19-2011, 08:17 PM
#1
Senior Member


Thread Starter
Member Since: Jan 2008
Location: Easton, PA
Posts: 12,154
Received 2,031 Likes
on
1,103 Posts
St. Jude Donor '10

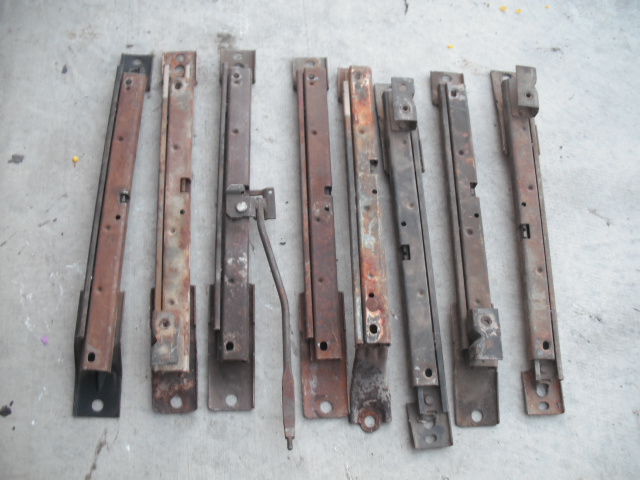
This series of three posts will show what I call the inner workings of C-3 seat tracks used on many of the 1968-1981 Corvettes in service today. I am doing this because of a lack of information available and a natural curiosity to find out what makes these seats work, and not work so well when they are old. I hope you enjoy learning about them as I have done and please feel free to ask questions after the third post and let me know what you think.
I purchased a “lot” of eight tracks from another forum member and then took a little time to look each of them over carefully seeking out those that might be the best candidates for my project. I found two and they became my projects called “DT” and “CT” which stands for drilled track and cut track, but more on that later in the post.
Candidate track one was badly rusted and moved on the track only when a large amount of force was applied, so we named it CT and it was to be cut apart for examination of the components to see how it worked.
Candidate track two was also badly rusted and moved a bit more freely but now near as you would want it to, so we named it DT and it was to be drilled at the dimple and rivet areas to see if the track could be drilled and separated in such a manner as to be able to put them back together after being taken apart.
The first two posts highlight cutting apart a seat track and what doing so revealed. The third post highlights the drilling of the second track and its components.
I will summarize on the third post at the end of the pictures. So let’s begin.
This is the lot of eight tracks I purchased for my research.
This is the first cut location for cutting open the track to see how the internal workings operated.
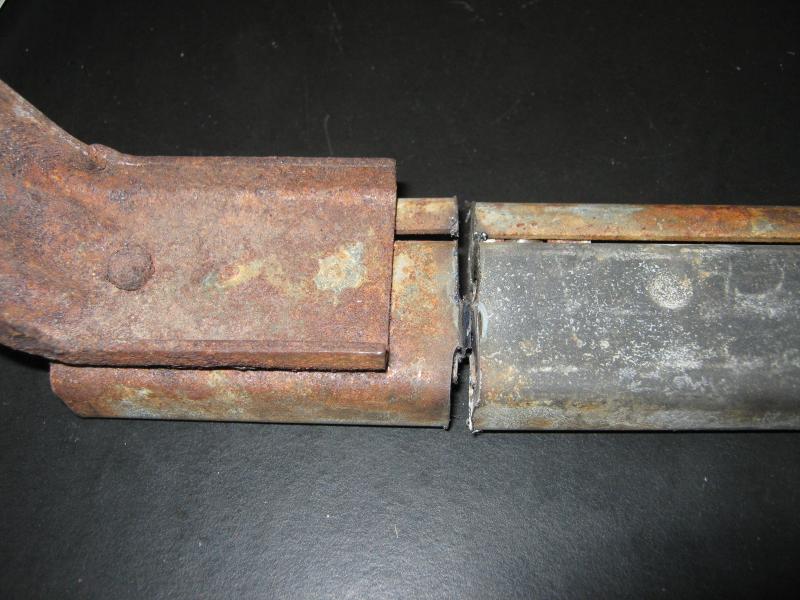
After making the first cut we moved the parts to show what the internal tracks look like when interconnected. Notice the spring clip attachment at the edge of the track. We intentionally cut near here so we could locate and remove the parts without damage.
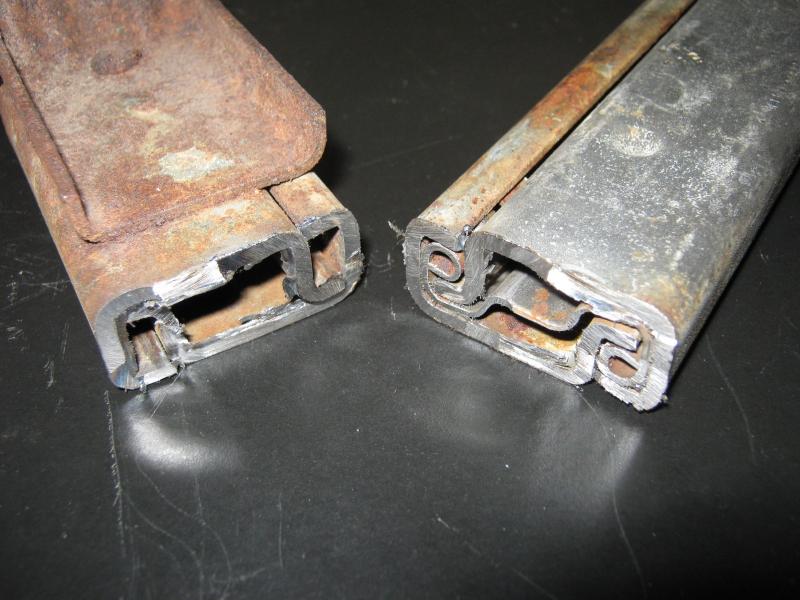
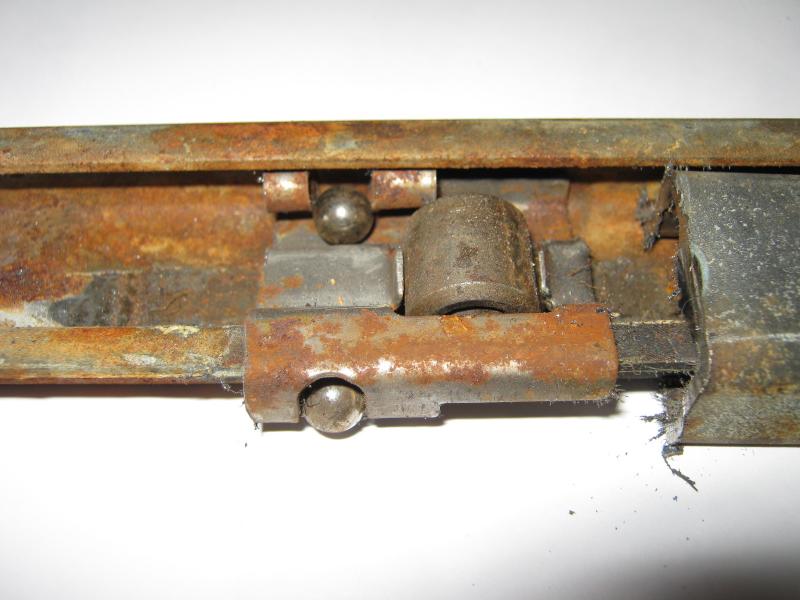
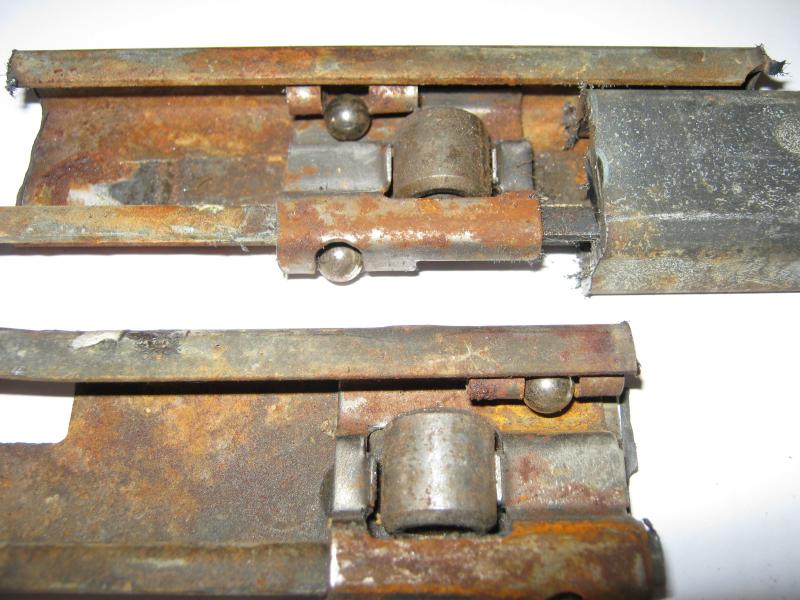
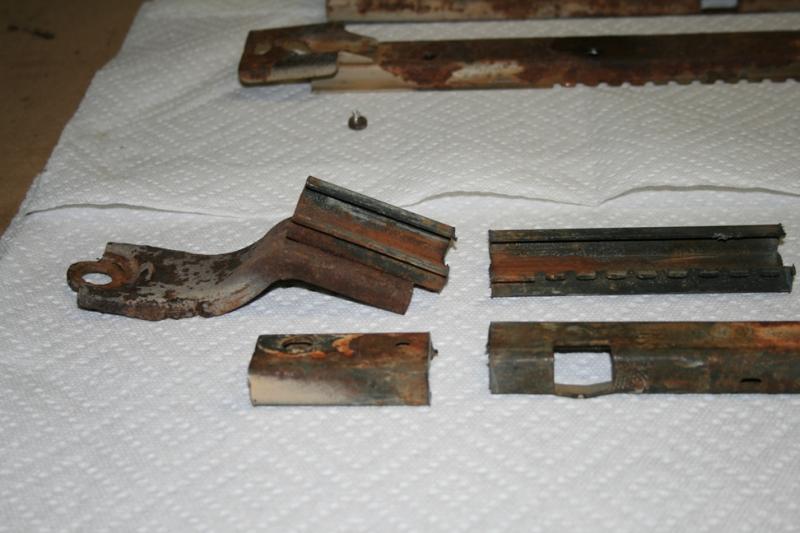
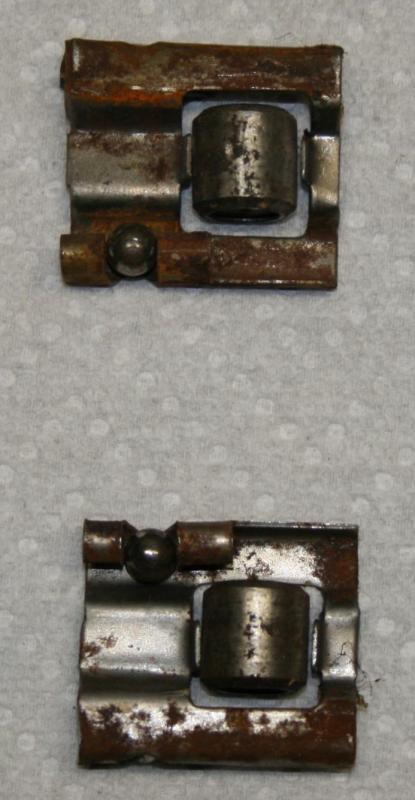
When we cut the other end of the track and then cut in the middle of the track we were able to easily slip the tracks apart and reveal the following clip components. We removed one half of the track and here are three detailed shots of the roller assemblies used to bear the full weight of the driver on the seat. On each track there are two sets of clips, each clip contains one round barrel roller and two small ball bearings. The ball bearings glide (fat chance without grease) along the side of the track and the rollers bear the weight and glide between the two tracks.
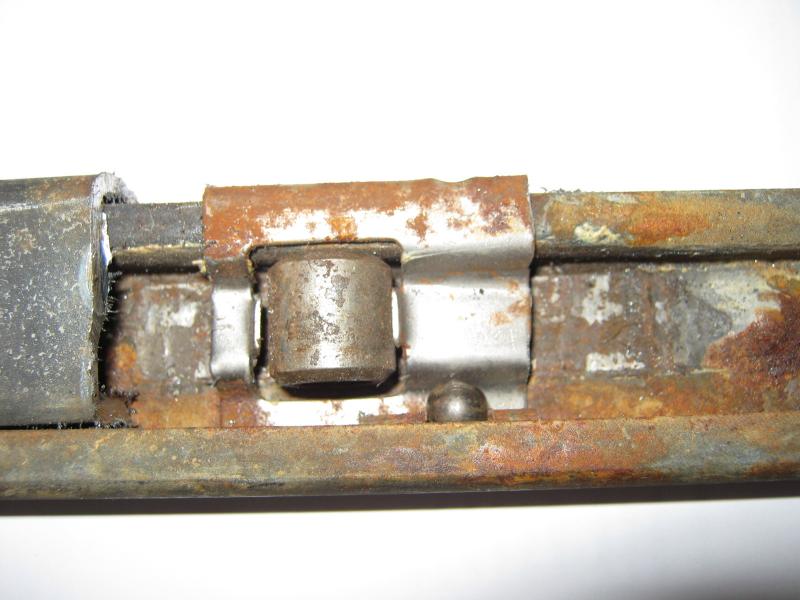
This picture shows clearly how the spring clip with rollers is riding within the tracks. Notice the wear to the left of the picture showing how the grease was ground into the track surface. Four of these little rollers are all that you are really sitting on with these tracks.
Let me continue a bit more on the next post for you.
I purchased a “lot” of eight tracks from another forum member and then took a little time to look each of them over carefully seeking out those that might be the best candidates for my project. I found two and they became my projects called “DT” and “CT” which stands for drilled track and cut track, but more on that later in the post.
Candidate track one was badly rusted and moved on the track only when a large amount of force was applied, so we named it CT and it was to be cut apart for examination of the components to see how it worked.
Candidate track two was also badly rusted and moved a bit more freely but now near as you would want it to, so we named it DT and it was to be drilled at the dimple and rivet areas to see if the track could be drilled and separated in such a manner as to be able to put them back together after being taken apart.
The first two posts highlight cutting apart a seat track and what doing so revealed. The third post highlights the drilling of the second track and its components.
I will summarize on the third post at the end of the pictures. So let’s begin.
This is the lot of eight tracks I purchased for my research.
This is the first cut location for cutting open the track to see how the internal workings operated.
After making the first cut we moved the parts to show what the internal tracks look like when interconnected. Notice the spring clip attachment at the edge of the track. We intentionally cut near here so we could locate and remove the parts without damage.
When we cut the other end of the track and then cut in the middle of the track we were able to easily slip the tracks apart and reveal the following clip components. We removed one half of the track and here are three detailed shots of the roller assemblies used to bear the full weight of the driver on the seat. On each track there are two sets of clips, each clip contains one round barrel roller and two small ball bearings. The ball bearings glide (fat chance without grease) along the side of the track and the rollers bear the weight and glide between the two tracks.
This picture shows clearly how the spring clip with rollers is riding within the tracks. Notice the wear to the left of the picture showing how the grease was ground into the track surface. Four of these little rollers are all that you are really sitting on with these tracks.
Let me continue a bit more on the next post for you.
Last edited by AllC34Me; 04-20-2011 at 08:45 AM.
 04-19-2011, 08:26 PM
#2
Senior Member
Thread Starter
Member Since: Jan 2008
Location: Easton, PA
Posts: 12,154
Received 2,031 Likes
on
1,103 Posts
St. Jude Donor '10
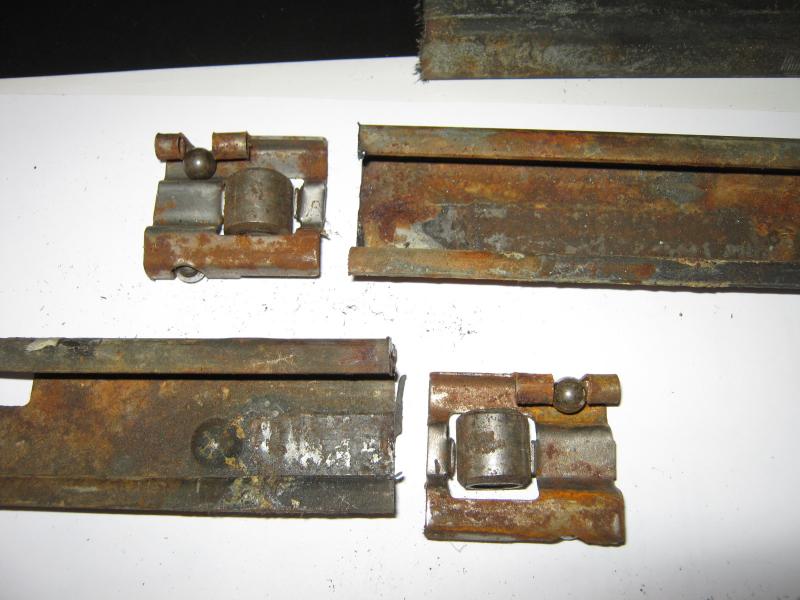
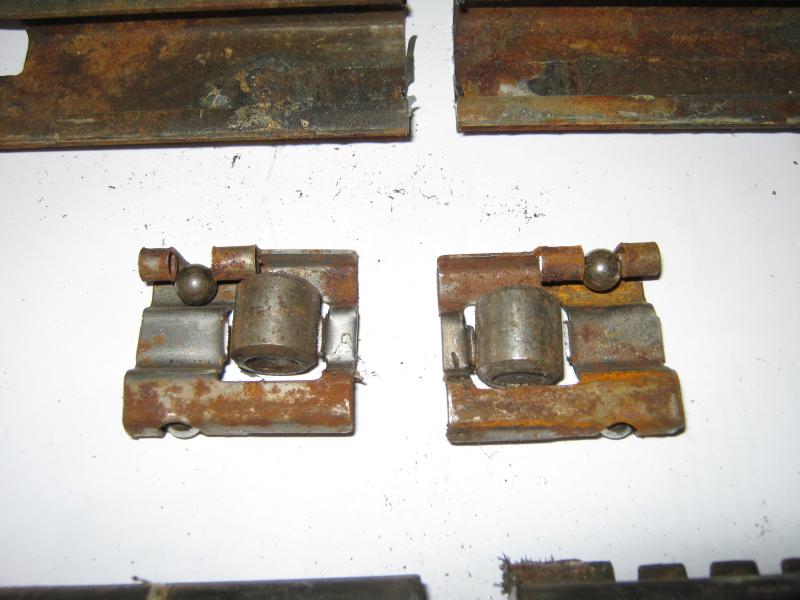
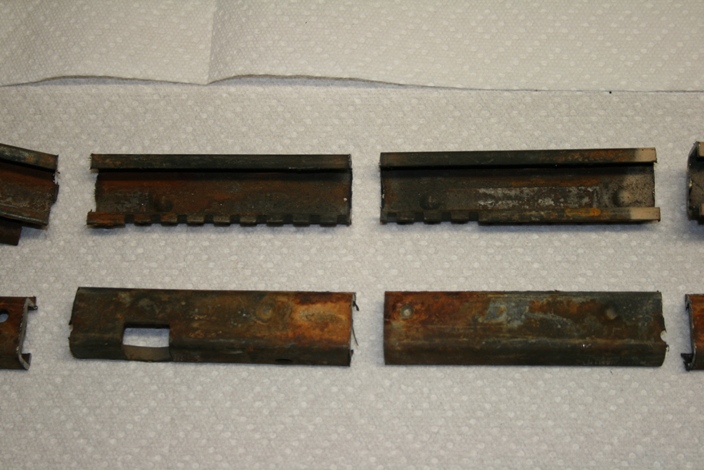
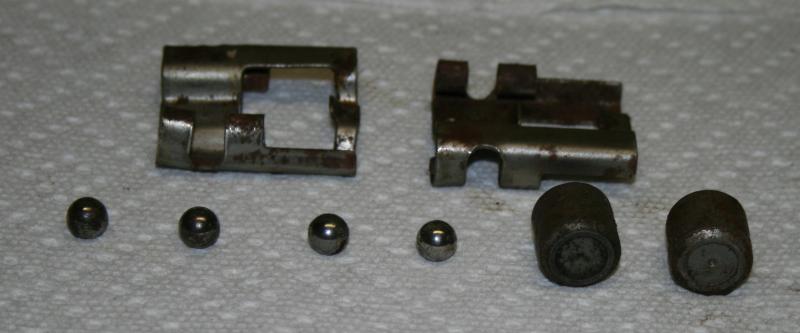
We were able to lift the spring clip assemblies out of the tracks and then easily remove the ball bearings and the rollers from each of the assemblies. Each of the two from this track were rusty, and showed signs of caked on and ground in grease remnants. The inside of the tracks were also quite rusty and had signs of caked on grease and dirt. You can look over the pictures below to see the clips, the track cut locations and the final picture shows the two tracks I was working with on this project. The second track is drilled and that will be what I cover in the next post.

04-19-2011, 08:38 PM
#3
Senior Member
Thread Starter
Member Since: Jan 2008
Location: Easton, PA
Posts: 12,154
Received 2,031 Likes
on
1,103 Posts
St. Jude Donor '10
Cutting a track apart is a great way to get the two halfs away from one another and to get to the inner workings of the track rollers but not a practical way to clean and repair a track so once we knew what we were working with we decided to try a second method, that is, drilling the tracks at the dimple areas and the rivets to see if we could get the tracks apart using this method.
We systematically drilled at each location we found that caused interferrence with the track preventing it from sliding all the way open on either end. We wound up drilling a lot of holes to remove the inward dimples that were applied by a press at the source of manufacturing. We also had to remove the rivets as they also protruded inside the track preventing us from sliding the two tracks off one another.
Once we had all the drilled holes in place we were able to slide the tracks open and remove the sprind clips and bearings, and rollers.
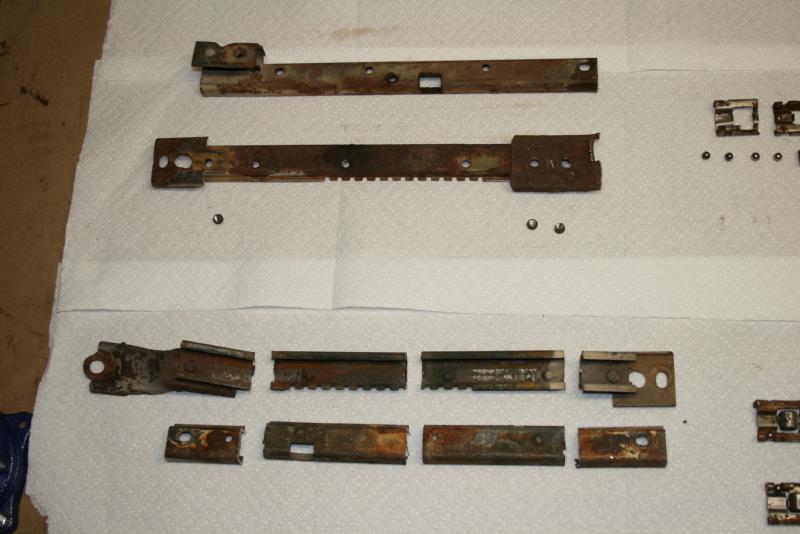
I took the components out and place them next to one another for a group photo at this point. All the components necessary to make a track roll, or not roll smoothly.
And that is the inner workings of a seat track. Not complex, but not built to be taken apart and cleaned either. So where do I go from here? Next up I will clean and resurface the rollers and then media clean the inside of the tracks to get a smooth and rust free surface. I will also be investigating the ability to add a grease fitting in the track surface that will allow for greasing the track once it is re-assembled, but that is a little ways away as I work through the cleaning and repair of the parts I have for this drilled track.
I will post more in the near future as I continue to make progress and if you have any questions fire away and I will do my best to answer them.
Thanks for watching.
David Howard
We systematically drilled at each location we found that caused interferrence with the track preventing it from sliding all the way open on either end. We wound up drilling a lot of holes to remove the inward dimples that were applied by a press at the source of manufacturing. We also had to remove the rivets as they also protruded inside the track preventing us from sliding the two tracks off one another.
Once we had all the drilled holes in place we were able to slide the tracks open and remove the sprind clips and bearings, and rollers.
I took the components out and place them next to one another for a group photo at this point. All the components necessary to make a track roll, or not roll smoothly.
And that is the inner workings of a seat track. Not complex, but not built to be taken apart and cleaned either. So where do I go from here? Next up I will clean and resurface the rollers and then media clean the inside of the tracks to get a smooth and rust free surface. I will also be investigating the ability to add a grease fitting in the track surface that will allow for greasing the track once it is re-assembled, but that is a little ways away as I work through the cleaning and repair of the parts I have for this drilled track.
I will post more in the near future as I continue to make progress and if you have any questions fire away and I will do my best to answer them.
Thanks for watching.
David Howard
The following users liked this post:
caskiguy (04-05-2021)
 04-19-2011, 08:53 PM
#5
Senior Member
Thread Starter
Member Since: Jan 2008
Location: Easton, PA
Posts: 12,154
Received 2,031 Likes
on
1,103 Posts
St. Jude Donor '10
More soon.
David
04-19-2011, 08:56 PM
#6
Drifting

Another thanks for the write-up and detail seat track info not often seen. My 69 tracks worked perfectly, so when I needed to modify them to fit C-5 seats, I went to the bone yard. My reasoning was, it was just as easy to find other tracks to modify and keep the original tracks original.
04-19-2011, 09:13 PM
#7
Senior Member
Thread Starter
Member Since: Jan 2008
Location: Easton, PA
Posts: 12,154
Received 2,031 Likes
on
1,103 Posts
St. Jude Donor '10
Another thanks for the write-up and detail seat track info not often seen. My 69 tracks worked perfectly, so when I needed to modify them to fit C-5 seats, I went to the bone yard. My reasoning was, it was just as easy to find other tracks to modify and keep the original tracks original.
David
04-19-2011, 09:17 PM
#8
Senior Member
Thread Starter
Member Since: Jan 2008
Location: Easton, PA
Posts: 12,154
Received 2,031 Likes
on
1,103 Posts
St. Jude Donor '10
http://forums.corvetteforum.com/c3-p...post1577388545
This is a quick reference posting that will take you to the original WTB thread I posted when looking for tracks to work on and learn from. I have a donor set of four tracks that came from a forum member that I will be sharing soon. I have started my work and assessment of those tracks and will be posting what I find shortly. What I am learning from the "Cut and Drill" tracks will be information I can use on the donor tracks. What I already know is these donor tracks will not be cut, and do not need to be drilled to bring them back into great condition. They do have some rust issues but mechanically I think we can turn these around nicely. There are some odd issues as well which will make the postings fun, so stay tuned and we'll get more education together on the inner working of tracks.
Stay tuned for more soon.
David

 04-20-2011, 07:50 AM
#10
Senior Member
Thread Starter
Member Since: Jan 2008
Location: Easton, PA
Posts: 12,154
Received 2,031 Likes
on
1,103 Posts
St. Jude Donor '10
I also will be looking at alternatives for placing a grease fitment or grease placement hole in the track that can be used to grease the bearings. I am positive that no amount of manipulation will get grease in the correct location on tracks due to the type of mechanisms used for rollers so I would like to test various ways of getting grease into the track at the correct location. I have ordered some threaded zirk fittings and some press fit zirk fittings to play with this as well. I will also be testing the benefit and effectiveness of placing very small hole between dimples which would allow you to spray lithium grease into the groove where the roller ball moves. Again I will document all of this as I move forward so you can all learn along with me.
Hope this helped to answer your questions.
Have a great day.
David
Last edited by AllC34Me; 04-20-2011 at 07:53 AM.
04-20-2011, 08:22 AM
#11
Le Mans Master

Member Since: Apr 2001
Location: Was New Orleans but swam to Baton Rouge LA
Posts: 5,928
Received 275 Likes
on
232 Posts
Cruise-In IX Veteran

Nice post. I sand blasted some of my tracks without pulling them apart and the sand gets in making them difficult to slide.
04-20-2011, 08:40 AM
#12
Senior Member
Thread Starter
Member Since: Jan 2008
Location: Easton, PA
Posts: 12,154
Received 2,031 Likes
on
1,103 Posts
St. Jude Donor '10
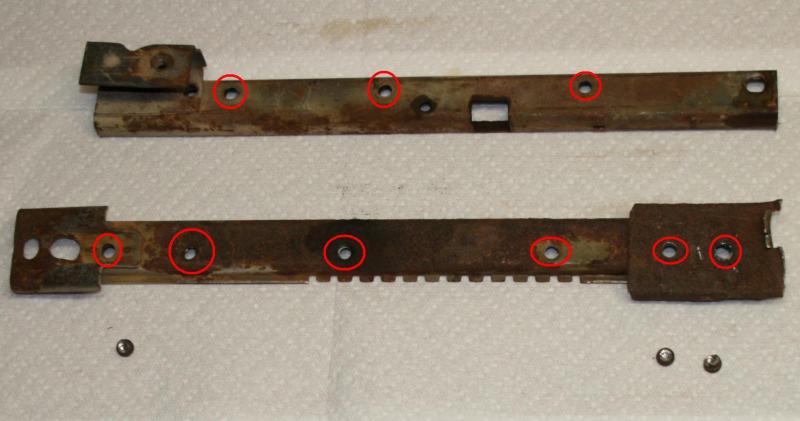
First picture shows the location of wear locations on the track, and where grease needs to be for smooth operation of the tracks.
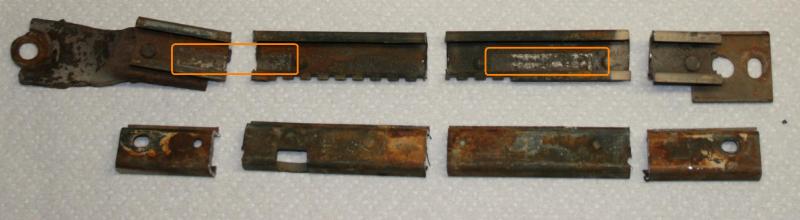
Second picture shows where I drilled rivets (purple circles) and dimples (green circles) on the track.

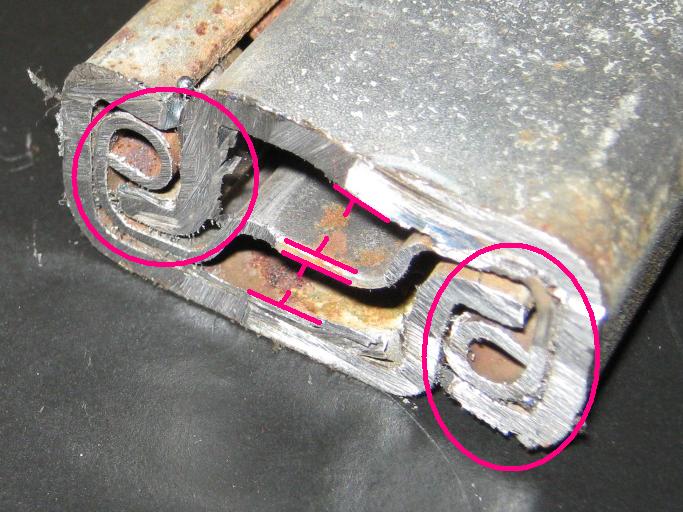
Third picture shows blow up detail of roller clip assembly inside the track which I cut just outside of the clip. As you can see, I got a little close to the clip. It shows how the two parts are held together. The ball bearings actually ride against the side rails while the roller ball rides against the top and bottom rail surfaces. I have marked the locations where I will take some dimensions to know the depth of dimples I will need. I will get that information from my cut track with the dimples still intact.
Have a great day and stay tuned.
David
Second picture shows where I drilled rivets (purple circles) and dimples (green circles) on the track.
Third picture shows blow up detail of roller clip assembly inside the track which I cut just outside of the clip. As you can see, I got a little close to the clip. It shows how the two parts are held together. The ball bearings actually ride against the side rails while the roller ball rides against the top and bottom rail surfaces. I have marked the locations where I will take some dimensions to know the depth of dimples I will need. I will get that information from my cut track with the dimples still intact.
Have a great day and stay tuned.
David
04-20-2011, 08:52 AM
#13
Senior Member
Thread Starter
Member Since: Jan 2008
Location: Easton, PA
Posts: 12,154
Received 2,031 Likes
on
1,103 Posts
St. Jude Donor '10
If you have a set of seat tracks that look well beyond repair and your next thought is to throw them away or recycle them then STOP for just a moment and consider this. The seat tracks are an endangered species for the C-3 Corvette Community. Okay, that does not mean they have huge value, it means we have to figure out ways to make them last a lifetime with our cars. No one is reproducing these parts in whole but thankfully some replacement brackets are still available, expensive, but available. So before you throw them out consider fixing them up or allowing the parts to be removed for use on other sets. The spring clips, rollers, and bearings can all be put back into service and I will gladly cut them out of your tracks if your tracks are shot. So all I ask is that you think before you pitch them and lets see if we can get back on track with our seats.
Thank you.
David Howard
AllC34Me
Thank you.
David Howard
AllC34Me
04-20-2011, 07:33 PM
#15
Team Owner

Member Since: Sep 2006
Location: Westminster Maryland
Posts: 30,173
Likes: 0
Received 2,878 Likes
on
2,515 Posts
Hi David,
VERY interesting pictures and information!
Over the years there have been many questions about the tracks; and taking them apart!
Regards,
Alan
VERY interesting pictures and information!
Over the years there have been many questions about the tracks; and taking them apart!
Regards,
Alan
04-20-2011, 11:13 PM
#16
Drifting
WOW! How comprehesive. My first assumption was that sandblasting the roller area would cause an uneven-ness that would not promote rolling. After some thought, it actually is just a point to ponder and investigate. The sandblasted area may help keep the grease where it belongs. More things to consider...and investigate.
04-20-2011, 11:48 PM
#17
Racer

This is awesome. Mine work decent, but need some lubing, cleaning and painting. This thread is a great look into how they work and how they can be fixed if needed. Man, I wish I had sent mine to you when we were PM'ing a week or so ago...
04-21-2011, 12:39 AM
#18
Le Mans Master

I hose down seat tracks with PB Blaster lube, work them back and forth for a while until they feel "free" then spray with motorcycle chain lube and they usually work well but, I live in the Peoples Republik of Kalifornia so rust usually insn't an issue here (dry off all external run-off.) In the past I have used spray lithium grease but, have found the MC chain spray is superior for lubrication.
04-21-2011, 08:19 AM
#19
Senior Member
Thread Starter
Member Since: Jan 2008
Location: Easton, PA
Posts: 12,154
Received 2,031 Likes
on
1,103 Posts
St. Jude Donor '10
WOW! How comprehesive. My first assumption was that sandblasting the roller area would cause an uneven-ness that would not promote rolling. After some thought, it actually is just a point to ponder and investigate. The sandblasted area may help keep the grease where it belongs. More things to consider...and investigate.
Okay, you have given me another item to check here and I will include it in my investigation. I also thought that if the tracks had some small grooves running the length of the roller area the grease or lubricant would have a place to stay but hey, I could be wrong. We'll see. I'll check out the effects of blasting (course, and fine) and we will see how it impacts the rollers. Good idea, thank you. David
04-21-2011, 08:23 AM
#20
Senior Member
Thread Starter
Member Since: Jan 2008
Location: Easton, PA
Posts: 12,154
Received 2,031 Likes
on
1,103 Posts
St. Jude Donor '10
No problem there. I have a set of four I am working on now for a gentleman down in Florida. They do not appear to be in bad shape except some exterior rusting which did look rough. I have four of them moving pretty smoothly now and I am working on the rust areas on the outside to repair the rust through. When that is completed I will report the results on this thread as well. You want to send them to me I will clean, inspect, lube, media blast if needed and paint them for you. Be glad to help you out if you don't mind waiting a week or so for me to get them done.