
Underbody Fiberglass Finish
 03-25-2017, 09:14 PM
#1
Burning Brakes


Thread Starter

I'm in the process of removing all of the over spray, sound deadener, undercoating, gravel and grease from the underside of my body. I have great access since I have the body on a rotisserie. I found the absolute best method to be lacquer thinner, rags. brass wire brush and scotch pads. This has been quite a time consuming process. This is a job that has to be done outside !!!!!! The lacquer thinner is highly flammable as we all know. The smallest spark would be deadly. The fumes inside would be over powering. However the lacquer has removed everything very nicely. Here's my question.......What should the fiberglass look like when clean. I have seen pictures of others that have done theirs and any pictures I've seen have a nice consistent mixture of fibers. I don't have that. I have a lot of areas that no fibers show. From what I can tell it appears this happens in the lower areas of each panel where more resin than fiberglass settled against the mold during the fabrication process. None of the body has patches or repairs that would make it a different finish, believe me that was my first thought. I just expected a completely consistent finish and it's not there.
So does anyone have pictures of their underbody and is this a common finish under our cars.
Ned
So does anyone have pictures of their underbody and is this a common finish under our cars.
Ned
 03-25-2017, 09:53 PM
#2
Racer

I'm in the process of removing all of the over spray, sound deadener, undercoating, gravel and grease from the underside of my body. I have great access since I have the body on a rotisserie. I found the absolute best method to be lacquer thinner, rags. brass wire brush and scotch pads. This has been quite a time consuming process. This is a job that has to be done outside !!!!!! The lacquer thinner is highly flammable as we all know. The smallest spark would be deadly. The fumes inside would be over powering. However the lacquer has removed everything very nicely. Here's my question.......What should the fiberglass look like when clean. I have seen pictures of others that have done theirs and any pictures I've seen have a nice consistent mixture of fibers. I don't have that. I have a lot of areas that no fibers show. From what I can tell it appears this happens in the lower areas of each panel where more resin than fiberglass settled against the mold during the fabrication process. None of the body has patches or repairs that would make it a different finish, believe me that was my first thought. I just expected a completely consistent finish and it's not there.
So does anyone have pictures of their underbody and is this a common finish under our cars.
Ned
So does anyone have pictures of their underbody and is this a common finish under our cars.
Ned
the results were natural fiberglass
i would not use wire brushes or scotch-pads, they can scratch the virgin fiberglass
sorry no pics
................................ tom
03-26-2017, 08:39 AM
#4
Team Owner

Member Since: Sep 2006
Location: Westminster Maryland
Posts: 30,173
Likes: 0
Received 2,878 Likes
on
2,515 Posts

Hi Ned,
Here are a couple of examples of the underbody on my 71.
The inner sides of the fenders, and rear clip are VERY different.
Having fun?
Regards,
Alan
Here are a couple of examples of the underbody on my 71.
The inner sides of the fenders, and rear clip are VERY different.
Having fun?
Regards,
Alan
03-26-2017, 09:29 AM
#5
Burning Brakes
Thread Starter
I agree. I have only been using the brass wire brush in the uneven surfaces like the bonding adhesive at some of the joints and in very hard to reach places. It's only the size and shape of a toothbrush, very soft and flexible brush.
Ned
03-26-2017, 09:34 AM
#6
Burning Brakes
Thread Starter
Hi Alan,
Yes, that is exactly what mine looks like. Thanks for posting the pictures. I figured it was from the resin settling differently in the corners vs. the flat areas. It seems the high points and flat areas of the panels show more fibers than the low points and corners.
I'm sure back in the day no one ever though we would be looking at this part, or most parts, of these cars with such scrutiny
Ned
03-26-2017, 09:55 AM
#7
Team Owner
Member Since: Sep 2006
Location: Westminster Maryland
Posts: 30,173
Likes: 0
Received 2,878 Likes
on
2,515 Posts
Hi Ned,
Sometimes when we're restoring a car we don't want to quite believe what we're seeing and what the car is telling us.
It's pretty nifty what you can learn when you take one apart carefully!
Regards,
Alan
Sometimes when we're restoring a car we don't want to quite believe what we're seeing and what the car is telling us.
It's pretty nifty what you can learn when you take one apart carefully!
Regards,
Alan
03-27-2017, 08:17 AM
#8
Burning Brakes
Thread Starter
Here's something I found hard to believe... "SO that's where that pesky little bolt went" This bolt looks like it was cast right in the mold with the floor pan. I don't recognize the bolt, could it be from the mold equipment?
03-27-2017, 08:56 AM
#9
Team Owner
Member Since: Sep 2006
Location: Westminster Maryland
Posts: 30,173
Likes: 0
Received 2,878 Likes
on
2,515 Posts
Hi Ned,
I've seen that before.
When you think what the molds were like, even for the underbody, it's pretty amazing that that was in there for at least a while!
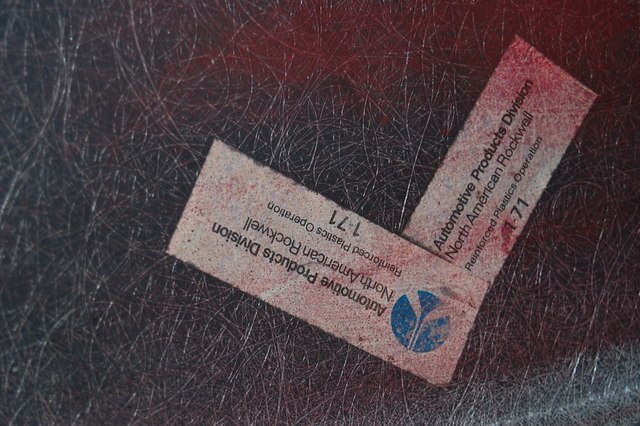
Have you come across any Rockwell labels yet?
Regards,
Alan
I've seen that before.
When you think what the molds were like, even for the underbody, it's pretty amazing that that was in there for at least a while!
Have you come across any Rockwell labels yet?
Regards,
Alan
03-28-2017, 07:38 AM
#10
Burning Brakes
Thread Starter
Alan,
No I haven't seen any Rockwell labels. That's a very nice find you have there. I've seen pictures of the labels in the past but not still attached to the car. I love finding the little small things on these cars that bring back the history.
Ned
Alan, This bolt is a raised area on the underside of the panel. It was either an indentation in the mold or the bolt is smashed in my floor panel. I'm going to clean the other side and see if I can see the rest of the bolt from the inside.
Last edited by NMT1957; 03-28-2017 at 07:41 AM.
03-28-2017, 07:57 AM
#11
Team Owner
Member Since: Sep 2006
Location: Westminster Maryland
Posts: 30,173
Likes: 0
Received 2,878 Likes
on
2,515 Posts
Hi Ned,
The Rockwell labels are actually imbedded in the resin so are well preserved.
Those in my photo are on the underside of the hood surround panel at the top of the left wheel well. They're also often seen in the spare tire tub.
It looks to me as though at some point a screw got into the mold and when it was closed it left an impression in the mold surface. Until the surface of the mold was repaired the resin used for each subsequent part filled the void in the mold and left that 'memory' off the screw on the part.
Just where is it located?
Regards,
Alan
Last edited by Alan 71; 03-28-2017 at 07:58 AM.
03-28-2017, 08:05 AM
#12
Burning Brakes
Thread Starter
Alan,
I'm not near the car right now but I'm trying to remember exactly where it was. So much for the memory....I'll check later today and let you know. This whole "going to work" thing has been getting in the way of my progress. HA!
Ned
I'm not near the car right now but I'm trying to remember exactly where it was. So much for the memory....I'll check later today and let you know. This whole "going to work" thing has been getting in the way of my progress. HA!
Ned
03-28-2017, 08:17 AM
#13
Team Owner
Member Since: Sep 2006
Location: Westminster Maryland
Posts: 30,173
Likes: 0
Received 2,878 Likes
on
2,515 Posts
Hi Ned,
Ah! Going to work!!!!
My wife and I each spent 50 years doing that.
Have the time to do whatever I want each day now, but somewhere along the way I became an old man.
Regards,
Alan
Ah! Going to work!!!!
My wife and I each spent 50 years doing that.
Have the time to do whatever I want each day now, but somewhere along the way I became an old man.
Regards,
Alan
03-28-2017, 08:31 AM
#14
Instructor


That bolt probably fell off some of the processing equipment and got stuck in the fiberglass matt prior to molding. Those molds were matched metal molds bolted into a hydraulic press. With a part thickness of only about a .100, the bolt left an impression in both the core and cavity of the mold. To repair would require welding the core and cavity of the mold and benching the surface back to a smooth surface.
03-28-2017, 08:37 AM
#15
Instructor
Hi Ned,
The Rockwell labels are actually imbedded in the resin so are well preserved.
Those in my photo are on the underside of the hood surround panel at the top of the left wheel well. They're also often seen in the spare tire tub.
It looks to me as though at some point a screw got into the mold and when it was closed it left an impression in the mold surface. Until the surface of the mold was repaired the resin used for each subsequent part filled the void in the mold and left that 'memory' off the screw on the part.
Just where is it located?
Regards,
Alan
I found some of the labels and crayon markings on my 72 when I restored the car. The labels were placed on the mold surface prior to putting the fiberglass and resin in place.
I also cleaned all of the undercoating from the fiberglass and left it natural. That shows the history and patina of the car. I really like that look.
03-28-2017, 08:31 PM
#16
Burning Brakes
Thread Starter
Alan,
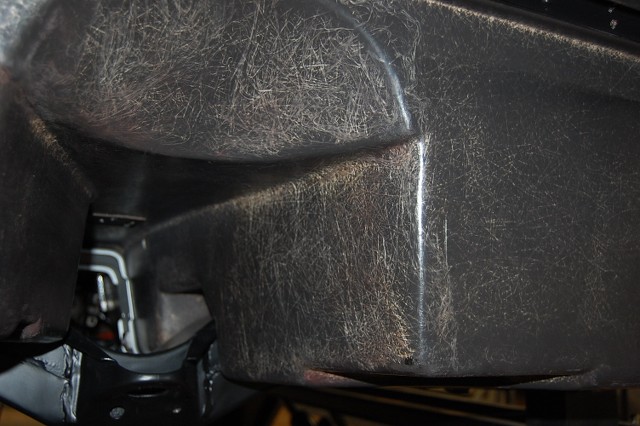
Here's a picture of where the bolt marking is located. It's between the battery compartment and the jack compartment on the high flat area. It's hard to see in this picture but hopefully you'll be able to spot it. Also the picture shows the finish I'm coming up with after many hours of cleaning. There are still a few spots that need cleaned in this picture and a final wipe down. A coat of semi flat clear, that was suggested by a very reliable member, HA, and it should be easy to keep clean.
Here's a picture of where the bolt marking is located. It's between the battery compartment and the jack compartment on the high flat area. It's hard to see in this picture but hopefully you'll be able to spot it. Also the picture shows the finish I'm coming up with after many hours of cleaning. There are still a few spots that need cleaned in this picture and a final wipe down. A coat of semi flat clear, that was suggested by a very reliable member, HA, and it should be easy to keep clean.
Last edited by NMT1957; 03-28-2017 at 08:32 PM.
04-10-2017, 06:23 PM
#17
Burning Brakes
Thread Starter
OK, I'm pretty sure this is the worst job there is to do on a car. Scraping off several layers of undercoating, over spray and road grime is not a job for the faint of heart. The car was painted twice over the original and each one put a fresh coat of undercoating on. It's been 2 weeks of part time work and 10 gallon of lacquer thinner but I almost have it done. One more day later this week and I can move on to other things. I'm debating if I'm going to put the "sound deadener" like the factory. I mean really? I just scraped all of that off. I can't cover up the fresh clean fiberglass. Hey maybe there's a clear product I can use for sound deadener? Any ideas?
Ned
Ned
04-10-2017, 07:01 PM
#18
Team Owner
Member Since: Sep 2006
Location: Westminster Maryland
Posts: 30,173
Likes: 0
Received 2,878 Likes
on
2,515 Posts
Hi Ned,
Originally the sound deadener was only sprayed into the wheel-wells� and really very little was sprayed.
Since the wheel-wells also received 'some' black-out you can have some leeway in doing a nicer job with the sound deadener and paint than was done in St.Louis.
The blackout was typically applied to the areas of the wheel-well that the buyer could see while he walked around the car WITHOUT bending down.
The 'bending down' is an important for another reason�.. typically the paint was only buffed as far down as would be even with a person's knees!!!
Regards,
Alan
Last edited by Alan 71; 04-10-2017 at 07:03 PM.
04-10-2017, 07:35 PM
#19
Burning Brakes
Thread Starter
Alan,
Once again I am reminded that this was a production car and not the "hand built" car I hoped it was. Everything was done to a minimum to get the car out for the lowest dollar possible.
All very useful and interesting information. I might take advantage of the leeway you mentioned. The underside is not as a consistent finish as I hoped for.
Ned
04-10-2017, 07:49 PM
#20
Burning Brakes
Thread Starter
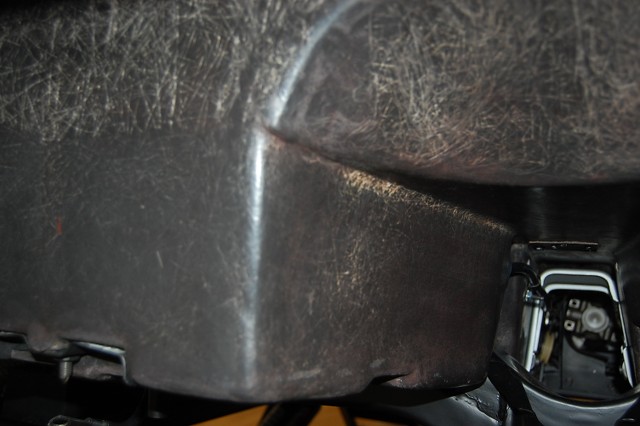
I found another tell tale sign of side exhaust. This picture is the underneath side of the flat part of the left front fender. I never heard of a marking here. I can understand why it might be there though. This was to let someone know this clip gets the bottom of the fenders "hacked away" as I like to call it, for the side exhaust clearance. Have you ever seen this marking in this location? I wonder if I should ask on the NCRS Site. I haven't been on there for quite a while.
Ned
Ned