
HELP body off checklist
 01-21-2006, 11:10 AM
#1
Racer

Thread Starter
Member Since: Oct 2002
Location: Muskoka ontario
Posts: 251
Likes: 0
Received 0 Likes
on
0 Posts

i'm almost ready to pull the body off the '76. but before i hook the straps up, i'd like some advise from you body-off veterans out there. any checklist you may have used or things you would have liked to have done while the body was still on. things like that would be helpful. 
 01-21-2006, 05:31 PM
#2
Advanced

Member Since: May 2004
Location: Michigan
Posts: 98
Likes: 0
Received 0 Likes
on
0 Posts
Make sure you have each of the 4 bolts on each side, the one in the kick panels got me. You also must take out the supports for the front bumper that run back to the frame. The tail light harness and most of the grounds etc, need to come off the frame. Dont forget to support the front end, as there is nothing to hold it together up there. As for the rear, I removed the fuel tank and ran a strap from where the filler neck used to go, and wrapped it around a 4x4 that i had underneath. The steering column needs to come unhooked along with the brake lines which are attached to the frame.
anyone else...did i miss anything?
anyone else...did i miss anything?
01-21-2006, 09:36 PM
#3
Safety Car


Make sure your rocker channels aren't to rusty to hold the straps. Mine were real bad but I got lucky and didn't drop the body. They did bend quite a bit. Body-off project
01-23-2006, 12:53 PM
#5
Safety Car
I don't know if your 76 is like my '69 but I had a seat belt cable under the tunnel and drive shaft that had to be disassasembeld First. I don't know much about any other year 'vett but my own, and not much about it. 
01-23-2006, 12:57 PM
#6
Burning Brakes

Member Since: Jan 2004
Location: Va
Posts: 1,022
Likes: 0
Received 0 Likes
on
0 Posts

disconnect seat belt and hand brake cables
record number of shims on each body mount, use same nuber when you put back on.
remove the frame to body/bumper bolts/brackets, not sure if there are any on a 76, i have a 71.
when installing the top rear shock mount bolts be sure the nut is on the inside of frame, otherwise you you won't be able to remove the bolt once the body is back on.
take plenty of pictures for future reference.
Have Fun!
01-23-2006, 01:05 PM
#7
Instructor
Member Since: Sep 2005
Location: St Louis Missouri
Posts: 241
Likes: 0
Received 0 Likes
on
0 Posts
Along with the information above, don�t forget to detach the parking brake. There is also a cable hoop that attaches to the frame near where the negative on the battery is connected. When I pulled mine I had already removed the nose. To use my cherry picker I took a 2x4 and trimmed it so that it would fit in the frame channel then bolted though it to some brackets for the straps. Oh yea, I think there is also an electrical ground near the firewall drivers side corner. On the manual transmission there is a cable that runs from reverse gear to the steering column. Also make sure you disassemble the shifter if it�s a manual. When I did mine I already had the nose and tail off.
Good luck
Good luck
01-23-2006, 01:50 PM
#8
Racer
Thread Starter
Member Since: Oct 2002
Location: Muskoka ontario
Posts: 251
Likes: 0
Received 0 Likes
on
0 Posts
here's what i got so far:
REDWING's list
Here is a list of the things needed to be done to remove the body.
Remove:
From Rear;
1.) The rear bumpers and support rackets
2.) License plate bezel and exhaust bezels
3.) Valence panel
4.) Ground strap from antenna
5.) Gas tank ground and sending unit wire
From Front;
1.) Remove the hood
2.) Valence panel and air dam
3.) Unbolt nose support from frame (will stay with body)
4.) Starter wires
5.) Ground straps (more than one place)
6.) Carbon can vacuum line
7.) Oil pressure gage line from motor
8.) Throttle cable from motor
9.) Coil wires
10.) Heater hoses and A/C compressor from motor. I straped the compressor to the fender.
11.) Alternator wires and temperature sending unit wire
12.) Fan and shroud, transmission cooling lines, radiator hoses, and radiator .
13.) Unbolt master brake cylinder from power boster.
From Center;
1.) Parking brake cable and brackets from under seat area
2.) Shifter cable and down shift wire (automatic) and speedometer cable
3.) Battery ground strap from frame
4.) Rocker moldings
also: seatbelt cables, count shims for future refference.
anything else?????
pics anyone???
bought straps, where do they go??? doors on off???
01-23-2006, 04:26 PM
#9
Burning Brakes
Member Since: Jan 2004
Location: Va
Posts: 1,022
Likes: 0
Received 0 Likes
on
0 Posts
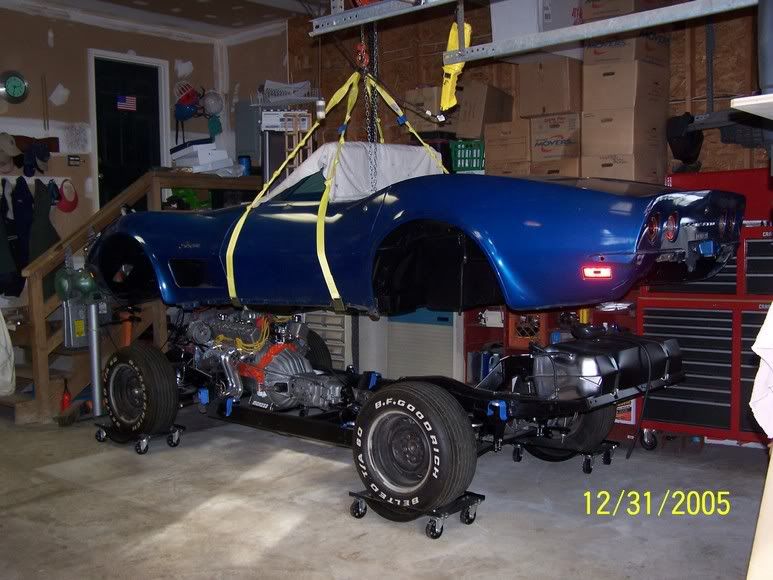
Sorry didn't have digital camera 4 years ago when I took the body off. note I had to tie knots in the slings to level the body out when taking it off. I recommend a chain hoist vs. a come-along like easier to manuver.

 01-23-2006, 07:18 PM
#11
Burning Brakes
Member Since: Jan 2004
Location: Va
Posts: 1,022
Likes: 0
Received 0 Likes
on
0 Posts
sounds crude but it works, look at the pic on the blue vert. I think I tied 4 or 5 in mine.
If you are redoing your interior, now would be a good time to remove it to reduce weight, even if you just remove the seats.
If you are redoing your interior, now would be a good time to remove it to reduce weight, even if you just remove the seats.
01-23-2006, 07:21 PM
#12
Melting Slicks

Check out this link (all you need to know, bottom goes into detail)
http://www.corvetterepair.com/tech_tips.htm
MID YEAR BODY REMOVAL AND REINSTALLATION
Body Removal Checklist
1. Battery - Disconnect only
2. Steering Column - Disconnect and remove
3. Master Cylinder - Disconnect lines only
4. Clutch Rod pedal - Disconnect wire clip only
5. Back up light plug - Disconnect only
6. Acceleration rod and ground straps - Disconnect only
7. Oil pressure line, big and small block - Disconnect only
8. Engine Wires:
Temperature sending unit - Disconnect only
Coil wires + and - - Disconnect only
Brake warning wire, 1967 only - Disconnect only
Alternator wires - Disconnect only
9. Distributor Tachometer Drive Unit - Disconnect only
10. A-Frame dust covers - Remove from under A-arm
11. Hood - Remove from car
12. Shifter ball and T-Handle - Remove
13. Side pipe covers or rocker moldings - Remove
14. Front bumpers and braces - Remove
15. Starter wires - Disconnect and remove
16. Splash shields, large and small - Remove
17. License plate trim - Remove
18. Rear exhaust panel - Remove
19. Gas tank sending unit wires - Disconnect and remove
20. Antenna and ground strap - Disconnect and remove
21. Seat belt anchors, left, right and center - Disconnect and remove
22. Emergency brake cable - Disconnect
23. Body mount, rear access door covers - Remove
24. Ground strap, left front body mount - Remove
25. Radiator core support bolts, lower only - Remove
26. All body mounts - Remove
'63-'64 coupe - 10 bolts
'63-'64 roadster - 12 bolts
'65-'67 coupe - 8 bolts
'65-'67 roadster - 10 bolts