
Technical advice for making fiberglass parts/molds needed!
 02-22-2010, 04:05 PM
#1
Team Owner


Thread Starter


I searched the forum for exact techniques for recreating fiberglass parts by making a mold, but found nothing real substantial. Some of the pieces that I have in my garage seem discontinued and now are probably rare and are not currently reproduced by anyone. I am also not interested in doing anything else other than supporting the body work on my own cars, if they are ever hit- since I plan on vintage racing.
What is the best method for laying up a mold? I have heard using aluminum foil over the part to be reproduced is a quick trick and then you sand it off. I also have heard of putting multiple coats of wax down on the original part, then laying down the glass, and then their is mold release which to me looks like it would get displaced when you lay on the glass or brush the resin down. Thus I am liking the aluminum foil and a release agent so as not to hurt my original panels. Also for making such thing as a flair, do you put down a single sheet of glass cloth into the mold and how can you get that flat to the mold when dealing with the curve? Or would it be better to lay in a coating of resin with a brush or even spray a gelcoat first, then build off the back with glass strips of mat and resin? I would assume that the gelcoat sprayed into the mold would give the best surface? This scares me in that laying the glass onto the gelcoat might fracture the gelcoat so I would assume that you have to let the gelcoat setup and then glass under it carefully and rolling out the air bubbles is difficult, but the mold with give you backing and strength to push on the material to work it consistently and evenly. I also think that 3 layers of cloth or the equivalent would do for strength? One set of flairs that I have uninstalled are a poor fit to the body, so I was planning on correcting that fit to the fender first by adding to the flair for a contour fit. I was going to space the flare out from the car body about a 1/2 inch to 1/4 and build that space up to the fender, then to make the molds. I had a V-8 IMSA flared 914 years ago and I remember those flares were a perfect fit to the body and I used fasteners to secure them. Who ever made those units was very precise! Any insight would be appreciated! Before tackling a project, I like to have a definitive direction to go in and a plan, instead of messing up everything by experimentation. Thanks!
What is the best method for laying up a mold? I have heard using aluminum foil over the part to be reproduced is a quick trick and then you sand it off. I also have heard of putting multiple coats of wax down on the original part, then laying down the glass, and then their is mold release which to me looks like it would get displaced when you lay on the glass or brush the resin down. Thus I am liking the aluminum foil and a release agent so as not to hurt my original panels. Also for making such thing as a flair, do you put down a single sheet of glass cloth into the mold and how can you get that flat to the mold when dealing with the curve? Or would it be better to lay in a coating of resin with a brush or even spray a gelcoat first, then build off the back with glass strips of mat and resin? I would assume that the gelcoat sprayed into the mold would give the best surface? This scares me in that laying the glass onto the gelcoat might fracture the gelcoat so I would assume that you have to let the gelcoat setup and then glass under it carefully and rolling out the air bubbles is difficult, but the mold with give you backing and strength to push on the material to work it consistently and evenly. I also think that 3 layers of cloth or the equivalent would do for strength? One set of flairs that I have uninstalled are a poor fit to the body, so I was planning on correcting that fit to the fender first by adding to the flair for a contour fit. I was going to space the flare out from the car body about a 1/2 inch to 1/4 and build that space up to the fender, then to make the molds. I had a V-8 IMSA flared 914 years ago and I remember those flares were a perfect fit to the body and I used fasteners to secure them. Who ever made those units was very precise! Any insight would be appreciated! Before tackling a project, I like to have a definitive direction to go in and a plan, instead of messing up everything by experimentation. Thanks!
Last edited by TCracingCA; 02-22-2010 at 09:35 PM.
 02-22-2010, 04:26 PM
#2
Team Owner
Member Since: Sep 2006
Location: Westminster Maryland
Posts: 30,173
Likes: 0
Received 2,878 Likes
on
2,515 Posts

Hi TC,
I suggest you contact Road-RaceVette (Stan). He's mentioned in some of his threads that he and someone who works for him have made molds for producing fiberglass parts. I believe the parts were a L-88 hood and some fender flairs.
Perhaps he can give you some guidance.
Regards,
Alan
I suggest you contact Road-RaceVette (Stan). He's mentioned in some of his threads that he and someone who works for him have made molds for producing fiberglass parts. I believe the parts were a L-88 hood and some fender flairs.
Perhaps he can give you some guidance.
Regards,
Alan
Last edited by Alan 71; 02-22-2010 at 04:39 PM.
02-22-2010, 05:28 PM
#3
Burning Brakes

Many books have been written on composite processing, so I can�t begin to cover all the details, but basically if you want to reproduce a part, you need to lay up reinforcement and resin material on top �take a splash� of the original part. If you reinforce the splash, it can become your mold. Organic wax does make good mold release, but make sure you don�t have any mechanical locks trapping the part in the mold.
Composites One has the materials you will need and processing guides, Good luck!
http://www.compositesone.com/process.php
Composites One has the materials you will need and processing guides, Good luck!
http://www.compositesone.com/process.php
02-22-2010, 06:16 PM
#4
Race Director

Here is the basic process.
http://www.fgci.com/howto/ht003fiberglass_mold.html
I would suggest you start with some scrap and try it and using aluminum is not ideal for this.
If you are making larger compound parts, it can get tricky quickly, but you will learn as you go.
This place also has all the supplies needed.
Visit a local boat builder/ repairer in your area to look at molds and ask questions.
Good luck.
 02-22-2010, 09:28 PM
#5
Team Owner
Thread Starter
I think I am close and have great experience with fiberglass, but not recently. I am an old surf board repairing guy and applied that to Corvettes and now would like to take the next step. Just as my welding experience has grown. Once I started doing projects, it all started to come together. I think those links will give me a solid basis for developing the ultimate technique that will work for me. As comments and suggestions were very much appreciated. Take care! I will look to see if anyone else jumps in with good guidance. I just finished a conversation with a guy that says to come over and watch a tape recording of Muscle car garage where they were flaring a Mustang road racer and used some interesting methods to include some sort of flower arrangement foam. I can't wait to watch the show he is talking about.
02-22-2010, 10:15 PM
#6
Racer

Member Since: Aug 2007
Location: Jackson MO
Posts: 363
Likes: 0
Received 0 Likes
on
0 Posts
Be carefull. Fiberglass work is like bricklaying. It looks simple, but there are many tricks and techniques to getting a quality product. IMO you would be money ahead by having your molds made by a qualified craftsman and then learning from him the casting process.
02-22-2010, 10:16 PM
#7
Racer
Member Since: Aug 2007
Location: CA
Posts: 323
Likes: 0
Received 0 Likes
on
0 Posts
Hi TC,
I suggest you contact Road-RaceVette (Stan). He's mentioned in some of his threads that he and someone who works for him have made molds for producing fiberglass parts. I believe the parts were a L-88 hood and some fender flairs.
Perhaps he can give you some guidance.
Regards,
Alan
I suggest you contact Road-RaceVette (Stan). He's mentioned in some of his threads that he and someone who works for him have made molds for producing fiberglass parts. I believe the parts were a L-88 hood and some fender flairs.
Perhaps he can give you some guidance.
Regards,
Alan
 glassman74
02-23-2010, 07:20 AM
glassman74
02-23-2010, 07:20 AM
#8
Safety Car

I have been making some stuff in carbon fiber ,which is basically the same process as fiberglass.
I made moulds of the interior pieces and exterior panels using plaster of paris ($15 for a big bag from Home Depot). I wax the part pretty heavily (I use Maguires #8 mold release wax, but multiple layers of any carnuba based wax will work or even PAM) then just mix up the PoP, and slap it on just remember to make sure that the edge where you are going to try and "pop" the mould is nice and thick (For larger parts using hemp or gauze bandage in the PoP will give some added strength to the mold). Just remember that if the piece you are making is a skin (ie sits on top of the existing piece) you need to build up the height of the original piece a little with 2 or three layers of masking tape or paint mask (looks like a big piece of masking tape air brushers use) before you apply the PoP.
Allow the PoP to dry overnight, use a plastic scraper and apply gentle pressure and you should feel the mould release. If the mold should break, dont panic and dont throw it around the room in anger, simply continue carefully and remove the remaining piece/pieces of the mold. PoP breaks quite cleanly, you can simply place the mold back on the original piece, clamp and apply PoP over the top and its all good to go (u may need to do some finishing work on the underside, light skim of glazing putty to fix any small cracks)
Leave the mould for another 24 hours, then lightly sand and coat with the same mould release agent you used before. All done...ready to fiberglass.
Last edited by lvrpool32; 02-23-2010 at 01:43 PM.

 02-23-2010, 09:33 PM
#11
Melting Slicks

02-24-2010, 05:16 PM
#12
Safety Car

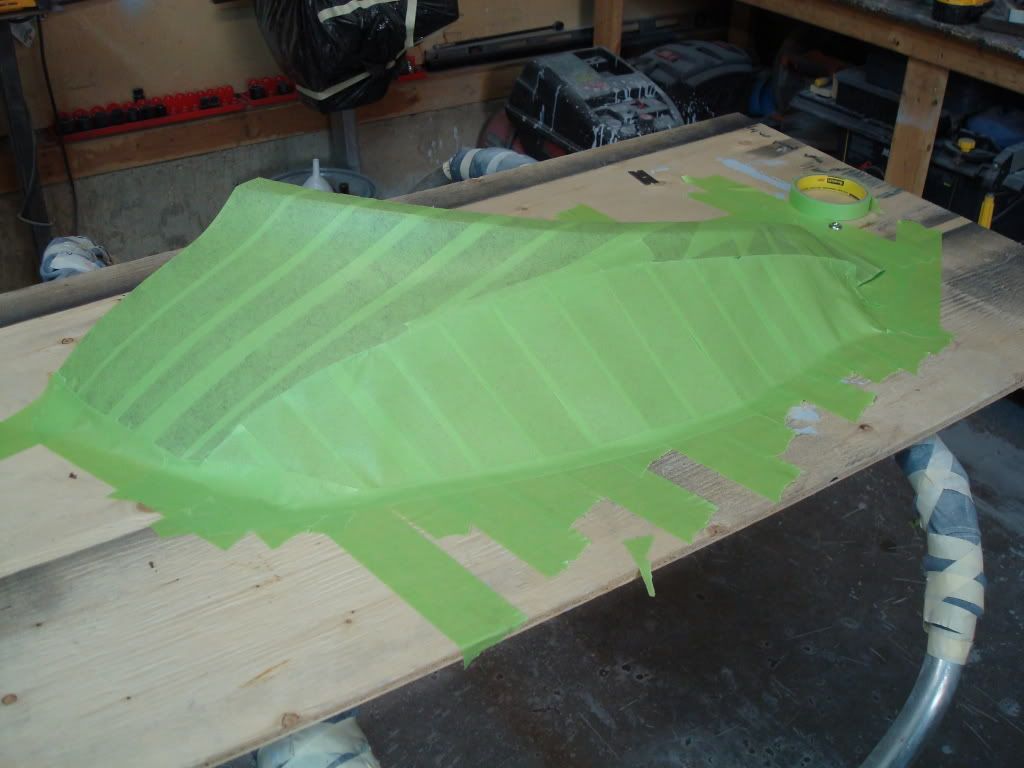
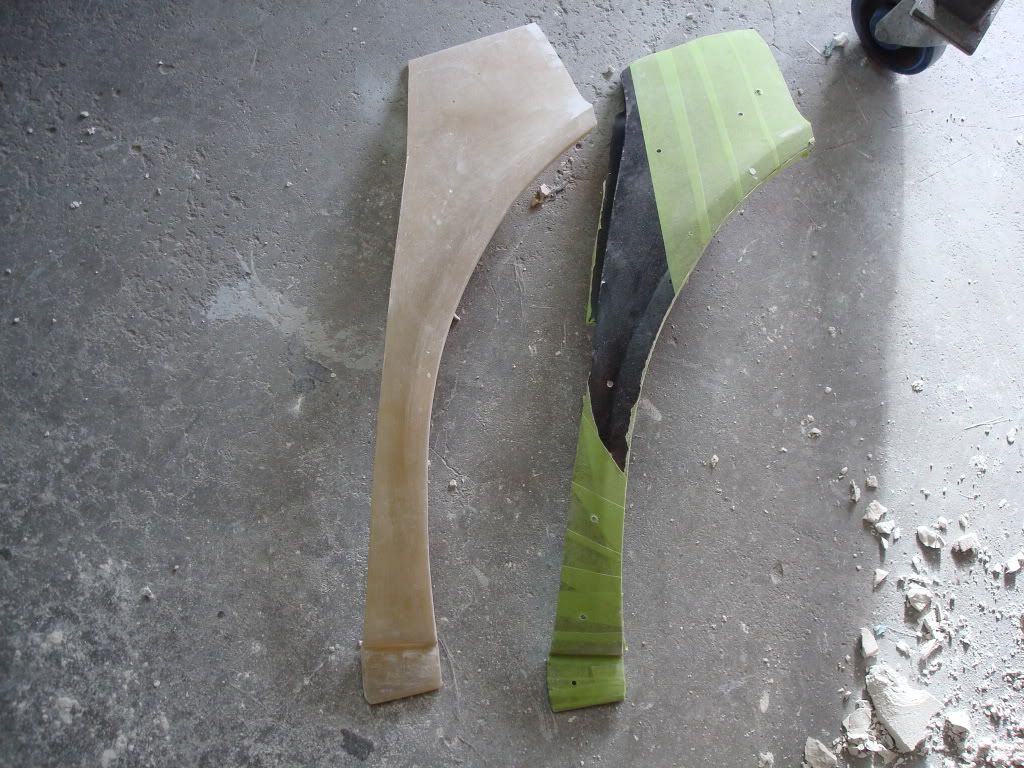
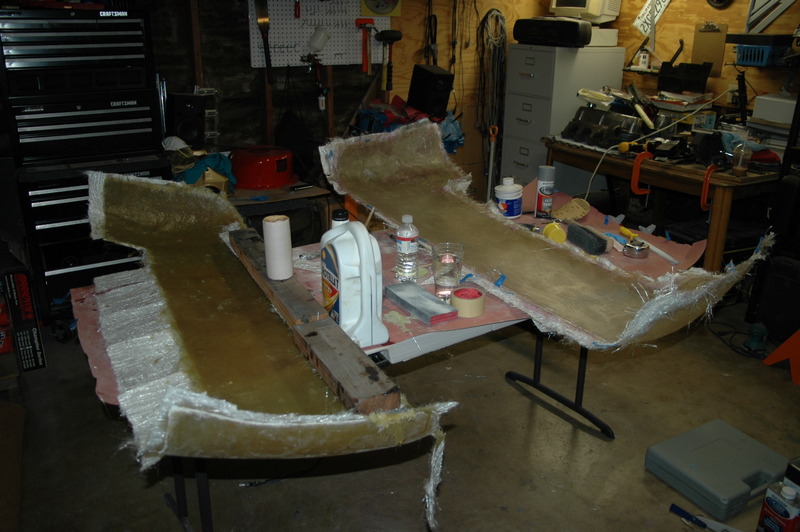
Here is my post so you dont gotta look through a 1000 pages.
I started making the mold for the dogleg today. Mike had a bubbafied 76 vette that he was parting out a while back. He sent the dogleg along with my parts a couple months ago so I at least had something to work with (we both knew that bubba had tried to fix this one, but its better than nothing, plus I got it for free
 ). Anyways, here is what it looked like after I stripped it...
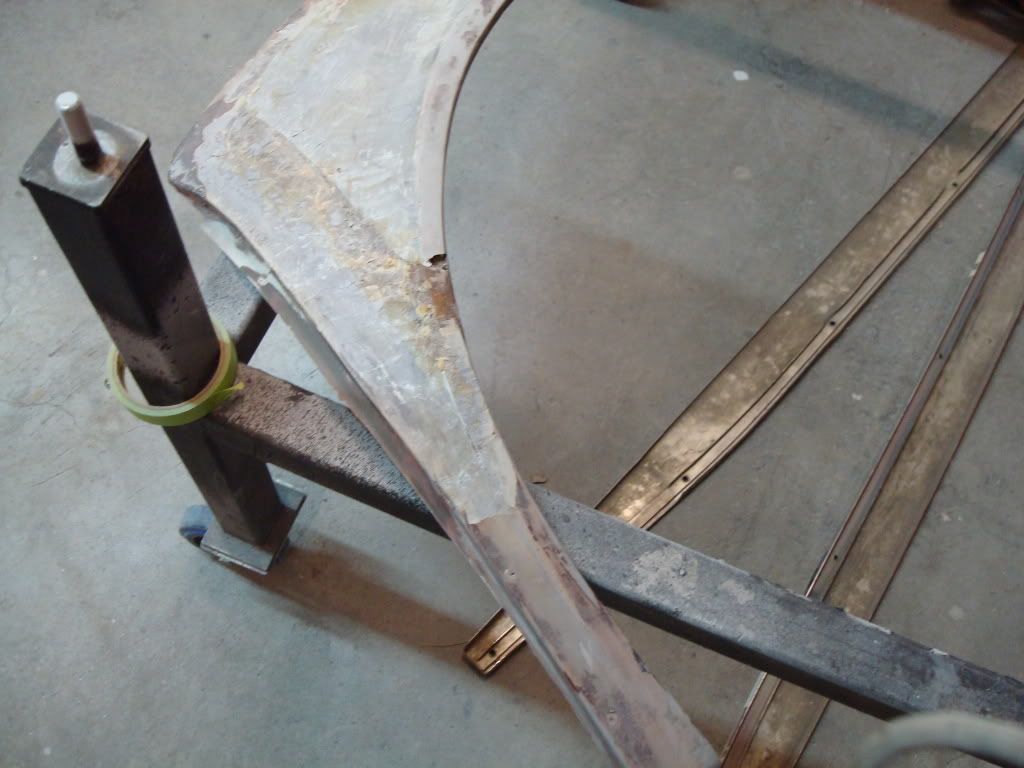
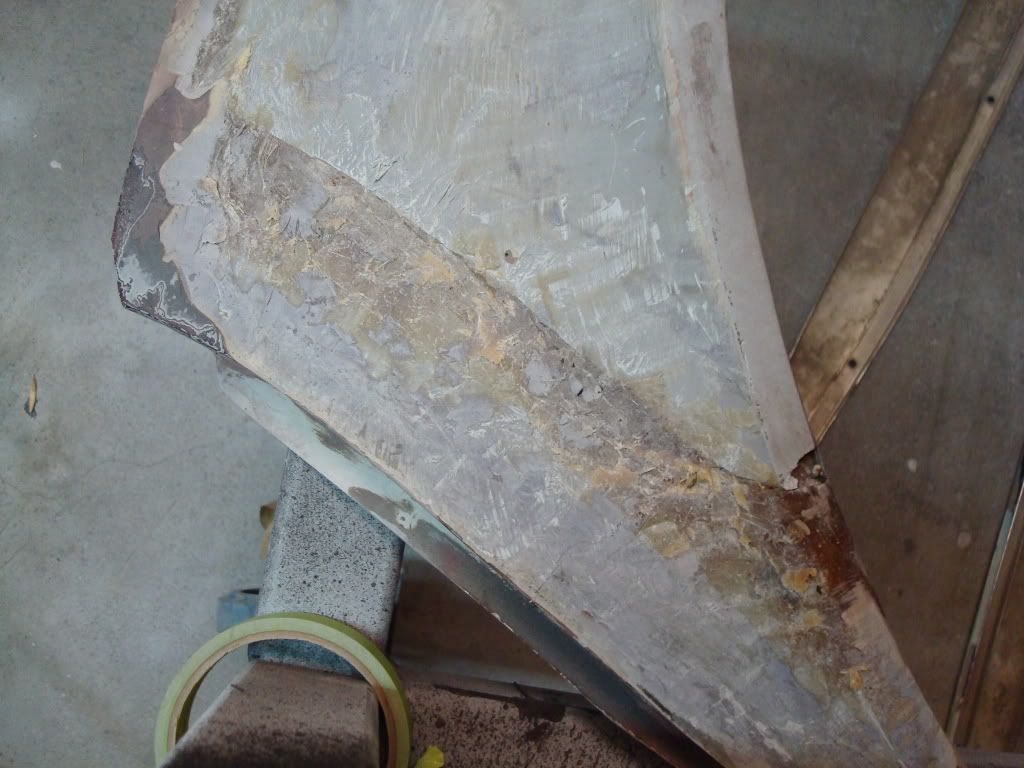
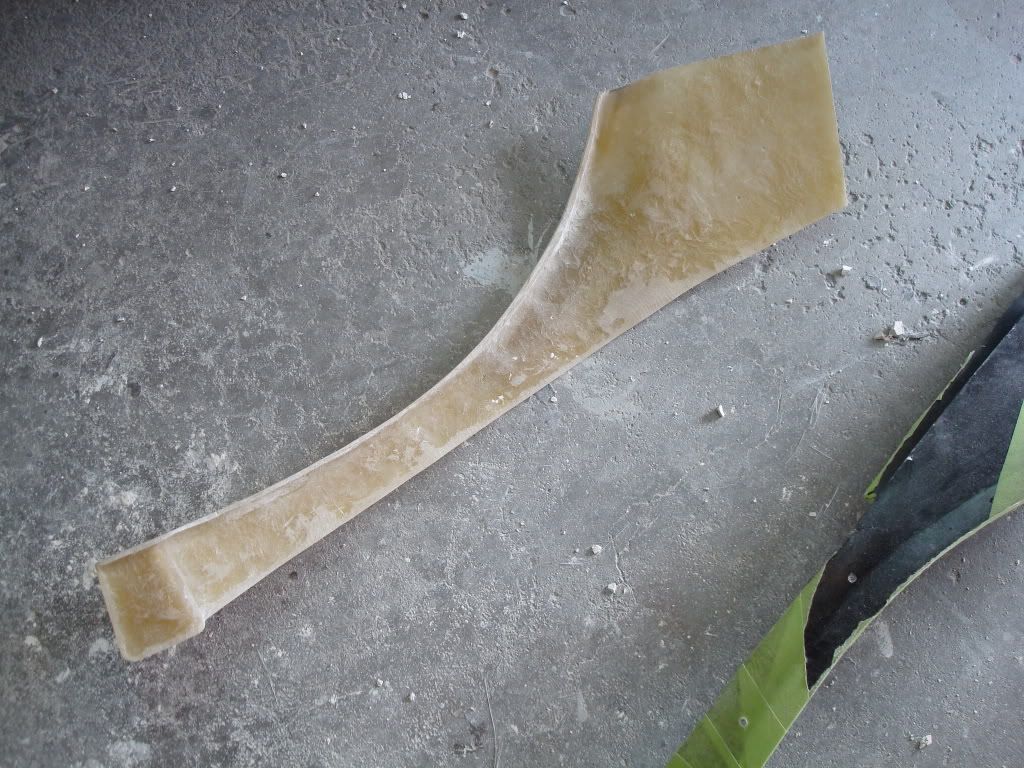
First thing I did was lay a whole skim coat of body filler on it. Then I sanded it down, and gave it a quick paint job to make sure it looked good.
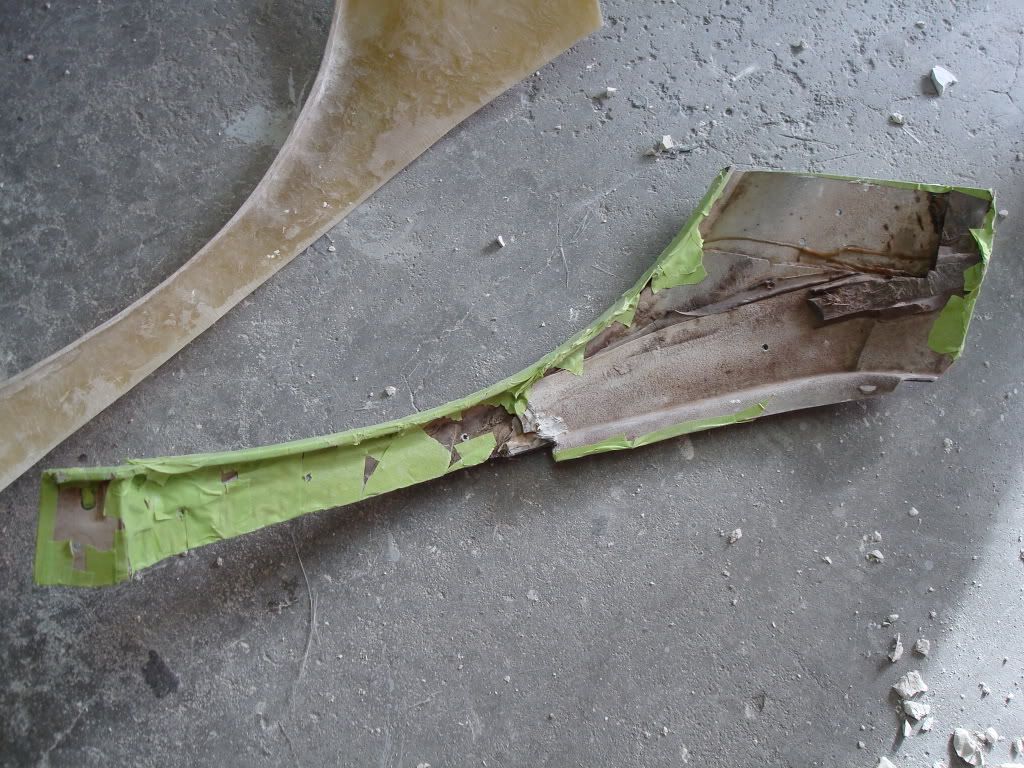
Next I covered it in tape, so it wouldn't stick to the mold. Remember, most of this is getting cut off because of the flares. So, it doesn't have to look perfect.
Next I put it on a piece of plywood, and taped the sides down so no plaster forms on the edges, which would prevent me from popping it loose of the mold.
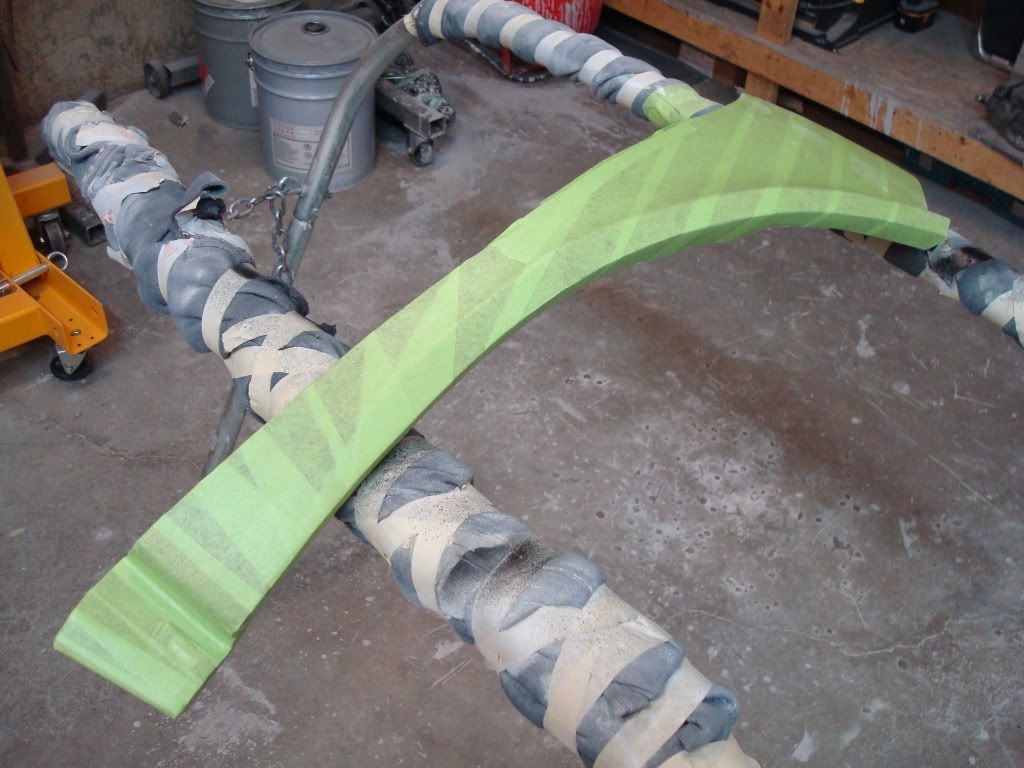
Time for me to go to shopping and get some plaster and reinforcing fibers.
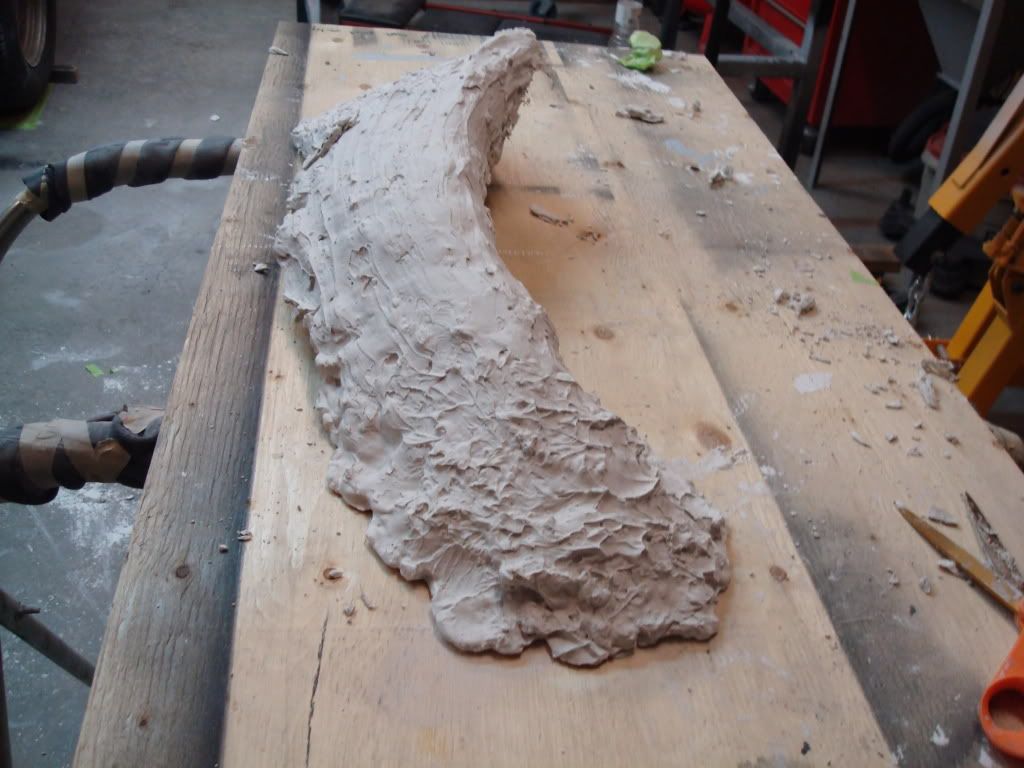
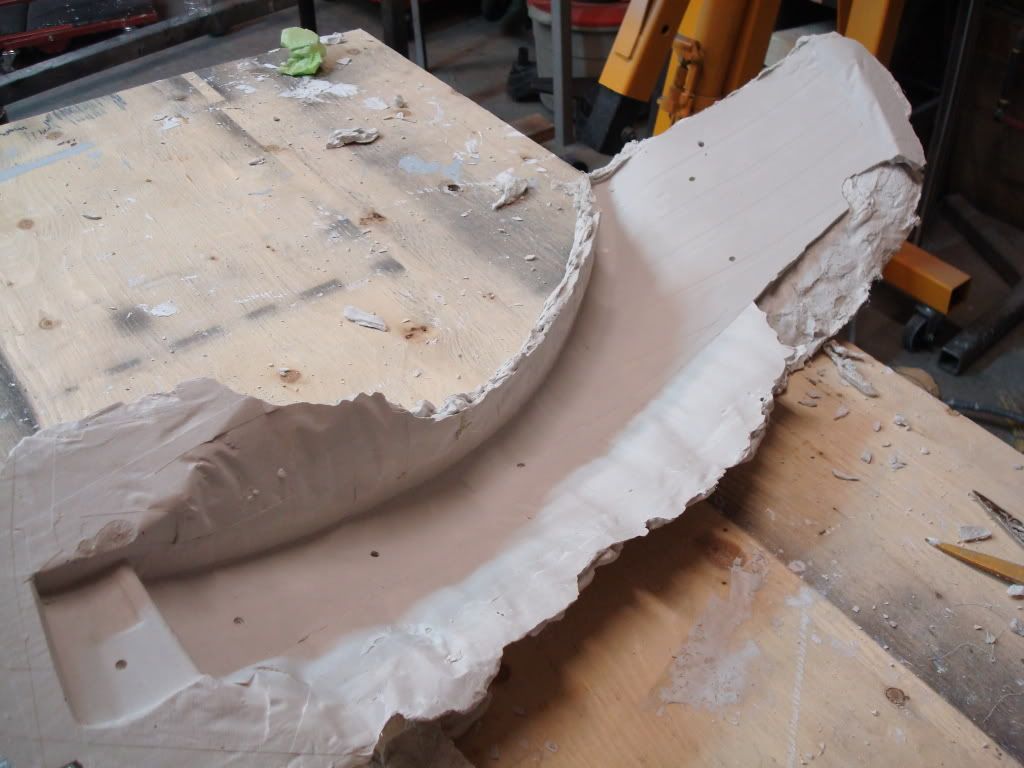
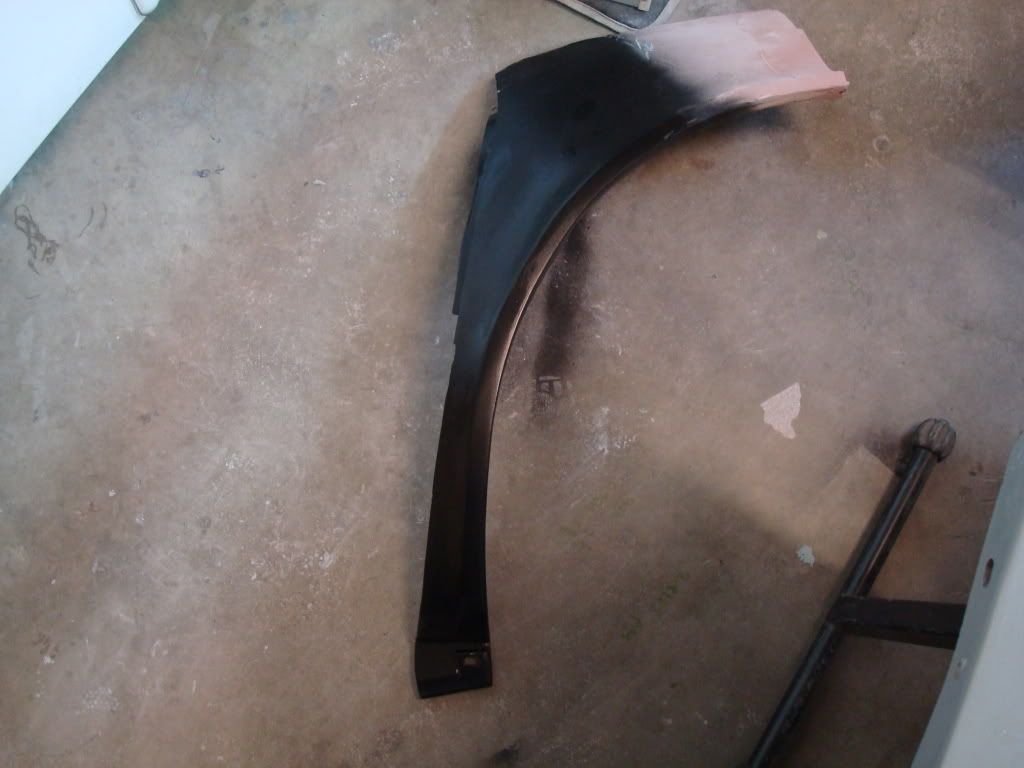
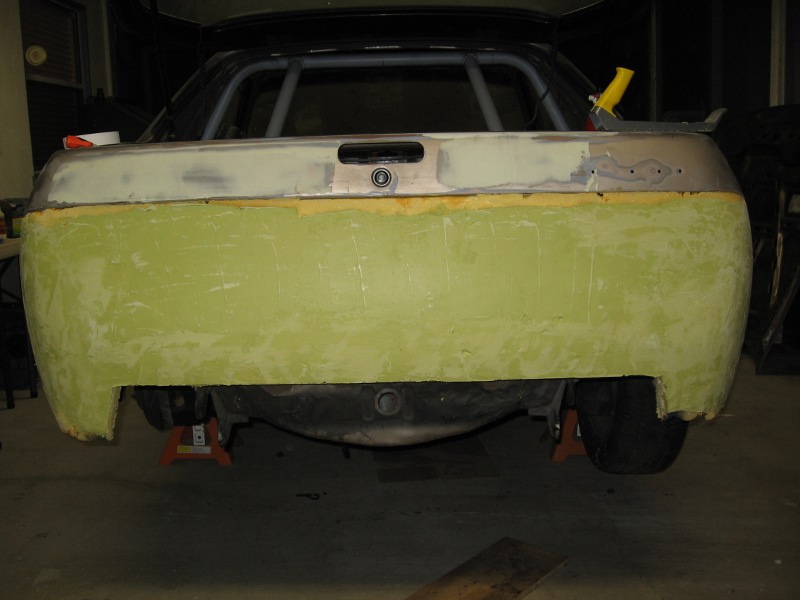
I just need to make a repair to the forward-most edge before I start glassing. Other than that, the mold came out perfect. I used air through those holes to pop it loose.
It took me all day to make this part. Hopefully I will be using it in the end...I'll see tomorrow if my hard work paid off, and if it turned out good. If it doesn't work out...oh well (it won't be the first time a project ends up in the trash lol).Time to hit the hay

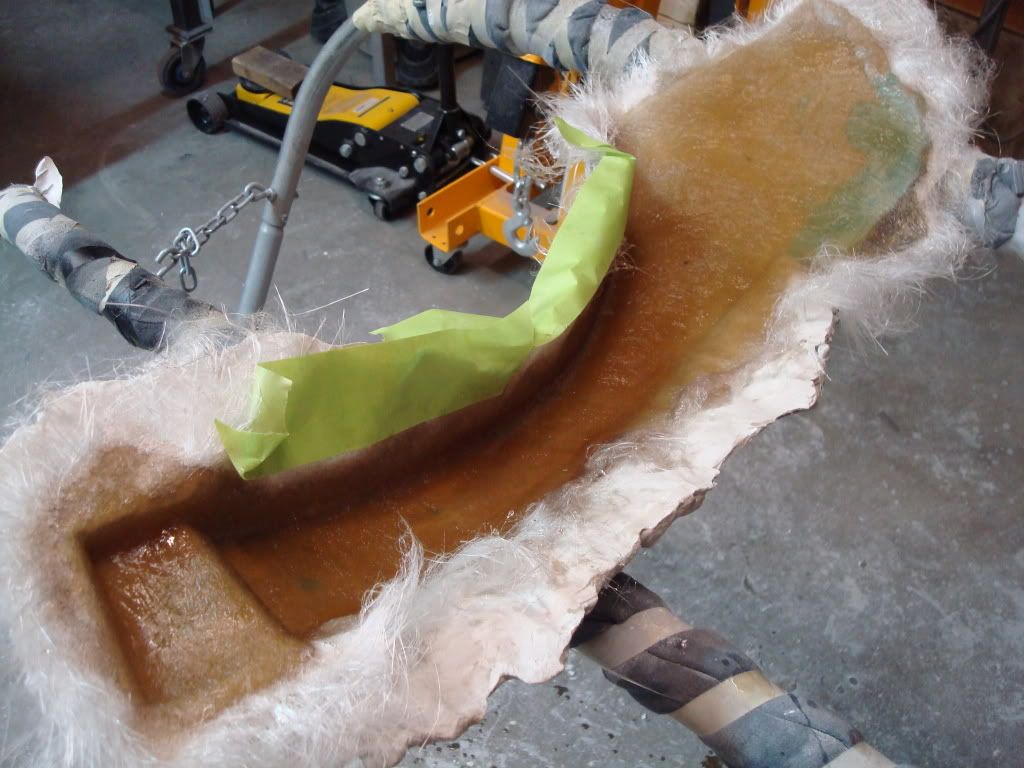
Well, the part is done. Turned out good. I just have a few air bubbles right at the bottom where it makes the turn for the rocker molding...that area was very tough to fiberglass, because of all the tight bends and curves. Maybe I should start making all of my parts
It turned out awesome.
02-24-2010, 05:37 PM
#13
Team Owner
Thread Starter
Hi, To Glassman 74, I have had hot and cold conversations with Red Vette Racer (Stan) over the years and he is extremely knowledgable and I feel one of the most knowledgable, but I always push the engineering on things and the last time we interacted was over a Bob Riley suspension design that I wanted to change and I did my changes vice the sincere advice. I am not a Jim Hall, but my family has played with Corvettes since 1957. I think I will be able to work out the fiberglass molds with all of this excellent advice and direction. If my flairs are rare now and other parts I have, I would rather not have a high end outfit getting the molds and then see them sold to countless cars. I started the popular current Barn find thread and just realized that to post pictures, I need to pay for a membership. I just recently finally picked up my first digital camera which will help me have better interaction with someone like Red Vette Racer. Maybe with some visual, the exchange would be more sharing of ideas. I hope to be posting pictures here shortly. I feel that I can talk on par on most Corvette topics with most everyone and I am not ashamed to know when to ask questions on areas where I have holes in my knowledge. Truly thank you for the recommendation to Red Vette Racer. My Vette part, Corvette collection of stuff is extensive. Like with my J-56 parts, because these types of parts went on my car back in 1969/70, over time I now have like 6 sets of pads, 3 proportioning valves, etc..
Last edited by TCracingCA; 02-24-2010 at 05:53 PM.
02-24-2010, 05:46 PM
#14
Use PVA (poly vinyl alcohol) on the plug, brush it on, one or two coats. Then lay out 3-4 layers of matte. Paint the resin on after mixing in the MEKP (catalyst) you'll have prob 5-10 mins of working time depending on the temp and amount of catalyst mixed in. Use a roller to get the bubbles out. Then you have your mold.
Brush the inside of the mold with PVA. Lay 3-4 layers in the mold using the same technique. Then pop the piece out and use a dremel to cut off the rough edges.
I've been making a custom bumper for a blown V8 2ng gen RX7. Not done yet, next step it to lay out the edges (I'm half way done with this) and then bolt it and glue it to the body. Then I'll grind a groove on the seam and fill and sand.
Plug:
Piece on the left, laying out the edge with a waxed 2x4, mold on the right:
http://motorgen.com/forum/showthread.php?t=1053&page=31
02-24-2010, 05:55 PM
#15
Safety Car
Hi, To Glassman 74, I have had hot and cold conversations with Red Vette Racer (Stan) over the years and he is extremely knowledgable and I feel one of the most knowledgable, but I always push the engineering on things and the last time we interacted was over a Bob Riley suspension design that I wanted to change and I did my changes vice the sincere advice. I am not a Jim Hall, but my family has played with Corvettes since 1957. I think I will be able to work out the fiberglass molds with all of this excellent advice and direction. If my flairs are rare now and other parts I have, I would rather not have a high end outfit getting the molds and then see them sold to countless cars. I started the popular current Barn find thread and just realized that to post pictures, I need to pay for a membership. I just recently finally picked up my first digital camera which will help me have better interaction with someone like Red Vette Racer. Maybe with some visual, the exchange would be more sharing of ideas. I hope to be posting pictures here shortly. I feel that I can talk on par on most Corvette topics with most everyone and I am not ashamed to know when to ask questions on areas where I have holes in my knowledge. Truly thank you for the recommendation to Red Vette Racer. My Vette part, Corvette collection of stuff is extensive. Like with my J-56 parts, because these types of parts went on my car back in 1969/70, over time I now have like 6 sets of pads, 3 proportioning valves, etc..
Stan is forum member "Road-Race Vette".
Howard is forum member "redvetracr", a well known racer from back in the day.
They are different people.
02-24-2010, 06:12 PM
#16
Team Owner
Thread Starter
Liverpool32, I like the POP method for my off of the car pieces. I think, I will go with that idea for my molds for any piece that is loose (uninstalled) and then employ the article advice to lay up duplicates if needed. I like Stinger 12's mold for the on-the-car flares once I get them fitted back on. They were on the car till 1987, then I cut them off because of the restoration bug, and the rollcage, etc. and now I am going to reinstall them again and return the car to the race car state (when I bought the car) prior to my restoration bug, but to fit the flares more percisely with my tire/rim combination (old Jongbloeds modulars) . Once I create the fit and finish that I want, then produce molds to support the car. So actually I will end up with two sets of molds now, 1. for the flares off of the car and 2. for the flares on the car when all done. Thank you!
02-24-2010, 06:20 PM
#17
Team Owner
Thread Starter
Thank you, I am corrected. I feel stupid. I think that I saw the Delorenzo/Thompson car associated with both of these guys and assumed that they were the same guy. And I may be wrong about the Delorenzo/Thompson car connection. I think Redvette racer owns one of the original race cars and now I will have to see if I have ever talked previously with Road Race Vette (Howard). The car in the picture looks like a car that I have seen featured somewhere. I know there was a guy on the forum that just finished a Delorenzo/Thompson style schemed paint job on what looked like a very solid and interesting racing styled Corvette. Thank you again. I wrote down the name and will most definitely contact him, if my project goes wrong and I need an expert/great guy to save me. The referral is appreciated.
Last edited by TCracingCA; 02-24-2010 at 06:25 PM.