
Window Frame Rust
 09-17-2011, 09:05 PM
#1
Racer

Thread Starter

Member Since: Nov 2010
Location: Flower Mound TX
Posts: 364
Likes: 0
Received 0 Likes
on
0 Posts
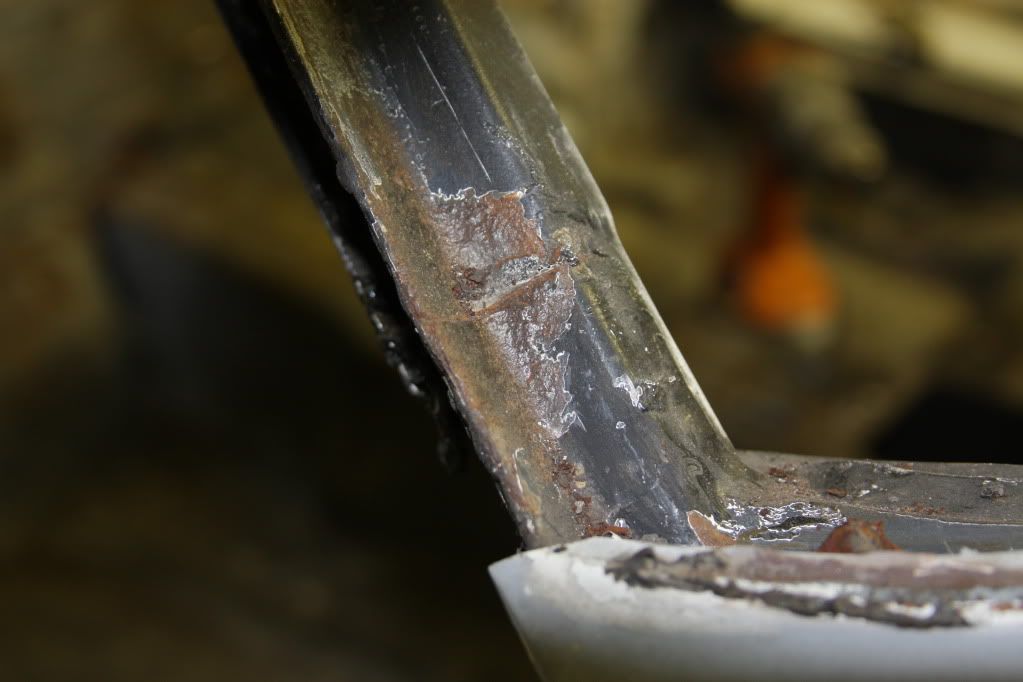
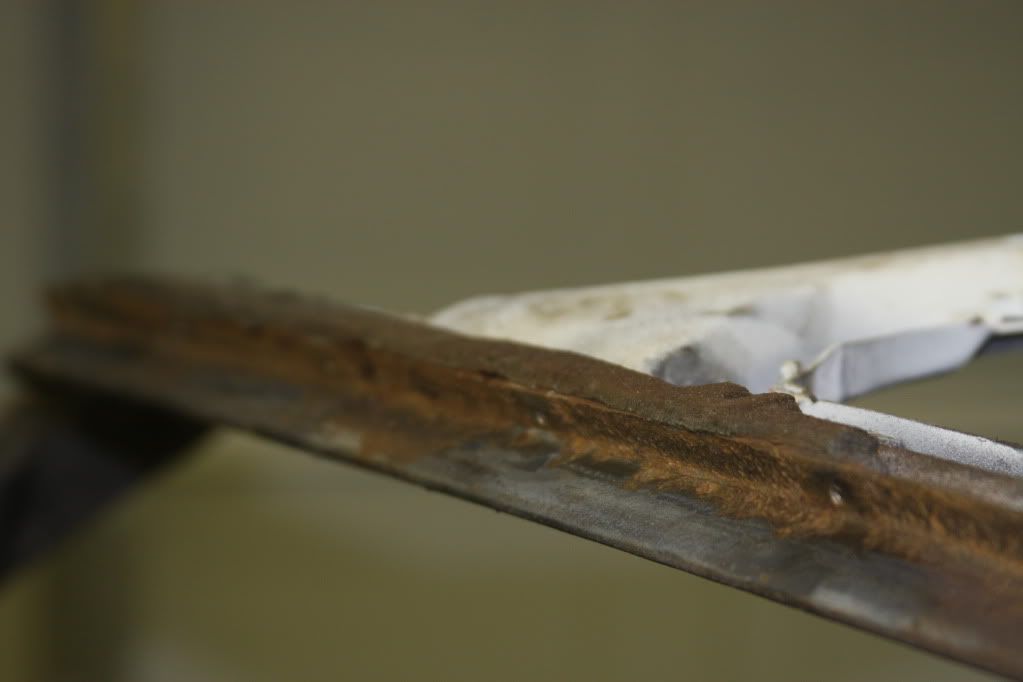
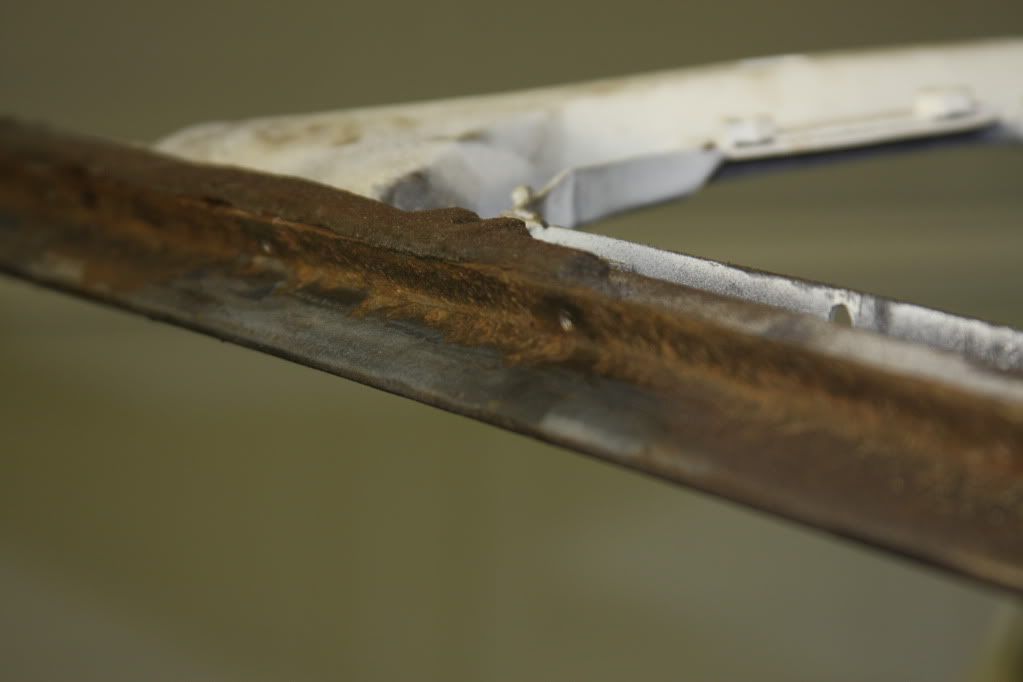
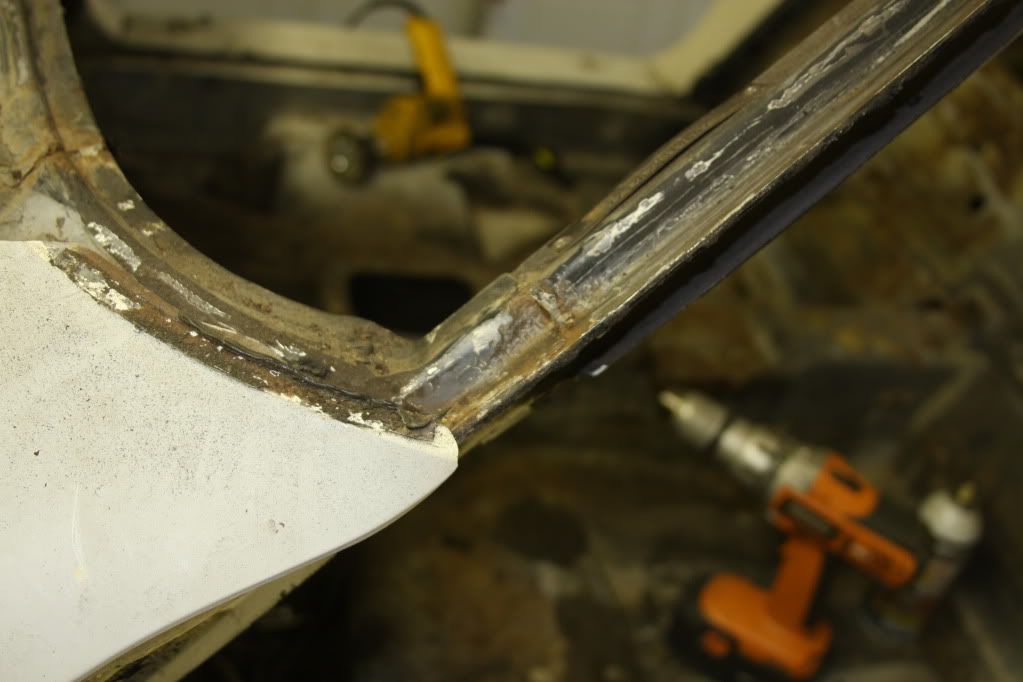
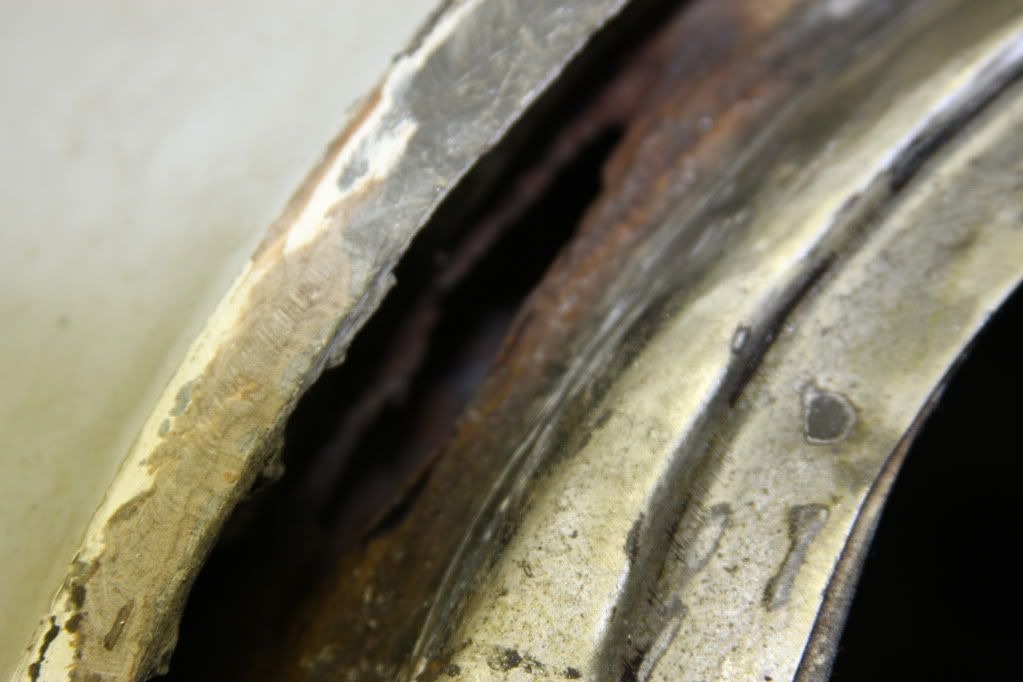
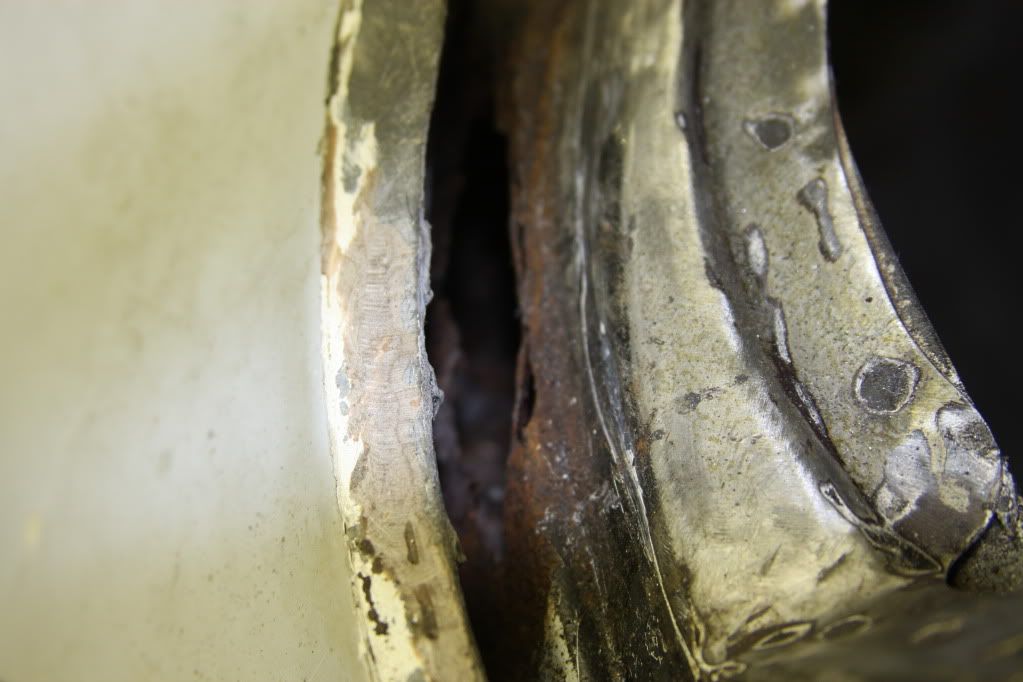
I took the windshield out of the vette today since I am not starting to the body related prep work. When I popped out the windshield and the caskets etc I found some rust in across the top and side posts of the windshield frames. There arer no holes but is reasonably rough.
I used a brass wheel on the drill to clean it up. Is there any specific thing I should do to stop the rust, fill it in, and prevent it from continuing?
I still have some silver por15 which I thought of putting a couple of coats on it after cleaning it up more. But I am not sure if this is all that should be done or not. Here are pictures after I wire wheeled it.
 09-17-2011, 10:47 PM
#2
Former Vendor
Member Since: Aug 2006
Location: Jeffersonville Indiana 812-288-7103
Posts: 76,656
Received 1,813 Likes
on
1,458 Posts
St. Jude Donor '08-'09-'10-'11-'12-'13-'14-'15

You have one huge thing going for you there.. NO holes... I'd love to take one apart and find this!
I think that I would get out the steel wire wheel, and the twist lock scotch pads and put a nice finish on this first. Then I would treat the metal with some metal prep. Then a rust converting primer. No POR on the windshield frame... It makes it to smooth and there is nothing to bite to for the urethane seal. (never really been a fan of POR anyway).
Use the rust converting primer, then paint, and then use the windshield urethane primer on top of the paint. The urethane primer works great with the new urethane seals.
When you re-install using urethane you'll also need spacer blocks to make sure the windshield is the proper height. When using Urethane as the seal the glass tends to sink a bit before the urethane dries.
I have a huge file on the web site about windshield frames that are rusted.. but you might want to go read it for some helpful hints too... http://willcoxcorvette.com/repairand...lp.php?hID=306
IMHO,
Willcox
09-18-2011, 09:57 AM
#3
Melting Slicks


I wish mine had looked that good! One suggestion on the wire wheel is to use a 4 or 4.5 inch grinder with a wire wheel. The stiffer wheels and higher RPMs really clean things up.  Not to sound like your mother but wear eye protection!
Not to sound like your mother but wear eye protection!
09-18-2011, 10:00 AM
#4
Former Vendor
Member Since: Aug 2006
Location: Jeffersonville Indiana 812-288-7103
Posts: 76,656
Received 1,813 Likes
on
1,458 Posts
St. Jude Donor '08-'09-'10-'11-'12-'13-'14-'15
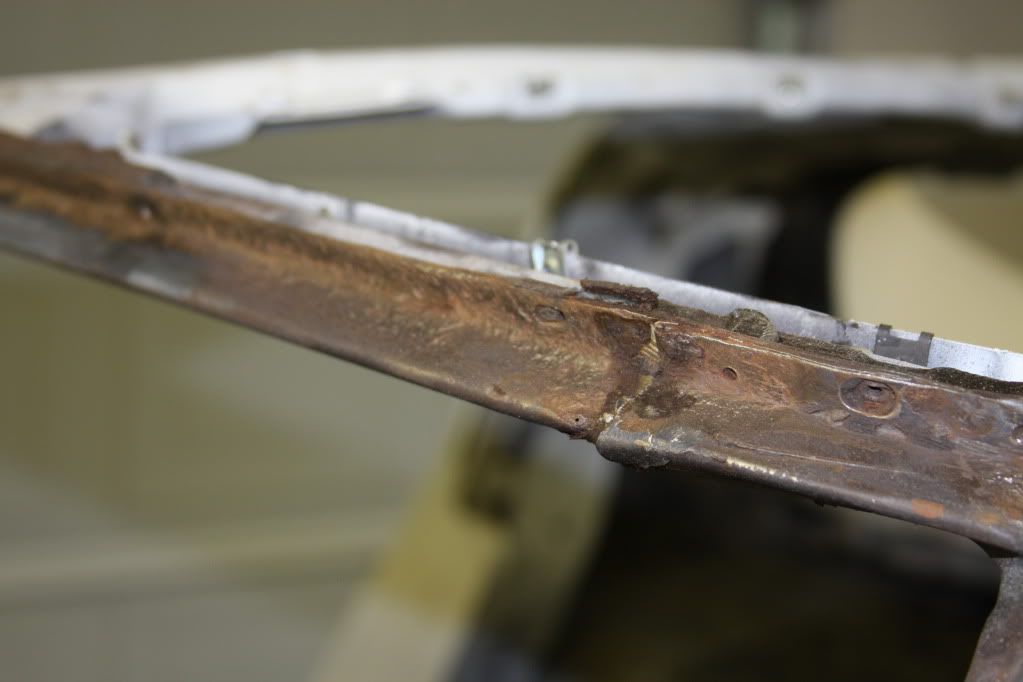
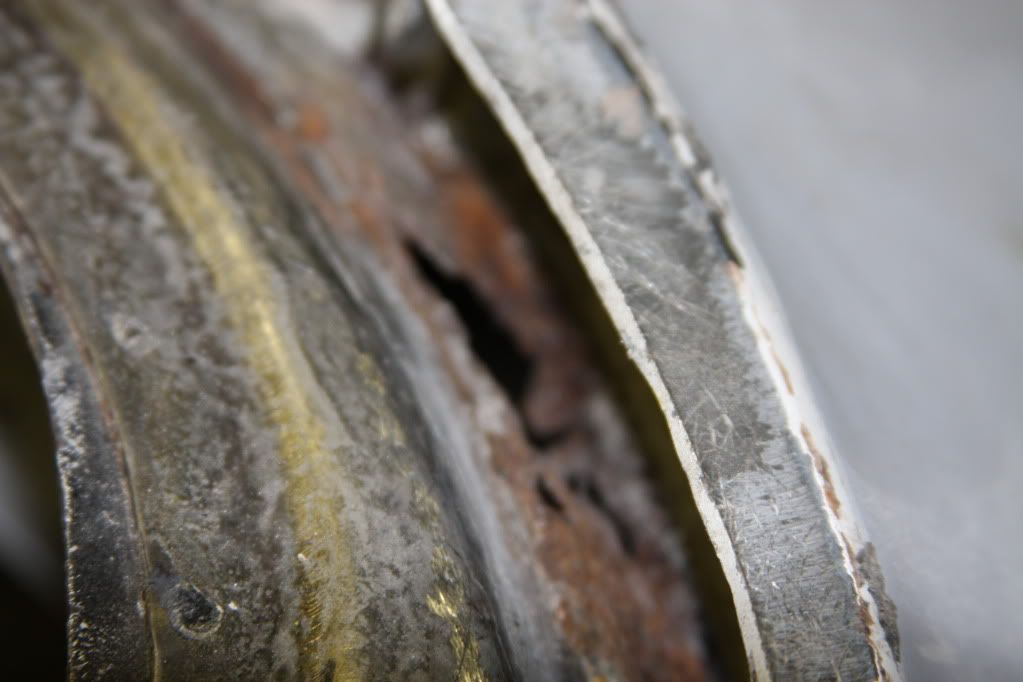
The left (driver) upper corner looks like there might be a flake there.. make sure you get under this if it is. You might need to dig at that spot a bit more and make sure the underside is good to go..
09-18-2011, 03:32 PM
#5
Racer
Thread Starter
Member Since: Nov 2010
Location: Flower Mound TX
Posts: 364
Likes: 0
Received 0 Likes
on
0 Posts
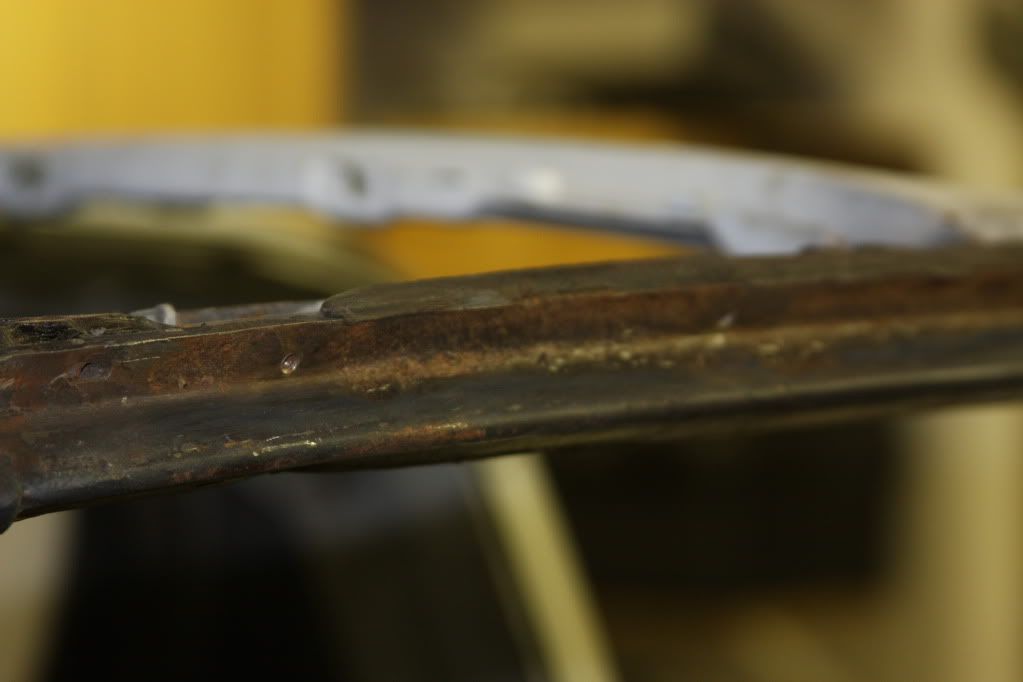
I have been wirebrushing it and using a rough bad on my grinder clean it up just a bit more and remove the paint so will put new back.
In the seams there is some stuff, at 1st I thought it may be bondo but after closer inspection it has a metalic look to it. What is this stuff? should it come out and be put back. I thought maybe it should be taken out and put back, but not knowing what exactly it is I dont want to mess with it any further.
The flake in the upper corner came out easily and NO hole under it, I am pleased with that. There is no holes at all after using the steel brush etc. The seams are the only concern and maybe I am just being paranoid. The material is also in the upper corner also.
Thanks again in advance.
09-18-2011, 10:42 PM
#7
Former Vendor
Member Since: Aug 2006
Location: Jeffersonville Indiana 812-288-7103
Posts: 76,656
Received 1,813 Likes
on
1,458 Posts
St. Jude Donor '08-'09-'10-'11-'12-'13-'14-'15

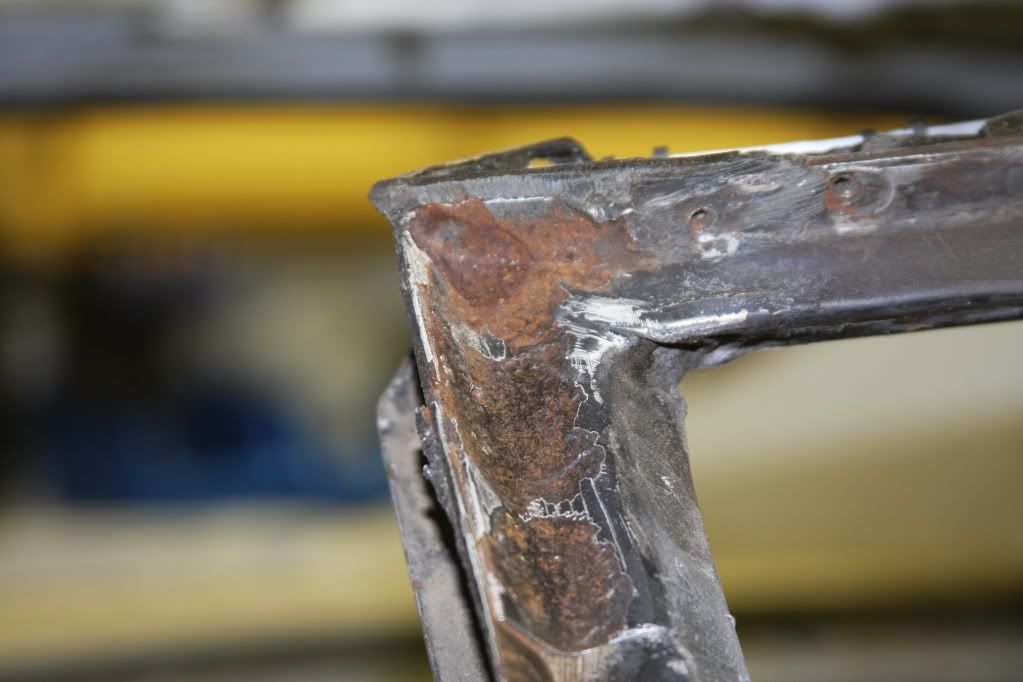
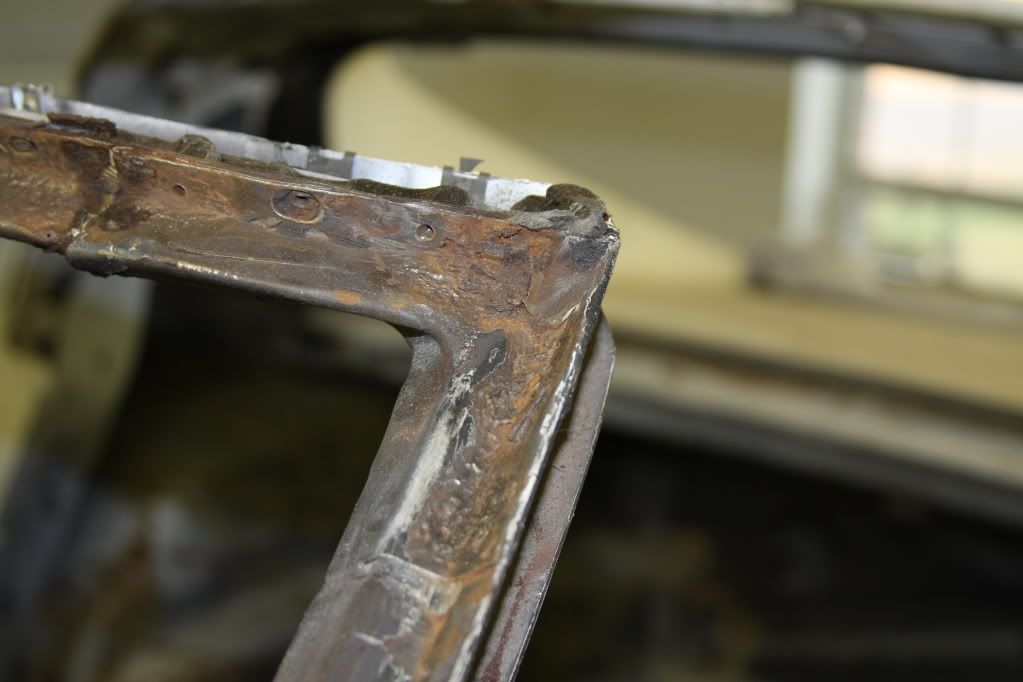
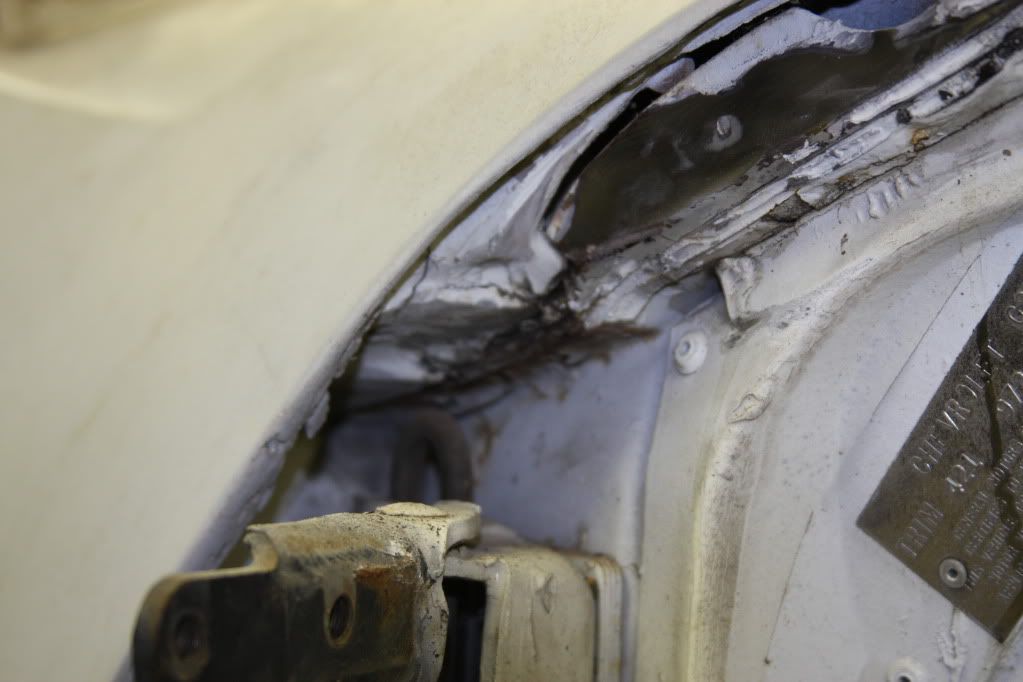
Ok.. if you look at the picture A...
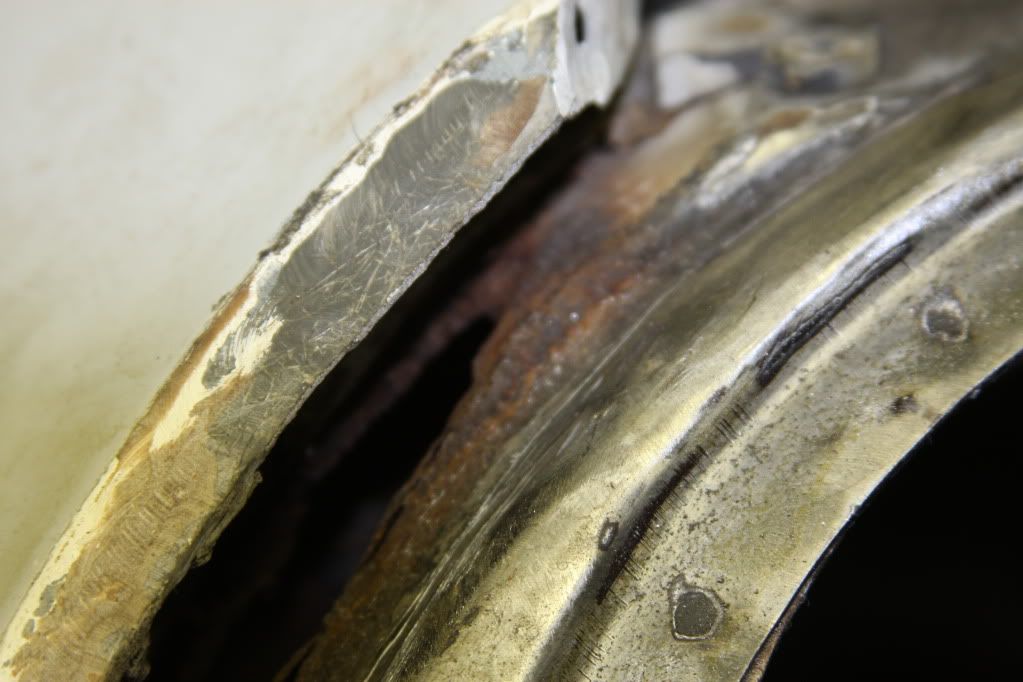
The left arrow is a hole for the header molding, you need to make sure that rust in there is treated. The right arrow is seam sealer in the corner. Remove this and make sure you are all good under it.
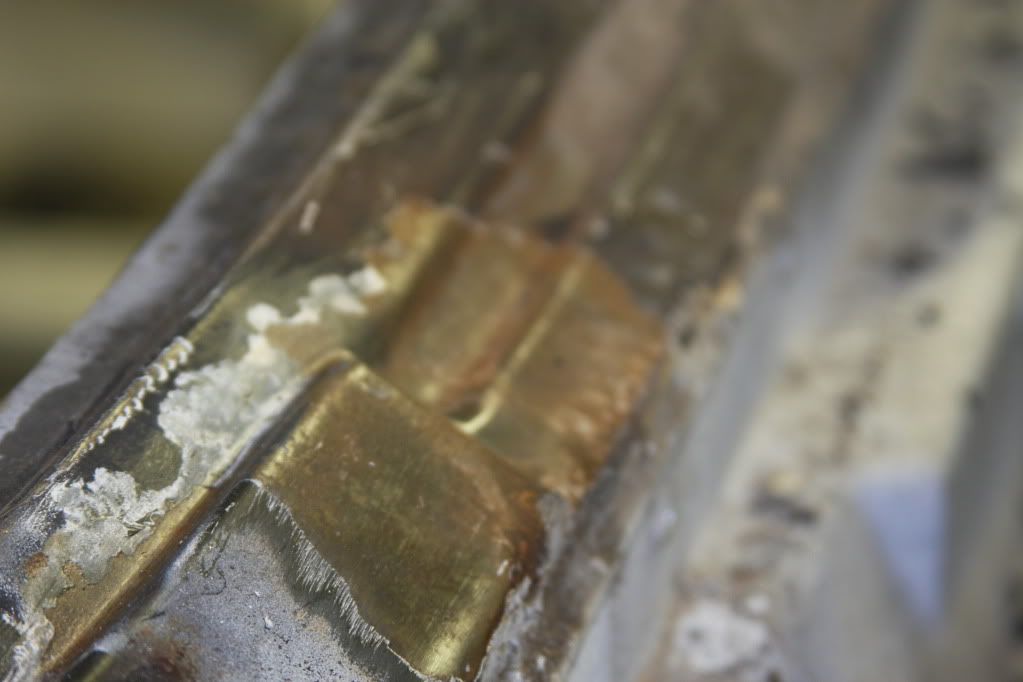
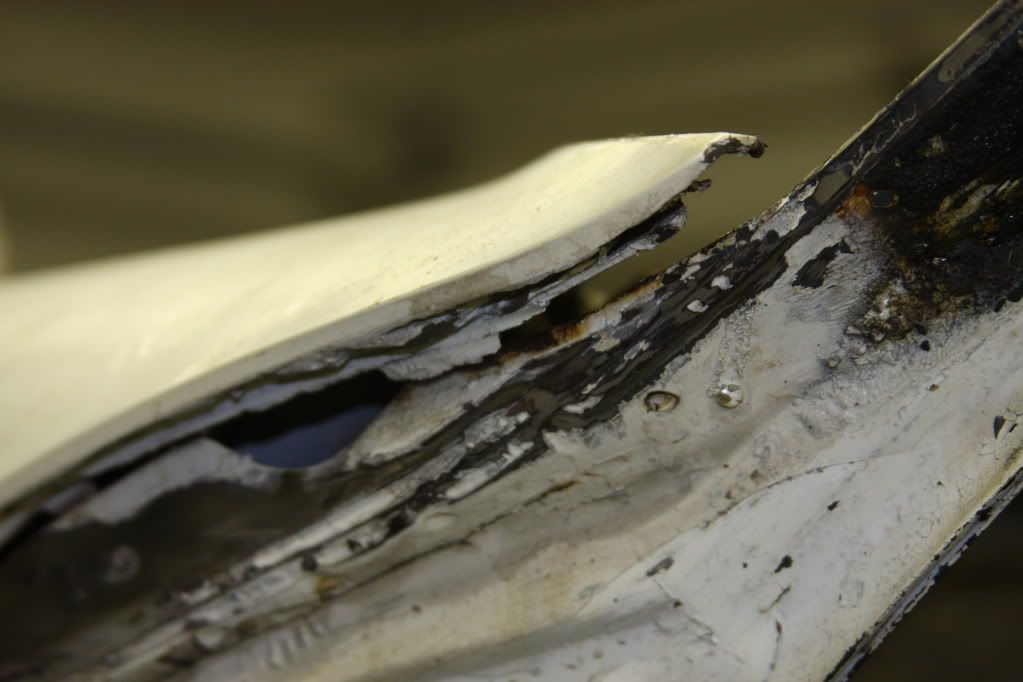
Picture B: The arrow is seam sealer, no worries with this, I would clean it all out, treat and replace.
Picture C: Same thing.
Picture D: This corner looks like rust in there. Make sure you get it as clean as possible and then treat it with a converter. If metal is missing I would replace and repair it.
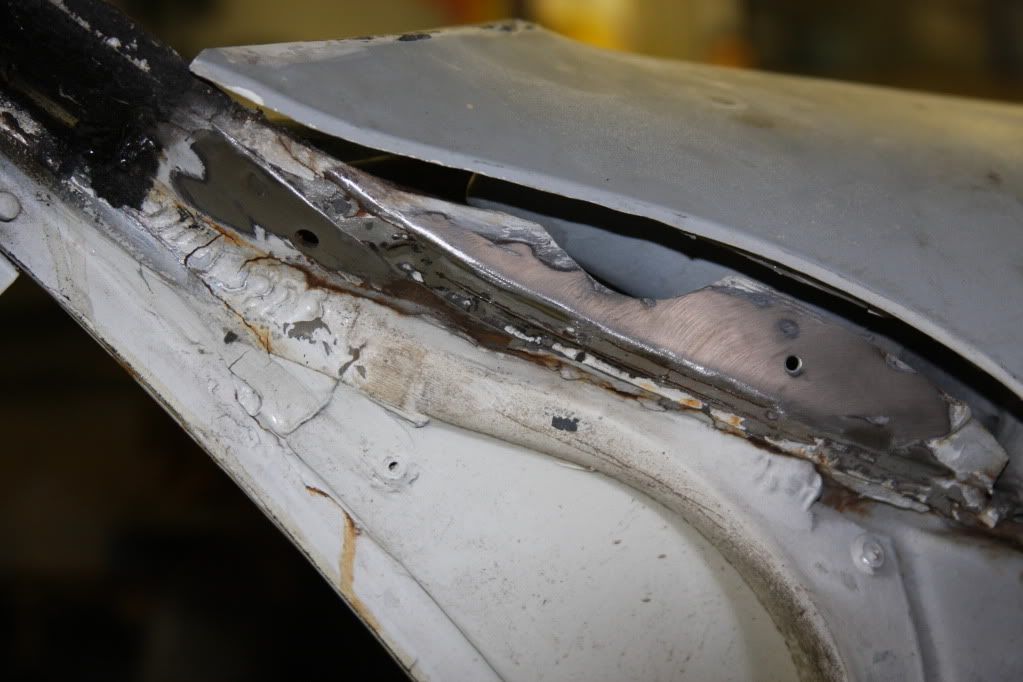
Picture E: Left arrow shows where metal has rusted off the pillar, you still have plenty of meet there but below the arrow you see a bit of of it missing. The brown area is the second layer of metal. Very fixable and nothing at all to worry about. I would weld over this and grind it back down. But I would also remove the area (in my copy of the picture) that is about 1/4" down. You see it looks a bit outward and it is... there will be rust under this and it needs to be removed. Sure it's only a tiny section but I would get it out of there.
On my car I used for the write up for the web site you'll see I had a similar issue only mine was way worse.
My personal opinion is you really don't have anything to worry about and if repaired properly it will out last me for sure.. you.. I gotta say yeah it will outlast you too!
Just remember if it looks like rust it is.. make sure you get it "ALL" out of there!
Willcox
09-19-2011, 07:35 PM
#8
Racer
Thread Starter
Member Since: Nov 2010
Location: Flower Mound TX
Posts: 364
Likes: 0
Received 0 Likes
on
0 Posts
It is coming along nice. As it turns our the left arrow on E was also the seam sealer, I was able to clean it out and see the perfectly straight edge of the piller. even that large clump in the upper corner came out, but it too some digging and griding with a stone bit and luckily there was no holes still.
I am now using the rust remover to help get even more rust out, this will take a while I am not using anything too aggressive to do it (evaporust). Afterward I will do some more griding with a pad to clean the frame so I can put on the rust converting primer on.
I am now using the rust remover to help get even more rust out, this will take a while I am not using anything too aggressive to do it (evaporust). Afterward I will do some more griding with a pad to clean the frame so I can put on the rust converting primer on.
09-19-2011, 08:51 PM
#9
Racer
Thread Starter
Member Since: Nov 2010
Location: Flower Mound TX
Posts: 364
Likes: 0
Received 0 Likes
on
0 Posts
This may be a dumb question so please dont beat me up too much. I am trying to clean the window frame on both sides etc (not the t-top cross bar).
While cleaning the inside seams of the car, the corner seam sealer looked different more putty like (but still stiff but not as metalic looking as the stuff on the front.
Are there 2 different kinds of seam sealer on the window frame? What seam sealer should I use for the seams?
and here is the maybe not so intuitive question. Once chemical has been used on the rust and fully dried etc. Do I put the seam sealer on 1st then the rust converting prime or the other way around? My logic says to put the rust converting primer on 1st to keep the rust from starting again then the sealer, but that seems odd also since I would think the sealer would need bare metal to adhere correctly (which is why there was some rust under the sealer originally.
Thanks for the time and patience.
Eddie
Last edited by efather; 09-19-2011 at 08:53 PM.
09-21-2011, 08:46 PM
#10
Racer
Thread Starter
Member Since: Nov 2010
Location: Flower Mound TX
Posts: 364
Likes: 0
Received 0 Likes
on
0 Posts
Well WHen I pulled the rubber trim that is at the base of the windshield under the fiberglasd, I found pretty good size holes on both sides of the car.
I am having trouble getting my pictures to upload to photobucket, and will post them as soon as I can get them uploaded.
That being said, is this going to be fixable in this location without pulling the front clip off? I really hope someone will say it is doable, even if it is a paint in the A$$ to do. The door jams look good, no rust under the dash. Just looks like it is in those 2 spots.
Passenger

Driver
I am having trouble getting my pictures to upload to photobucket, and will post them as soon as I can get them uploaded.
That being said, is this going to be fixable in this location without pulling the front clip off? I really hope someone will say it is doable, even if it is a paint in the A$$ to do. The door jams look good, no rust under the dash. Just looks like it is in those 2 spots.
Passenger
Driver
Last edited by efather; 09-21-2011 at 10:11 PM. Reason: pics added
09-23-2011, 12:13 AM
#11
Former Vendor
Member Since: Aug 2006
Location: Jeffersonville Indiana 812-288-7103
Posts: 76,656
Received 1,813 Likes
on
1,458 Posts
St. Jude Donor '08-'09-'10-'11-'12-'13-'14-'15
And with one fail swoop of pictures.. I go from feeling good for you to horrible..
The holes you are showing above are the worst possible place to have them.... there is no real easy fix and I hate to say that!
To answer your questions above.. yes they did use a seam sealer in the jointed areas sometimes. Its not found in all cars and today we took one apart that had it in the upper corners like your picture shows.
But the issue at hand now is those holes and how to repair them. We just did a 71 with these same holes but you have more room on the 68-72 car from the difference in the end of the fender. We also painted the car so we were not worried about messing up the paint either.
I'm going to look at the 76 tomorrow for you and see if I can figure a way out of this mess for you.. but I don't think I can.
The repair solutions are one of two ways in my book. 1) remove the front end from the car to gain room and access, or 2) Cut the back edge of the fenders off and have either the car or the front end repainted.
Bear in mind that if you cut the rear edges of the fenders for clearance you will never be able to completely hide this cut in the fiberglass. I've done this type of repair before and only at the customers request after signing a release form. The issue is the cut area when bonded back in will shrink and show... just like a side fender bonding strip line only in most cases because of the angel it will be easier to detect. Factor this in when you make your decision...
Willcox
09-23-2011, 08:03 AM
#12
Racer
Thread Starter
Member Since: Nov 2010
Location: Flower Mound TX
Posts: 364
Likes: 0
Received 0 Likes
on
0 Posts
Yeah, As soon as I heard the crunch when taking out the rubber, I was like, crap and knew this is the worst place for me.
So after reflecting and going over the front end of the car closer, I have decided that I am going to proceed with my general plan and direction I am going, but adding 3 new steps in the process. there is lots of bondo around the front end (near the doors for example)
I have a feeling the front clip may be in rough shape (more than I thought), I already know the rivits on teh front have popped and someone before me used mat and clumped bondo on the driver front corner. I will make the determination on handling that.
1. Going to go ahead and start stripping the paint and junk off the car this weekend inside and outside, which I had already planned on doing
2. Will remove the Clip (new step)
3. Fix the rust (new step)
4. reinstall the clip (new step)
5. back to the original task of body work
6. ....
There basically no way I would be happy with short cutting this fix or any other. So I am going to have to learn a couple new skills and just do it with patience.
Eddie
09-23-2011, 06:52 PM
#13
Burning Brakes


You have one huge thing going for you there.. NO holes... I'd love to take one apart and find this!
I think that I would get out the steel wire wheel, and the twist lock scotch pads and put a nice finish on this first. Then I would treat the metal with some metal prep. Then a rust converting primer. No POR on the windshield frame... It makes it to smooth and there is nothing to bite to for the urethane seal. (never really been a fan of POR anyway).
Use the rust converting primer, then paint, and then use the windshield urethane primer on top of the paint. The urethane primer works great with the new urethane seals.
When you re-install using urethane you'll also need spacer blocks to make sure the windshield is the proper height. When using Urethane as the seal the glass tends to sink a bit before the urethane dries.
I have a huge file on the web site about windshield frames that are rusted.. but you might want to go read it for some helpful hints too... http://willcoxcorvette.com/repairand...lp.php?hID=306
IMHO,
Willcox
I think that I would get out the steel wire wheel, and the twist lock scotch pads and put a nice finish on this first. Then I would treat the metal with some metal prep. Then a rust converting primer. No POR on the windshield frame... It makes it to smooth and there is nothing to bite to for the urethane seal. (never really been a fan of POR anyway).
Use the rust converting primer, then paint, and then use the windshield urethane primer on top of the paint. The urethane primer works great with the new urethane seals.
When you re-install using urethane you'll also need spacer blocks to make sure the windshield is the proper height. When using Urethane as the seal the glass tends to sink a bit before the urethane dries.
I have a huge file on the web site about windshield frames that are rusted.. but you might want to go read it for some helpful hints too... http://willcoxcorvette.com/repairand...lp.php?hID=306
IMHO,
Willcox
dave
09-24-2011, 12:10 AM
#14
Former Vendor
Member Since: Aug 2006
Location: Jeffersonville Indiana 812-288-7103
Posts: 76,656
Received 1,813 Likes
on
1,458 Posts
St. Jude Donor '08-'09-'10-'11-'12-'13-'14-'15
double post
Last edited by Willcox Corvette; 09-24-2011 at 07:38 AM.
09-24-2011, 12:16 AM
#15
Former Vendor
Member Since: Aug 2006
Location: Jeffersonville Indiana 812-288-7103
Posts: 76,656
Received 1,813 Likes
on
1,458 Posts
St. Jude Donor '08-'09-'10-'11-'12-'13-'14-'15
Yeah, As soon as I heard the crunch when taking out the rubber, I was like, crap and knew this is the worst place for me.
So after reflecting and going over the front end of the car closer, I have decided that I am going to proceed with my general plan and direction I am going, but adding 3 new steps in the process. there is lots of bondo around the front end (near the doors for example)
I have a feeling the front clip may be in rough shape (more than I thought), I already know the rivits on teh front have popped and someone before me used mat and clumped bondo on the driver front corner. I will make the determination on handling that.
1. Going to go ahead and start stripping the paint and junk off the car this weekend inside and outside, which I had already planned on doing
2. Will remove the Clip (new step)
3. Fix the rust (new step)
4. reinstall the clip (new step)
5. back to the original task of body work
6. ....
There basically no way I would be happy with short cutting this fix or any other. So I am going to have to learn a couple new skills and just do it with patience.
Eddie
So after reflecting and going over the front end of the car closer, I have decided that I am going to proceed with my general plan and direction I am going, but adding 3 new steps in the process. there is lots of bondo around the front end (near the doors for example)
I have a feeling the front clip may be in rough shape (more than I thought), I already know the rivits on teh front have popped and someone before me used mat and clumped bondo on the driver front corner. I will make the determination on handling that.
1. Going to go ahead and start stripping the paint and junk off the car this weekend inside and outside, which I had already planned on doing
2. Will remove the Clip (new step)
3. Fix the rust (new step)
4. reinstall the clip (new step)
5. back to the original task of body work
6. ....
There basically no way I would be happy with short cutting this fix or any other. So I am going to have to learn a couple new skills and just do it with patience.
Eddie
Last edited by Willcox Corvette; 09-24-2011 at 12:59 AM.
09-24-2011, 11:37 AM
#17
Team Owner

Member Since: Sep 2006
Location: Westminster Maryland
Posts: 30,173
Likes: 0
Received 2,878 Likes
on
2,515 Posts
Hi Eddie,
If you care about the car, I agree with you about doing things right. Too many people fall into the trap of just doing the cosmetic part of the job and not doing what NEEDS to be done. The next owner, (whenever that may be), is left with a mess, AND, doesn't trust the rest of the car either.
GOOD FOR YOU!!!!
Regards,
Alan
09-24-2011, 12:29 PM
#18
Burning Brakes
Yeah, As soon as I heard the crunch when taking out the rubber, I was like, crap and knew this is the worst place for me.
So after reflecting and going over the front end of the car closer, I have decided that I am going to proceed with my general plan and direction I am going, but adding 3 new steps in the process. there is lots of bondo around the front end (near the doors for example)
I have a feeling the front clip may be in rough shape (more than I thought), I already know the rivits on teh front have popped and someone before me used mat and clumped bondo on the driver front corner. I will make the determination on handling that.
1. Going to go ahead and start stripping the paint and junk off the car this weekend inside and outside, which I had already planned on doing
2. Will remove the Clip (new step)
3. Fix the rust (new step)
4. reinstall the clip (new step)
5. back to the original task of body work
6. ....
There basically no way I would be happy with short cutting this fix or any other. So I am going to have to learn a couple new skills and just do it with patience.
Eddie
So after reflecting and going over the front end of the car closer, I have decided that I am going to proceed with my general plan and direction I am going, but adding 3 new steps in the process. there is lots of bondo around the front end (near the doors for example)
I have a feeling the front clip may be in rough shape (more than I thought), I already know the rivits on teh front have popped and someone before me used mat and clumped bondo on the driver front corner. I will make the determination on handling that.
1. Going to go ahead and start stripping the paint and junk off the car this weekend inside and outside, which I had already planned on doing
2. Will remove the Clip (new step)
3. Fix the rust (new step)
4. reinstall the clip (new step)
5. back to the original task of body work
6. ....
There basically no way I would be happy with short cutting this fix or any other. So I am going to have to learn a couple new skills and just do it with patience.
Eddie
That is going to be some work for sure, but very doable if you just go slow and think each step through. I would consider replacement of items before patching, your end result will be much better I belive. When you see just what you need search around, the parts are there that you will need, much easyer in the long run and cheaper also. When I did my 68 I found the complete wndshield frame including the lower corners from a place called "Pipers" This was NOS stuff pricey but new. It can be installed with out cutting the fenders and without removeing the front clip also, most will say no way, cool but I did it on my 68, it can be done!
09-24-2011, 01:07 PM
#19
Instructor
Member Since: Aug 2011
Posts: 155
Likes: 0
Received 0 Likes
on
0 Posts
This is the exact reason I am leaving my windshield alone.
I can see a little bubbling towards the bottom and I know it's just waiting for me to poke it.
Save that for when I am ready for the big one!!
I can see a little bubbling towards the bottom and I know it's just waiting for me to poke it.
Save that for when I am ready for the big one!!
09-24-2011, 01:33 PM
#20
Melting Slicks

Hi Eddie,
If you care about the car, I agree with you about doing things right. Too many people fall into the trap of just doing the cosmetic part of the job and not doing what NEEDS to be done. The next owner, (whenever that may be), is left with a mess, AND, doesn't trust the rest of the car either.
GOOD FOR YOU!!!!
Regards,
Alan
If you care about the car, I agree with you about doing things right. Too many people fall into the trap of just doing the cosmetic part of the job and not doing what NEEDS to be done. The next owner, (whenever that may be), is left with a mess, AND, doesn't trust the rest of the car either.
GOOD FOR YOU!!!!
Regards,
Alan
 The reason I took on a frame off on mine was not because I wanted to restore ala NCRS but more a case of finding what needed to be fixed to make the car more reliable and reduce future surprises. The car was just over 20 years old at the time. The fellow I bought from did the cosmetic part. Bought the car MANY years ago, long before the wealth of information from the internet was available.
That is going to be some work for sure, but very doable if you just go slow and think each step through. I would consider replacement of items before patching, your end result will be much better I belive. When you see just what you need search around, the parts are there that you will need, much easyer in the long run and cheaper also. When I did my 68 I found the complete wndshield frame including the lower corners from a place called "Pipers" This was NOS stuff pricey but new. It can be installed with out cutting the fenders and without removeing the front clip also, most will say no way, cool but I did it on my 68, it can be done!
Know the feeling. VERY nerve wracking when digging out the caulk between the fender tips and windshield frame. I felt a need to know and plan for repair if necessary. Mine turned out OK, whew...