
Front inner wheel bearing fit-pics
 01-19-2012, 05:41 PM
#1
Burning Brakes


Thread Starter

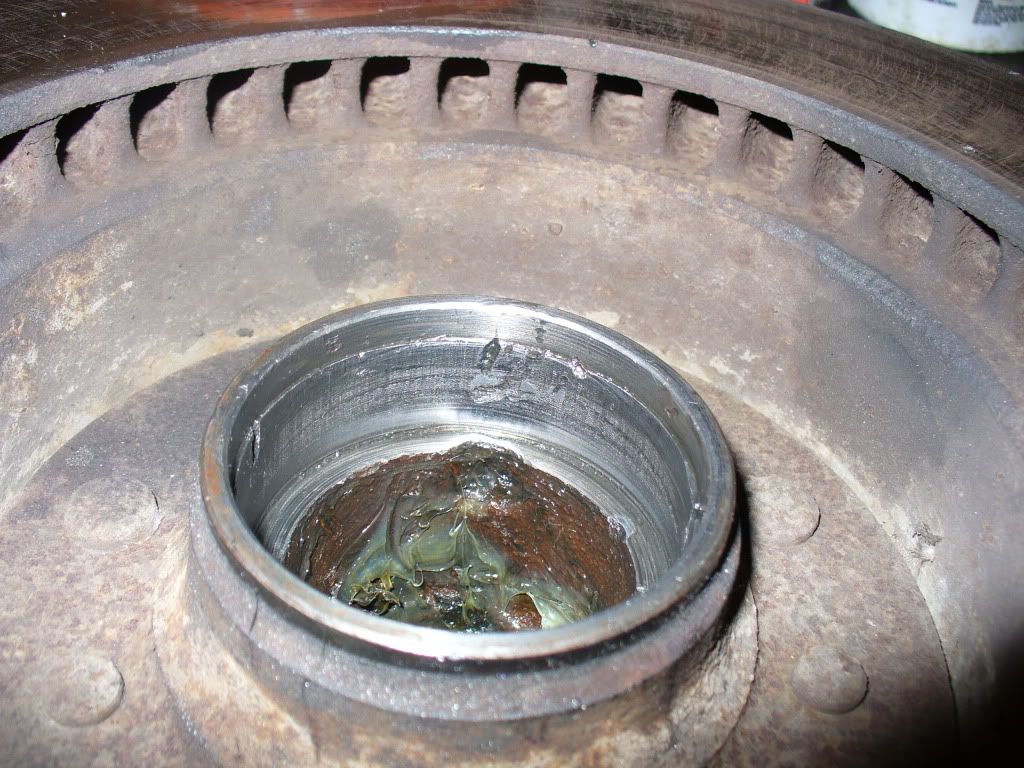
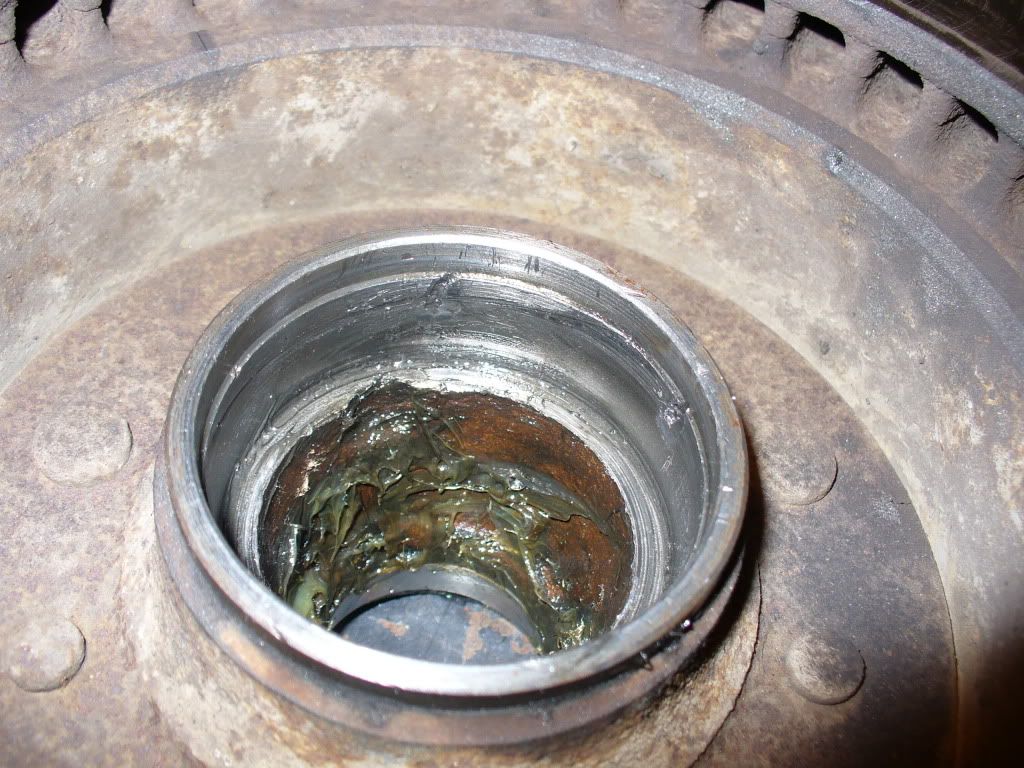
Pinpointed the play in the wheel to bearings. Previous owner indicated wheel bearings were new and after removing the hub, fresh grease and shiny finish on race and bearings corroborate his claim. No manufacturer name found on the bearing.
My question: how snug should the inner bearing be with respect to the inner seal cap? Pics portray the gap...
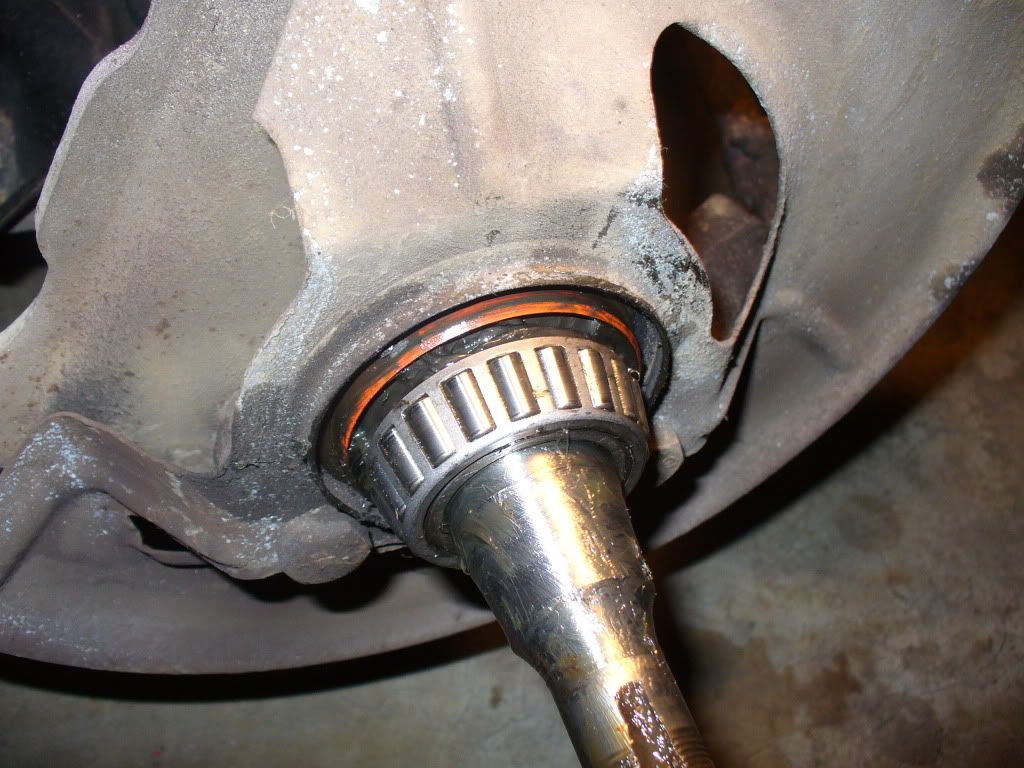

My question: how snug should the inner bearing be with respect to the inner seal cap? Pics portray the gap...
 01-19-2012, 07:42 PM
#2

Inner bearing to seal clearance is of no real importance. Bearing will rest in race which is seated into hub. Seal seats in hub also but no spec. for clearance to bearing. Seal just keeps water out as it rides on spindle. Make sure race is fully seated in hub and seal is seated into it's bore. mike...
Last edited by mds3013; 01-19-2012 at 07:44 PM.
01-20-2012, 02:13 AM
#3
Burning Brakes

Make sure you check the wheel hub inside diameters where the bearing outer races are supposed to seat. I've seen wheel hubs that have an oversize diameter caused by an old bearing that has siezed and caused the outer race to spin within the hub. You can have brand new bearings, properly adjusted, yet still have too much wheel movement. You'll know the hub is damaged after you press the outer races in. The races will be loose!
John
John
01-20-2012, 11:53 AM
#4
Team Owner

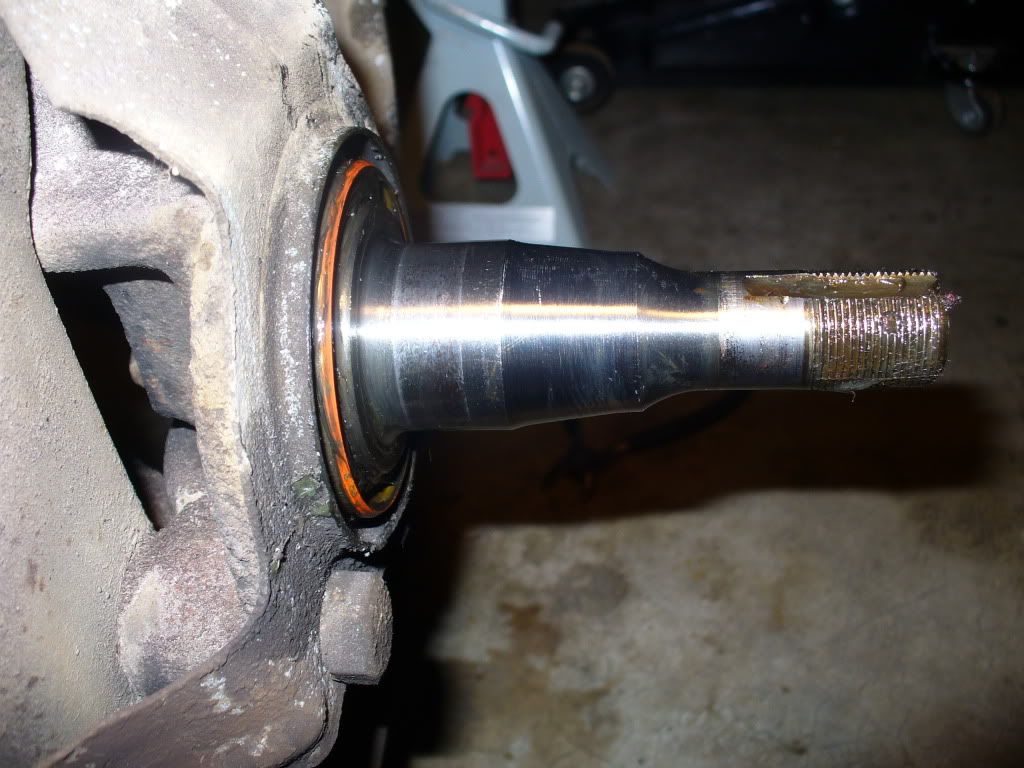
The inside face of the inner bearing race should fit up against the flat behind the spindle. In other words, drive the bearing inner race completely onto the spindle. If it won't go all the way, there is some kind of interference or machining problem on the spindle [very unlikely that the bearing race is mis-machined...although it is possible].
Then install rotor and set castle nut per procedure.
If you have to grind down the fillet radius on the spindle, be careful not to take more metal than you need. Also, make sure you smooth and blend the surface when you get the metal removed; you don't want to create a stress riser that can initiate a crack at the base of the spindle.
01-20-2012, 08:30 PM
#5
Burning Brakes
Thread Starter
Inner bearing to seal clearance is of no real importance. Bearing will rest in race which is seated into hub. Seal seats in hub also but no spec. for clearance to bearing. Seal just keeps water out as it rides on spindle. Make sure race is fully seated in hub and seal is seated into it's bore. mike...
Make sure you check the wheel hub inside diameters where the bearing outer races are supposed to seat. I've seen wheel hubs that have an oversize diameter caused by an old bearing that has siezed and caused the outer race to spin within the hub. You can have brand new bearings, properly adjusted, yet still have too much wheel movement. You'll know the hub is damaged after you press the outer races in. The races will be loose!
John
John
The inside face of the inner bearing race should fit up against the flat behind the spindle. In other words, drive the bearing inner race completely onto the spindle. If it won't go all the way, there is some kind of interference or machining problem on the spindle [very unlikely that the bearing race is mis-machined...although it is possible].
Then install rotor and set castle nut per procedure.
If you have to grind down the fillet radius on the spindle, be careful not to take more metal than you need. Also, make sure you smooth and blend the surface when you get the metal removed; you don't want to create a stress riser that can initiate a crack at the base of the spindle.
Then install rotor and set castle nut per procedure.
If you have to grind down the fillet radius on the spindle, be careful not to take more metal than you need. Also, make sure you smooth and blend the surface when you get the metal removed; you don't want to create a stress riser that can initiate a crack at the base of the spindle.
 01-20-2012, 10:33 PM
#6
Burning Brakes
Thread Starter
John, when applying finger pressure to the inner race, I can turn the race to make is spin inside the hub. It shouldn't move at all, correct?
01-20-2012, 10:46 PM
#7
If you can turn the race when it is fully seated in the hub then you have a problem. Race is a press fit, easily tapped in place with a small hammer and a brass punch. You should not be able to turn it. Race may be under size or hub may be damaged. Look at inner surface of hub where the race sets. Is it scored or damaged? When replacing inner bearings the order is, race into hub, grease packed bearing into pre lubed race, seal, slide rotor/hub onto spindle, outer race already installed and seated with lube, outer grease packed bearing, washer with tang, castle nut, cotter pin and dust cap. mike...
Last edited by mds3013; 01-20-2012 at 10:58 PM.
01-20-2012, 10:58 PM
#9
Burning Brakes
Thread Starter
If you can turn the race when it is fully seated in the hub then you have a problem. Race is a press fit, easily tapped in place with a small hammer and a brass punch. You should not be able to turn it. When replacing inner bearings the order is, race into hub, grease packed bearing into pre lubed race, seal, slide rotor/hub onto spindle, outer race already installed and seated with lube, outer grease packed bearing, washer with tang, nut, cotter pin and dust cap. mike...
01-20-2012, 11:00 PM
#10
01-20-2012, 11:11 PM
#11
Burning Brakes
Thread Starter


 01-20-2012, 11:24 PM
#12
Team Owner
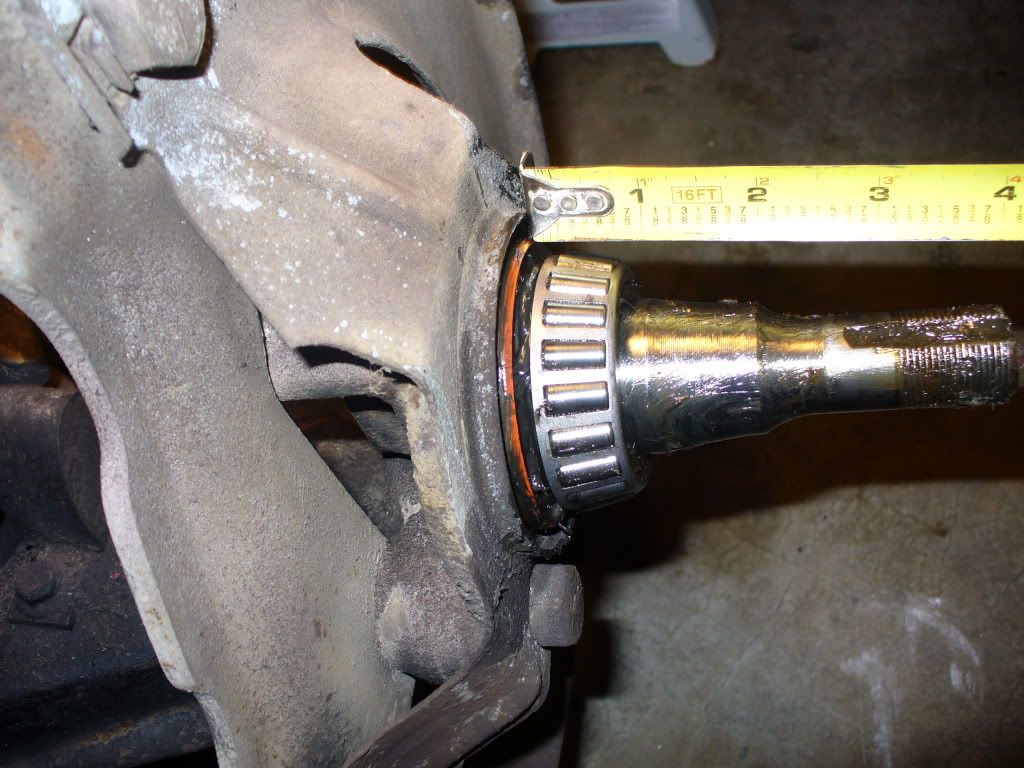
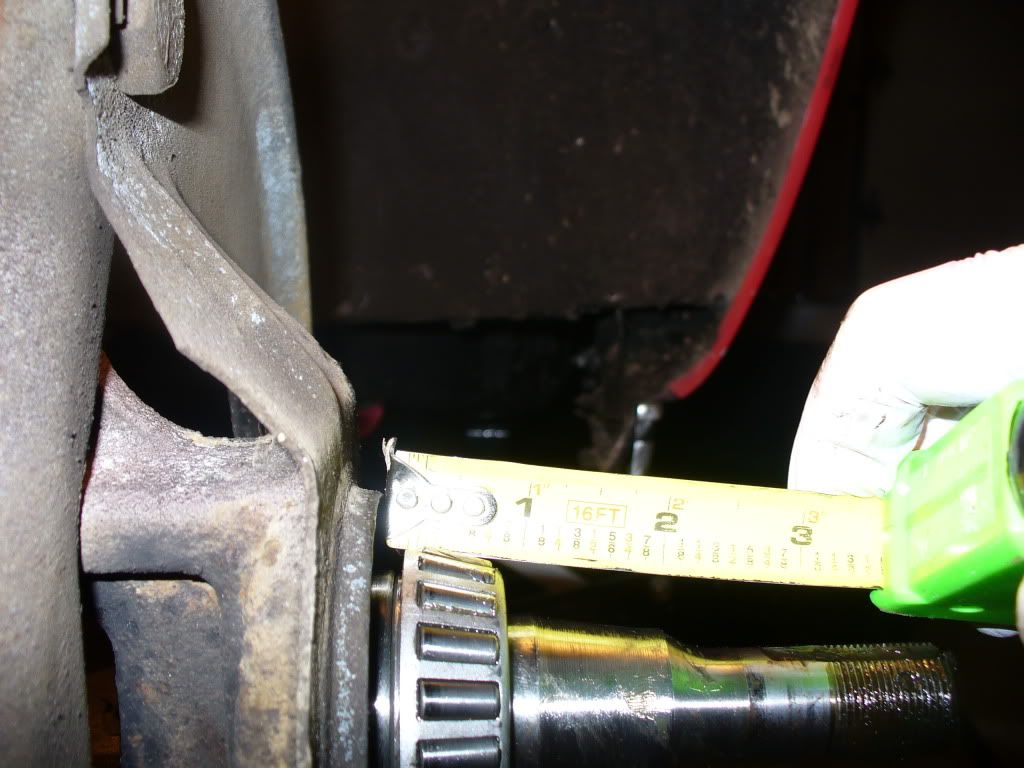
The problem with that spindle is that there is a "taper" machined into the journal for that bearing. Trace the journal surface back torward the flange....at a little more than 1/8" from the face of the flange, that journal starts to get larger as it merges with the flange. It should have a radius on it that is smaller than the [mating] radius on the bearing's inner race. Since it is larger, it stops the bearing from being completely seated. That fillet radius area on the spindle needs to be machined down with a die grinder or a cut-off wheel so that it no longer interferes with the bearing radius; then the bearing will completely seat.
You don't have to be super careful with your "deburring" effort. You just need to remove the material that is causing the interference, don't go much below the surface of the flange and/or spindle, and make the repair work smooth before you assemble the bearing. Also, try to keep any grinding chips/dust from getting into the bearing or other 'sensitive' areas.
Looks like the machining work on that spindle could stand to be 'improved'. Is that an original GM or 'other' aftermarket part?
{Note: For those that might be 'nervous' about removing any hardened material of the part by grinding that area down, you should be aware that the journal diameter is surface hardened to keep from having 'fretting' wear between the spindle and bearing...but there will only be a small area of the spindle with that hardened surface removed; most of that spindle area will still be hardened. No big deal. For those worried about losing 'strength' at the juntion of the spindle and flange, you should be aware that the whole part is 'core hardened' so that the part has the necessary strength to prevent spindle breakage. The small amount of material removed for obtaining the proper fillet clearance will have a negligible effect on overall part strength.}
Last edited by 7T1vette; 01-20-2012 at 11:31 PM.
01-21-2012, 12:21 AM
#13
Burning Brakes
Thread Starter
QUOTE=7T1vette;1579792815]The problem with that spindle is that there is a "taper" machined into the journal for that bearing.
Is that an original GM or 'other' aftermarket part?
7T1, thank you. My attempt to find the spindle part number in AIM was unsuccessful. Is there another resource available to determine the part's origin?
Is that an original GM or 'other' aftermarket part?
7T1, thank you. My attempt to find the spindle part number in AIM was unsuccessful. Is there another resource available to determine the part's origin?
01-21-2012, 04:08 AM
#14
Team Owner
Probably not...unless there is a part number cast into it somewhere. The AIM only shows those detail parts that were assembled at the final vehicle assembly plant. Those spindles were part of the steering sub-assembly provided by Saginaw Steering Division, so no detail parts in the AIM...only the entire sub-assembly number.
That spindle (if you think it is original to the car) could have been mis-machined at the factory. If so, it has run with a bearing on it for a lot of years without being fully seated. (not the worst 'quality' situation I've seen, by far)
If you want to confirm my 'theory' of the problem, determine the size of the radius at that end on the inner bearing race. Then, get a drill bit sized to twice that radius and lay it in the fillet on that spindle. If it won't seat properly with bottom and side of that drill shank touching the spindle journal and flange face, you have the interference condition I've described. And, I think removing some metal is preferable to disassembling that spindle and replacing it. But, that's your call.
Good luck with the fix.
That spindle (if you think it is original to the car) could have been mis-machined at the factory. If so, it has run with a bearing on it for a lot of years without being fully seated.
(not the worst 'quality' situation I've seen, by far)If you want to confirm my 'theory' of the problem, determine the size of the radius at that end on the inner bearing race. Then, get a drill bit sized to twice that radius and lay it in the fillet on that spindle. If it won't seat properly with bottom and side of that drill shank touching the spindle journal and flange face, you have the interference condition I've described. And, I think removing some metal is preferable to disassembling that spindle and replacing it. But, that's your call.
Good luck with the fix.
01-21-2012, 11:53 AM
#16
Drifting

So far I am not seeing any problem. Wash the grease out of the bearing and slide it on the spindle. Check to see if it bottoms out(slides on all the way). But first remove the seal from the spindle and clean off the grease. Post pics
Mike
Mike
01-21-2012, 02:19 PM
#17
Burning Brakes
Thread Starter
Thanks for the help and to all who chimed to suppport my stance as a learner. Bruce
 01-21-2012, 05:51 PM
#18
Burning Brakes
Thread Starter
Do I buy a new hub or the inner part? Unsure how to proceed from here. Other side probably in same shape.
See these pics
 01-21-2012, 06:32 PM
#19
Race Director

The hub needs to be replaced. I think your spindle is fine. That inner bearing does not need to be tight against the face of the spindle but the race has to be a pressed fit into the hub. I usually use the old race and a hammer to carefully install the new race. You want it to go in straight.
You drill the rivets out holding the rotor to hub, buy a new hub (may come with races and bearings) if not replace inner and outer race. Pack the bearings and install them into the races then carefully tap the inner seal in. Install Hub onto spindle and install washer and castle nut and snug it. Spin the hub to seat the bearings then just snug the castle nut until you feel a slight drag spinning the hub. Back off castle nut to the next slot and install the cotter pin. replace rotor onto new hub securing it with a couple wheel lugs and check rotor runout with magnetic base dial indicator. Shim rotor to hub to achieve .002 runout or less. Sometimes you can pull the rotor off the studs and rotate it a hole then check runout. Do this until you find the spot that is closest to 0 runout then shim to spec. Then replace the caliper and pads, install the tire and torque the lugs. No need to replace rivets holding the rotor to hub. I would check the other side before you buy parts but it is likely fine.
You drill the rivets out holding the rotor to hub, buy a new hub (may come with races and bearings) if not replace inner and outer race. Pack the bearings and install them into the races then carefully tap the inner seal in. Install Hub onto spindle and install washer and castle nut and snug it. Spin the hub to seat the bearings then just snug the castle nut until you feel a slight drag spinning the hub. Back off castle nut to the next slot and install the cotter pin. replace rotor onto new hub securing it with a couple wheel lugs and check rotor runout with magnetic base dial indicator. Shim rotor to hub to achieve .002 runout or less. Sometimes you can pull the rotor off the studs and rotate it a hole then check runout. Do this until you find the spot that is closest to 0 runout then shim to spec. Then replace the caliper and pads, install the tire and torque the lugs. No need to replace rivets holding the rotor to hub. I would check the other side before you buy parts but it is likely fine.