
IMPORTANT ELECTRICAL INFORMATION (Long!)
 10-07-2014, 08:24 PM
#1681
Intermediate


C1281 = DTC C1281 Steering Sensor Uncorrelated Malfunction and that is most likely your EBTCM issue.
The SCM No Comms. Hmmm, is the seat that you installed a MEMORY seat? If the car that it came out of didnt have memory, it will not work by the memory function. The BCM has to be able to communicate with the memory module.
Yes,, it will function fine manually
Compare the seat that you took out with the one you installed AND look at the seat connector and see if it has a memory wire that matches with the memory wire in the body connector for the seat:
Look for the BROWN WHITE wire:
BC
Also any suggestions on the Steering sensor code? Any way to check it? Replace the sensor? Thanks for your knowledge and help as always.
UPDATE: Did some reading on the steering sensor. Going to check voltages and check all the wiring connections in the morning. Try a couple tricks that worked for others. Probably finish up my ground checks as well before I consider replacing the sensor although it appears I may have to. And of course the one for my 97 is the most expensive. Upwards of 300 dollars best I could find it.
Last edited by RNCvette1; 10-08-2014 at 12:12 AM.
 10-09-2014, 09:50 PM
#1682
Intermediate

Member Since: Jan 2013
Location: San Tan Arizona
Posts: 35
Likes: 0
Received 0 Likes
on
0 Posts
Hello All,
I still have issue with alternator not kicking in (Charging), unless i rev engine up, or when it is hot out side or when car has been running the alternator will charge. I have a lot of comments on here and have answered them, but still cant seem to fix it. Has any one ever had this issue? Just a brief summery it reads 11.8v until i rev engine or when hot outside it goes to 14.1 volts. The only thing I am not sure of is the 3 wires going to the alternator terminal. I have checked the gnds even replace with eye connectors to frame, checked hot fuseible link wires, replace battery, two alternators, starter. clean connectors going to computer. Not sure where to go from here.
Thanks in advance,
Jimmy
10-09-2014, 11:14 PM
#1683
Tech Contributor


Thread Starter

Member Since: Dec 1999
Location: Anthony TX
Posts: 32,736
Received 2,180 Likes
on
1,583 Posts
CI 6,7,8,9,11 Vet
St. Jude Donor '08

HMMMM,,, Do you have a NM6 or a A4 Trans? Does your alternator have the clutch unit on the pulley or just a regular pulley??
10-10-2014, 09:40 AM
#1684
Intermediate
Member Since: Jan 2013
Location: San Tan Arizona
Posts: 35
Likes: 0
Received 0 Likes
on
0 Posts
10-10-2014, 07:13 PM
#1685
Tech Contributor
Thread Starter
Member Since: Dec 1999
Location: Anthony TX
Posts: 32,736
Received 2,180 Likes
on
1,583 Posts
CI 6,7,8,9,11 Vet
St. Jude Donor '08
You need to find a shop with a TECH-2. Have them check the duty cycle (which is controlled by the PCM) and make sure that the PCM is being told to charge properly.
I would also make sure that the red FEED BACK WIRE has proper continuity and making proper connection at the starter and at the alternator plug.
I would also make sure that the red FEED BACK WIRE has proper continuity and making proper connection at the starter and at the alternator plug.
10-10-2014, 11:41 PM
#1686
Intermediate
Member Since: Jan 2013
Location: San Tan Arizona
Posts: 35
Likes: 0
Received 0 Likes
on
0 Posts
You need to find a shop with a TECH-2. Have them check the duty cycle (which is controlled by the PCM) and make sure that the PCM is being told to charge properly.
I would also make sure that the red FEED BACK WIRE has proper continuity and making proper connection at the starter and at the alternator plug.
I would also make sure that the red FEED BACK WIRE has proper continuity and making proper connection at the starter and at the alternator plug.
10-10-2014, 11:54 PM
#1687
Tech Contributor
Thread Starter
Member Since: Dec 1999
Location: Anthony TX
Posts: 32,736
Received 2,180 Likes
on
1,583 Posts
CI 6,7,8,9,11 Vet
St. Jude Donor '08
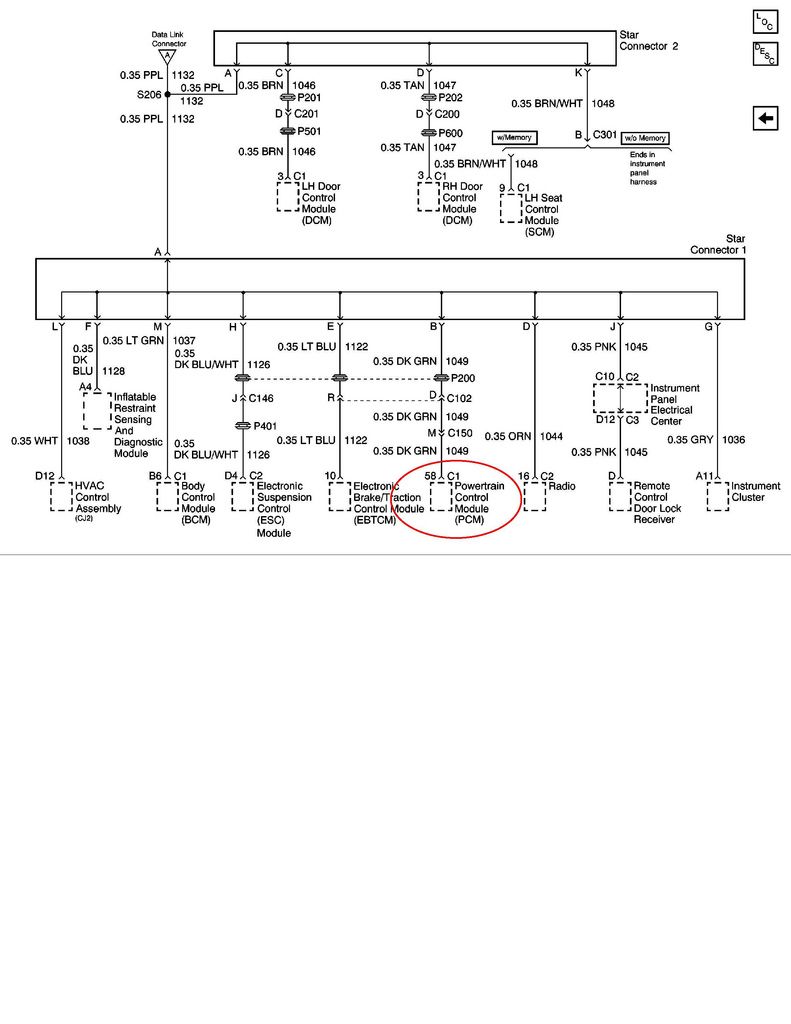
You need to check more than the main red wire. Use this schematic and continuity check the feed back wire PIN "D" on the plug on the tio of the case. That is the wire that tells the alternator what voltage to regulate to.
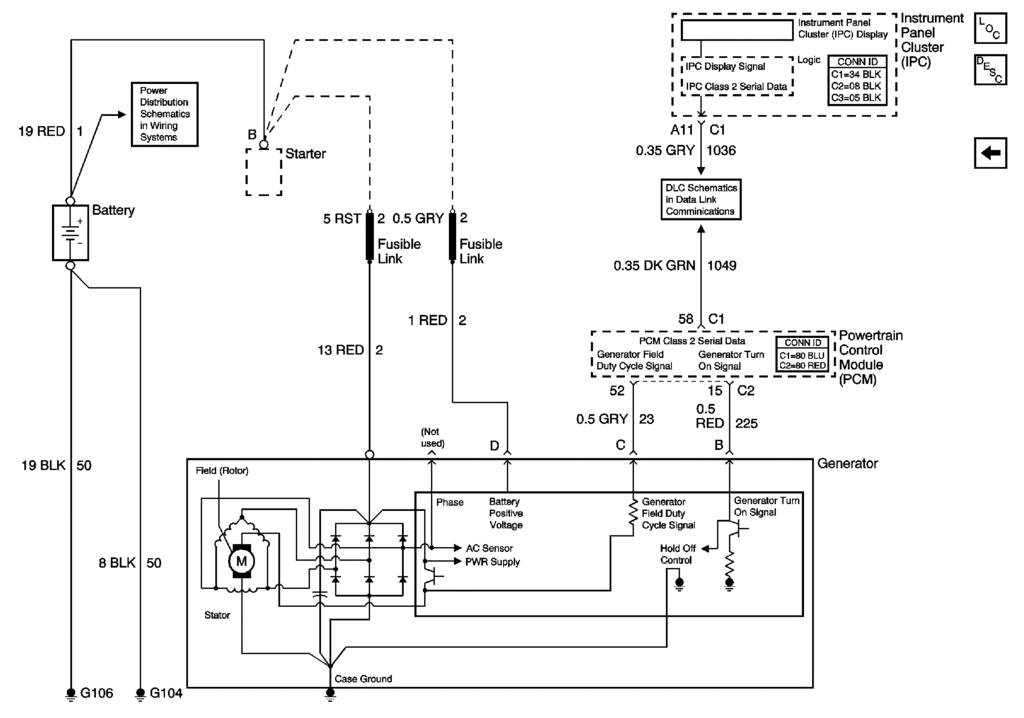
Bill
Bill
12-25-2014, 09:08 PM
#1688
Burning Brakes


I have a weird electrical issue...
When hp tuners scanner is connected to obd the radio and display will go dead sometimes. And may take multiple drive cycles before it comes back. Only happens when scanner is connected.
Any thoughts would be awesome.
When hp tuners scanner is connected to obd the radio and display will go dead sometimes. And may take multiple drive cycles before it comes back. Only happens when scanner is connected.
Any thoughts would be awesome.
12-25-2014, 09:40 PM
#1689
Tech Contributor
Thread Starter
Member Since: Dec 1999
Location: Anthony TX
Posts: 32,736
Received 2,180 Likes
on
1,583 Posts
CI 6,7,8,9,11 Vet
St. Jude Donor '08
Try this....
Find a male PIN with the same width and thickness as the male pin in the HP Tuners plug in connector.. Check the at the autoparts store for a new spare pin..
INSERT that spare pin into each OBD2 port pin slot... If the FEMALE Pin is good,, there will be a noted GRIP ( resistance on isnertion and removal) on the male pin in insertion and removal.
If you find that the make pin has NO resistance,,, that could be your issue. That pin or the entire connector may need repair or replacement.
Try that first
Bill
12-25-2014, 10:56 PM
#1690
Burning Brakes
JOSH
Try this....
Find a male PIN with the same width and thickness as the male pin in the HP Tuners plug in connector.. Check the at the autoparts store for a new spare pin..
INSERT that spare pin into each OBD2 port pin slot... If the FEMALE Pin is good,, there will be a noted GRIP ( resistance on isnertion and removal) on the male pin in insertion and removal.
If you find that the make pin has NO resistance,,, that could be your issue. That pin or the entire connector may need repair or replacement.
Try that first
Bill
Must be shorting something... If I have the radio on while logging and it goes dead makes a loud, startling sound.
01-06-2015, 04:29 PM
#1691
Navigator

Member Since: Jan 2015
Posts: 9
Likes: 0
Received 0 Likes
on
0 Posts
Hi Bill
Great information here. I have been having many of the problems stated, tach not working, fuel gauge showing empty, oil pressure gauge not working....etc Then the next time I start it they work. Ghost in the machine as it were. My question is how hard is it to get to the ground points? 2001 -Drive it year round so I am assuming this will clear it up Fingers crossed. Is there any way to tell which number corresponds with which sensor? Sorry, hope it's not too much of a rookie question.
Thanks for all your great posts. I know where I'm going for info now!!
Dave
01-06-2015, 05:44 PM
#1692
Tech Contributor
Thread Starter
Member Since: Dec 1999
Location: Anthony TX
Posts: 32,736
Received 2,180 Likes
on
1,583 Posts
CI 6,7,8,9,11 Vet
St. Jude Donor '08
Hi Bill
Great information here. I have been having many of the problems stated, tach not working, fuel gauge showing empty, oil pressure gauge not working....etc Then the next time I start it they work. Ghost in the machine as it were. My question is how hard is it to get to the ground points? 2001 -Drive it year round so I am assuming this will clear it up Fingers crossed. Is there any way to tell which number corresponds with which sensor? Sorry, hope it's not too much of a rookie question.
Thanks for all your great posts. I know where I'm going for info now!!
Dave
Great information here. I have been having many of the problems stated, tach not working, fuel gauge showing empty, oil pressure gauge not working....etc Then the next time I start it they work. Ghost in the machine as it were. My question is how hard is it to get to the ground points? 2001 -Drive it year round so I am assuming this will clear it up Fingers crossed. Is there any way to tell which number corresponds with which sensor? Sorry, hope it's not too much of a rookie question.
Thanks for all your great posts. I know where I'm going for info now!!
Dave
Your showing the effects of a corrupted serial data buss OR low voltage
My money is on a serial data issue. Lets try this so I can help you nail down the root cause.
The very next time it happens, see if either one of your doors loose control of the up/down switch.
Read your DTCs and see if you have NO COMMUNICATIONS on any of the modules. YOU MUST use the DIC internal DTC reading routeine to see this code/message!
READING YOUR Engine Diagnostic Codes
The Diagnostic Display Mode is entered with the following procedure:
1) Turn on the ignition but don't start the engine.
NOTE! You can read the DTCs with the engine running and or driving down the road but it can distract you. BE careful! Some DTCs clear themselves when you turn the ignition OFF!
I always read my DTCs prior to turning OFF the ignition switch. If you have any messages on the DIC,, PRESS RESET until they are gone!
2) Press the RESET button to turn off any warning messages. (i.e. door open, trunk open ect.)
3) Press and hold OPTIONS
4) While holding OPTIONS, press FUEL four times within a 10-second period.
Initially, on-board diagnostics go into an Automatic Mode which shows diagnostic codes in a pre-set sequence: PCM - TCS - RTD - BCM - IPC - RADIO - HVAC - LDCM - RDCM - SCM - RFA. All codes will be displayed for each. ( i.e. PCM = 4 codes) If none are present in a given module, you will see No More Codes on the display.
There are two kinds of diagnostic codes, Current and History designated with a letter suffix, "C" or "H". A current C code indicates a malfunction is present and active in the module displaying data. A history code indicates a problem existed sometime in the last 40 or 50 ignition cycles. When not accompanied by a current code of the same number, it's potential evidence of a previous problem, now resolved, that was not removed by clearing the codes.
More likely it's an indication of an intermittent malfunction.
Intermittent codes are the most challenging of the diagnostics. An intermittent code may have happened once, may have happened more than once but is inconsistent or may be happening on a regular basis but not at the time the codes are displayed. History codes can also be caused by a current malfunction in a system that is not operating at the time codes are displayed. An example is the rear window defogger which doesn't operate until the Body Control Module detects engine rpm. For history codes set by a module that does not operate with the key on and engine off, a special diagnostic tool called a Scan Tester is necessary to properly diagnose the malfunction.
Once the system has displayed all modules, it goes into the manual mode which allows selection of each module using combinations of Driver Information Center buttons. Manual mode can also be entered during the automatic sequence by pressing any button except English/Metric (E/M). Once the display shows Manual Diagnostics, select a module by pressing the OPTIONS button to go forward or the TRIP button to go back. Once a module is selected, a code is displayed, and if more than one are present; press GAGES to go forward or FUEL to go back.
To exit the diagnostic mode at any time, press E/M. If you want to erase codes in a given module, press and hold the RESET button To reset the codes once in manual mode, press and hold RESET until it displays NO CODES Press OPTIONS to go to the next module. Repeat the steps until you have reset the codes in all the computer modules.
NOTE!! Only reset the codes IF you want to - it is NOT necessary to do this. Clearing a code does not repair a problem. You are simply erasing the evidence of it in the module's memory. If you clear the code/s, and extinguish the Check Engine Light, your emissions status ready will NOT allow you to pass an emissions test until you have completed the required driving cycles.
Once you have the codes, the next question is: What to do with the information?
First, consult the factory service manual. Any serious C5 Do-It-Yourself owner should invest in the Corvette Service Manual of the appropriate model year. The Service Manual is really a requirement if you want to understand and work on your C5. You can GOOGLE the DTC and also find information on it.
Here is very good site that explains the DTCs:
http://www.corvette-web-central.com/C5DTCcode.html
http://www.obd-codes.com/trouble_cod...d-ii-codes.php
Make sure to include the H or C suffix!!
If you have NO COMMS, OPEN BOTH DOORS. Grab the rubber accordion tube and shake the heck out of it. Read the DTCs again and clear all messages / DTCs and see if the issues go away.
Bill
01-06-2015, 07:12 PM
#1693
Navigator
Member Since: Jan 2015
Posts: 9
Likes: 0
Received 0 Likes
on
0 Posts
WELL,,,,,,,,,,,,, As important as grounds are, I dont think that your issues being caused by a ground issue.
Your showing the effects of a corrupted serial data buss OR low voltage
My money is on a serial data issue. Lets try this so I can help you nail down the root cause.
The very next time it happens, see if either one of your doors loose control of the up/down switch.
Read your DTCs and see if you have NO COMMUNICATIONS on any of the modules. YOU MUST use the DIC internal DTC reading routeine to see this code/message!
READING YOUR Engine Diagnostic Codes
The Diagnostic Display Mode is entered with the following procedure:
1) Turn on the ignition but don't start the engine.
NOTE! You can read the DTCs with the engine running and or driving down the road but it can distract you. BE careful! Some DTCs clear themselves when you turn the ignition OFF!
I always read my DTCs prior to turning OFF the ignition switch. If you have any messages on the DIC,, PRESS RESET until they are gone!
2) Press the RESET button to turn off any warning messages. (i.e. door open, trunk open ect.)
3) Press and hold OPTIONS
4) While holding OPTIONS, press FUEL four times within a 10-second period.
Initially, on-board diagnostics go into an Automatic Mode which shows diagnostic codes in a pre-set sequence: PCM - TCS - RTD - BCM - IPC - RADIO - HVAC - LDCM - RDCM - SCM - RFA. All codes will be displayed for each. ( i.e. PCM = 4 codes) If none are present in a given module, you will see No More Codes on the display.
There are two kinds of diagnostic codes, Current and History designated with a letter suffix, "C" or "H". A current C code indicates a malfunction is present and active in the module displaying data. A history code indicates a problem existed sometime in the last 40 or 50 ignition cycles. When not accompanied by a current code of the same number, it's potential evidence of a previous problem, now resolved, that was not removed by clearing the codes.
More likely it's an indication of an intermittent malfunction.
Intermittent codes are the most challenging of the diagnostics. An intermittent code may have happened once, may have happened more than once but is inconsistent or may be happening on a regular basis but not at the time the codes are displayed. History codes can also be caused by a current malfunction in a system that is not operating at the time codes are displayed. An example is the rear window defogger which doesn't operate until the Body Control Module detects engine rpm. For history codes set by a module that does not operate with the key on and engine off, a special diagnostic tool called a Scan Tester is necessary to properly diagnose the malfunction.
Once the system has displayed all modules, it goes into the manual mode which allows selection of each module using combinations of Driver Information Center buttons. Manual mode can also be entered during the automatic sequence by pressing any button except English/Metric (E/M). Once the display shows Manual Diagnostics, select a module by pressing the OPTIONS button to go forward or the TRIP button to go back. Once a module is selected, a code is displayed, and if more than one are present; press GAGES to go forward or FUEL to go back.
To exit the diagnostic mode at any time, press E/M. If you want to erase codes in a given module, press and hold the RESET button To reset the codes once in manual mode, press and hold RESET until it displays NO CODES Press OPTIONS to go to the next module. Repeat the steps until you have reset the codes in all the computer modules.
NOTE!! Only reset the codes IF you want to - it is NOT necessary to do this. Clearing a code does not repair a problem. You are simply erasing the evidence of it in the module's memory. If you clear the code/s, and extinguish the Check Engine Light, your emissions status ready will NOT allow you to pass an emissions test until you have completed the required driving cycles.
Once you have the codes, the next question is: What to do with the information?
First, consult the factory service manual. Any serious C5 Do-It-Yourself owner should invest in the Corvette Service Manual of the appropriate model year. The Service Manual is really a requirement if you want to understand and work on your C5. You can GOOGLE the DTC and also find information on it.
Here is very good site that explains the DTCs:
http://www.corvette-web-central.com/C5DTCcode.html
http://www.obd-codes.com/trouble_cod...d-ii-codes.php
Make sure to include the H or C suffix!!
If you have NO COMMS, OPEN BOTH DOORS. Grab the rubber accordion tube and shake the heck out of it. Read the DTCs again and clear all messages / DTCs and see if the issues go away.
Bill
Thanks!
01-06-2015, 07:29 PM
#1694
Tech Contributor
Thread Starter
Member Since: Dec 1999
Location: Anthony TX
Posts: 32,736
Received 2,180 Likes
on
1,583 Posts
CI 6,7,8,9,11 Vet
St. Jude Donor '08
Doors have always worked. Not ever had a problem there. But I will specifically check it. What would be the source of a low voltage problem. As I stated before, I'm new to corvettes, so I am trying to learn. The TC and ABS lights have been on for a few weeks as well. The battery recently went out, I can charge it and get the car started, but it won't hold a charge, was getting ready to go have it tested and replaced. Thoughts?
Thanks!
Thanks!
A good battery is 100% CRITICLE in C5/C6 proper operation. As batteries age, their ability to supply proper VOLTAGE during high load (current demand) situations starts to falter.
When a module sees low voltage it starts to have issues and will most likely shut down until the voltage is normal again.
Any newer vehicle can have the same battery issues.
Just today my 08 Jeep Wrangler FAILED Emissions due to a weak aged battery. Its 7 YEARS OLD. It starts the engine just fine. When I cold crank the engine (heavy starter load) the battery voltage drops down below 9 VDC for just a split second and that causes the ECU to reset ALL of the emissions ready flags to NOT READY. You have to have ALL the flags READY. That requires several drive cycles
So,, Before you can properly troubleshoot you issue, I highly recommend either;
Having your battery fully charged and then fully tested
OR
Replace it with one that has the proper CCA and Reserve capacity
A new good battery should be able to sit in the car idle for 30 days and still properly crank and start the engine.
Bill
01-09-2015, 12:48 PM
#1695
Melting Slicks


In the past week and a half the battery in my '03 A4 has failed to spin the starter on command. Not even a clicking noise. This issue comes after sitting for about three hours not over night or days. This has happened three times.
I have a heavy drain.
The Battery gauge reads about 8-9 volts.
Twice I have left it alone overnight and in the morning it fired right up.
It had to be jumped once but it did not even flinch to start connected to cables.
After reading this thread I have started turning off the radio and the HVAC before shutting down and watching for lights that will not go off. I have not had the non- start issue since.
I believe the Bose Amp relay is sticking if I sit in the non-running car and listen to the radio after I am done driving.
Can I pull the amp relay and still get a radio signal?
I am going to follow the advice in this thread I just have not had the time and I believe I have already found the culprit.
I am just curious about pulling the relay or just buying a new one and trying to shut down with the radio on.
Thanks for replies if deemed necessary. The answers are already included in this thread somewhere.
 01-09-2015, 06:03 PM
#1696
Tech Contributor
Thread Starter
Member Since: Dec 1999
Location: Anthony TX
Posts: 32,736
Received 2,180 Likes
on
1,583 Posts
CI 6,7,8,9,11 Vet
St. Jude Donor '08
LOL! Well,,,,,,,,,,,,,,,,,,,,, Lets do some splaining!!
The Volt Meter on the dash DOES NOT represent TRUE battery terminal voltage. It represents the battery voltage AFTER the "IGNITION SWITCH"
Unless you use a DC Volt Meter on the battery terminals, you can NOT be sure of actual battery voltage!!
If the IGNITION SWITCH contacts are dirty/burnt/ corroded/carboned,,, It will not supply full battery voltage..
On another direction,, when the STARTER will NOT crank the engine,, it could very well be a defective starter SOLENOID. They are WELL KNOWN to cause that very issue.
When it will not crank, find something to WHACK the starter while some one holds the key to crank.
If that resolves the NO CRANK issue,, check the connections on the solenoid and or replace the solenoid or entire starter.
BC
01-09-2015, 08:07 PM
#1698
Tech Contributor
Thread Starter
Member Since: Dec 1999
Location: Anthony TX
Posts: 32,736
Received 2,180 Likes
on
1,583 Posts
CI 6,7,8,9,11 Vet
St. Jude Donor '08
As ALWAYS when your C5 has an issue,,,,,,,,,,,,,, Read the DTCs! POST what shows up.. Then,, clear the DTCs and re read. Post what comes back after a short drive! That is what needs to be investigated!.
BC
BC
Last edited by Bill Curlee; 01-09-2015 at 08:10 PM.
01-10-2015, 06:17 PM
#1699
Melting Slicks
LOL! Well,,,,,,,,,,,,,,,,,,,,, Lets do some splaining!!
The Volt Meter on the dash DOES NOT represent TRUE battery terminal voltage. It represents the battery voltage AFTER the "IGNITION SWITCH"
Unless you use a DC Volt Meter on the battery terminals, you can NOT be sure of actual battery voltage!!
If the IGNITION SWITCH contacts are dirty/burnt/ corroded/carboned,,, It will not supply full battery voltage
On another direction,, when the STARTER will NOT crank the engine,, it could very well be a defective starter SOLENOID. They are WELL KNOWN to cause that very issue.
When it will not crank, find something to WHACK the starter while some one holds the key to crank.
If that resolves the NO CRANK issue,, check the connections on the solenoid and or replace the solenoid or entire starter.
BC
After turning the key off and on a couple of times I jiggled the key and it started, so I drove home.
When I got home and in the drive way I tested and I could get it to repeat this issue.
The key switch is loose in the dash, not solid like in a column key switch.
I have a pick-up truck I am re-doing the front end suspension on currently and I hope to have it finished this weekend. The lower ball joints are being testy going back in.
The Vette was to go in the barn next for the droopy HUD mod, wind shield visors, better alignment for the side window fit and seal, drivers auto dimming side mirror repair, and some trim pieces need replacing. I guess I can check the key switch while I have it torn down for the rest of the repairs.
Last edited by drtyTshrt; 01-10-2015 at 06:24 PM.
01-10-2015, 10:22 PM
#1700
Tech Contributor
Thread Starter
Member Since: Dec 1999
Location: Anthony TX
Posts: 32,736
Received 2,180 Likes
on
1,583 Posts
CI 6,7,8,9,11 Vet
St. Jude Donor '08
Im NOT counting out the ignition switch as the culprit BUT,,,,,, the actual key cylinder "LOCK" has NOTHING to do with the actual electrical switch.
HOWEVER,,,,,, That being said,, the LOOSE key in the slot can and will have a lot to do with the KEY RESISTOR CHIP READER SENSOR on the end of the switch housing.
If the chip reader sensor was the issue, it would throw a DTC AND SHOW the PULL KEY message..
The cylinder and the switch are basically ISOLATED.
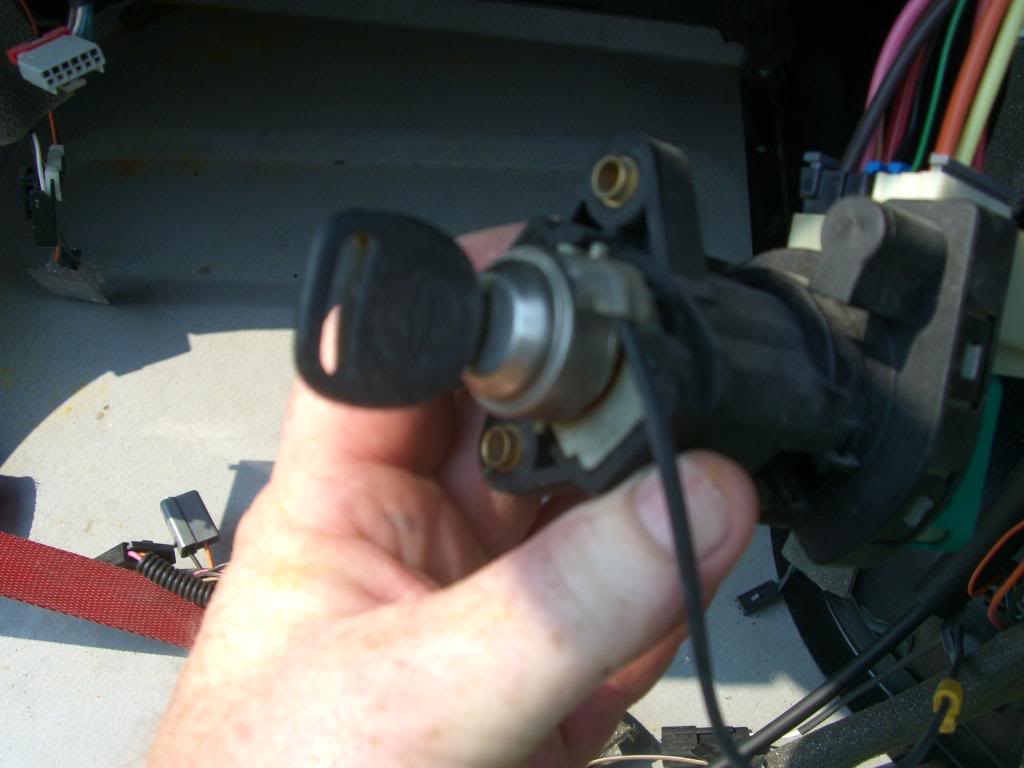
Here is the ignition switch with the key cylinder section removed! As you can see,, the cylinder has NOTHING to do with electrical connections. It just turns the shaft that actuates the switches.
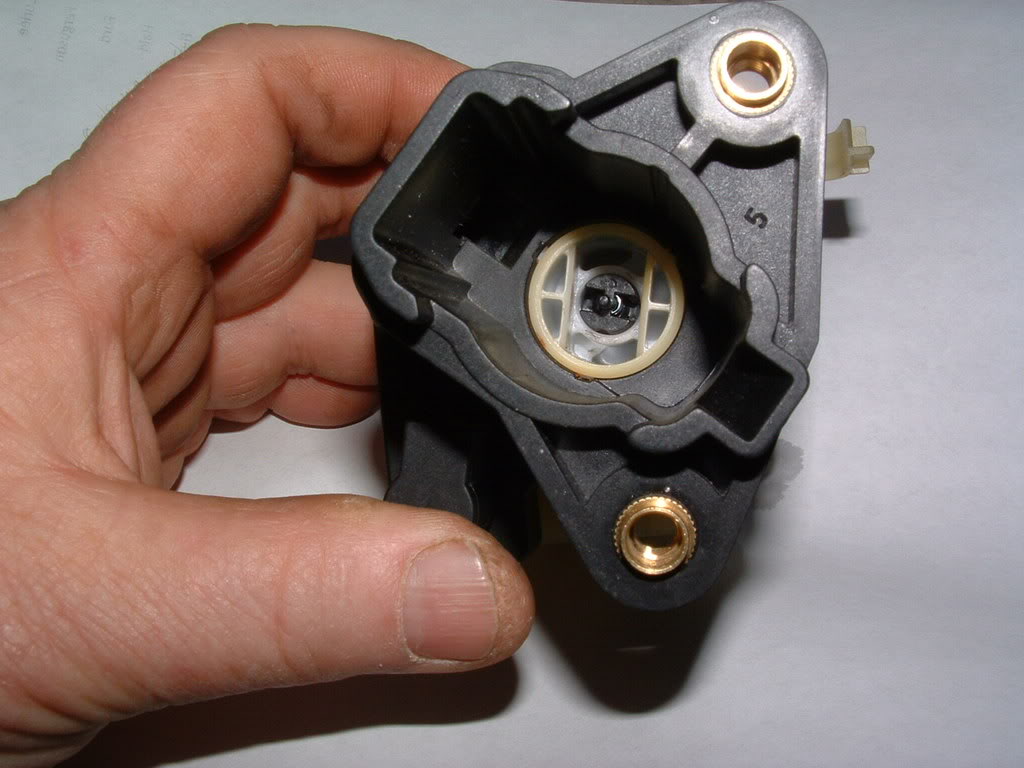
IF, It were my car,,, I would suspect the STARTER SOLENOID or the secondary electrical circuits or the connections on the starter to be the issue..
Been around the block on this issue a FEW times!

You can use my IGNITION SWITCH post to rework your old switch to be like NEW.
- C5 ignition Switch repair - http://forums.corvetteforum.com/c5-t...ch-repair.html
HOWEVER,,,,,, That being said,, the LOOSE key in the slot can and will have a lot to do with the KEY RESISTOR CHIP READER SENSOR on the end of the switch housing.
If the chip reader sensor was the issue, it would throw a DTC AND SHOW the PULL KEY message..
The cylinder and the switch are basically ISOLATED.
Here is the ignition switch with the key cylinder section removed! As you can see,, the cylinder has NOTHING to do with electrical connections. It just turns the shaft that actuates the switches.
IF, It were my car,,, I would suspect the STARTER SOLENOID or the secondary electrical circuits or the connections on the starter to be the issue..
Been around the block on this issue a FEW times!
You can use my IGNITION SWITCH post to rework your old switch to be like NEW.
- C5 ignition Switch repair - http://forums.corvetteforum.com/c5-t...ch-repair.html
Last edited by Bill Curlee; 01-10-2015 at 10:24 PM.