rounding off panel edges
 11-10-2014, 11:11 AM
#1
Melting Slicks

Thread Starter


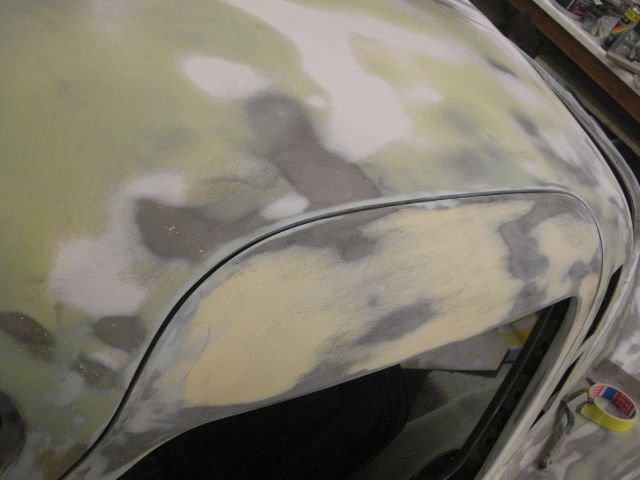
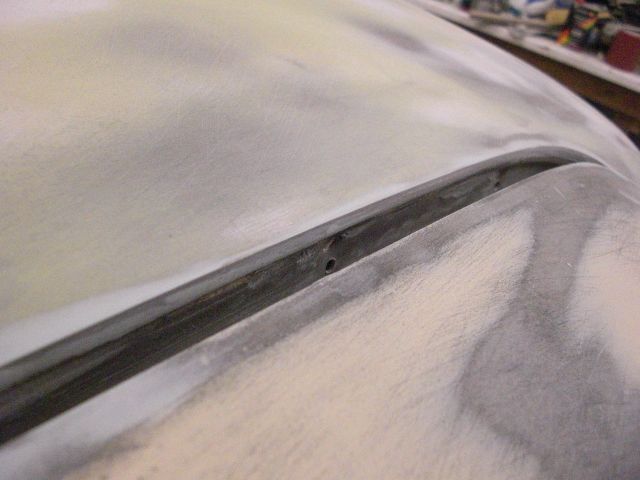
I spent about a year to restore the body of my 64. The panel gaps are looking fine now, however I kept the 'rounding-off' phase till the end. As hopefully can be seen in the pictures, the edges are very sharp and need to be smoothened to avoid excessive vulnerability to paint chipping etc.
My question: is there any method for doing this that yields consistent radius results?
My question: is there any method for doing this that yields consistent radius results?


 11-10-2014, 05:43 PM
#2
Race Director


A piece of DA paper in your hand and cup you palm over the edge and run across it. Do not over-think this. You are going to be applying so much primer and blocking it out...that if a conscience effort is made to make sure your edges are covered the same as the rest of the panel surface...you should not have any problems.
DO NOT FORGET.....not knowing what you are planning on applying in the car....if you are planning on applying ...for example....gelcoat...then a polyester primer...then a sealer...then paint...then clear. You need to make sure that you compensate the gaps so that when all of this material is applied...it does not close up the gaps too much...BECAUSE you did not widen them for the film thickness of all the materials.
I doubt you are going to do it....but I have mentioned to many members that they shoot a panel from start to finish..(treat it EXACTLY as if it were your car)...so they know how thick the materials is going to add to the panels surface. I know from experience on how wide to have my gaps...so when it is all said and done...the gaps are perfect.
Question: Why did you not stay with the same type of filler through the car????
DUB
11-11-2014, 04:50 AM
#3
Melting Slicks
Thread Starter
A piece of DA paper in your hand and cup you palm over the edge and run across it. Do not over-think this. You are going to be applying so much primer and blocking it out...that if a conscience effort is made to make sure your edges are covered the same as the rest of the panel surface...you should not have any problems.
DO NOT FORGET.....not knowing what you are planning on applying in the car....if you are planning on applying ...for example....gelcoat...then a polyester primer...then a sealer...then paint...then clear. You need to make sure that you compensate the gaps so that when all of this material is applied...it does not close up the gaps too much...BECAUSE you did not widen them for the film thickness of all the materials.
I doubt you are going to do it....but I have mentioned to many members that they shoot a panel from start to finish..(treat it EXACTLY as if it were your car)...so they know how thick the materials is going to add to the panels surface. I know from experience on how wide to have my gaps...so when it is all said and done...the gaps are perfect.
Question: Why did you not stay with the same type of filler through the car????
DUB
DO NOT FORGET.....not knowing what you are planning on applying in the car....if you are planning on applying ...for example....gelcoat...then a polyester primer...then a sealer...then paint...then clear. You need to make sure that you compensate the gaps so that when all of this material is applied...it does not close up the gaps too much...BECAUSE you did not widen them for the film thickness of all the materials.
I doubt you are going to do it....but I have mentioned to many members that they shoot a panel from start to finish..(treat it EXACTLY as if it were your car)...so they know how thick the materials is going to add to the panels surface. I know from experience on how wide to have my gaps...so when it is all said and done...the gaps are perfect.
Question: Why did you not stay with the same type of filler through the car????
DUB

The reason why you see different fillers is because I could not find the one that worked (for me..). It's only when I was halfway a frustrating exercise that I could get hold on Evercoat Rage Gold and Easy Sand (difficult to find in europe). That is what I use now. I particularly like that I can sand them while they are hardly dried out (still rubbery) for a first rough cut shaping without clogging the sandpaper. Speeds up the finishing later, and I find it easier on double curved surfaces (a C2 has plenty) where it's easy to have flat spots.
It's been an enormous learning journey. I have never done any bodywork before (except on my small RC flying models ;-) ), I absolutely wanted to give it a try. I have myself advised by some experts from the Glasurit Technical Center which is just around the corner, and they jump in once in a while to judge my work (thanks guys!). For sure they did not like my first blocking results. I needed to learn and integrate the 'feel' of floating with a handpalm over a panel and identify highs and lows. That took a while but now I am much better at it. I use guide coat a lot, but the handpalm method works better to identify smoothness of soft curves. I learned to use the multitude of blocking tools I have accumulated (hard, soft, flex, round, long, short etc). Nothing beats experience...I spent hundreds of hours just for blocking&shaping. But if I had to redo it, I would be way faster because I am better and more confident now than when I started.
Next step it to finish off the bottom side and engine bay. Then the whole things gets epoxy primed. Another first in my life
 11-11-2014, 04:54 AM
#4
Melting Slicks
Thread Starter
11-11-2014, 07:03 PM
#5
Race Director
First off....I do not know if anyone has told you this 'trick'. when you are feeling the panel....have a clean towel between your hand and the surface.....it magnifies what you can feel....and ALSO....do not LOOK at what you are feeling. I close my eyes and let my hand tell me what I feel....and when I find a bad spot...I stop and mark it with a pencil.
I KNOW you have spent COUNTLESS hours on this...and the learning journey is PRICELESS. And remember...I DO NOT have a crystal ball...so I can not see into the future......but.....from past experiences.....if different fillers are used. Hopefully they are from the same manufacturer...and the more dense filler be used on the panel first...and then the softer fillers used for fine refinement on top. A lot also has to do with how thick the filler is. Some fillers work better when a thin layer si needed.....not writing that a dense filler when applied in a thin coat is not good.
I....personally/professionally only use one filler (as you probably know) and use it from start to finish....but that is just me. the round paper can be 180 or 220 grit...it have everything to due with the pressure and your sense of feel.
PAT YOURSELF on the back. Keep it up and when this is all done...you can look back and see what you have done. Being your first car...the feeling will be AWESOME...because I can still remember the first cart I did all by myself...from start to finish...and that feeling is still there when I complete a job that I put all of my efforts into to get right.
DUB
11-12-2014, 04:35 AM
#6
Melting Slicks
Thread Starter
First off....I do not know if anyone has told you this 'trick'. when you are feeling the panel....have a clean towel between your hand and the surface.....it magnifies what you can feel....and ALSO....do not LOOK at what you are feeling. I close my eyes and let my hand tell me what I feel....and when I find a bad spot...I stop and mark it with a pencil.
....from past experiences.....if different fillers are used. Hopefully they are from the same manufacturer...and the more dense filler be used on the panel first...
DUB
....from past experiences.....if different fillers are used. Hopefully they are from the same manufacturer...and the more dense filler be used on the panel first...
DUB
On my next car I will definitely use only one type of base filler and one finer filler. What hopefully will save me on my current project is that I had straightened the bare body as much as possible. After having glassed countless repairs, I topped the whole body with gelcoat. I applied it with a brush (don't yell...). Then block and block and block. Net result is that primer thickness required for finishing is probably rarely more than 1/64".
And you are right it's all very rewarding, not without having being very scary and frustrating first and for a long time...Last week the Glasurit Technical manager came to judge my work, and when he said 'perfect' I felt a huge relief ;-) I don't believe it is 'perfect', but at least good enough to finally go to the next step: epoxy primer.
Thanks for your very much appreciated advise
Last edited by alexandervdr; 11-12-2014 at 04:42 AM.
 11-12-2014, 06:10 PM
#8
Race Director
 But my poor hands are so dry....the only time my hands get oily is when I put moisturizer on them.
 11-12-2014, 06:16 PM
#9
Race Director
Knowing when you can stop doing bodywork...is the 'trick'...so the end result does not suffer....and knowing what products to use to achieve that result also.
DUB