

 03-25-2015, 01:48 PM
Last edit by: IB Advertising
See related guides and technical advice from our community experts:
Browse all: Interior How-Tos
- C6 Corvette: How to Install an Amplifier
Step by step instructions for do-it-yourselfers...
Browse all: Interior How-Tos

C5 and general audio FAQ
01-06-2008, 09:23 AM
#81


Thanks, really appreciate all this information.
Bob
 01-06-2008, 11:58 AM
#82
Tech Contributor
COR-HAR link, and new equivalent
 01-06-2008, 12:12 PM
#83
If you have the 2 changer plugs in the passenger footwell, then yes, but you'd also need to buy a COR-HAR (or whatever the latest equivalent is). Both plugs are near the lower right corner, one is probably tucked up under the fuse box, the other is possibly taped to another cable run that goes up the pillar in front of the door.
COR-HAR link, and new equivalent
COR-HAR link, and new equivalent
One further question however; if the plugs are not there then what is my option?
I just want to hook up a Sirius receiver and would prefer not go use the FM modulator even though I intend to wire direct to the antenna. Figure using the Aux input woud give me better sound.
01-06-2008, 01:41 PM
#84
[QUOTE=markcz;1563494266]If you have the 2 changer plugs in the passenger footwell, then yes, but you'd also need to buy a COR-HAR (or whatever the latest equivalent is). Both plugs are near the lower right corner, one is probably tucked up under the fuse box, the other is possibly taped to another cable run that goes up the pillar in front of the door.
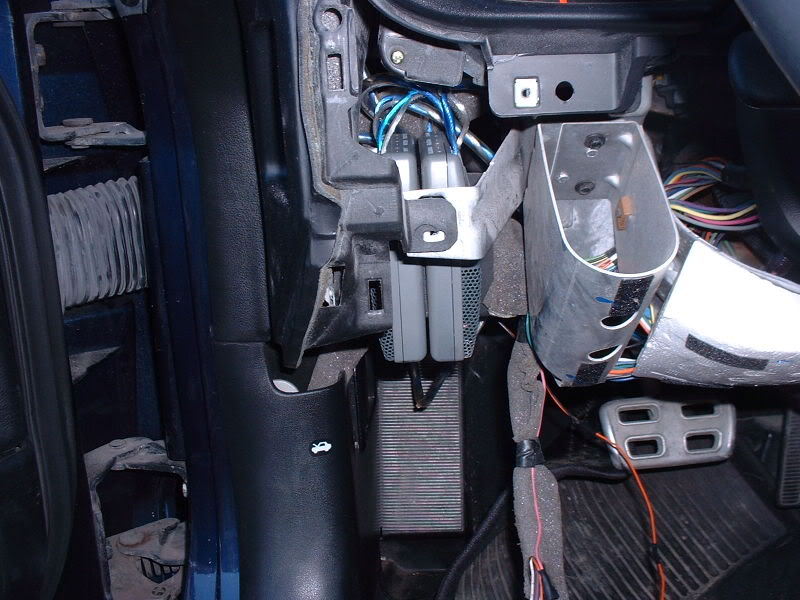
Ok,Ifound one plug below and next to the fuse box. . .it is an open plug with wires that run up the a pillar.

Can't find another plug anywhere.
All i did find is a plug with three wires (red, yellow, black) coming from it and taped but it is located near the council (left) side of the foot well

Ok,Ifound one plug below and next to the fuse box. . .it is an open plug with wires that run up the a pillar.
Can't find another plug anywhere.
All i did find is a plug with three wires (red, yellow, black) coming from it and taped but it is located near the council (left) side of the foot well
Last edited by Slider-01; 01-06-2008 at 01:53 PM. Reason: Changed image
01-06-2008, 03:48 PM
#85
Tech Contributor
The 3-wire orange/yellow/black plug you found in the top left corner is the accessory power plug. Black is ground, yellow is switched, and orange is constant +12V. GM thought we'd like it for hard wiring fuzz busters and such, and we do  Click here to see the schematic (and fuses) for those wires.
The plug you found on the lower right side is one of the ones you need. It looks like the 3 pin plug in the pic, the other has 4 wires and is wider and shorter. It should be there, but is usually very well hidden.
There are quite a few posts about people initially not being able to find the plugs, do a search and see if you can find tips on where to look, but I'm pretty sure it will be taped to another wire within 6" of where you found the first plug.
Click here to see the schematic (and fuses) for those wires.The plug you found on the lower right side is one of the ones you need. It looks like the 3 pin plug in the pic, the other has 4 wires and is wider and shorter. It should be there, but is usually very well hidden.
There are quite a few posts about people initially not being able to find the plugs, do a search and see if you can find tips on where to look, but I'm pretty sure it will be taped to another wire within 6" of where you found the first plug.
01-06-2008, 04:37 PM
#86
The 3-wire orange/yellow/black plug you found in the top left corner is the accessory power plug. Black is ground, yellow is switched, and orange is constant +12V. GM thought we'd like it for hard wiring fuzz busters and such, and we do Click here to see the schematic (and fuses) for those wires.
The plug you found on the lower right side is one of the ones you need. It looks like the 3 pin plug in the pic, the other has 4 wires and is wider and shorter. It should be there, but is usually very well hidden.
There are quite a few posts about people initially not being able to find the plugs, do a search and see if you can find tips on where to look, but I'm pretty sure it will be taped to another wire within 6" of where you found the first plug.
Click here to see the schematic (and fuses) for those wires.The plug you found on the lower right side is one of the ones you need. It looks like the 3 pin plug in the pic, the other has 4 wires and is wider and shorter. It should be there, but is usually very well hidden.
There are quite a few posts about people initially not being able to find the plugs, do a search and see if you can find tips on where to look, but I'm pretty sure it will be taped to another wire within 6" of where you found the first plug.
One further question; if i can't find the second plug and assuming that for whatever reason it isn't there. what are my options for using the Aux button on the HU to select my Sirius receiver? Or am I to settle with using the FM direct modulator that ties directly into the antenna?
Thanks
Bob
Last edited by Slider-01; 01-06-2008 at 10:50 PM. Reason: updated


 01-20-2008, 07:31 PM
#88
Burning Brakes

Using the iPod2Car adapter from Peripheral Electronics :

This cable (GMH20T) plugs into the back of the factory Bose (it tee's into the factory harness):
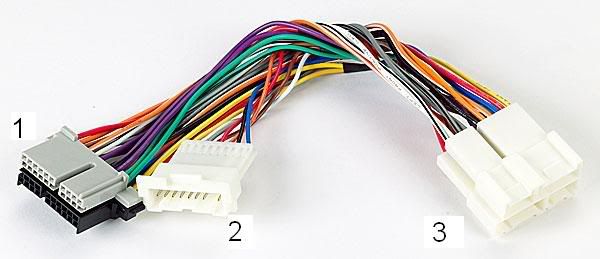
Unplug the factory harness on the back of the radio
Connector 1 connects to the back of the radio
Connector 2 connects to the cable below (connector 5)
Connector 3 connects to the factory harness previously connected to the radio.
This cable (PHXGM1) connects to the GMH20T above :
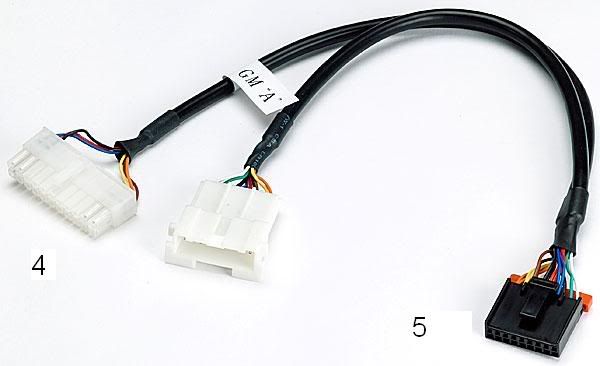
Connector 4 plugs into the iPod2Car
Connector 5 plugs into connector 2 above.
The cable is shown connected to the iPod2Car adapter in the first picture.
The remaining connector is not used.
That's it : no soldering, no cutting, no crimping, no wiring to fuse panel.
Everything works, except for factory radio controls, which are intermittant at best. Others have had better success.
The iPod powers up & down with the radio power; the battery in the iPod stays charged. Sounds quality is excellent. I purchased everything from Crutchfield.
I had to try 3 of these gadgets before I found one that worked for me; I never could get the factory radio controls to control the iPod (2001 C5)
This cable (GMH20T) plugs into the back of the factory Bose (it tee's into the factory harness):
Unplug the factory harness on the back of the radio
Connector 1 connects to the back of the radio
Connector 2 connects to the cable below (connector 5)
Connector 3 connects to the factory harness previously connected to the radio.
This cable (PHXGM1) connects to the GMH20T above :
Connector 4 plugs into the iPod2Car
Connector 5 plugs into connector 2 above.
The cable is shown connected to the iPod2Car adapter in the first picture.
The remaining connector is not used.
That's it : no soldering, no cutting, no crimping, no wiring to fuse panel.
Everything works, except for factory radio controls, which are intermittant at best. Others have had better success.
The iPod powers up & down with the radio power; the battery in the iPod stays charged. Sounds quality is excellent. I purchased everything from Crutchfield.
I had to try 3 of these gadgets before I found one that worked for me; I never could get the factory radio controls to control the iPod (2001 C5)
01-20-2008, 10:38 PM
#89

BTW, I believe there is a single cable now available that replaces the GMH20T & PHXGM1.
01-21-2008, 11:17 AM
#91
Tech Contributor
I was using a GM10-Aux for a while in my C5, and the OEM HU was quite finicky about recognizing that it was there some times. I put this procedure in post #9 once I figured it out, maybe it will help you if you're having the same problem.
GOOD LUCK!
Sometimes if you loose power to the radio (dead/disconnected battery), or unplug the GM10-Aux converter, your stock head unit may not want to go to or stay on "Disc 1 Track 1" like it should. After getting some advice from other forum members I put thogther this little procedure that has worked for me every time so far:
-unplug GM10-Aux from Cor-Har changer cable
-let it sit overnight (a few hours at least)
-with car still off, plug in GM10-Aux
-let it sit for at least 10 minutes
-turn on car & radio, select changer on radio
-if it works (Disc 1 Track 1) you're done
-if it doesn't work, leave car running but turn off radio
-unplug GM10-Aux, then reconnect it
-turn on radio, it should work
01-28-2008, 07:17 PM
#92
Instructor

Member Since: Nov 2007
Location: Willie Nelson Country TX
Posts: 216
Likes: 0
Received 0 Likes
on
0 Posts
I'm not really deaf - just a little confused (oldtimers disease). Luckily I have a son that lives and breathes this kind of thing - told him I'd strip it down if he would twist the wires. On my '02 Z06 I think what I am going to do after talking to the tech @ JL is the following:
Door speakers: JL C5 - 650 (6.5"component speakers).
Rear sides: JL is just now coming out with C5 - 525X (5.25 coaxial).
Sub: JL 10W7 in stealth enclosure.
Amp: JL 300-4 for the 4 cabin speakers.
Amp: JL 500-1 for the sub.
I like the best on a beer budget and don't mind rolling the dice on warranty (Crutchfield is the only authorized warranty re seller) but I really don't want to wait for the 5.25" speakers to hit the market - then eBay. Has anybody ever tried a larger speaker in the existing enclosure - I haven't removed the moulding yet to see for myself? Sure would sound better if you could in the Z.
The reason I am posting this is I am strictly going by fairly reliable word of mouth recommendations and am told that it doesn't get much better than JL - Bet some might disagree and I'd like to know. JL is pricey but I want the best possible sound I can get. Years ago I could afford a Timex but wanted a Rolex so I just waited, saved & bought the Rolex 25 years ago - still wear it (just my **** retentive way of thinking).
Any thoughts, info, suggestions will be appreciated.
01-29-2008, 07:18 PM
#94
Instructor
Member Since: Nov 2007
Location: Willie Nelson Country TX
Posts: 216
Likes: 0
Received 0 Likes
on
0 Posts
Thanks BMG. Does anyone make or know of a source for a custom sub grille to fit the JL 10W7 in an enclosure from Sub Thump? I'm not talking about something Frank Zappa would have liked - need something with the C5 or Z06 logo. Conservative but BowTie oriented.
Last edited by bojangles5169; 01-29-2008 at 07:21 PM. Reason: added thanks
03-23-2008, 02:48 AM
#96
Tech Contributor
It seems that I can no longer edit post #9, so here are links to the C5 radio prints.
Schematics:
Vert Power Antenna
Coupe Antenna Module
BOSE prints
Radio Schematics 1/4 Radio, Power, Changer
Radio Schematics 2/4 RAP Controlled 12v Switched Power Locations
Radio Schematics 3/4 Bose Signal Processor
Radio Schematics 4/4 Speakers
Base prints
Radio/Power
Speakers
Plug Pin-Outs:
Radio Plugs (1 of 6) Bose Signal Processor
Radio Plugs (2 of 6) Bose Signal Processor (cont), Coupe Antenna Module
Radio Plugs (3 of 6) Radio C1 & C2
Radio Plugs (4 of 6) Radio C3 & C4, Vert Antenna Module (NOTE: If you have a pink wire instead of dark green, verify voltage before using it for anything. It may only be 5v.)
Radio Plugs (5 of 6) Changer, Left Speakers
Radio Plugs (6 of 6) Right Speakers
Happy Modding
Last edited by markcz; 07-09-2012 at 05:42 PM.
04-15-2008, 01:33 PM
#97
Racer

Member Since: Apr 2005
Location: Lake Orion MI
Posts: 307
Likes: 0
Received 0 Likes
on
0 Posts

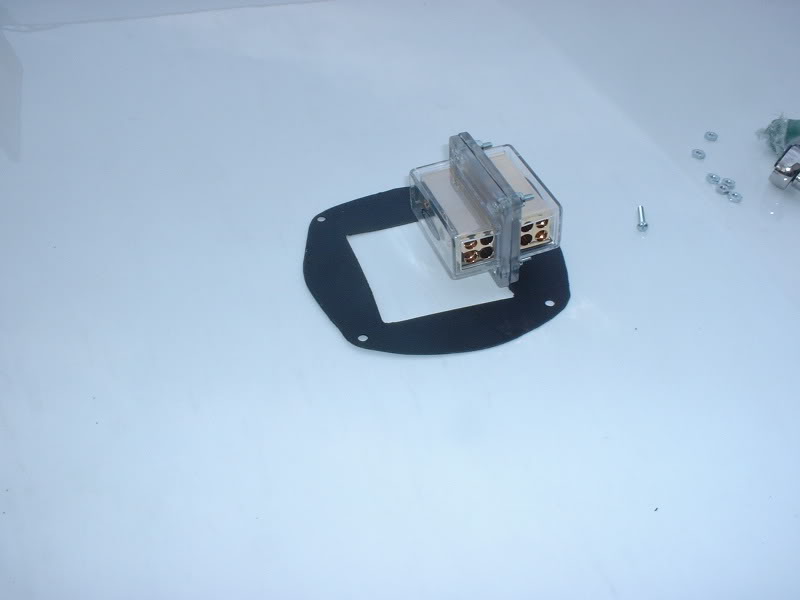
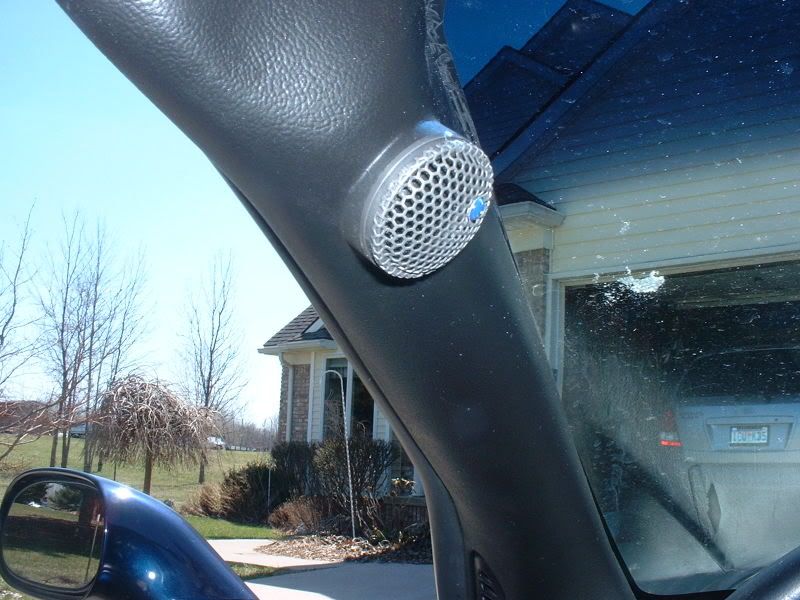
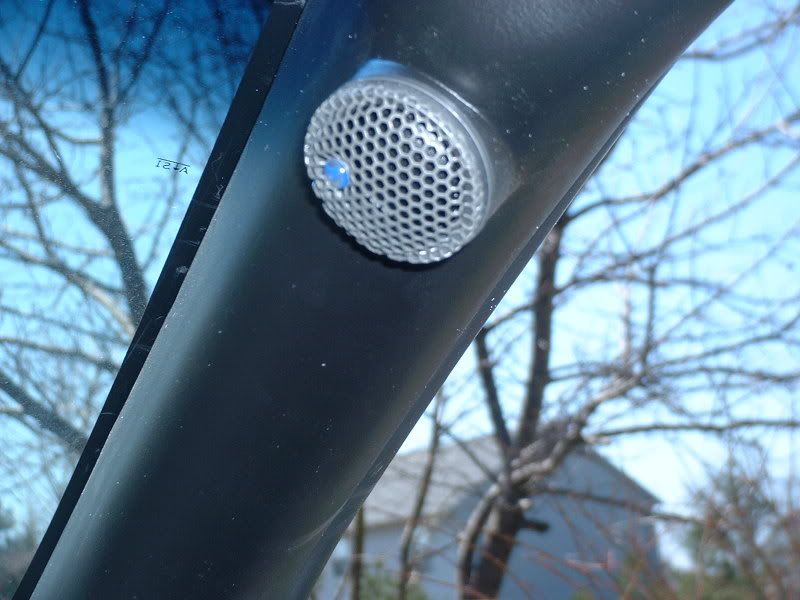
Finishing up a install. made a cuple of brackets for the crossovers and junction blocks for power and ground. I found some space under the drivers dash panel. Their was plenty of space to mount them and easy to get to. As for the junction blocks for ground and power, I removed the pass. rear speeker and installed my bracket their. I am running 6.5" CDT's in the front only. For the tweeters, I found some PVC pipe that was a little small for the tweeters and I slit it up the side. then I used plastic adheasive to glue the pipe into the a piller covers. sanded the leftover and finished with bondo. I painted with SEM textured paint and cleared with SEM low luster clear. They turned out good. I am deff and imageing to the experts may be a problem but, I sticky taped the tweeters in many places and drove the car for 2 days first. Then I decided that this location was best for me. I LIKE THE SOUND! Just a little more info for this thread.
 05-01-2008, 10:13 PM
#100
Drifting

Member Since: Jul 2006
Location: Brookfield Wisconsin
Posts: 1,564
Likes: 0
Received 2 Likes
on
2 Posts
Anybody have an issue like this with a Soundgate Harness?
http://forums.corvetteforum.com/show....php?t=2013415
http://forums.corvetteforum.com/show....php?t=2013415