
Ok. Here is how to make your own door speaker mounts for the c5...
 05-23-2006, 02:25 PM
#1
Le Mans Master

Thread Starter
Member Since: Aug 2005
Location: DP(oh you know where) IL
Posts: 7,201
Likes: 0
Received 0 Likes
on
0 Posts
St. Jude Donor '06
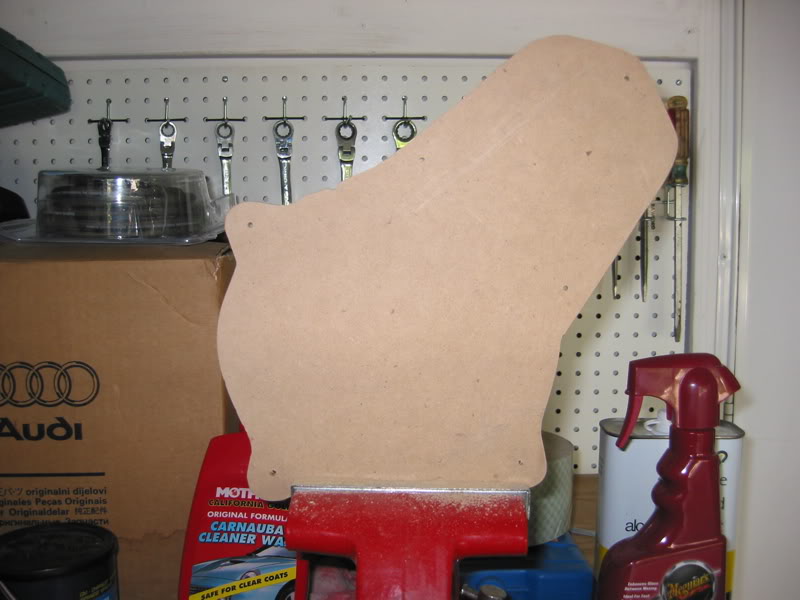
I found an easy way to make your own templates for the door speaker mounts.
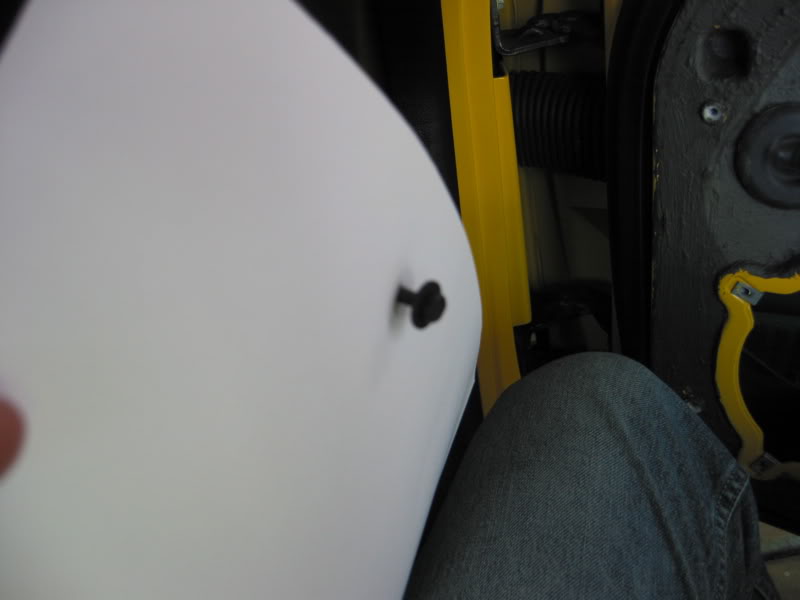
1. Take a slightly less thicker poster board roughly the size of the door mounts. about 10"x15". You can probably get away with posterboard. Using one of the original speaker mount screws and aligning the piece of poster board so that it will cover the speaker hole area, take your screw and poke it through the paper into the top hole.Do not screw it in all the way just yet, but close enough to where there is just enough play to move the paper around.
2. Take the rest of the screws and continue to poke through the screws. After doing the top 3 you can screw these down almost tight so that the paper isnt moving around on you and changing your hole measurements and positions.
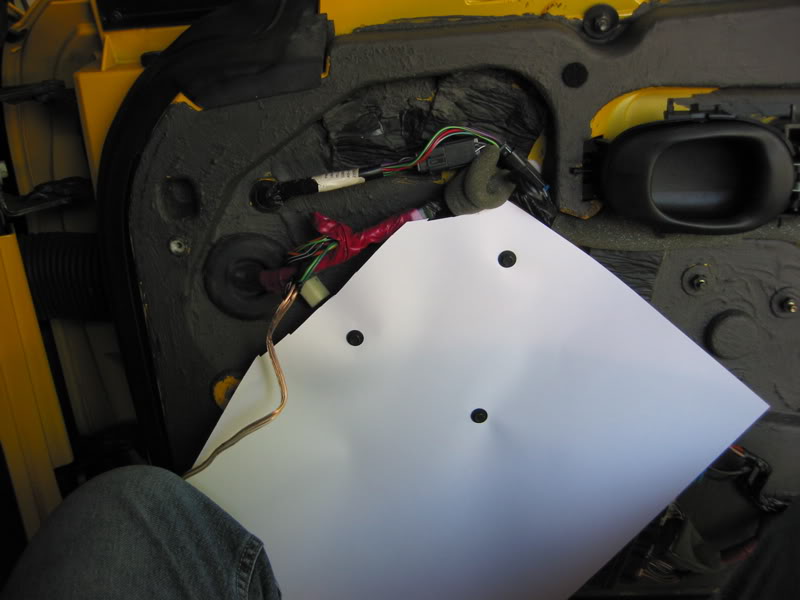
3. Now that you have all screws tightened down. Use scissors to trim so that its just easier to make the paper sit flush.
4. Here is the easy part. Take a pencil. Preferably a wooden pencil, and rub the tip of the pencil onto a finger. I used my thumb. Make sure that you have transfered the graphite to your finger. Now press down on the flat part and go out away from the center of the paper making sure you press down and slightly press over the edge, creating a slight crease. The crease also helps make an edge for the pencil markings to stop. Now continue to remark your finger and repeating these steps until you have gone around completely.
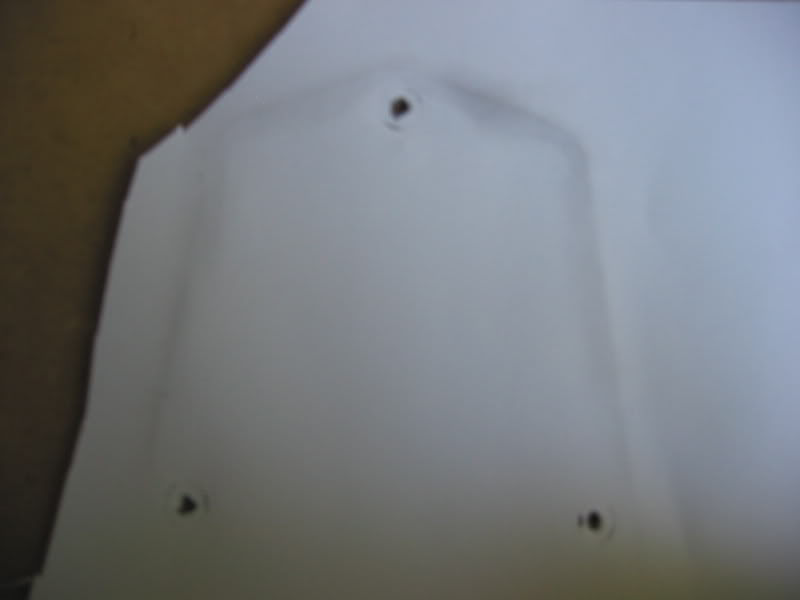
5. Once you are done, you can remove the paper and cut out the template you have just created.
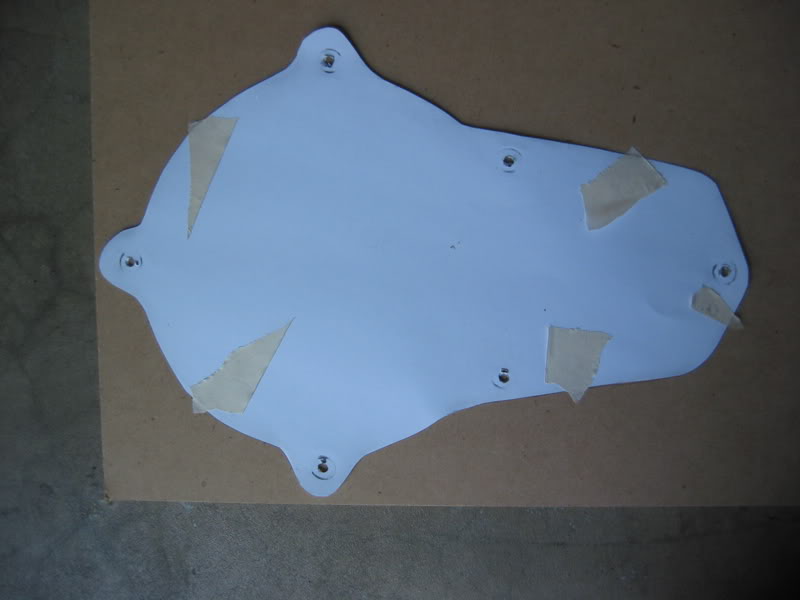
As you can tell, you now have your template and all the positions for your screws as well. Now transfer that template onto your material of choice.
1. Take a slightly less thicker poster board roughly the size of the door mounts. about 10"x15". You can probably get away with posterboard. Using one of the original speaker mount screws and aligning the piece of poster board so that it will cover the speaker hole area, take your screw and poke it through the paper into the top hole.Do not screw it in all the way just yet, but close enough to where there is just enough play to move the paper around.
2. Take the rest of the screws and continue to poke through the screws. After doing the top 3 you can screw these down almost tight so that the paper isnt moving around on you and changing your hole measurements and positions.
3. Now that you have all screws tightened down. Use scissors to trim so that its just easier to make the paper sit flush.
4. Here is the easy part. Take a pencil. Preferably a wooden pencil, and rub the tip of the pencil onto a finger. I used my thumb. Make sure that you have transfered the graphite to your finger. Now press down on the flat part and go out away from the center of the paper making sure you press down and slightly press over the edge, creating a slight crease. The crease also helps make an edge for the pencil markings to stop. Now continue to remark your finger and repeating these steps until you have gone around completely.
5. Once you are done, you can remove the paper and cut out the template you have just created.
As you can tell, you now have your template and all the positions for your screws as well. Now transfer that template onto your material of choice.
Last edited by DPG; 05-23-2006 at 05:25 PM.


 05-23-2006, 03:06 PM
#4
Originally Posted by pentavolvo
... come on how much better can it be then my one handed attempt in the dark lol

I saw your handy work on the HU install in Dave's car this past Sat. Looked pretty good.
 05-23-2006, 07:15 PM
#6
Le Mans Master
Thats a cool way to do it.
I just used the existing GM mount and laid it over the top of my mdf panel and traced the outline with a pencil.
Then put old screws in the door with grease on the tips to mark screw placement on my newly cut mdf.
Scott

I just used the existing GM mount and laid it over the top of my mdf panel and traced the outline with a pencil.
Then put old screws in the door with grease on the tips to mark screw placement on my newly cut mdf.
Scott
05-23-2006, 07:59 PM
#7
Le Mans Master
Thread Starter
Member Since: Aug 2005
Location: DP(oh you know where) IL
Posts: 7,201
Likes: 0
Received 0 Likes
on
0 Posts
St. Jude Donor '06
Scott, thats how I did it the first time when Greg cut them out for me. I traced the bose assembly, but I didnt think of doing it with the scews that way. Thats a great idea too.  When I did the screws i just used a wood nail and went through the existing mount holes and it didnt come out too accurate, but it worked. Since these mounts are gonna be a premanent setup, maybe. I tried doing a template like this and it worked great for me, so I decided to share it in all with pics cause i know thats what we like to see are pics.... I wish I would have thought of the screw grease thing
Oh and scott not to get off topic here. But how are the tweets behind the panel working out for you. When I get ready to do mine, im not sure if I want door pulls or behind the panel like you. If you ould let me know why your reason was or if you could do it the other way, that would be great. Thanks
When I did the screws i just used a wood nail and went through the existing mount holes and it didnt come out too accurate, but it worked. Since these mounts are gonna be a premanent setup, maybe. I tried doing a template like this and it worked great for me, so I decided to share it in all with pics cause i know thats what we like to see are pics.... I wish I would have thought of the screw grease thingOh and scott not to get off topic here. But how are the tweets behind the panel working out for you. When I get ready to do mine, im not sure if I want door pulls or behind the panel like you. If you ould let me know why your reason was or if you could do it the other way, that would be great. Thanks
05-23-2006, 11:04 PM
#8
I'm with DPG on how do you like the sound of the tweets behind the door panels. I have noticed a huge improvement in sound (with the stock Bose) when I move my leg off the door panel while just cruising down the interstate. I tried covering parts of the door panel with my hand to tell how the sound changed as I moved my hand around.
I'm wondering if I could mount the tweeter behind the door panel up high and towards the front of the car and not have my leg cover it. I know many people put the tweets in the door pulls to help prevent the sound being interfered with. Just trying to see what options there are...
I'm wondering if I could mount the tweeter behind the door panel up high and towards the front of the car and not have my leg cover it. I know many people put the tweets in the door pulls to help prevent the sound being interfered with. Just trying to see what options there are...
05-24-2006, 09:13 AM
#10
Le Mans Master
My tweets come in just fine. In fact, a little overpowering. The Focals, like any speakers that were designed for accuracy without discoloration border on being bright.
I kicked my tweets down -2 dB on the x-over.
Of course, I'm a tall lanky gent and with the seat back almost all the way, I am not blocking much of the speaker area.
That being said, I've been wanting to place the tweets on the A pillar hitting the windshield at an angle to see what that does for staging.
I would then place a 4" mid driver in its place in the door and go back to bi-amping for greater control.
Scott
05-24-2006, 09:21 AM
#11
Le Mans Master
Thread Starter
Member Since: Aug 2005
Location: DP(oh you know where) IL
Posts: 7,201
Likes: 0
Received 0 Likes
on
0 Posts
St. Jude Donor '06
Cool thanks for the info on the tweet position Scott. I just didnt want to cut into my pulls if i didnt have to for a 2way. With a 3way i can understand the need for it. Speakers come in today hopefully

 12-28-2013, 09:54 PM
#14
4th Gear


Member Since: Dec 2013
Posts: 4
Likes: 0
Received 0 Likes
on
0 Posts
I'm trying to figure out how large of a sub speaker i could squeeze into this bracket. Ideally i would like to put a 3.5" speaker in the top (powered by HU) and a 8"component sub powered from a seperate amp in the bottom. Does anyone have exact measurements for the bracket or could make a copy on paper of their template? I have my vette put up and stored for the winter but want to get all the equipment ready to install at first sign of spring!
04-16-2014, 07:45 AM
#16
4th Gear
Member Since: Dec 2013
Posts: 4
Likes: 0
Received 0 Likes
on
0 Posts
i ended up taking the cover off and pulling the door panel. I made my own bracket out of HDPE plastic. The bottom fits a 8" Kicker comp speaker (was going to be a JBL GTO8 but they were back ordered and the kicker specs were close) i also put an Infinity 4" full range in the top. There wasn't much space to spare but it all fit. The kicker is a much deeper speaker than the crap pancake woofer that Bose puts in there, so we had to cut a couple spacers to move the subwoofer forward (towards the cabin) about 1".
6.5" Infinities behind the seats. and a 12" alpine in the rear hatch.
More importantly, it's doable and still sounds great.
6.5" Infinities behind the seats. and a 12" alpine in the rear hatch.
More importantly, it's doable and still sounds great.