


DIY SUBWOOFER for C6 Coupe

Thread Starter
Pro


Joined: Sep 2005
Posts: 595
Likes: 38
From: San Jose CA.
After much investigation, I decided to design and fabricate my own subwoofer. I just had my audio system replaced and wanted to complete the sound. The only sub on the market which appealed to me was the JL Stealth Box which costs over $500. without amp. I built mine for about $80. and 1 hour work. It is truly "stealth" and doesn't take up any luggage space or interfere with top stowage. The sound is excellent with no buzzing or vibrations. My new system consists of:
Head Unit: Alpine CDA-9857

Front speakers: Focal Polyglas 165V2 component 6 and 1/2 in.
Rear speakers: Focal 130CA coax 5 and 1/4 in.
4 Channel amp: Alpine MRP-F450 (behind passenger seat)
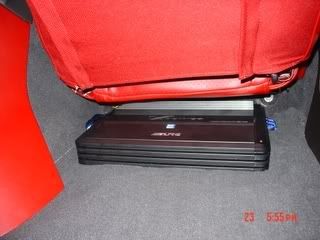
Subwoofer amp: Alpine MRP-M450 (behind drivers seat)

8 in subwoofer: CDT-EF8 (Woofersetc.com $60 + $8 for grill)
Other: Alpine Sirius sat radio module, Alpine high speed Ipod connector, Metra fascia and GM chime module, Motorola Bluetooth car kit, Komoman custom front speaker mounts (this Forum), Dynamat for doors and sub enclosure.
Construction: (See corresponding pictures)
1. Remove top of left rear cubby (which is about 0.4 cu ft in volume); note plastic hinge pins on cubby lid.

2. Measure and cut 5/8 in MDF board (13 1/2 X 8 7/8 in) with notch at LR corner.

3. Fully cover top plastic lip of cubby with 1/4 in closed cell sponge rubber weatherstrip and fill in any gaps under plastic lip with same.

4. Line cubby with Dynamat and seal seams with duct tape; you probably should also glue Dynamat to cubby felt walls since it doesn't adhere too well. Cover exposed plastic exterior of cubby from below car with similar sound deadener; I just did exposed areas but if you are really **** you can remove the plastic shield and cover the whole exterior. (No pic)
5. Carefully position previously cut MDF over cubby and place subwoofer into correct location upside down to trace outer edge. Remember, the portion of the speaker that is below the MDF must clear the cubby walls. The cubby rim is asymmetric so the speaker is slightly offset. Note that the speaker itself is about 8 1/4 in in diameter but the hole is 7 in in diameter (use a compass to draw the hole (circle) you will cut with a saber saw). The sub rim may rest slightly over the plastic lip in some places but the speaker below the MDF will clear the walls. Don't worry since the screws go into the MDF not through to the lip.

6. Run speaker wire through left side of cubby under paltic lip and seal any gaps. Connect to sub and confirm function.
7. Prime top, bottom and sides of MDF with black spray primer and let dry

8. Mount sub to MDF with screws (3/4 in); drill small pilot hole first
9. Glue MDF with sub attached and wired to top of sponge rubber weatherseal with silicone adhesive all around so entire unit is air tight.

10. Cover MDF with material of your choice; I used 1/8 in ebony foam and cut hole (with speaker grill as template) in Lloyds mat.
11. Voila! a truly stealth subwoofer that provides excellent subsonic bass for a miniscule price!

The author after a job well-done!

Head Unit: Alpine CDA-9857
Front speakers: Focal Polyglas 165V2 component 6 and 1/2 in.
Rear speakers: Focal 130CA coax 5 and 1/4 in.
4 Channel amp: Alpine MRP-F450 (behind passenger seat)
Subwoofer amp: Alpine MRP-M450 (behind drivers seat)
8 in subwoofer: CDT-EF8 (Woofersetc.com $60 + $8 for grill)
Other: Alpine Sirius sat radio module, Alpine high speed Ipod connector, Metra fascia and GM chime module, Motorola Bluetooth car kit, Komoman custom front speaker mounts (this Forum), Dynamat for doors and sub enclosure.
Construction: (See corresponding pictures)
1. Remove top of left rear cubby (which is about 0.4 cu ft in volume); note plastic hinge pins on cubby lid.
2. Measure and cut 5/8 in MDF board (13 1/2 X 8 7/8 in) with notch at LR corner.
3. Fully cover top plastic lip of cubby with 1/4 in closed cell sponge rubber weatherstrip and fill in any gaps under plastic lip with same.
4. Line cubby with Dynamat and seal seams with duct tape; you probably should also glue Dynamat to cubby felt walls since it doesn't adhere too well. Cover exposed plastic exterior of cubby from below car with similar sound deadener; I just did exposed areas but if you are really **** you can remove the plastic shield and cover the whole exterior. (No pic)
5. Carefully position previously cut MDF over cubby and place subwoofer into correct location upside down to trace outer edge. Remember, the portion of the speaker that is below the MDF must clear the cubby walls. The cubby rim is asymmetric so the speaker is slightly offset. Note that the speaker itself is about 8 1/4 in in diameter but the hole is 7 in in diameter (use a compass to draw the hole (circle) you will cut with a saber saw). The sub rim may rest slightly over the plastic lip in some places but the speaker below the MDF will clear the walls. Don't worry since the screws go into the MDF not through to the lip.
6. Run speaker wire through left side of cubby under paltic lip and seal any gaps. Connect to sub and confirm function.
7. Prime top, bottom and sides of MDF with black spray primer and let dry
8. Mount sub to MDF with screws (3/4 in); drill small pilot hole first
9. Glue MDF with sub attached and wired to top of sponge rubber weatherseal with silicone adhesive all around so entire unit is air tight.
10. Cover MDF with material of your choice; I used 1/8 in ebony foam and cut hole (with speaker grill as template) in Lloyds mat.
11. Voila! a truly stealth subwoofer that provides excellent subsonic bass for a miniscule price!
The author after a job well-done!
Thread Starter
Pro
Joined: Sep 2005
Posts: 595
Likes: 38
From: San Jose CA.
Sound is excellent; remember the subwoofer mainly provides an effect at a very narrow frequency band; it is monophonic and omnidirectional; I can't imagine needing more subsonic bass bottom than this setup provides. I primarily listen to jazz and classic rock.
The cubby below the HU is the extra storage space (Metra face kit)that you get when you insert a single DIN HU in place of the stock double DIN unit; I use it for the HU remote and glasses, etc.
The cubby below the HU is the extra storage space (Metra face kit)that you get when you insert a single DIN HU in place of the stock double DIN unit; I use it for the HU remote and glasses, etc.
Originally Posted by mkiv808
How's it sound? I'd imagine an 8" would be ok for rock, classical, jazz. I don't listen to R&B/hip-hop so would you recommend this? I was originally going to go 10".
Le Mans Master


Joined: Nov 2004
Posts: 7,242
Likes: 8
I'd imagine it'll fall off at real low frequencies, important for the heavy rap / hip hop crew. For the rest of us, me included, 8's will sound great. Powerful and tight.
Great work, nice writeup. I like the attention to detail, regarding sealing the interior, etc.
Great work, nice writeup. I like the attention to detail, regarding sealing the interior, etc.
Corvette Stories
The Best of Corvette for Corvette Enthusiasts

Every 2027 Corvette Engine Explained
Joe Kucinski
Designer Imagines A Corvette That Looks More Like a Corvette Than the Corvette
Verdad Gallardo
10 Ugly Corvettes That We Still Kinda Love
Joe Kucinski
Top 10 Most Expensive Corvettes Ever Sold on Bring A Trailer
Brett Foote
10 Things Every Corvette Owner Needs (2026 Edition)
Michael S. Palmer
8 Most "Only Corvette Owners Understand" Quirks and Problems
Pouria Savadkouei
10 Reasons the C6 Z06 is Still A Performance Benchmark After 20 Years
Joe Kucinski
How Much Horsepower Every Corvette Engine "LOST" in 1972
Joe Kucinski
Top 10 DOs and DON'Ts for Protecting Your Convertible Top!
Michael S. PalmerSafety Car

Joined: Dec 2005
Posts: 4,184
Likes: 1
From: CT
Originally Posted by rmp
Sound is excellent; remember the subwoofer mainly provides an effect at a very narrow frequency band; it is monophonic and omnidirectional; I can't imagine needing more subsonic bass bottom than this setup provides. I primarily listen to jazz and classic rock.
The cubby below the HU is the extra storage space (Metra face kit)that you get when you insert a single DIN HU in place of the stock double DIN unit; I use it for the HU remote and glasses, etc.
The cubby below the HU is the extra storage space (Metra face kit)that you get when you insert a single DIN HU in place of the stock double DIN unit; I use it for the HU remote and glasses, etc.


Advanced

Joined: Mar 2009
Posts: 50
Likes: 0
From: Lubbock TX
I was thinking about doing this very same DIY sub box in the cubbies with a couple of JL AUDIO 8W1v2-4 and a JL Audio J2 360.2 2-Channel 360 Watts RMS Amplifier to push them. Any one else done this? Experiences? Opinions on my speaker and amp selections?