

A $100 fix for the C6 Bose system...

Thread Starter
Burning Brakes


Joined: Mar 2010
Posts: 914
Likes: 2
From: Newnan Georgia
I'll start off by saying I do (one day) plan on changing out my complete Bose/Nav system, but in the mean time I decided to try and make it a little more bearable. I've done a lot of research and explored several options and came up with what I think is a nice improvement that keeps everything stock by basically just adding a powered sub and enclosure. I know that there may be folks that will disagree and think that this setup is a waist of time, money, or valuable cargo space... but to each their own.  It sounds great to me and that's what matters(to me).
I'd also like to say that some of the best info on installing anything audio related in a C6 is in the "C6 Audio FAQ" thread. A HUGE thanks to TheKomoman for putting it together and to everyone that has contributed! I would not have been able to make my system more enjoyable if it weren't for the info posted there.
OK, with all of that said... down to the details. I've got an '05 with the factory nav head unit and bose speaker system. All in all, I spent a total of about 8 hours tearing everything down, installing, and putting everything back together. Combined, everything that I purchased came to about $115, but prices will probably vary depending on what you choose to buy. The first purchase I made was a PAC ADD-GM24 harness from sonic electronix and modded it as detailed in this thread. "PAC ADD-GM24 Mod" This mod is by far the best way to get low-level outputs to your amp from the factory head unit. It keeps the factory harness in tact and produces a very usuable, clear signal... no whine what so ever!
Harness

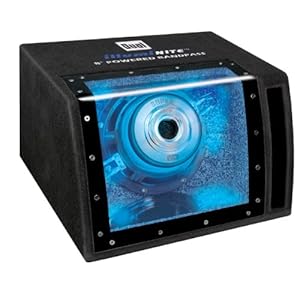
The next piece I had to decide on was the sub. I considered so many options on this that I really don't know how I ended up going in the direction that I did. I think the biggest driving factors were ease of install (by far the biggest factor), a finished look that I would be happy with, great consumer reviews and of course the price. I picked up an 8" powered bandpass enclosure manufactured by Dual (model # SBP8A). It's a very nice looking enclosure that has a built in amp and crossover as well as a nickel plated 8" sub that can be seen through the plexiglass front cover on the enclosure. I know it's by far not a top of the line piece of equipment, but it really is impressive for the $80 price tag that I picked it up at. They can be bought at online retailers, but I found mine on clearance at a local Wally World which saved me about $30 (enough to pay for the amp install kit). Here's what it looks like:
Sub Enclosure
Next, I picked up an amp install kit. It's an 8ga kit which is plenty for the amp that's built into the enclosure and it definately makes the install go a little easier. One downside to it is I had to extend the ground cable due to all of the composite in the back area of the car. Not too difficult to do if you know how to solder larger gauge wire. I picked up a ground on the passenger panel just behind the door from an existing ground stud.
Amp Kit

As far as the actual install, I don't have many pics. I did stop a few times to take some with my phone... wish I had taken the time to stop and get the Nikon out but I really just wanted to keep moving and get it done. I pulled out the center console, the radio surround, the climate control panel, both seats, all of passenger side and cargo area carpet and the carpet behind the seats. I also had to pull the battery to get to the firewall grommit and a couple small panels by the fuse panel on the passenger side as well as all of the floor level trim around the passenger door opening.

By far, the most difficult part of the install was getting the main power feed cable through the firewall grommit. Some suggest that you drill a new hole and use a compresion style grommit to get the power cable into the cabin, this is probably the best route to take. I chose to go through the factory firewall grommit which took some doing to get to the cable from inside the car once I got it started into the grommit. Once I was able to get ahold of the cable with some hemostats, I was able to pull it through.


I ran the power cables down the outer part of the passengers seat pan next to the door and I ran the rca's down the inner side next to the center console. I ty-wrapped and taped them down along the way to keep them in place, here's a shot of power and ground wires ran up to where the enclosure is mounted.

With the car stripped down like this, it's a great opportunity to clean areas that have been accessible before not to mention it's a great way to get a good feel for how the car is made and how some of the stuff works.

I've got to get some pics of the completed project to show how everything looks installed... I'll try to get them posted tonight. The targa top still stows in the cradle, but in order for it to fit I had to put the enclosure closer to the center of the cargo area. It did take up some space, but hey... my boys baseball bag and my golf clubs will still fit so it's all good.
D
It sounds great to me and that's what matters(to me). I'd also like to say that some of the best info on installing anything audio related in a C6 is in the "C6 Audio FAQ" thread. A HUGE thanks to TheKomoman for putting it together and to everyone that has contributed!
I would not have been able to make my system more enjoyable if it weren't for the info posted there.OK, with all of that said... down to the details. I've got an '05 with the factory nav head unit and bose speaker system. All in all, I spent a total of about 8 hours tearing everything down, installing, and putting everything back together. Combined, everything that I purchased came to about $115, but prices will probably vary depending on what you choose to buy. The first purchase I made was a PAC ADD-GM24 harness from sonic electronix and modded it as detailed in this thread. "PAC ADD-GM24 Mod" This mod is by far the best way to get low-level outputs to your amp from the factory head unit. It keeps the factory harness in tact and produces a very usuable, clear signal... no whine what so ever!
Harness
The next piece I had to decide on was the sub. I considered so many options on this that I really don't know how I ended up going in the direction that I did. I think the biggest driving factors were ease of install (by far the biggest factor), a finished look that I would be happy with, great consumer reviews and of course the price. I picked up an 8" powered bandpass enclosure manufactured by Dual (model # SBP8A). It's a very nice looking enclosure that has a built in amp and crossover as well as a nickel plated 8" sub that can be seen through the plexiglass front cover on the enclosure. I know it's by far not a top of the line piece of equipment, but it really is impressive for the $80 price tag that I picked it up at. They can be bought at online retailers, but I found mine on clearance at a local Wally World which saved me about $30 (enough to pay for the amp install kit). Here's what it looks like:
Sub Enclosure
Next, I picked up an amp install kit. It's an 8ga kit which is plenty for the amp that's built into the enclosure and it definately makes the install go a little easier. One downside to it is I had to extend the ground cable due to all of the composite in the back area of the car. Not too difficult to do if you know how to solder larger gauge wire. I picked up a ground on the passenger panel just behind the door from an existing ground stud.
Amp Kit
As far as the actual install, I don't have many pics. I did stop a few times to take some with my phone... wish I had taken the time to stop and get the Nikon out but I really just wanted to keep moving and get it done. I pulled out the center console, the radio surround, the climate control panel, both seats, all of passenger side and cargo area carpet and the carpet behind the seats. I also had to pull the battery to get to the firewall grommit and a couple small panels by the fuse panel on the passenger side as well as all of the floor level trim around the passenger door opening.
By far, the most difficult part of the install was getting the main power feed cable through the firewall grommit. Some suggest that you drill a new hole and use a compresion style grommit to get the power cable into the cabin, this is probably the best route to take. I chose to go through the factory firewall grommit which took some doing to get to the cable from inside the car once I got it started into the grommit. Once I was able to get ahold of the cable with some hemostats, I was able to pull it through.
I ran the power cables down the outer part of the passengers seat pan next to the door and I ran the rca's down the inner side next to the center console. I ty-wrapped and taped them down along the way to keep them in place, here's a shot of power and ground wires ran up to where the enclosure is mounted.
With the car stripped down like this, it's a great opportunity to clean areas that have been accessible before not to mention it's a great way to get a good feel for how the car is made and how some of the stuff works.
I've got to get some pics of the completed project to show how everything looks installed... I'll try to get them posted tonight. The targa top still stows in the cradle, but in order for it to fit I had to put the enclosure closer to the center of the cargo area. It did take up some space, but hey... my boys baseball bag and my golf clubs will still fit so it's all good.
D
Thread Starter
Burning Brakes
Joined: Mar 2010
Posts: 914
Likes: 2
From: Newnan Georgia
Had a few folks remind me about posting the finished pics... been a little crazy around here as usual and it slipped my mind. Here's a couple shots with the powered enclosure installed.
As mentioned earlier it had to be almost centered in order for the top to still fit into the cradle, but there's still plenty of room left for the things that I normally carry. The system sounds much better now...


Here's one with the LED's lit up, it's hard to get a good shot with them on. You can barely see the LED's with the cargo shade on at night, just a very slight glow of blue. I'll probably recover the enclosure to get rid of the text and logo on top and I've already ordered a silver C6 decal to go one the plexiglass to give it an etched look.

D
As mentioned earlier it had to be almost centered in order for the top to still fit into the cradle, but there's still plenty of room left for the things that I normally carry. The system sounds much better now...
Here's one with the LED's lit up, it's hard to get a good shot with them on. You can barely see the LED's with the cargo shade on at night, just a very slight glow of blue. I'll probably recover the enclosure to get rid of the text and logo on top and I've already ordered a silver C6 decal to go one the plexiglass to give it an etched look.
D
Last edited by BigDs_C6; Aug 17, 2010 at 03:59 PM.


