Follow Along Part II: A '61 Rest-Mod
 09-04-2007, 11:06 AM
#41
Burning Brakes

Member Since: Feb 1999
Location: Patagonia Arizona
Posts: 1,057
Likes: 0
Received 9 Likes
on
2 Posts

Colt,
I just noticed you are doing a 61, duh! I assume (?) the wiper config is different than a midyear so the options may be limited. Sorry for my confusion :o
Rich's cars can be seen at http://www.corvetteforum.net/c5/richs7/
Nick
I just noticed you are doing a 61, duh! I assume (?) the wiper config is different than a midyear so the options may be limited. Sorry for my confusion :o
Rich's cars can be seen at http://www.corvetteforum.net/c5/richs7/
Nick
 09-06-2007, 08:08 PM
#42
Racer

Thread Starter
Member Since: Jun 2004
Location: freehold NJ
Posts: 384
Likes: 0
Received 0 Likes
on
0 Posts

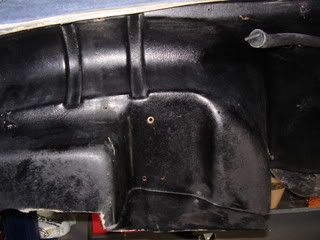
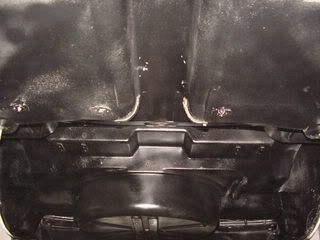
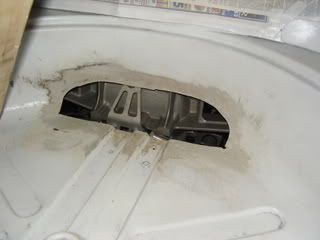
How did you spend your Thursday? I spent mine unbolting stuff from the engine bay then scraping and wiping off years of grime, oil and gunk.  And I've only just begun. Still have to clean the entire underbody and wheel wells then fill holes with fiberglass filler, sand then paint. Here's where I'm at: The firt pic is the passenger side inner fender.

And I've only just begun. Still have to clean the entire underbody and wheel wells then fill holes with fiberglass filler, sand then paint. Here's where I'm at: The firt pic is the passenger side inner fender.
09-12-2007, 11:07 PM
#43
Racer
Thread Starter
Member Since: Jun 2004
Location: freehold NJ
Posts: 384
Likes: 0
Received 0 Likes
on
0 Posts
Update: I'm one month into the project and it seems on schedule.
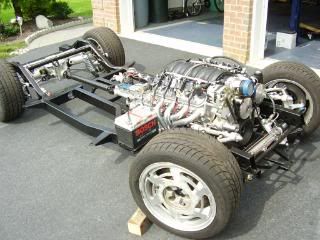
Here's the latest: I installed the LS2 harness made by FAST.
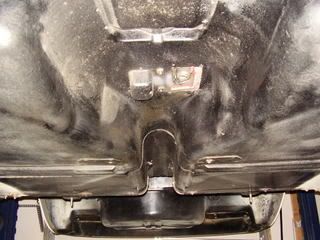
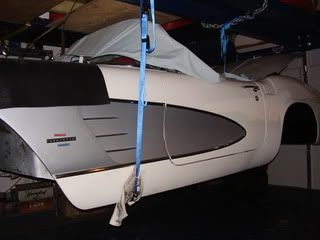
Here's the underside of the car after 4 days of washing. This weekend I'll scrub down the 4 inner fender wells and then make my 3 cuts to the fiberglass (one on each side of inner fender to clear new A-arms and one in the spare tire compartment).
Later, I'll fill all holes in the bay then paint the whole thing underneath.
Here's the latest: I installed the LS2 harness made by FAST.
Here's the underside of the car after 4 days of washing. This weekend I'll scrub down the 4 inner fender wells and then make my 3 cuts to the fiberglass (one on each side of inner fender to clear new A-arms and one in the spare tire compartment).
Later, I'll fill all holes in the bay then paint the whole thing underneath.
 09-14-2007, 11:05 AM
#45
Racer
Thread Starter
Member Since: Jun 2004
Location: freehold NJ
Posts: 384
Likes: 0
Received 0 Likes
on
0 Posts
Thanks 55gasser!
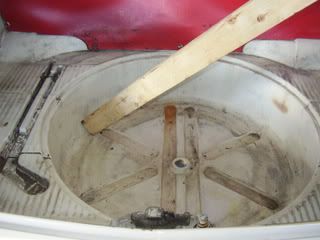
I've finally finished scrubbing down the whole underbody and have painted the rear half. I've started filling holes in the engine bay. Still have to sand then paint. I'm not sure I'll have time to make that windshield wiper motor dissapear like I had wanted....seems pretty entailed.
I've finally finished scrubbing down the whole underbody and have painted the rear half. I've started filling holes in the engine bay. Still have to sand then paint. I'm not sure I'll have time to make that windshield wiper motor dissapear like I had wanted....seems pretty entailed.
Last edited by 90ZR1; 09-15-2007 at 02:29 PM.
09-18-2007, 10:52 PM
#46
Racer
Thread Starter
Member Since: Jun 2004
Location: freehold NJ
Posts: 384
Likes: 0
Received 0 Likes
on
0 Posts
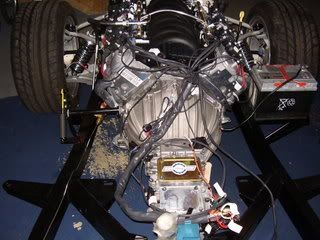
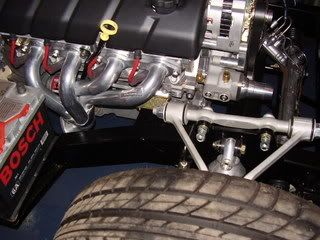
We put on custom headers on the LS2 which required custom spark plug wires. Here's a pic:
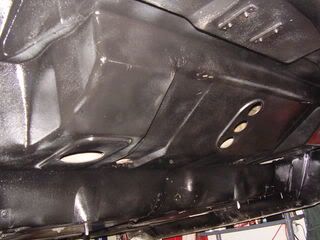
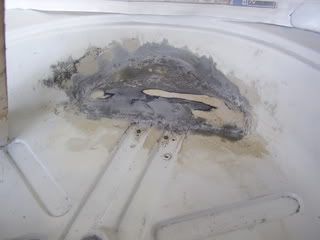
Here I've applied fiberglass filler in the engine bay. Will sand and paint next:
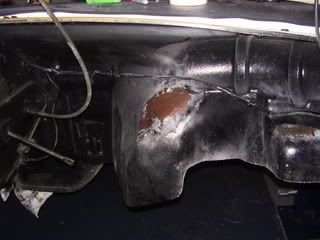
Here I've applied fiberglass filler in the engine bay. Will sand and paint next:
 09-20-2007, 10:56 PM
#49
Racer
Thread Starter
Member Since: Jun 2004
Location: freehold NJ
Posts: 384
Likes: 0
Received 0 Likes
on
0 Posts
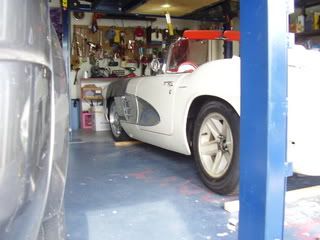
Here's the latest. I cleaned and marked out the cut I'll make in the rear wheel well. I've already cut the inner fender wheels. Now I've lowered the car to 3 inches above the chassis to see where I stand. Looks like I'll have to cut a little more off the front of the inner fenders to clear the upper A-arm.....otherwise, all bolt-holes are lined up right on!
The last pic is of the zero clearance using these wide tires, whick of course I never intended to - they're just rollers and the keepers are still on order because they are being custom cut.
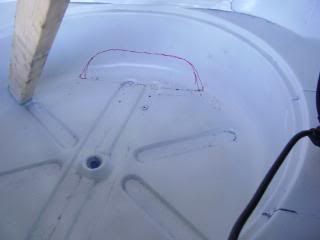
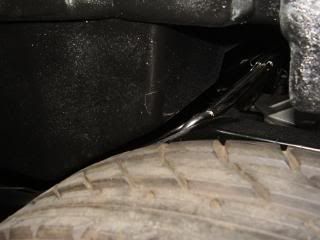

The last pic is of the zero clearance using these wide tires, whick of course I never intended to - they're just rollers and the keepers are still on order because they are being custom cut.
 09-27-2007, 10:16 PM
#53


You really have two options on removing the column. If you remove the pitman arm from the box, you should be able to rotate the box and slide it out the front toward the bottom. The other option is to wire it in place, and remove it with the body. It is not that hard to remove the pitman arm, and I usually take that route. I have seen guys try and lift the body over the mounted steering box, and while it can be done, it is an absolute pain!
Unless Flaming river cam out with a beter looking C1 column, the IDIDIT column is way better looking The one FR used to sell for C1 cars had all square edges on it and looked like crap. The IDIDIT column looked more like an original C1 column. We have been bitching at FR for years about the looks of their C1 column!
Regards, John McGraw
09-27-2007, 10:38 PM
#54
Racer
Thread Starter
Member Since: Jun 2004
Location: freehold NJ
Posts: 384
Likes: 0
Received 0 Likes
on
0 Posts
Thanks for the above responses. I have sanded and painted the cut areas now and am ready to lower the body, EXCEPT, I'd like to find a better body mount kit than original. They actually used cardboard between body and frame. I'm going to look for some thin strips of polyurethane tomorrow at NAPA as I can't find anything in the Corvette mags (and I don't want to wait till next week to lower the body!).
10-04-2007, 03:00 PM
#55
Racer
Thread Starter
Member Since: Jun 2004
Location: freehold NJ
Posts: 384
Likes: 0
Received 0 Likes
on
0 Posts
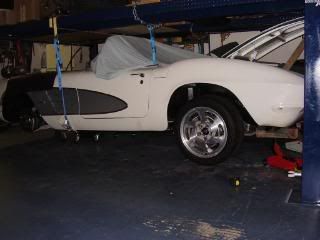
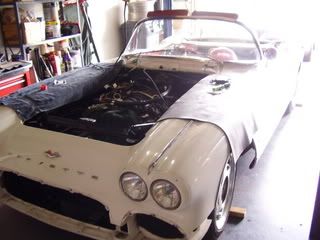
Well, I got set back a week waiting for the polyurethane body mounts to come in. So they got there and I put them on today and lowered the body and tightened all 12 mounts.
I changed around the temp tires. I put 15" on the back and had to use the 17" on the front to clear the brakes.
All 4 wheels will need to be aligned obviously but...there ya go:
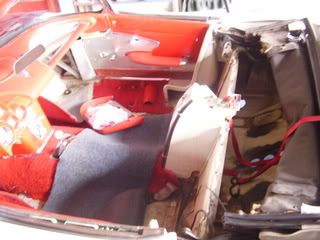
I will be completely re-doing the interrior as well:
I changed around the temp tires. I put 15" on the back and had to use the 17" on the front to clear the brakes.
All 4 wheels will need to be aligned obviously but...there ya go:
I will be completely re-doing the interrior as well:
10-04-2007, 04:32 PM
#56

Enjoy reading about your current project. I finished my 61 about a year ago with LS1, 4L60e, custom interior, IFS front, four-link and coil overs i the rear. Just started my latest project, a 63 SWC with street shop chassis, LS7, tremec 5 speed, Dana 44.Full custom leather interior. This car is already sold when completed. Ron

 10-05-2007, 08:31 PM
#59
Racer
Thread Starter
Member Since: Jun 2004
Location: freehold NJ
Posts: 384
Likes: 0
Received 0 Likes
on
0 Posts
Enjoy reading about your current project. I finished my 61 about a year ago with LS1, 4L60e, custom interior, IFS front, four-link and coil overs i the rear. Just started my latest project, a 63 SWC with street shop chassis, LS7, tremec 5 speed, Dana 44.Full custom leather interior. This car is already sold when completed. Ron
Colt
10-06-2007, 04:31 PM
#60
Drifting

Colt,
Being a relative newcomer to the C2 section, I'm getting caught up on some of the past threads - I've just read through the 65 Coupe resto-mod, and you do some fine work.

How's the spreadsheet working out, did the previous project's bill of materials streamline this job, or are you finding that there is significant differences in doing a C1 compared to a C2? Do you use MS Project to plan the work? Is this a full-time job for you, or are you superhuman?

Being a relative newcomer to the C2 section, I'm getting caught up on some of the past threads - I've just read through the 65 Coupe resto-mod, and you do some fine work.
How's the spreadsheet working out, did the previous project's bill of materials streamline this job, or are you finding that there is significant differences in doing a C1 compared to a C2? Do you use MS Project to plan the work? Is this a full-time job for you, or are you superhuman?