Power Steering Control Valve leak and Rebuild
 11-04-2007, 08:57 PM
#1
Race Director


Thread Starter
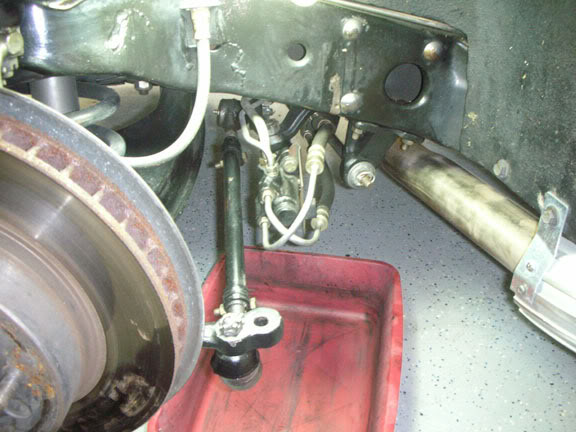
Well it seems that my vette has decided to start leaking this week. Well I looked under the car and it wasn’t where I thought the leak would be coming from. I found that the Power Steering Control Valve (PSCV) was leaking from the Ball stud dust boot. So this could only mean one thing.. The vee seal in the PSCV had torn.
I started by looking at getting a replacement but it seems that the only ones available are the crappo overseas crap. I looked into the vendor that John Hinkley recommended but that was still over $100 for a control valve. I called Corvette Stainless Steel Brakes and they had the rebuild kit for $21 and Tom was nice enough to give me a quick tutorial on rebuilding the PSCV.
I have read all of the horror stories of PSCV leaking after they’ve been replaced, rebuilt or even the new ones. So I thought what the heck it’s only $21 plus shipping. I’ve rebuilt about everything else on the car why not this.
I think the hardest part of all of this was separating the ball stud from the pitman arm. I know that I’ve read in the past that using a pickle fork is not a good idea on the PSCV. However I have tried my tie rod puller and there is not enough room so I had to use the pickle fork. If anyone has a picture of said ball stud separator that will fit in the confines of a midyear frame it would be greatly appreciated. The only way that you can effectively get to the ball stud to separate it with the pickle fork is to do as follows. Remove the four nuts that secure the Power steering ram and let it hang down. You will need to have the car up on jackstands as now you have to get under the car. Turn the wheels to the right so that the pitman arm is pretty much at the center of the car. Then place the pickle fork perpendicular to the control valve and hammer away. It is necessary to be perpendicular as this is the only way that the pickle fork is not binding on the hosing bolts.
Once you have the ball stud separated from the pitman arm now you can remove the four hoses from the PSCV. Now remove the bolt that secures the PSCV to the drag link. This will allow you to unscrew the PSCV. As you unscrew the PSCV count the amount of revolutions it requires to remove it. This is important as you need to match this when you put it back on. If you don’t you will have the opportunity to have the balance of the system off. Mine was 16 turns.
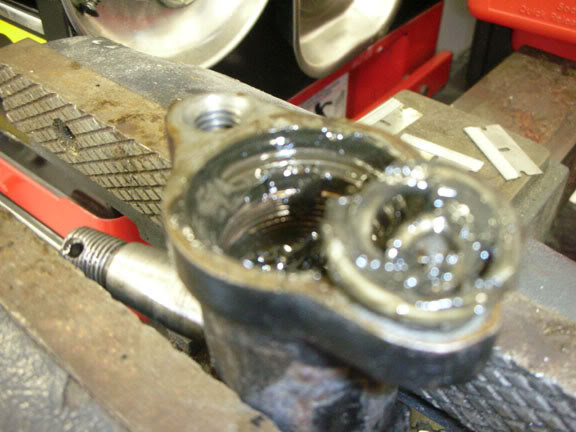
Now you have the PSCV off and on your work bench. Secure it in the vise and remove the dust cover from the end. There is an adjustment nut under the dust cap that is what controls the PSCV. When you remove this it is important that you count the revolutions also. Mine was 10 turns.
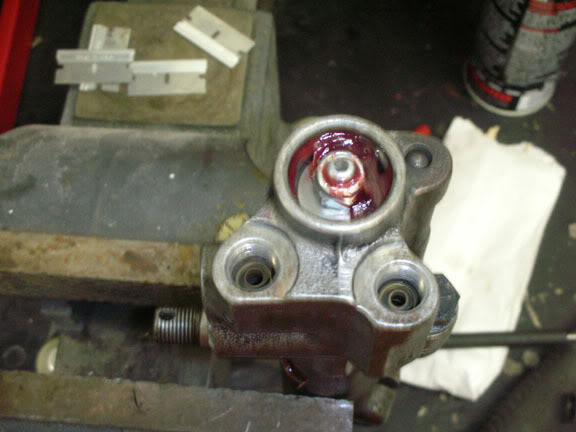
The reason that this is important is that when you get the system all back together this is what controls the centering of the system. Now you can remove the two bolts that hold the two halves together. I took lots of pictures as the Overhaul manual has a good picture but not good enough to see the items as I would like. I can see why so many guys have problems with this rebuild.
I cleaned up the all of the parts in my handy dandy plastic tub with some BrakeKleen as I don’t have a fancy parts washer yet. The rebuild kit that I received had all of the seals that I needed but one looked a little smaller and the original was not damaged so I reused it.
I did not take pictures as I rebuilt the ball stud side but I have the disassembly pics..When you seperate the two sides you first see this with a washer on top.
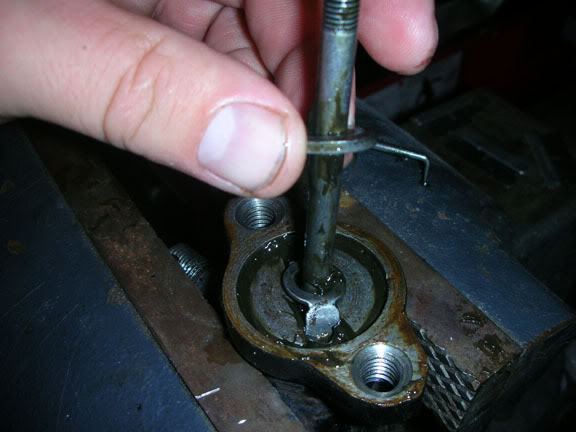
Now unscrew the ball stud adjuster nut.
Once you have that out there is a spring under it that you want the point end towards the ball stud cup.
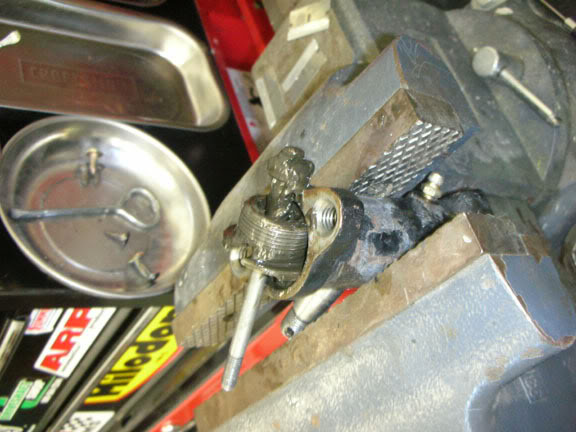
The way I was told to do this was to stack the parts on the ball stud side of the unit and lower the hydraulic side down on it. Well in theory that may work but I found a better way. This is how it should look if you try to stack them.
Now to get to that point I think the manual is a little lacking. Here is the order to build the hydraulic side.
This is the washer, seal and washer. Remember the seal lip goes towards the hydraulic side.
Then next add the spring
Then the valve reaction spool
Next you need to add the keeper.
The other side of the hydraulic portion has the valve spool and adjustment spring. I used a little bit of grease to hold the spring inside.
This loads into the top of the housing.
Now that you have the ball stud stacked in the vise and you have the spool valve in the hydraulic housing you could lower it onto the ball stud side. Unfortunately I could not get the seal to pass into the hydraulic housing.
So I turned the hydraulic housing over and loaded the stack into it. You will have to apply some pressure to the seal to compress the spring in the spool. All the while working the seal into the bore. Then place the plate and thin metal gasket over top while still hold it down. Now with your thumbs holding the metal plate lower it onto the Ball stud side. Slide your thumbs out and you have now just joined the two sides. Easy not exactly but it can be done.
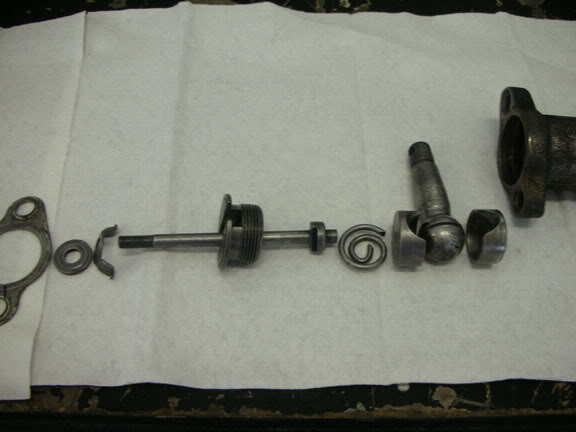
Just for reference here are all of the parts laid out like the Overhaul manual shows them.
The ball stud side.
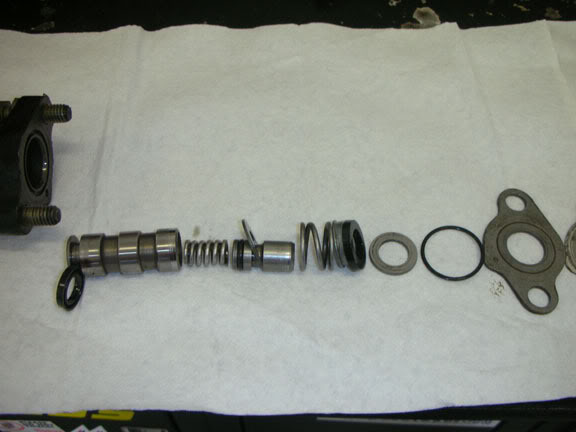
The hydraulic side
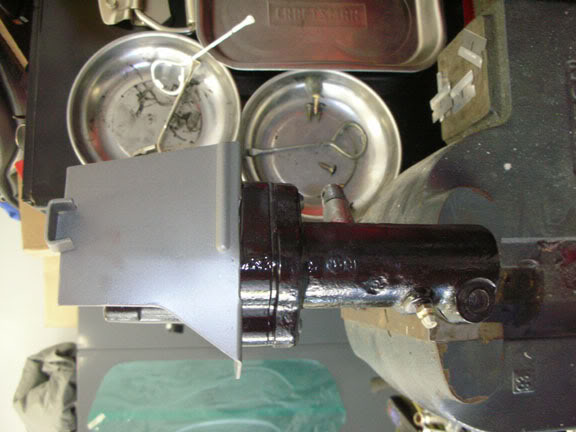
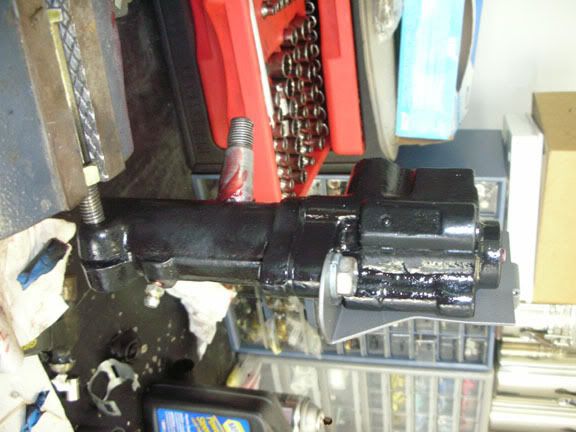
The finished product.
When you have the PSCV reinstalled your ready to start the car right? Nope. Refill the PS reservoir and remember to remove the belt and rotate the pump backwards to prime it. I also move the steering wheel back and forth to get some of the air out of the system then run the pump backwards by hand again. Okay now we've got the reservoir filled and we are ready to start the car.
Now the manual says to disconnect the ram so the pump doesn't burn the belts and hurt something. Well I say I'd rather the ram jam the wheels verses the chance of it over extending and then I have to deal with that. I just made sure that I set the adjustment nut to 10 turns. This got me close. Make SURE THAT YOU KEEP YOUR HANDS OUT OF THE STEERING WHEEL WHEN YOU START THE CAR. If the PSCV is not center it will rotate the wheel violently. At first you only want to run the car for about 10 seconds to get some of the air out. The car is still up in the air.
Now if your steering wheel was spinning by itself you need to adjust the nut. Turn it one turn to see if when you start the car back up if the wheel will stay center if not you will have to adjust it until it does.
I doubt that I got it all but the Overhaul manual just didn't do it for me and I could not find a good write up here in the archives. Hope this helps someone save some money on a rebuilt control valve Dave
Dave
I started by looking at getting a replacement but it seems that the only ones available are the crappo overseas crap. I looked into the vendor that John Hinkley recommended but that was still over $100 for a control valve. I called Corvette Stainless Steel Brakes and they had the rebuild kit for $21 and Tom was nice enough to give me a quick tutorial on rebuilding the PSCV.
I have read all of the horror stories of PSCV leaking after they’ve been replaced, rebuilt or even the new ones. So I thought what the heck it’s only $21 plus shipping. I’ve rebuilt about everything else on the car why not this.
I think the hardest part of all of this was separating the ball stud from the pitman arm. I know that I’ve read in the past that using a pickle fork is not a good idea on the PSCV. However I have tried my tie rod puller and there is not enough room so I had to use the pickle fork. If anyone has a picture of said ball stud separator that will fit in the confines of a midyear frame it would be greatly appreciated. The only way that you can effectively get to the ball stud to separate it with the pickle fork is to do as follows. Remove the four nuts that secure the Power steering ram and let it hang down. You will need to have the car up on jackstands as now you have to get under the car. Turn the wheels to the right so that the pitman arm is pretty much at the center of the car. Then place the pickle fork perpendicular to the control valve and hammer away. It is necessary to be perpendicular as this is the only way that the pickle fork is not binding on the hosing bolts.
Once you have the ball stud separated from the pitman arm now you can remove the four hoses from the PSCV. Now remove the bolt that secures the PSCV to the drag link. This will allow you to unscrew the PSCV. As you unscrew the PSCV count the amount of revolutions it requires to remove it. This is important as you need to match this when you put it back on. If you don’t you will have the opportunity to have the balance of the system off. Mine was 16 turns.
Now you have the PSCV off and on your work bench. Secure it in the vise and remove the dust cover from the end. There is an adjustment nut under the dust cap that is what controls the PSCV. When you remove this it is important that you count the revolutions also. Mine was 10 turns.
The reason that this is important is that when you get the system all back together this is what controls the centering of the system. Now you can remove the two bolts that hold the two halves together. I took lots of pictures as the Overhaul manual has a good picture but not good enough to see the items as I would like. I can see why so many guys have problems with this rebuild.
I cleaned up the all of the parts in my handy dandy plastic tub with some BrakeKleen as I don’t have a fancy parts washer yet. The rebuild kit that I received had all of the seals that I needed but one looked a little smaller and the original was not damaged so I reused it.
I did not take pictures as I rebuilt the ball stud side but I have the disassembly pics..When you seperate the two sides you first see this with a washer on top.
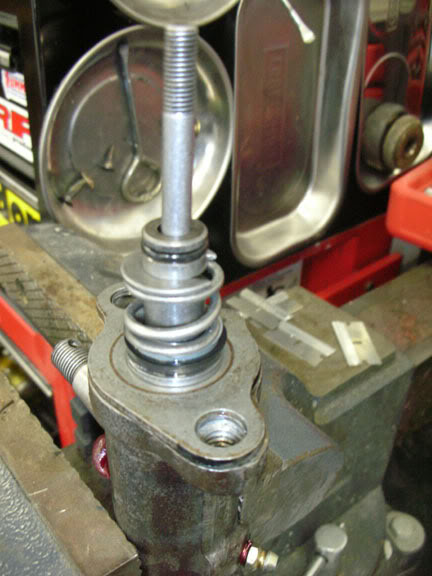
Now unscrew the ball stud adjuster nut.
Once you have that out there is a spring under it that you want the point end towards the ball stud cup.
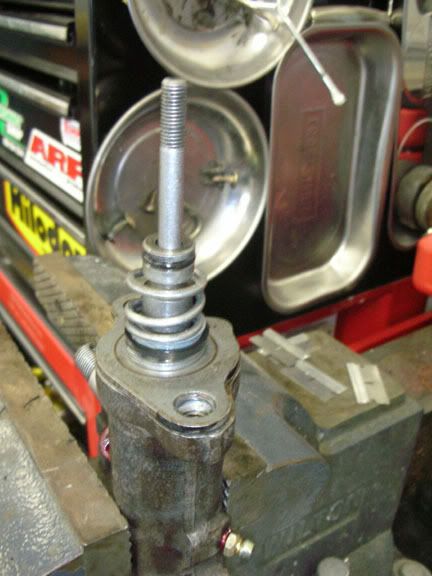
The way I was told to do this was to stack the parts on the ball stud side of the unit and lower the hydraulic side down on it. Well in theory that may work but I found a better way. This is how it should look if you try to stack them.
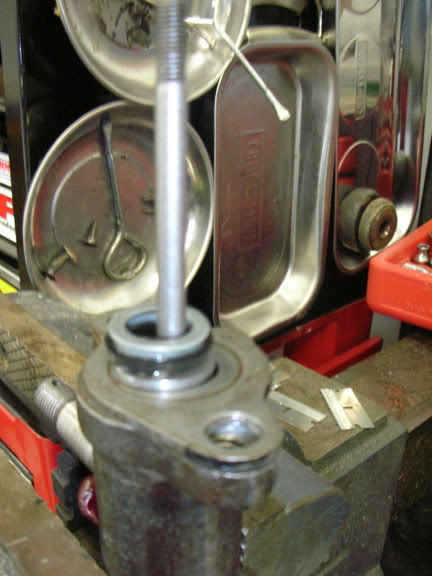
Now to get to that point I think the manual is a little lacking. Here is the order to build the hydraulic side.
This is the washer, seal and washer. Remember the seal lip goes towards the hydraulic side.
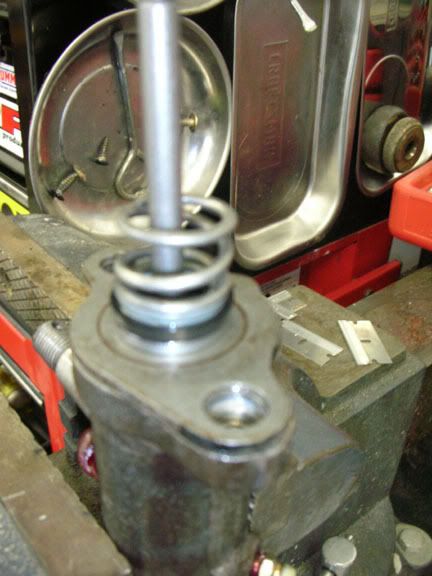
Then next add the spring
Then the valve reaction spool
Next you need to add the keeper.
The other side of the hydraulic portion has the valve spool and adjustment spring. I used a little bit of grease to hold the spring inside.
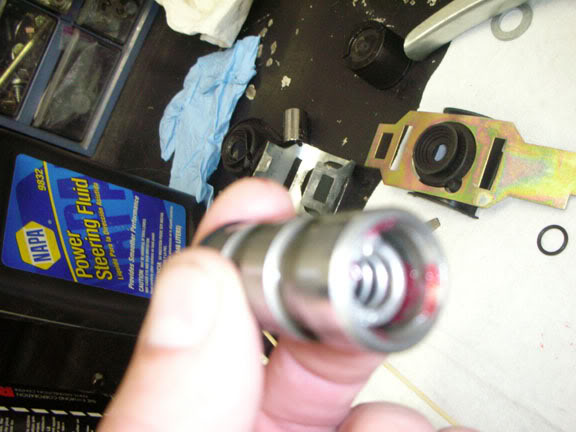
This loads into the top of the housing.
Now that you have the ball stud stacked in the vise and you have the spool valve in the hydraulic housing you could lower it onto the ball stud side. Unfortunately I could not get the seal to pass into the hydraulic housing.
So I turned the hydraulic housing over and loaded the stack into it. You will have to apply some pressure to the seal to compress the spring in the spool. All the while working the seal into the bore. Then place the plate and thin metal gasket over top while still hold it down. Now with your thumbs holding the metal plate lower it onto the Ball stud side. Slide your thumbs out and you have now just joined the two sides. Easy not exactly but it can be done.
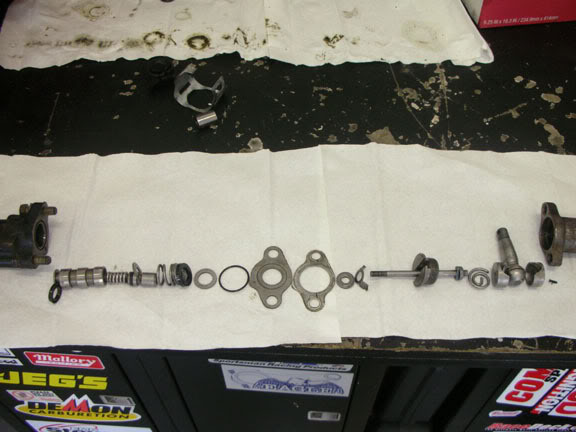
Just for reference here are all of the parts laid out like the Overhaul manual shows them.
The ball stud side.
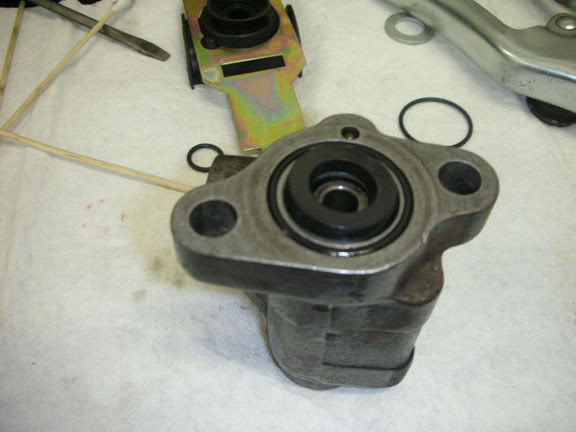
The hydraulic side
The finished product.
When you have the PSCV reinstalled your ready to start the car right? Nope. Refill the PS reservoir and remember to remove the belt and rotate the pump backwards to prime it. I also move the steering wheel back and forth to get some of the air out of the system then run the pump backwards by hand again. Okay now we've got the reservoir filled and we are ready to start the car.
Now the manual says to disconnect the ram so the pump doesn't burn the belts and hurt something. Well I say I'd rather the ram jam the wheels verses the chance of it over extending and then I have to deal with that. I just made sure that I set the adjustment nut to 10 turns. This got me close. Make SURE THAT YOU KEEP YOUR HANDS OUT OF THE STEERING WHEEL WHEN YOU START THE CAR. If the PSCV is not center it will rotate the wheel violently. At first you only want to run the car for about 10 seconds to get some of the air out. The car is still up in the air.
Now if your steering wheel was spinning by itself you need to adjust the nut. Turn it one turn to see if when you start the car back up if the wheel will stay center if not you will have to adjust it until it does.
I doubt that I got it all but the Overhaul manual just didn't do it for me and I could not find a good write up here in the archives. Hope this helps someone save some money on a rebuilt control valve
Dave
Last edited by Hitch; 11-04-2007 at 09:00 PM.
 11-04-2007, 09:25 PM
#2
Melting Slicks


Dave, nice write-up. "You da Man". Save some energy cause I'm gonna need ya when the BB goes in. Talked to Daddy H this week, man he loves that double nickel.

Earl
Earl
 11-05-2007, 01:20 AM
#4
Burning Brakes

That's a great right up. Makes me wish I had power steering so I could go to to the garage and start working on it. It seems everyone with power-steering has trouble with their power steering valves. Hope yours all worked out.
regards,
65-StingRay
Makes me wish I had power steering so I could go to to the garage and start working on it. It seems everyone with power-steering has trouble with their power steering valves. Hope yours all worked out.regards,
65-StingRay

 11-05-2007, 07:06 PM
#7
Race Director
Thread Starter
I hear ya, call me when the deed is to be done. Oh and yea Pop is really enjoying the 55 Chevy. He drives it more than the vette
 That's a good thing though it means that I'll have another 66 that's like new
As for the thread thanks. I always try to put up a good tutorial when I don't find anything in the archives. Talk to you soon.
DaveAlec!!! Good to see you posting again.
11-06-2007, 11:36 AM
#9
Race Director
I just went through this on my Nova.With the belt OFF the pump,cranking the wheel from lock to lock Ive got fluid squirting out of the top of the cap.The level is correct.Is this normal with the pump inactive?
11-07-2007, 04:54 AM
#11
Advanced


Member Since: Jun 2006
Location: SF Peninsula CA
Posts: 90
Likes: 0
Received 0 Likes
on
0 Posts
I have read and studied the pictures in this post very carefully because my PSCV has leaked for some time. It also has very little effort, or road feel. It is way too easy, you can turn the wheel lock to lock with your little finger. In post http://forums.corvetteforum.com/show...power+steering
Buns posted the Chassis Overhaul Manual which says the corvette PSCV should have a 55lb centering spring and should have an X stamped on the dust cover. Mine has a C stamped on it. I don�t know what that means, other than it is not an X. Which spring in the pictures is the centering spring ?? Is there someplace I could order a 55lb centering spring from?
Buns posted the Chassis Overhaul Manual which says the corvette PSCV should have a 55lb centering spring and should have an X stamped on the dust cover. Mine has a C stamped on it. I don�t know what that means, other than it is not an X. Which spring in the pictures is the centering spring ?? Is there someplace I could order a 55lb centering spring from?


 11-07-2007, 03:35 PM
#14
Team Owner


Member Since: Oct 2000
Location: Washington Michigan
Posts: 38,899
Received 1,857 Likes
on
1,100 Posts

Buns posted the Chassis Overhaul Manual which says the corvette PSCV should have a 55lb centering spring and should have an X stamped on the dust cover. Mine has a C stamped on it. I don�t know what that means, other than it is not an X. Which spring in the pictures is the centering spring ?? Is there someplace I could order a 55lb centering spring from?
11-07-2007, 04:08 PM
#15
Le Mans Master

From what I gather from reading the Jim Shea papers is that the typical Corvette rebuilt valve should uses a 40# spring and you can special order your rebuilt valve with a 55# spring from VB&P for better road feel. I bet that John is right, some of these may have who knows what spring installed.
11-07-2007, 08:21 PM
#16
Race Director
Thread Starter
Funny.. I'm in Statesville today and tomorrow.. I had to take care of a customer Davis Regional Hospital...
You're either a week late or I'm a week early..

You guys gave me such a hard time last time about that. I have now developed a complex and can not bear to wear those frilly girlie latex gloves...
Okay not really I just happened not to have them on to use the camera as the gloves had the grease and grim on them. Slip em off and presto the camera stays clean..
http://www.cssbinc.com/
Jeff I've never tried that. Why would you have the cap off when you did this? Are you troubleshooting a problem or is this an effect? Sorry I didn't see your reply earlier.. I've been on the road.
Last edited by Hitch; 11-07-2007 at 08:30 PM.
11-11-2007, 12:56 AM
#17
Race Director
[QUOTE
Jeff I've never tried that. Why would you have the cap off when you did this? Are you troubleshooting a problem or is this an effect? Sorry I didn't see your reply earlier.. I've been on the road.[/QUOTE]
The cap hasnt been removed from the PS pump.While in the process of moving the wheel from lock to lock to bleed air from the system I get fluid squirting out of the breather hole in the cap.
11-11-2007, 01:00 AM
#18
Race Director
Im having a hard time finding the hose route from the control valve to the ram for a 64 Nova.I just picked up an N.O.S. pump so Ive still got to bolt this in the car.
11-11-2007, 06:02 AM
#19
Drifting


Member Since: Sep 2007
Location: Pendleton IN
Posts: 1,679
Likes: 0
Received 0 Likes
on
0 Posts
Geat article and pictures!
If anyone decides to just buy a new one, here's a tip.
After you install it, make sure that the centering adjustment is somewhere in near the middle. You can adjust it with the car running and the wheels will center up for you. Place the car on jack stands in the front and start the car. As you adjust, the wheels will go to the correct aligned position. HERE'S THE TIP.
When starting the car, if you are just reaching in to start it, DO NOT STICK YOUR HAND THROUGH THE STEERING WHEEL WHEN TURNING THE KEY!!!!!!!!!!!!!!!!!! If the valve is not centered, the steering wheel will rotate with your arm still stuck through it!!! It will rotate fast.
It hurts like #%^&*!!. I was 19 yrs old when I did this and haven't forgot it. I'm 46 now and still have both arms!! Good learning experience.
11-28-2007, 06:48 PM
#20
Race Director
Geat article and pictures!
If anyone decides to just buy a new one, here's a tip.
After you install it, make sure that the centering adjustment is somewhere in near the middle. You can adjust it with the car running and the wheels will center up for you. Place the car on jack stands in the front and start the car. As you adjust, the wheels will go to the correct aligned position. HERE'S THE TIP.
When starting the car, if you are just reaching in to start it, DO NOT STICK YOUR HAND THROUGH THE STEERING WHEEL WHEN TURNING THE KEY!!!!!!!!!!!!!!!!!! If the valve is not centered, the steering wheel will rotate with your arm still stuck through it!!! It will rotate fast.
It hurts like #%^&*!!. I was 19 yrs old when I did this and haven't forgot it. I'm 46 now and still have both arms!! Good learning experience.
If anyone decides to just buy a new one, here's a tip.
After you install it, make sure that the centering adjustment is somewhere in near the middle. You can adjust it with the car running and the wheels will center up for you. Place the car on jack stands in the front and start the car. As you adjust, the wheels will go to the correct aligned position. HERE'S THE TIP.
When starting the car, if you are just reaching in to start it, DO NOT STICK YOUR HAND THROUGH THE STEERING WHEEL WHEN TURNING THE KEY!!!!!!!!!!!!!!!!!! If the valve is not centered, the steering wheel will rotate with your arm still stuck through it!!! It will rotate fast.
It hurts like #%^&*!!. I was 19 yrs old when I did this and haven't forgot it. I'm 46 now and still have both arms!! Good learning experience.
Last edited by Z51JEFF; 11-28-2007 at 06:50 PM.