


Basic Engine Machining & Building Tips
Thread Starter
Intermediate

Joined: Jul 2009
Posts: 49
Likes: 0
From: La Habra Ca

Le Mans Master


Joined: Jan 2005
Posts: 8,226
Likes: 2
From: Lake Wylie SC
According to Reher Morrison the actual clearance with an already compressed gasket using his method would have yielded another .020
Here is his method of doing it but I did not have the luxury of a spare 2.30 valve nor did I have a used 4.5 gasket.
http://www.rehermorrison.com/blog/?p=186
Doug
Thread Starter
Intermediate
Joined: Jul 2009
Posts: 49
Likes: 0
From: La Habra Ca
I just did this yesterday with a friend using the old school method of light tension springs and clay.......... ended up with .071 with the lash on the intake but I run pretty stiff springs. (255)
According to Reher Morrison the actual clearance with an already compressed gasket using his method would have yielded another .020
Here is his method of doing it but I did not have the luxury of a spare 2.30 valve nor did I have a used 4.5 gasket.
http://www.rehermorrison.com/blog/?p=186
Doug
According to Reher Morrison the actual clearance with an already compressed gasket using his method would have yielded another .020
Here is his method of doing it but I did not have the luxury of a spare 2.30 valve nor did I have a used 4.5 gasket.
http://www.rehermorrison.com/blog/?p=186
Doug
Please educate me:o
Le Mans Master
Joined: Jan 2005
Posts: 8,226
Likes: 2
From: Lake Wylie SC
Thread Starter
Intermediate
Joined: Jul 2009
Posts: 49
Likes: 0
From: La Habra Ca
oops, Sorry Doug,
I thought the subject was "Short Block clearances ",which is what I
have been refering to(oil clear. etc).
Was not aware that u were working on V/P.
I'm open for discussing & helping with anyone, and a little humor goes a long way!!
Good luck with your project
David.
I thought the subject was "Short Block clearances ",which is what I
have been refering to(oil clear. etc).
Was not aware that u were working on V/P.
I'm open for discussing & helping with anyone, and a little humor goes a long way!!
Good luck with your project
David.
Le Mans Master
Joined: Jan 2005
Posts: 8,226
Likes: 2
From: Lake Wylie SC
oops, Sorry Doug,
I thought the subject was "Short Block clearances ",which is what I
have been refering to(oil clear. etc).
Was not aware that u were working on V/P.
I'm open for discussing & helping with anyone, and a little humor goes a long way!!
Good luck with your project
David.
I thought the subject was "Short Block clearances ",which is what I
have been refering to(oil clear. etc).
Was not aware that u were working on V/P.
I'm open for discussing & helping with anyone, and a little humor goes a long way!!
Good luck with your project
David.
I realize that I am only a novice but having to do things twice or wish that I had planned ahead a little better are not things that I want to haunt me if things do not work out. IMO it is bad enough when the unexpected takes it toll but I do not like to think that something negative could have been avoided.
I have found that to work well for me even if it does upset others who "know better" than I do.
So therefore after assembling the parts that I hope to be using I did a hands on trial mockup with the block, one piston/rod combo, one head and the valvetrain with the cam degreed in......... so far so good
After a couple of years and two blown motors because of problems with quality concerning parts, labor and erroneous "expert opinions" I feel like Sulivans law that simply stated said the Murphy was an optimist.
Consequently I will be reading your posts here looking to glean what I can
Doug
Thread Starter
Intermediate
Joined: Jul 2009
Posts: 49
Likes: 0
From: La Habra Ca
Hi Doug...Thank's for you reply
You know there is nothing wrong with you being a Novice !
In fact I've been doing this for over 30 yrs & if it was'nt for
the fact that I keep my eyes and ears open to learn more each and
every day...I would not see any point in being an engine builder/ Machinest:
I love what I do & I do not do production work. What I do is my best with every project. Anyhay...Your mock-up aka Pre-Assy is the absolute
best thing you could do. I do not intend on posting any Hi Tech stuff here...just helping pointers for u guy's. Yet if anyone needs my help,I'm just a phone call away . Once again be confident in your build...Sure it will be awesome! Looking fwd to hearing about your results
David

Drifting

Joined: Dec 2005
Posts: 1,360
Likes: 3
From: NORTHEAST
FOR PIC'S VIEW MY SITE @ www.aanddengines.com "Click Services".
First all parts must be thoroughly cleaned prior to inspection,magnafluxed and may need to be
pressure tested to insure absence of defects. Check & Mic. parts to find out what needs to be done as far as Machine Work etc. to obtain desired tolerances & clearances for your application.
1. Inspect for cracks/flaws on the block decks around the cylinder head
bolt holes and between the cylinders. Inspect the main web & main
saddles as well. Check cylinders for size & condition.
2. Check decks for straightness,surface if needed. (Removing +/-.003 your Vin#'s will be visible)
3. Inspect cam thrust and lifter bores & machine as needed.
4. Tork main caps to specs. and check I/D with a dial bore guage for
size.Note that caps must fit in registers snuggly & not rock.Machine as needed
5. Bore & Hone cylinders to piston manufacturer's spec's. Adjustments will be based on engine use
,...Leave +/- .003 for honing stock.
6. Inspect & chase all bolt holes with a dull tap and use tapping fluid.
7. After machining, clean & prep block for assy, Install cam bearings &.
check cam fit . NEXT TIME CONNECTING ROD WORK!
The block should be square decked of the cam and crank center line for an true 45 degrees and will put the decks 90 degrees from each other and machining off the mains will have your decks square with the mains which is a must.
Here is a link on blue printing a block I did years ago and granted not every block needs the cam tunnel and lifter bores done but should be at least sqared and decked, bored and plate honed for a good job.
http://www.chevelles.com/forums/showthread.php?t=93124
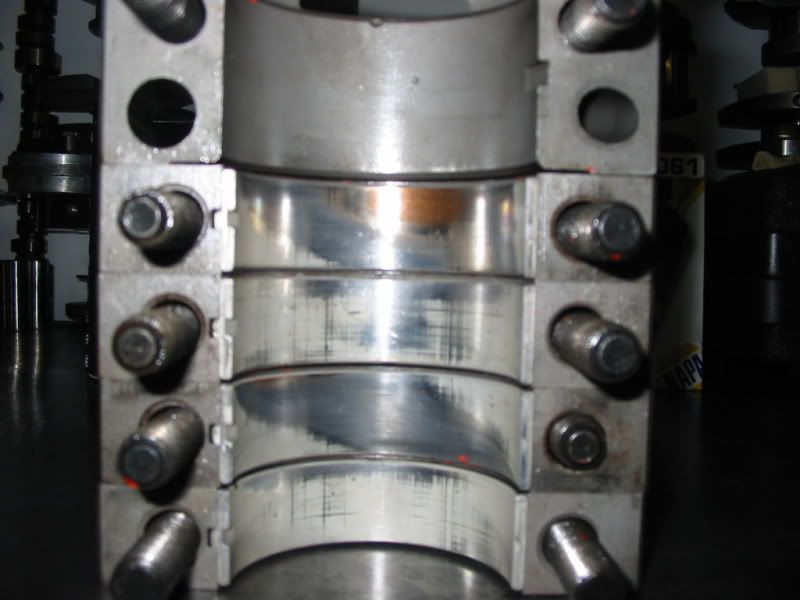
Just measuring the main housing bores does not mean they are in line with each other as I am a big advicate of line honing as we just went through a block for a customer on this site which had 400 miles on the engine and the bores measured with in spec but look at the pics and you can see the problems with alignment.
Corvette Stories
The Best of Corvette for Corvette Enthusiasts

Every 2027 Corvette Engine Explained
Joe Kucinski
Designer Imagines A Corvette That Looks More Like a Corvette Than the Corvette
Verdad Gallardo
10 Ugly Corvettes That We Still Kinda Love
Joe Kucinski
Top 10 Most Expensive Corvettes Ever Sold on Bring A Trailer
Brett Foote
10 Things Every Corvette Owner Needs (2026 Edition)
Michael S. Palmer
8 Most "Only Corvette Owners Understand" Quirks and Problems
Pouria Savadkouei
10 Reasons the C6 Z06 is Still A Performance Benchmark After 20 Years
Joe Kucinski
How Much Horsepower Every Corvette Engine "LOST" in 1972
Joe Kucinski
Top 10 DOs and DON'Ts for Protecting Your Convertible Top!
Michael S. Palmer
Thread Starter
Intermediate
Joined: Jul 2009
Posts: 49
Likes: 0
From: La Habra Ca
I looked over your website and noticed your decking your blocks in a Bridgeport off the pan rails, Take a block and measure from the pan rail down to the main bearing housing bore as we have seen them off as much as .006
The block should be square decked of the cam and crank center line for an true 45 degrees and will put the decks 90 degrees from each other and machining off the mains will have your decks square with the mains which is a must.
Here is a link on blue printing a block I did years ago and granted not every block needs the cam tunnel and lifter bores done but should be at least sqared and decked, bored and plate honed for a good job.
http://www.chevelles.com/forums/showthread.php?t=93124
Just measuring the main housing bores does not mean they are in line with each other as I am a big advicate of line honing as we just went through a block for a customer on this site which had 400 miles on the engine and the bores measured with in spec but look at the pics and you can see the problems with alignment.
Thanks for reading my post. Regarding your statement about milling
machine operations and what can be done on one,from an engineering
standpoint, I am in disagreement with your statement.
ways, different ways,to machine anything provided the experience is their. Ex: Boring cylinders is even done on milling machines. BHJ offers many tools specifically designed for the mill...Research it out ,You may also contact Goodson's engineering Dept. for more research about this subject.
I viewed the main bearings you posted and I agree their is a alignment issue there. Obviously when mains are being inspected, the mains must
be checked for alignment,size,register fit,cracks around oiling holes in mains, main web area & caps magged. The alignment issue should have
been caught during inspection or pre-assy, as you know. Apparently whoever did the final assy here,didn't know any better,for sure that
rotating assy had drag & clearance issues that you could feel just by spinning the crank.
As far as Main housing operations, I much prefer "Line boring & honing"
as opposed to" line honing," especially when dealing with spun bearings or cap replacement.. In fact I beleive that a Vertical line bore and hone
is far better yet ,opposed to horizontal work. Also check the mains not just for vertical clearance, but at 90 degrees as you know.
I just this year had a friend pass Jay @ Taylor Engines in Whittier Ca.
He was one of the best,I was fortunate to at an early age learn from his endless experience & I thank him for that!! (u may know him)
In closing...The fact is that engine rebuilding is not limited to engine rebuilding equipment exclusively. Many would be suprised at what can creatively be done on a Milling Machine & a Lathe., Oh and I'm sure you've heard the Old saying...."It's not the machine,but the operator."
Thank's again for your reply,Chat soon! P.S. I viewed your "Blueprinted Engine" NO math/clearances shown...Why is that ? What were the clearances on that assy,curious?
David
Last edited by Engine Doctor; Jul 26, 2009 at 06:21 PM.
Thread Starter
Intermediate
Joined: Jul 2009
Posts: 49
Likes: 0
From: La Habra Ca
These are basic tips only...(SBC RODS) as an example;
1. clean,inspect,mag or you can use dye penetrants as well,to detect
cracks/flaws.
2. Check all dimensions: pin end(reciprocating end) Big end (Rotating)
Lenth (center to center) & Straightness. .
3. Deburr rods to prevent stress risers, shot peen for strenth & Machine
as needed. Typically you will only need to size the big end (with new
rod bolts). Not expensive work ! ( this is part of your oiling system/ & very little room for error !)
4. SBC stock rod lenth @ 5.700
Big eng @ 2.224 7/10 to 2.225 2/10
5. Balancing your rotating & Reciprocating weights as well as checking
your oil clearances during pre-assy is the only way of being sure of
whatcha got. (New rods need to be inspected too IMO)
THERE IS MUCH MORE TO ROD WORK, GIVEN THE APPLICATION
Last edited by Engine Doctor; Jul 27, 2009 at 07:35 PM.

Le Mans Master

Joined: Nov 2008
Posts: 5,691
Likes: 12
From: columbus oh
Thread Starter
Intermediate
Joined: Jul 2009
Posts: 49
Likes: 0
From: La Habra Ca

Race Director


Joined: Dec 2004
Posts: 10,332
Likes: 63
From: PARADISE
St. Jude Donor '09-'11-'12-'13-'14
These are basic tips only...(SBC RODS) as an example;
1. clean,inspect,mag or you can use dye penetrants as well,to detect
cracks/flaws.
2. Check all dimensions: pin end(reciprocating end) Big end (Rotating)
Lenth (center to center) & Straightness. .
3. Deburr rods to prevent STRESS risers, shot peen for strenth & Machine
as needed. Typically you will only need to size the big end (with new
rod bolts). Not expensive work ! ( this is part of your oiling system/ & very little room for error !)
4. SBC stock rod lenth @ 5.700
Big eng @ 2.224 7/10 to 2.225 2/10
5. Balancing your rotating & Reciprocating weights as well as checking
your oil clearances during pre-assy is the only way of being sure of
whatcha got. (New rods need to be inspected too IMO)
THERE IS MUCH MORE TO ROD WORK, GIVEN THE APPLICATION
Drifting
Joined: Dec 2005
Posts: 1,360
Likes: 3
From: NORTHEAST
Hi Carl ! First off we are not indicating off the pan rail as you stated,2nd. That condition you stated about .006 from pan rail to main is indicative to a condition known as "Factory Tolerance Stacking" as you already know, And lets move on:
Thanks for reading my post. Regarding your statement about milling
machine operations and what can be done on one,from an engineering
standpoint, I am in disagreement with your statement. There are many,many
ways, different ways,to machine anything provided the experience is their. Ex: Boring cylinders is even done on milling machines. BHJ offers many tools specifically designed for the mill...Research it out ,You may also contact Goodson's engineering Dept. for more research about this subject.
I viewed the main bearings you posted and I agree their is a alignment issue there. Obviously when mains are being inspected, the mains must
be checked for alignment,size,register fit,cracks around oiling holes in mains, main web area & caps magged. The alignment issue should have
been caught during inspection or pre-assy, as you know. Apparently whoever did the final assy here,didn't know any better,for sure that
rotating assy had drag & clearance issues that you could feel just by spinning the crank.
As far as Main housing operations, I much prefer "Line boring & honing"
as opposed to" line honing," especially when dealing with spun bearings or cap replacement.. In fact I beleive that a Vertical line bore and hone
is far better yet ,opposed to horizontal work. Also check the mains not just for vertical clearance, but at 90 degrees as you know.
I just this year had a friend pass Jay @ Taylor Engines in Whittier Ca.
He was one of the best,I was fortunate to at an early age learn from his endless experience & I thank him for that!! (u may know him)
In closing...The fact is that engine rebuilding is not limited to engine rebuilding equipment exclusively. Many would be suprised at what can creatively be done on a Milling Machine & a Lathe., Oh and I'm sure you've heard the Old saying...."It's not the machine,but the operator."
Thank's again for your reply,Chat soon! P.S. I viewed your "Blueprinted Engine" NO math/clearances shown...Why is that ? What were the clearances on that assy,curious?
David
Thanks for reading my post. Regarding your statement about milling
machine operations and what can be done on one,from an engineering
standpoint, I am in disagreement with your statement.
ways, different ways,to machine anything provided the experience is their. Ex: Boring cylinders is even done on milling machines. BHJ offers many tools specifically designed for the mill...Research it out ,You may also contact Goodson's engineering Dept. for more research about this subject.
I viewed the main bearings you posted and I agree their is a alignment issue there. Obviously when mains are being inspected, the mains must
be checked for alignment,size,register fit,cracks around oiling holes in mains, main web area & caps magged. The alignment issue should have
been caught during inspection or pre-assy, as you know. Apparently whoever did the final assy here,didn't know any better,for sure that
rotating assy had drag & clearance issues that you could feel just by spinning the crank.
As far as Main housing operations, I much prefer "Line boring & honing"
as opposed to" line honing," especially when dealing with spun bearings or cap replacement.. In fact I beleive that a Vertical line bore and hone
is far better yet ,opposed to horizontal work. Also check the mains not just for vertical clearance, but at 90 degrees as you know.
I just this year had a friend pass Jay @ Taylor Engines in Whittier Ca.
He was one of the best,I was fortunate to at an early age learn from his endless experience & I thank him for that!! (u may know him)
In closing...The fact is that engine rebuilding is not limited to engine rebuilding equipment exclusively. Many would be suprised at what can creatively be done on a Milling Machine & a Lathe., Oh and I'm sure you've heard the Old saying...."It's not the machine,but the operator."
Thank's again for your reply,Chat soon! P.S. I viewed your "Blueprinted Engine" NO math/clearances shown...Why is that ? What were the clearances on that assy,curious?
David
I had all the BHJ equipment they sell as we used it before the 2 CNC machines as I have been building performance engines for 36 years now and have a good idea what it takes to machine a block and do it right and I have 2 Bridgeports and would I ever deck a block on a Bridgeport and consider it as good as using a BHJ fixture or a CNC machine I would say it would not be close enough for me.
Most old Bridgeports are not very accurate when loading a 180 pound peice of cast iron on the table and moving left to right as they will leave a bow on the decks high in the middle and low on the ends.
And by the looks of your machined it looks to be painted with a yellow spray bomb maybe to make it look new I don't know. Hey if you can duplicate what we can do with your Bridgeport congradulations.
P.S. I viewed your "Blueprinted Engine" NO math/clearances shown...Why is that ? What were the clearances on that assy,curious?
Again what clearances are you looking for??
Thread Starter
Intermediate
Joined: Jul 2009
Posts: 49
Likes: 0
From: La Habra Ca
I had all the BHJ equipment they sell as we used it before the 2 CNC machines as I have been building performance engines for 36 years now and have a good idea what it takes to machine a block and do it right and I have 2 Bridgeports and would I ever deck a block on a Bridgeport and consider it as good as using a BHJ fixture or a CNC machine I would say it would not be close enough for me.
Most old Bridgeports are not very accurate when loading a 180 pound peice of cast iron on the table and moving left to right as they will leave a bow on the decks high in the middle and low on the ends.
And by the looks of your machined it looks to be painted with a yellow spray bomb maybe to make it look new I don't know. Hey if you can duplicate what we can do with your Bridgeport congradulations.
What are you looking for as I believe there are 2 block in that post and when we machine a block we have the ability to probe the block out in .0001 and that as it a has an automatic probing cycle that checks cylinder locations in X and Y locations deck heights we can check lifter bore locations and cam tunnel locations as well.
Again what clearances are you looking for??

So much for "A community of engine builders educating the consumer":
No wonder people are afraid of engine builders

Do your work your way ..Never said anything was wrong with that!
And I did not offend you...Child's play
Proof is in the pudding...my customers keep coming back
We both know what #'s mean on a build ..& I'm never ashamed to show them. Are You???
Last edited by Engine Doctor; Jul 27, 2009 at 11:41 AM.
Drifting
Joined: Dec 2005
Posts: 1,360
Likes: 3
From: NORTHEAST
Why are you so defensive
So much for "A community of engine builders educating the consumer":
No wonder people are afraid of engine builders
Do your work your way ..Never said anything was wrong with that!
And I did not offend you...Child's play
Proof is in the pudding...my customer keep coming back
Also I don't need to know your clearances...I CONTROL MY OWN
P.S. I viewed your "Blueprinted Engine" NO math/clearances shown...Why is that ? What were the clearances on that assy,curious?
Proof is in the pudding...my customer keep coming back
Last edited by BLOCKMAN; Jul 26, 2009 at 08:44 PM.
Thread Starter
Intermediate
Joined: Jul 2009
Posts: 49
Likes: 0
From: La Habra Ca


