Bird cage rust
 08-05-2009, 07:34 AM
#21


John is correct as that is the way I had to do my birdcage. However another forum member who's name now escapes me drilled the rivets out through fiberglass
Below is one of pictures

Below is one of pictures
 08-05-2009, 12:32 PM
#22
Safety Car


 I wonder how he got to the lower rivets that hold the lower side of the windshield frame to the cowl?
My recollection is that they are pretty much hidden down in the cowl unless the clip is off. I guess you could grind the tails of under the dash, and punch the rivets out, but how would you ever get new ones in? It would be tough to get a pop rivet tool down in the cowl area to install new ones.
Regards, John McGraw
08-05-2009, 12:44 PM
#23
Burning Brakes

Thread Starter

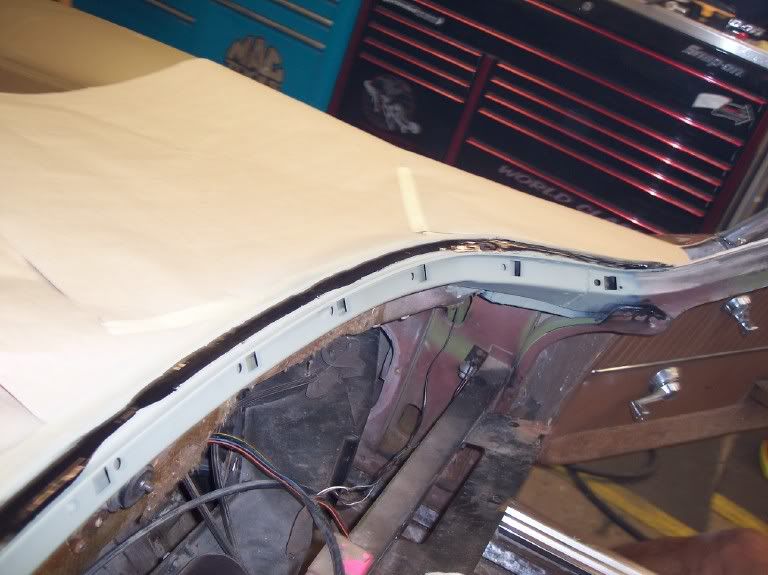
OK, I feel better now, we ground the backside of the rivet off that was at the cowl area, the top of the underside panel was so rusted, there wasn't anything holding to the top where you are showing your drilled out spots. Our plan is to use a panel bonding adhesive designed for metal and fiberglass in place of the rivets and weld the ends. I will get the number tonight of the adhesive/bonding material if anybody want's.
Tonight's agenda is to patch the rust hole on the left pillar and hopefully weld/bond the lower windshield/birdcage panel in.
Last night did a rough mock up with the new piece to get the game plan together.
Tonight's agenda is to patch the rust hole on the left pillar and hopefully weld/bond the lower windshield/birdcage panel in.
Last night did a rough mock up with the new piece to get the game plan together.
08-05-2009, 01:49 PM
#24
Team Owner


Member Since: Jan 2007
Location: cookeville tennessee
Posts: 28,855
Received 1,767 Likes
on
1,533 Posts

OK, I feel better now, we ground the backside of the rivet off that was at the cowl area, the top of the underside panel was so rusted, there wasn't anything holding to the top where you are showing your drilled out spots. Our plan is to use a panel bonding adhesive designed for metal and fiberglass in place of the rivets and weld the ends. I will get the number tonight of the adhesive/bonding material if anybody want's.
Tonight's agenda is to patch the rust hole on the left pillar and hopefully weld/bond the lower windshield/birdcage panel in.
Last night did a rough mock up with the new piece to get the game plan together.
Tonight's agenda is to patch the rust hole on the left pillar and hopefully weld/bond the lower windshield/birdcage panel in.
Last night did a rough mock up with the new piece to get the game plan together.
 08-05-2009, 07:49 PM
#25
Burning Brakes
Thread Starter
Part is bonded to firewall and underside of cowl, rust hole on left a-pillar is patched, will weld the lower surround on the sides tomorrow and paint.
I am having problems getting the computer with the camera program to boot up, I am still taking pics for those of interest.
I am having problems getting the computer with the camera program to boot up, I am still taking pics for those of interest.
08-05-2009, 09:11 PM
#26
Team Owner
Member Since: Jan 2007
Location: cookeville tennessee
Posts: 28,855
Received 1,767 Likes
on
1,533 Posts
Part is bonded to firewall and underside of cowl, rust hole on left a-pillar is patched, will weld the lower surround on the sides tomorrow and paint.
I am having problems getting the computer with the camera program to boot up, I am still taking pics for those of interest.
I am having problems getting the computer with the camera program to boot up, I am still taking pics for those of interest.
pic,s

 08-06-2009, 09:52 AM
#28
Team Owner
Member Since: Jan 2007
Location: cookeville tennessee
Posts: 28,855
Received 1,767 Likes
on
1,533 Posts
08-08-2009, 05:27 PM
#29
Drifting

I will be very interested to see those pics when you get a chance to post them. I always enjoy seeing and hearing of how someone tackles a big job in a new way. It seems like your approach will be closely watched and probably replicated...

08-08-2009, 11:01 PM
#30
Team Owner
Member Since: Jan 2007
Location: cookeville tennessee
Posts: 28,855
Received 1,767 Likes
on
1,533 Posts
 I am sure it will be better than when it rolled off the show room. pic,s
 08-09-2009, 05:38 AM
#32
Burning Brakes
Thread Starter
Computer for pics fixed, beginning reassembly.Almost said final, dash will be coming out for the A/M Ac unit when the 6.0 motor goes in probably late next year.
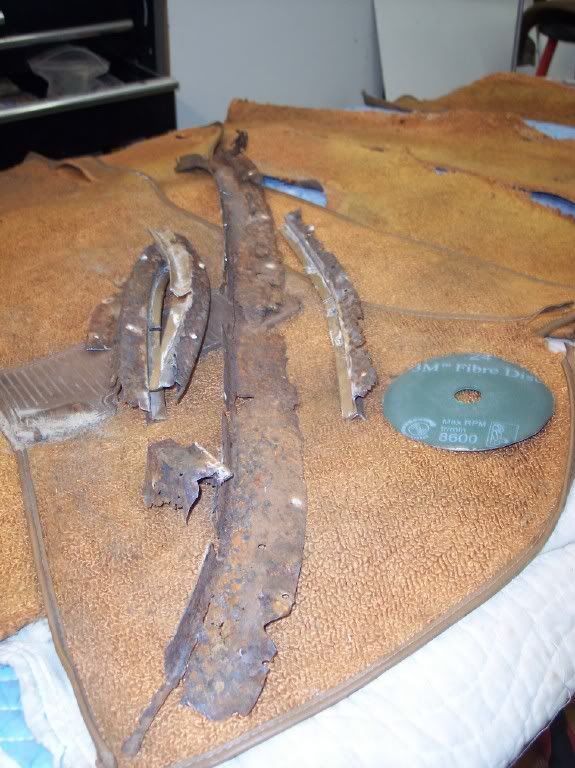 the old part (whats left)
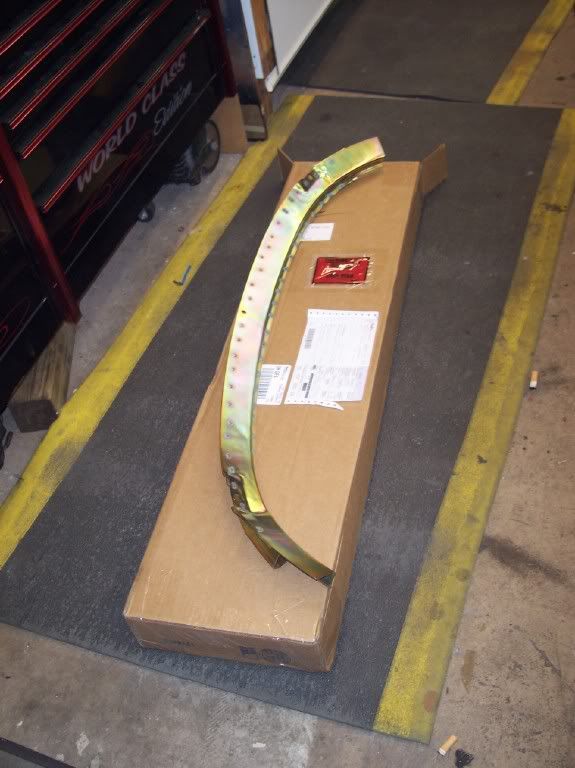 the new part
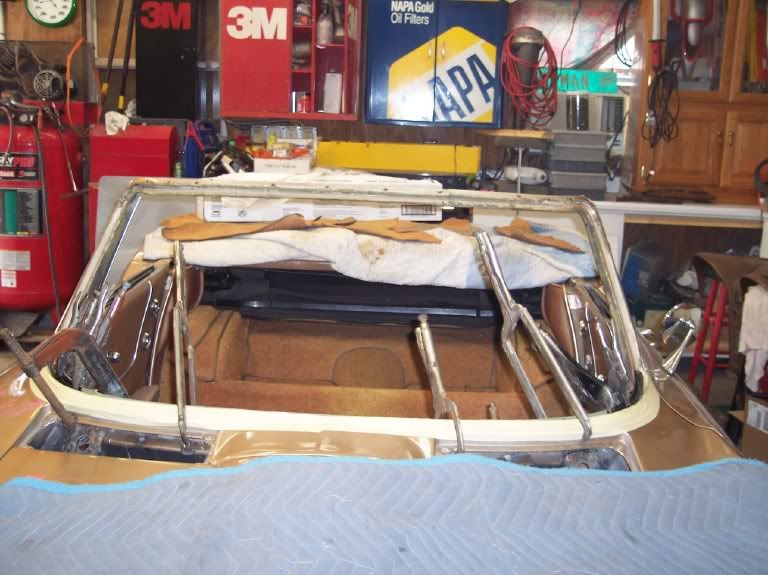
 test fit
 Bonded Let sit for 24 hrs before welding sides
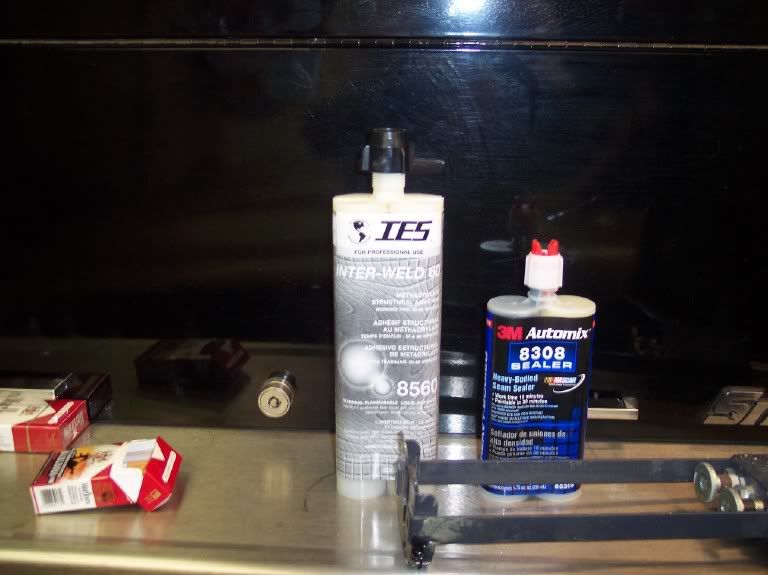 Bonding material on left, sealer on rt.
 bonded, welded, seam sealed
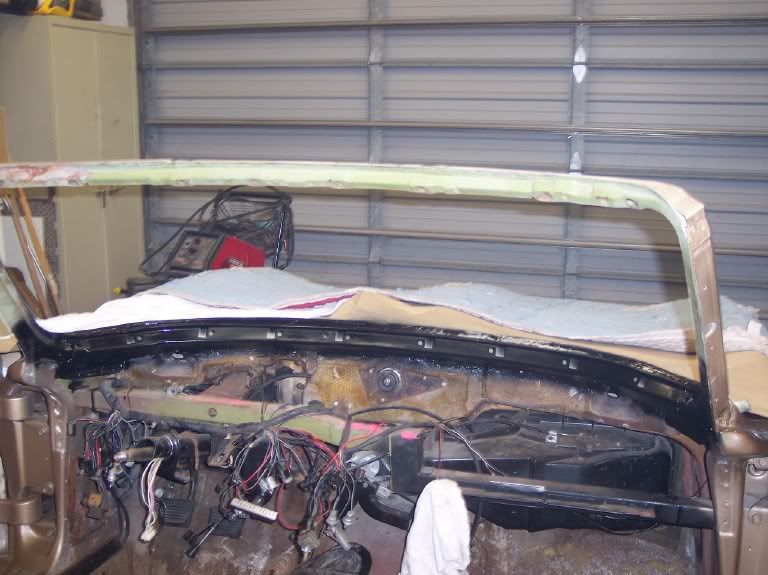 Ready for the reassembly process
Sorry about the multiple pics, Give's another option/idea to some of us who have this issue, Thankfully the part is now available saving many many hours of fabricating.
Special thanks to my good friend Peter who also was SO involved in the yellow 66 blower car.
the old part (whats left) the new part test fit Bonded Let sit for 24 hrs before welding sides Bonding material on left, sealer on rt. bonded, welded, seam sealed Ready for the reassembly processSorry about the multiple pics, Give's another option/idea to some of us who have this issue, Thankfully the part is now available saving many many hours of fabricating.
Special thanks to my good friend Peter who also was SO involved in the yellow 66 blower car.
08-09-2009, 11:32 AM
#33

great job!! I'm glad it all worked out for ya.
Why didn't you opt for the inner post from Gary? Was it easy to fab? I have the whole length to do where the holes are located for the moldings. Not sure what to get ... I want to look at his brochure before buying anything.
Why didn't you opt for the inner post from Gary? Was it easy to fab? I have the whole length to do where the holes are located for the moldings. Not sure what to get ... I want to look at his brochure before buying anything.
08-09-2009, 12:01 PM
#34
Burning Brakes
Thread Starter
I did buy both the inner and outer assm, Part can be bought seperate or as a assm with them welding the 2 together as a assm (worth the money)
Count, before you order your piece, Pull the dash so you can get a good look at what you need. Again, thanks for the heads up on this person, they do not have a web site, they actually manufacter the parts for many other companies.
Count, before you order your piece, Pull the dash so you can get a good look at what you need. Again, thanks for the heads up on this person, they do not have a web site, they actually manufacter the parts for many other companies.
08-09-2009, 02:12 PM
#35
Sorry I did not explain it correctly... My rust issue is on the passenger vertical post (inner ..where the sheet metal folds over to make the drip rail I think...I think I will take pics with me to Carlisle since Gary will be there... Then order the parts once he determines what I need... So I pay for shippping..who cares...
You know if I had the courage I should pull the dash..... It must be rotten in there... But would'nt I be able to see any issues with my glove box out... I'm going to stick a flash light in there tonight to investigate..
See ya
You know if I had the courage I should pull the dash..... It must be rotten in there... But would'nt I be able to see any issues with my glove box out... I'm going to stick a flash light in there tonight to investigate..
See ya
08-09-2009, 02:22 PM
#36
Team Owner
Member Since: Jan 2007
Location: cookeville tennessee
Posts: 28,855
Received 1,767 Likes
on
1,533 Posts
Computer for pics fixed, beginning reassembly.Almost said final, dash will be coming out for the A/M Ac unit when the 6.0 motor goes in probably late next year.
the old part (whats left)
the new part
test fit
Bonded Let sit for 24 hrs before welding sides
Bonding material on left, sealer on rt.
bonded, welded, seam sealed
Ready for the reassembly process
Sorry about the multiple pics, Give's another option/idea to some of us who have this issue, Thankfully the part is now available saving many many hours of fabricating.
Special thanks to my good friend Peter who also was SO involved in the yellow 66 blower car.
the old part (whats left) the new part test fit Bonded Let sit for 24 hrs before welding sides Bonding material on left, sealer on rt. bonded, welded, seam sealed Ready for the reassembly processSorry about the multiple pics, Give's another option/idea to some of us who have this issue, Thankfully the part is now available saving many many hours of fabricating.
Special thanks to my good friend Peter who also was SO involved in the yellow 66 blower car.
08-09-2009, 09:03 PM
#37
Burning Brakes
Thread Starter
Car is back together, I actually used the shop vac to vacumn the carpet for dirt/dust after washing the car rather than to get the water out. I think I still have a leak at the conv top header area, will find out in one of the Florida rain storms.
08-09-2009, 09:10 PM
#38
Drifting
09-16-2009, 06:10 PM
#39
Advanced


Member Since: Mar 2009
Posts: 72
Likes: 0
Received 0 Likes
on
0 Posts

Thanks
09-17-2009, 05:10 AM
#40
Burning Brakes
Thread Starter
They do not have a website, look at post 2, it has a phone number, post 3 has a picture of different parts. When I called, I spoke to Gary, very helpful, I needed the part asap since it is a daily driver, next day delivery, very impressed with the part.They do have a catalog as well. I would suggest pulling the dash and windshield mldgs to see what you have before ordering stuff if possible.