


 !
!


Free Bird!!
Thread Starter
Drifting


Joined: Jun 2009
Posts: 1,277
Likes: 275
From: Leo IN
Cage that is...
Finally, after lots of late nights and weekends I have the birdcage out and ready to go to Redi Strip. Have the new metal bits as well to repair the "creative" welding and rust that has occured over the past 46 years.
After that, it's off to be powder coated or e-coated at Creative Coatings.
Whew!

-- Joe
Finally, after lots of late nights and weekends I have the birdcage out and ready to go to Redi Strip. Have the new metal bits as well to repair the "creative" welding and rust that has occured over the past 46 years.
After that, it's off to be powder coated or e-coated at Creative Coatings.
Whew!
-- Joe
Thread Starter
Drifting
Joined: Jun 2009
Posts: 1,277
Likes: 275
From: Leo IN
OK, did some begging and borrowing. Ta da, some pics. 

What's missing in this pic?

Cracked floor pan

Hole in the trans tunnel

Pass side repairs:


Drivers side repairs:

New metal, waiting to be installed:

Thoughts?
-- Joe
What's missing in this pic?
Cracked floor pan
Hole in the trans tunnel
Pass side repairs:
Drivers side repairs:
New metal, waiting to be installed:
Thoughts?
-- Joe

Burning Brakes


Joined: Jan 2007
Posts: 1,104
Likes: 12
From: Woonsocket Rhode Island
I look at your project and pass the plague to you for taking on such a challenge. I saved the original
Running boards from mine and see that they could be used for the same repair you did to yours.
I will be using your measurements later tonight but first I need to prototype some
railing detail for an aircraft carrier fundraiser. The one I�m helping with is 14� long
but the funds are intended to resurrect a lot bigger one!
If you could measure from the tops of the windshield frame corners to the bottom inside corner of the lock
pillars it would help me a lot.
Thread Starter
Drifting
Joined: Jun 2009
Posts: 1,277
Likes: 275
From: Leo IN
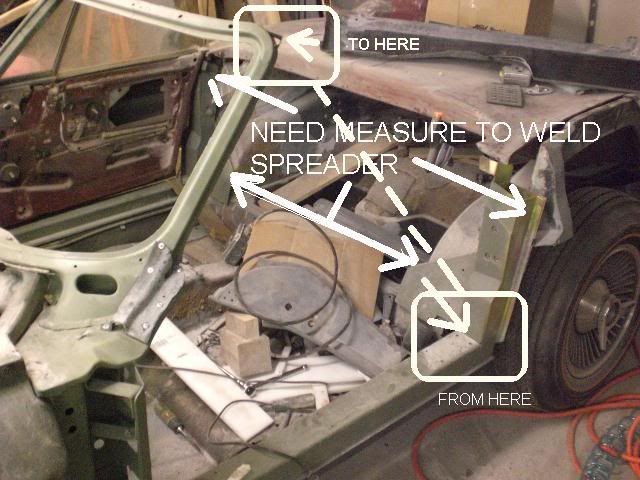
Measuring from the bottom of the luggage stop extensions (inner bottom most) to the upper loop (top inner most) I get:
Drivers side: 956mm
Passengers side: 959mm
Measuring from the same points on the windshield frame to the inside front bottom of both lock pillars (right where the metal loops under the pillar to weld to the rocker panel), I get (on both sides) 955mm.
Is this close to what you get? What measurements do you get for the rocker molding mounting tabs?
-- Joe
Last edited by out2kayak; Jun 20, 2010 at 09:41 PM.
Corvette Stories
The Best of Corvette for Corvette Enthusiasts

Every 2027 Corvette Engine Explained
Joe Kucinski
Designer Imagines A Corvette That Looks More Like a Corvette Than the Corvette
Verdad Gallardo
10 Ugly Corvettes That We Still Kinda Love
Joe Kucinski
Top 10 Most Expensive Corvettes Ever Sold on Bring A Trailer
Brett Foote
10 Things Every Corvette Owner Needs (2026 Edition)
Michael S. Palmer
8 Most "Only Corvette Owners Understand" Quirks and Problems
Pouria Savadkouei
10 Reasons the C6 Z06 is Still A Performance Benchmark After 20 Years
Joe Kucinski
How Much Horsepower Every Corvette Engine "LOST" in 1972
Joe Kucinski
Top 10 DOs and DON'Ts for Protecting Your Convertible Top!
Michael S. Palmer
Team Owner


Joined: Jan 2007
Posts: 29,065
Likes: 1,839
From: cookeville tennessee
Man that is going to look like to major work and job. Glad to see you are doing it at least you will know what you have when it is all said and done. Good luck with her and post more pic,s as you go on with her man....
Burning Brakes
Joined: Jan 2007
Posts: 1,104
Likes: 12
From: Woonsocket Rhode Island
Measuring from the bottom of the luggage stop extensions (inner bottom most) to the upper loop (top inner most) I get:
YOURS MINE
Drivers side: 956mm 932.182
Passengers side: 959mm 956
Measuring from the same points on the windshield frame to the inside front bottom of both lock pillars (right where the metal loops under the pillar to weld to the rocker panel), I get (on both sides) 955mm.
MINE
PASS: 965.2
DRIVERS:939.8
Is this close to what you get? What measurements do you get for the rocker molding mounting tabs?
These comparisons relate to the past history of this car. While being stored a lot of crap was piled on it and that explains the windshield being lower on one side than the other. Because this car was hit hard on the drivers side I notice that the drivers rocker is closer to body center than the passenger side.
I will be jacking the body off the main mounts to get a center measurement at #2 and #4 and believe I will get 60" or 1524mm. Right now the rockers are 59 1/2" but the drivers rocker overhangs the frame more than the passenger. Using a level I measured a 3/4" difference L to R from the rockers to the edge of the windshield.
I just repaired more of the firewall so the resin is setting. Later.
Thread Starter
Drifting
Joined: Jun 2009
Posts: 1,277
Likes: 275
From: Leo IN
Looking at the lock pillars, just above the rocker panels, they are cracked almost all the way through. So, I have new lock pillars, luggage stop extensions, luggage stop, and new rocker moulding brackets (several are rusted through) from Caledonia.
I should have them here next weekend (hopefully) so I can start assembling the back 1/2 of the birdcage. Once I have that good and solid, I can take apart mine and have the front (especially around the windshield) cleaned. I'm taking next week off, so I can take the front down to Indy for a cleaning.
Once everything is cleaned, there is a local place that can e-coat and powder coat the entire birdcage.
It looks like my rack and pinion is done (I ordered it from Woodward Steering) and on it's way. Two final things to get before I can do a trip to SRIII and have everything ready for them -- the tie rods and coil overs.
I have new fibreglass rocker panels ordered from Sermersheim's. They just started to carry the entire panels, press moulded (not just the repair panels that are hand laid), and are on their way to replace my old ones.
So, progress is slow but sure.
-- Joe
Thread Starter
Drifting
Joined: Jun 2009
Posts: 1,277
Likes: 275
From: Leo IN
Measuring from the bottom of the luggage stop extensions (inner bottom most) to the upper loop (top inner most) I get:
YOURS MINE
Drivers side: 956mm 932.182
Passengers side: 959mm 956
Measuring from the same points on the windshield frame to the inside front bottom of both lock pillars (right where the metal loops under the pillar to weld to the rocker panel), I get (on both sides) 955mm.
MINE
PASS: 965.2
DRIVERS:939.8
Is this close to what you get? What measurements do you get for the rocker molding mounting tabs?
These comparisons relate to the past history of this car. While being stored a lot of crap was piled on it and that explains the windshield being lower on one side than the other. Because this car was hit hard on the drivers side I notice that the drivers rocker is closer to body center than the passenger side.
I will be jacking the body off the main mounts to get a center measurement at #2 and #4 and believe I will get 60" or 1524mm. Right now the rockers are 59 1/2" but the drivers rocker overhangs the frame more than the passenger. Using a level I measured a 3/4" difference L to R from the rockers to the edge of the windshield.
I just repaired more of the firewall so the resin is setting. Later.
YOURS MINE
Drivers side: 956mm 932.182
Passengers side: 959mm 956
Measuring from the same points on the windshield frame to the inside front bottom of both lock pillars (right where the metal loops under the pillar to weld to the rocker panel), I get (on both sides) 955mm.
MINE
PASS: 965.2
DRIVERS:939.8
Is this close to what you get? What measurements do you get for the rocker molding mounting tabs?
These comparisons relate to the past history of this car. While being stored a lot of crap was piled on it and that explains the windshield being lower on one side than the other. Because this car was hit hard on the drivers side I notice that the drivers rocker is closer to body center than the passenger side.
I will be jacking the body off the main mounts to get a center measurement at #2 and #4 and believe I will get 60" or 1524mm. Right now the rockers are 59 1/2" but the drivers rocker overhangs the frame more than the passenger. Using a level I measured a 3/4" difference L to R from the rockers to the edge of the windshield.
I just repaired more of the firewall so the resin is setting. Later.
Measuring from the bottom of the luggage stop extensions (inner bottom most) to the upper loop (top inner most) should be 956mm.
Seem right to you?
Here are the measurements for the rocker panel moulding mounting tabs on the bottom of the passengers side rocker panel.

Thoughts?
-- Joe
Last edited by out2kayak; Jun 27, 2010 at 10:44 PM.
Thread Starter
Drifting
Joined: Jun 2009
Posts: 1,277
Likes: 275
From: Leo IN
Also, looking at the rocker panels and the lock pillars, it looks like the mount hole that goes through the rocker and pillar have to match exactly:
Drivers side from under the rocker:

Drivers side from in the pillar:

Passengers side from in the rocker:

Passengers side in the pillar:

As well, on where the pillars and the rocker panels meet on the inside bottom, the two edges should align perfectly in the front:
Passengers side:

Drivers side:

Unfortunately (as mentioned) mine on the outside is cracked and the inside is buckled as you go to the rear of the car.
Does this match what you have?
Also, one thing to mention. The reason I did the funky way of measuring the placement of the rocker moulding brackets is that I purposely avoided measuring the welded area. When I measured my old, welded rocker panels they were not the correct length (they are slightly longer).
-- Joe
Drivers side from under the rocker:
Drivers side from in the pillar:
Passengers side from in the rocker:
Passengers side in the pillar:
As well, on where the pillars and the rocker panels meet on the inside bottom, the two edges should align perfectly in the front:
Passengers side:
Drivers side:
Unfortunately (as mentioned) mine on the outside is cracked and the inside is buckled as you go to the rear of the car.
Does this match what you have?
Also, one thing to mention. The reason I did the funky way of measuring the placement of the rocker moulding brackets is that I purposely avoided measuring the welded area. When I measured my old, welded rocker panels they were not the correct length (they are slightly longer).
-- Joe
Last edited by out2kayak; Jun 27, 2010 at 10:59 PM.
Thread Starter
Drifting
Joined: Jun 2009
Posts: 1,277
Likes: 275
From: Leo IN
Just a quick check, going from the rockers (the bottom edge flat edge) to the hinge pillar, I measure 89 degrees on both the drivers and passengers side.
Is this consistent with what you have or is mine off?


-- Joe
Is this consistent with what you have or is mine off?
-- Joe
Racer


Joined: Jan 2008
Posts: 379
Likes: 10
From: N'Awlins
Joe, I had broken rocker panel mounting brackets broken off my car from previous mishaps, too. To locate the mounting brackets, what I did was use the rocker moulding to bolt the brackets on to determine the correct location. Be careful, the rocker moulding has two sets of holes, e.g. left or right side.
I used 1/4" carriage bolts (the square fits perfectly in the bracket to keep the bolt centered) and bolted the brackets to the moulding.

This is just to show how I put the bolts thru the bracket and rocker moulding. The bolts are tightened to hold both pieces secure then c-clamp the bracket to the birdcage.

This is the moulding hanging loose with just two bolts to show what I'm talking about. As you can see at the right I still have one more bracket to install but I ran out of brackets, so the next time I have the body off I'll change that one, too.

The left side of my car was in an accident at the door/rear wheel and the lock pillar was bent, so I spent a lot of time measuring and guessing to see how square everything is and trying to make everything right.
I'm too old to be 'cifering mm to inches, can't y'all use good ol' inches. But if you need any measurements or anything else I have the left side lock pillar exposed and will gladly take pictures or measurements for you.
Good luck with your project and keep the pics and commentary coming.
CJ
I used 1/4" carriage bolts (the square fits perfectly in the bracket to keep the bolt centered) and bolted the brackets to the moulding.
This is just to show how I put the bolts thru the bracket and rocker moulding. The bolts are tightened to hold both pieces secure then c-clamp the bracket to the birdcage.
This is the moulding hanging loose with just two bolts to show what I'm talking about. As you can see at the right I still have one more bracket to install but I ran out of brackets, so the next time I have the body off I'll change that one, too.
The left side of my car was in an accident at the door/rear wheel and the lock pillar was bent, so I spent a lot of time measuring and guessing to see how square everything is and trying to make everything right.
I'm too old to be 'cifering mm to inches, can't y'all use good ol' inches.
But if you need any measurements or anything else I have the left side lock pillar exposed and will gladly take pictures or measurements for you.Good luck with your project and keep the pics and commentary coming.
CJ
Burning Brakes
Joined: Jan 2007
Posts: 1,104
Likes: 12
From: Woonsocket Rhode Island
Back again with more dim's. I put the gauge against the hinge pillars on a verticle and got 89 deg also so that is a match to yours. The lock pillars I have at 10 deg on one side and 9 on the other... not sure which one is correct but taking a measurement from bottom of hinge to top of lock it matches.
How wide are your rockers at the base of the hinge and lock pillars? You might have to measure ahead of the hinge pillars because of the tranny tunnel .
Last night after looking at all sorts of sinerios, it would seem that my cowl is twisted. The base cross dims match but the upper cross dims to not. It might be shims or a bend from the accident?
PJ
Thread Starter
Drifting
Joined: Jun 2009
Posts: 1,277
Likes: 275
From: Leo IN
Pat,
Do these help? Bear in mind that the drivers side hinge pillar has several welds already removed, so it's no big suprise that those differ from the drivers side. That said, the cage is level and square.
This picture is upside down:


Do these help? Bear in mind that the drivers side hinge pillar has several welds already removed, so it's no big suprise that those differ from the drivers side. That said, the cage is level and square.
This picture is upside down:


Burning Brakes
Joined: Jan 2007
Posts: 1,104
Likes: 12
From: Woonsocket Rhode Island
Dang, you did a super job with all those measurements! You are really into your project as well! Nice clean work shop too.
Seeing your cage all striped of fiberglass certainly looks different and gives an idea that Vette are mostly plastic.
With the information you offered it is definate that my cowl may be OK. I see that your rockers are off set as well but not as much as mine and if I push out the drivers hinge pillar so that the criss cross matches, mine will match yours!
Thanks a whole bunches, you've been great!