


Headlight Motor Removal
Thread Starter
Instructor


Joined: Nov 2010
Posts: 218
Likes: 2
From: Harrisburg Penna
I want to "refresh" my headlight motor which seems to need assistance in opening/closing. Two questions:
1. Is it necessary to remove the hood to remove the motor?
2. Can the motor be disconnected/removed without removing the entire headlight assembly?
I've searched and have come across the excellent pics for disassembly and re-lubing the motor, but I am just not quite clear about the above. Do not want to tear apart any more parts than necessary.

Le Mans Master


Joined: Jan 2000
Posts: 8,918
Likes: 27
From: New Hill NC
Get someone to hold the hood up high and work the motor out. It will come with a little twisting.
Remove the ground wire, the plug connection , and the clip. Slide it straight off the shaft.
Remove the ground wire, the plug connection , and the clip. Slide it straight off the shaft.
Last edited by wombvette; Feb 5, 2011 at 10:19 AM.
Tech Contributor


Joined: May 2005
Posts: 15,576
Likes: 118
From: Conroe Texas
2. Can the motor be disconnected/removed without removing the entire headlight assembly?
1) Disconnect the power wire (the ecru connector on the left of this photo)
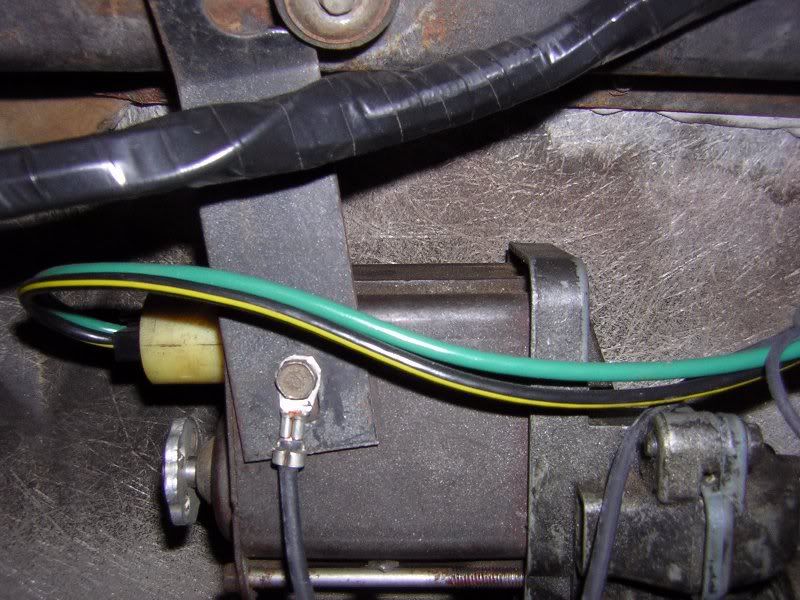
2) Disconnect the ground wire (the small screw in the same photo on the mounting bracket)
3) Remove the clip circled in red (note, this is the driver's side motor in this photo, but passenger side used in above photo)
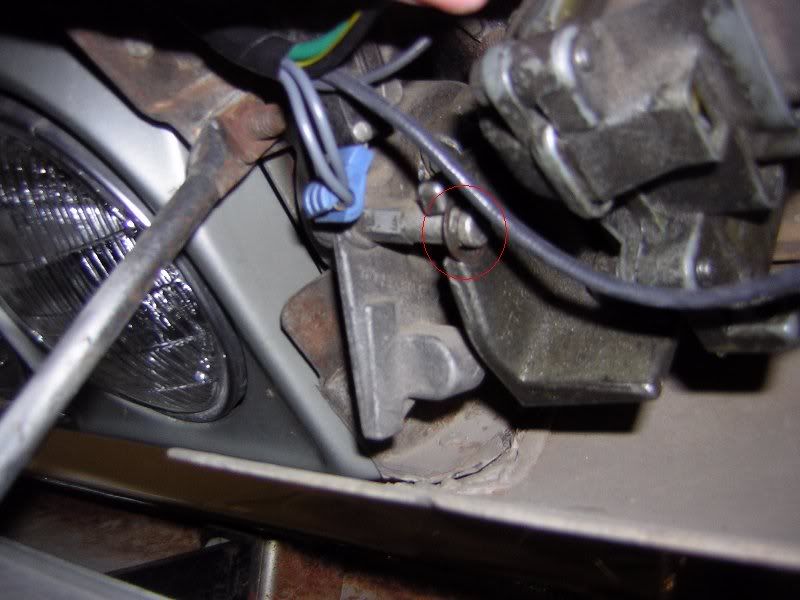
4) Slide the motor off the headlight bucket pivot shaft and remove the motor from the car.
Last edited by 62Jeff; Feb 5, 2011 at 10:21 AM.
Drifting

Joined: Jun 2005
Posts: 1,327
Likes: 29
From: Columbus, Ga
Not at all,just have someone "over open" the hood while you are removing the motor. Also, protect the paint so you don't scratch the hood as you extract the motor because the clearance is small.
Absolultely. I'll try to find pictures, hold on...
1) Disconnect the power wire (the ecru connector on the left of this photo)
2) Disconnect the ground wire (the small screw in the same photo on the mounting bracket)
3) Remove the clip circled in red (note, this is the driver's side motor in this photo, but passenger side used in above photo)
4) Slide the motor off the headlight bucket pivot shaft and remove the motor from the car.
please clarify what you mean by "over open."
thanks
Melting Slicks

Joined: Oct 2006
Posts: 2,366
Likes: 105
From: Flower Mound TX
I actually have pulled mine out multiple times via the grill. That way I don't go near the hood to scratch it.
If someone finds a vendor that makes the aluminum gear that fits on the fork, let me know. Every single one I have purchased has been too small of a hole.
If someone finds a vendor that makes the aluminum gear that fits on the fork, let me know. Every single one I have purchased has been too small of a hole.

Team Owner


Joined: Oct 2000
Posts: 38,897
Likes: 1,926
From: Washington Michigan
After opening the hood, hold it all the way open; when it's resting on the hood support by itself, it isn't all the way open. You can still pull it forward a few inches past the "rest" point, which gives you more room at the front side to get the motor out. 
Race Director


Joined: Jan 2002
Posts: 15,352
Likes: 2,726
From: Close to DC
C2 of the Year Finalist - Modified 2020
62Jeff. The clip circled in the photo is incorrect, you may know that, but works. It's very difficult to remove compared to the correct "Y" shaped unit. Gettysburg, you may have the correct clips, if not get them from one of our supporting vendors.  Dennis
Dennis
Corvette Stories
The Best of Corvette for Corvette Enthusiasts

Top 10 Most Expensive Corvettes Ever Sold on Bring A Trailer
Brett Foote
10 Things Every Corvette Owner Needs (2026 Edition)
Michael S. Palmer
8 Most "Only Corvette Owners Understand" Quirks and Problems
Pouria Savadkouei
10 Reasons the C6 Z06 is Still A Performance Benchmark After 20 Years
Joe Kucinski
How Much Horsepower Every Corvette Engine "LOST" in 1972
Joe Kucinski
Top 10 DOs and DON'Ts for Protecting Your Convertible Top!
Michael S. Palmer
Top 10 Most Explosive Corvettes Ever Made: Power-to-Weight Ratio Ranked!
Joe Kucinski
150 hp to 1,250 hp: Every Corvette Generation Compared by the Specs That Matter
Joe Kucinski
8 Coolest Corvette Pace Cars (and Replicas) of All Time
Verdad GallardoSafety Car


Joined: Nov 2004
Posts: 4,182
Likes: 94
From: going faster miles an hour...with the radio on in browns mills new jersey
Tech Contributor
Joined: May 2005
Posts: 15,576
Likes: 118
From: Conroe Texas
Melting Slicks

Joined: Nov 2006
Posts: 2,618
Likes: 149
From: Anaheim California
You can prop up a broom stick up against the intake and hood to get the hood to "full open". Also you can place a small mirror just opposite the motor so you can see what you are doing.

Burning Brakes

Joined: Feb 2008
Posts: 916
Likes: 2
From: prescott arizona
I removed my hood to "rebuild" both of the headlight motors. It's amazing how much room you gain by removing it. Simply mark the hood hinge locations with blue 3M masking tape before you remove it.
I also used my wifes makeup mirror in the cavity along with a trouble light to see what I was doing. You will be working on your knees, bent over and everything will be azz backwards. It's kind of a PITA!!!
I also used my wifes makeup mirror in the cavity along with a trouble light to see what I was doing. You will be working on your knees, bent over and everything will be azz backwards. It's kind of a PITA!!!
Tech Contributor
Joined: May 2005
Posts: 15,576
Likes: 118
From: Conroe Texas
I would allocate about 4 hours to do both motors, since you have not done it before. That covers removal, rebuild, installation time, and learning curve.
Jeff
Safety Car

Joined: Nov 2000
Posts: 4,761
Likes: 138
From: Clinton Township MI
Cruise-In III Veteran
4440stevesvette,
LOL, think we went to different schools together. That's exactly how I did my motors last month. Removing the hood just gives you more room to work upside down Took the motors apart, sanded with emory cloth the points and also removed the tarnish from the copper windings, finally rotated the gear in each, liberally coating the gear innards with wheel bearing grease. Those bad boys now almost snap to attention, HA!
Good project with an immediate return on your efforts.
Regards,
Jim
In God We Trust!
LOL, think we went to different schools together. That's exactly how I did my motors last month. Removing the hood just gives you more room to work upside down
Took the motors apart, sanded with emory cloth the points and also removed the tarnish from the copper windings, finally rotated the gear in each, liberally coating the gear innards with wheel bearing grease. Those bad boys now almost snap to attention, HA!Good project with an immediate return on your efforts.
Regards,
Jim
In God We Trust!
Safety Car
Joined: Nov 2004
Posts: 4,182
Likes: 94
From: going faster miles an hour...with the radio on in browns mills new jersey
The easiest way to prop your hood fully open is to put a bolt through the 'safety hole' on the hood support.
With the hood fully open, this hole will be exposed above the other part of the hood support.
With the hood fully open, this hole will be exposed above the other part of the hood support.
Burning Brakes
Joined: Feb 2008
Posts: 916
Likes: 2
From: prescott arizona
4440stevesvette,
LOL, think we went to different schools together. That's exactly how I did my motors last month. Removing the hood just gives you more room to work upside down Took the motors apart, sanded with emory cloth the points and also removed the tarnish from the copper windings, finally rotated the gear in each, liberally coating the gear innards with wheel bearing grease. Those bad boys now almost snap to attention, HA!
Good project with an immediate return on your efforts.
Regards,
Jim
In God We Trust!
LOL, think we went to different schools together. That's exactly how I did my motors last month. Removing the hood just gives you more room to work upside down
Took the motors apart, sanded with emory cloth the points and also removed the tarnish from the copper windings, finally rotated the gear in each, liberally coating the gear innards with wheel bearing grease. Those bad boys now almost snap to attention, HA!Good project with an immediate return on your efforts.
Regards,
Jim
In God We Trust!


Team Owner
Joined: Aug 2007
Posts: 58,061
Likes: 7,146
Army
Prop the hood ALL the way open - past the point where it normally latches open. Prop the hood open and/or tie it open from the male latch spring to a rafter or such...you do NOT want it closing accidentally with your hands in front of it. Put a layer of blue tape on the front edge of the hood and the hood surround just in front of that. You can then unscrew the ground wire...disconnect the electrical connector, remove the hairpin clip and lift the motor out of the body. If you can't work the motor off its bucket spindle working the manual thumbwheel will give you some slack.
With the motors out make sure the buckets will flip up and down with a flick of two fingers - if not you have bucket problems..
Anything else you want to know is here:
With the motors out make sure the buckets will flip up and down with a flick of two fingers - if not you have bucket problems..
Anything else you want to know is here:
Last edited by Frankie the Fink; Jan 16, 2017 at 07:36 PM.