


'61 Bumper Alignment Help
Thread Starter
Melting Slicks


Joined: Nov 2006
Posts: 2,618
Likes: 149
From: Anaheim California
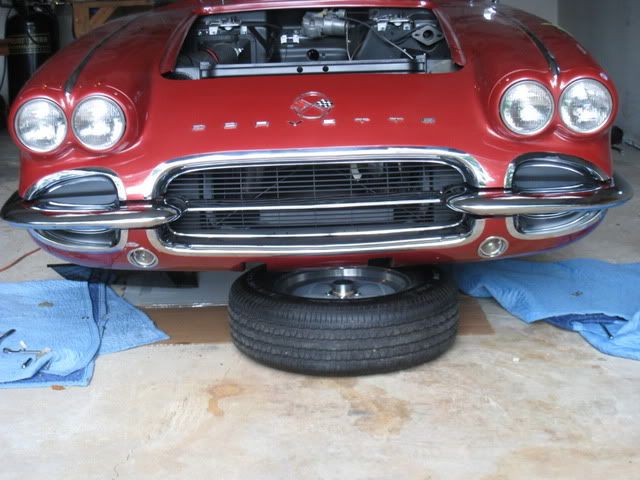
I put my bumper back on after paint a few months ago and noticed that the rt side hangs lower by the upper eye brow. It lined up perfectly before disassembly. I believe I replaced the grille bar with a repo. Based on the photo where does the adjustment need to be made? Thanks

Le Mans Master


Joined: Sep 2003
Posts: 8,934
Likes: 657
From: Norwalk ohio
2019 Corvette of the Year Winner
St. Jude Donor '15
I put my bumper back on after paint a few months ago and noticed that the rt side hangs lower by the upper eye brow. It lined up perfectly before disassembly. I believe I replaced the grille bar with a repo. Based on the photo where does the adjustment need to be made? Thanks
We even had to bend a few brackets slightly, but start out with two people...if you did it by yourself it is one tough job. I had 80 hours in my bumpers getting them to look decent....
Le Mans Master
Joined: Feb 2004
Posts: 7,359
Likes: 871
From: Norcal CA
2018 C1 of Year Finalist
Here is what I did and it seemed to work well. I had a bunch of extra cardboard shims for the body or for the bumper. I placed them underneath the bumper to use a guide. You might be able to do this with thick cardboard or something like it which will not scratch the paint. I was able to do it myself and align the grill as best as I could.
Last edited by jimh_1962; Mar 24, 2011 at 11:44 PM.
Thread Starter
Melting Slicks
Joined: Nov 2006
Posts: 2,618
Likes: 149
From: Anaheim California
Where would I be making the adjustments? Would I be loosening all the inner and outer bracket bolts to shift the bumper? Do I have to completely remove the bumper or just loosen and adjust? Great idea with the cardboard shims, Jim. Larry
Le Mans Master
Joined: Sep 2003
Posts: 8,934
Likes: 657
From: Norwalk ohio
2019 Corvette of the Year Winner
St. Jude Donor '15
I would all for one bumper and move it into position and then tighten in place,,,,that will give you an idea.
Le Mans Master

Joined: Feb 2008
Posts: 5,214
Likes: 447
From: NJ Hockey beer league
One of my winter projects was to remove the front bumper brackets, clean and paint them, and install all new hardware so I was basically at the same position you are in initially. The way I did it was to install all the brackets and bolts loosely at first, add shims as needed, THEN move the bumpers to where you want them to be alignment wise. At that point, tighten the bolts slowly and evenly and see if the bumper will remain in place (holds the adjustment). If so, finish tightening the bolts and you are done. If not, you may need to tweak the brackets and or add a shim. If they fit before and the car was not hit, this will work. If necessary, you can elongate the bumper bracket holes slightly to get the adjustment you are looking for. It looks like your drivers side needs to come down a bit and the passenger side needs to come up. Try for EVEN gaps all around on both sides.  Pilot Dan
Pilot Dan
Last edited by Pilot Dan; Mar 25, 2011 at 01:33 AM.
Thread Starter
Melting Slicks
Joined: Nov 2006
Posts: 2,618
Likes: 149
From: Anaheim California
One of my winter projects was to remove the front bumper brackets, clean and paint them, and install all new hardware so I was basically at the same position you are in initially. The way I did it was to install all the brackets and bolts loosely at first, add shims as needed, THEN move the bumpers to where you want them to be alignment wise. At that point, tighten the bolts slowly and evenly and see if the bumper will remain in place (holds the adjustment). If so, finish tightening the bolts and you are done. If not, you may need to tweak the brackets and or add a shim. If they fit before and the car was not hit, this will work. If necessary, you can elongate the bumper bracket holes slightly to get the adjustment you are looking for. It looks like your drivers side needs to come down a bit and the passenger side needs to come up. Try for EVEN gaps all around on both sides. Pilot Dan
Pilot Dan
Team Owner

Joined: Aug 2007
Posts: 58,061
Likes: 7,146
Army
Pilot Dan has told you right...exactly what I had to do and there is no "set" formula. I used big washers fro shims on the bracket bolts and I had to push down with my knee on the inboard side of the driver's side front bumper and tighten, push a little more then tighten some more. I had the EXACT problem shown in your picture. This is as much about stamina as technique !
Last edited by Frankie the Fink; Mar 25, 2011 at 08:00 AM.
Corvette Stories
The Best of Corvette for Corvette Enthusiasts

Top 10 Most Expensive Corvettes Ever Sold on Bring A Trailer
Brett Foote
10 Things Every Corvette Owner Needs (2026 Edition)
Michael S. Palmer
8 Most "Only Corvette Owners Understand" Quirks and Problems
Pouria Savadkouei
10 Reasons the C6 Z06 is Still A Performance Benchmark After 20 Years
Joe Kucinski
How Much Horsepower Every Corvette Engine "LOST" in 1972
Joe Kucinski
Top 10 DOs and DON'Ts for Protecting Your Convertible Top!
Michael S. Palmer
Top 10 Most Explosive Corvettes Ever Made: Power-to-Weight Ratio Ranked!
Joe Kucinski
150 hp to 1,250 hp: Every Corvette Generation Compared by the Specs That Matter
Joe Kucinski
8 Coolest Corvette Pace Cars (and Replicas) of All Time
Verdad Gallardo
Racer


Joined: May 2008
Posts: 258
Likes: 7
From: Beaver Falls Pa
Larry,
You have 2 axis you need to look at: front-to-back and inboard-to-outboard.
Check front to back first. does the bumper drop down in the front, or is it level? If it's level, I would not loosen all the bolts yet.
Look at the outboard bumper mount. This is the one with the long bracket that goes throuth the body near the wheel well. Can you move it up and down, or is it solid? If it moves, you probably do not have the rubber pads installed. I can't post a picture of what I'm talking about, but someone should be able to supply one.
If it doesn't move up and down, loosen the outboard bolt that goes through the body and see how much up and down play you have. It may be as easy as loosening the outboard bolt, pushing up on the bumper, and retightening the bolt. You can also loosen the 2 bolts that hold the bracet to the frame to give you more play.
If that doesn't work, it gets a little more complicated. You can loosten the 2 nuts that connect the grille bar to the bumper (not a lot, since the grille bar may drop slightly), and see if that gives you enough play you can raise the outside end of the bumper to where you want it. Then tighten the outboard bolt then the grille bar nuts.
If you get it to line up and then it moves once you tighten everything back up, you may have a bent bracket. A lot of this is trial and error. As others have said, having 2 people doing this helps.
Rod
Le Mans Master
Joined: Sep 2003
Posts: 8,934
Likes: 657
From: Norwalk ohio
2019 Corvette of the Year Winner
St. Jude Donor '15
ALSO, I taped up the bumpers and car body with green body masking tape. I had the bumpers on and off and moving around so much I didnt want to scratch either finish. My '60 has the grill teeth and I put green tape down and then I put duct tape on top of that to make sure I had a layer of protection.
Above it was mentioned that there are 2 axis to contend with, I had the feeling that I had 2 axis, but because of the outside fender bolt on the side, it also felt that the bumper could rotate (you can have the gap right near the front but find that the bumper tilts up or down (rotates or pivots at the side bolt attachment point) and the end of the bumper won't look right on the car) So there you are trying to get the gaps up and down right, the bumper swung in tight enough and you think you have it only to find that the gaps on the outside of the fender up/down are off. The darn bumper kind of rotates on the bolts because it doesnt have 2 bolts on the front and side. As others have said it is a major PIA if you try to get everything looking perfect because the general never made the car perfect to begin with!
Get a partner to help and between what one person sees on the outside and the other person sees by tightening bolts etc the one tightening will get a feel of what to do.
Good luck!
ps... we ended up using some washers as shims as well to get it in position.
Le Mans Master
Joined: Feb 2008
Posts: 5,214
Likes: 447
From: NJ Hockey beer league
Pilot Dan


