


66 Headlamp motor problems.
Tech Contributor


Joined: May 2005
Posts: 15,576
Likes: 118
From: Conroe Texas
Then I just visualized where things were and worked by feel.
I posted these instructions for a member yesterday, perhaps they will assist you as well.
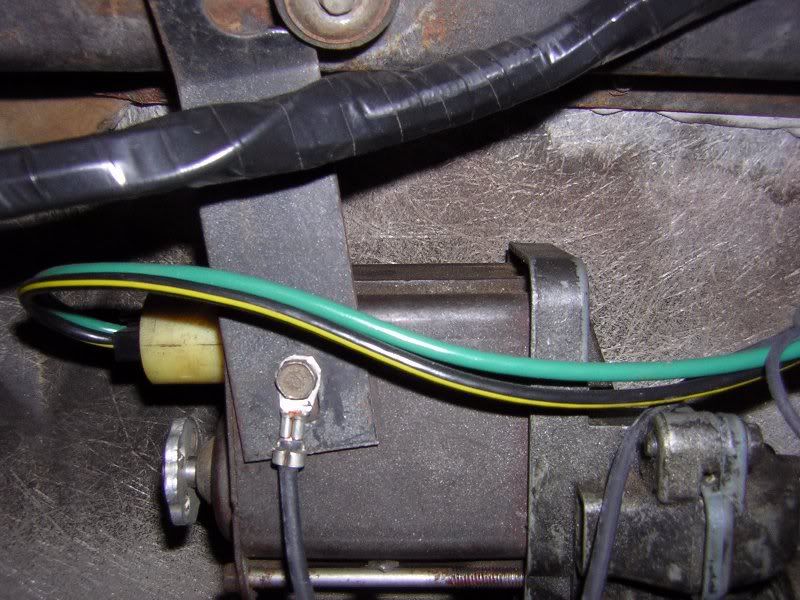
1) Remove the wiring (off-white connector) from the motor by pulling straight out. This photo shows the passenger side motor.

2) Remove the small screw on the support bracket, shown in the photo above holding on a ground wire, and remove the bracket from the car. The other end you can see just slips into a rubber grommet - although in this photo it's almost out of that grommet.
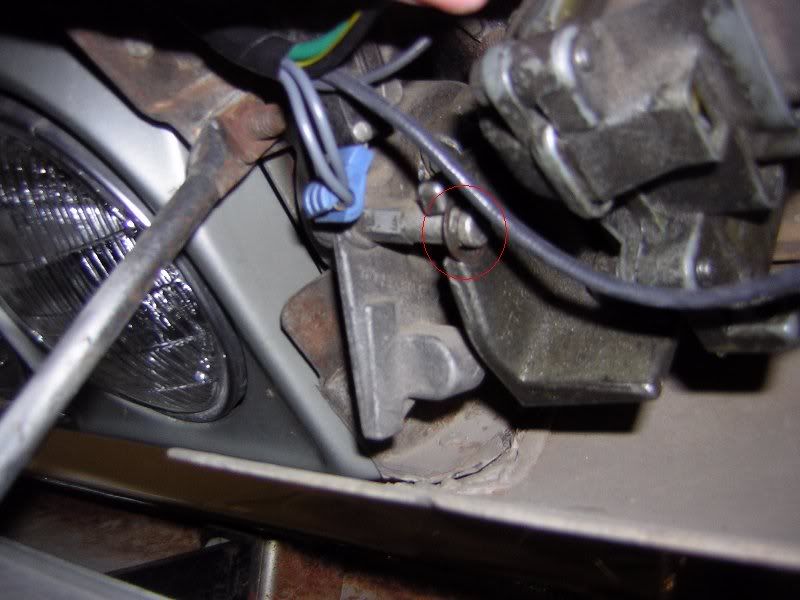
3) Remove the clip (circled in red) that locates the motor on the bucket shaft. This clip is normally shaped more like a bobby pin, but in this photo it's an "e" clip. This photo shows the driver's side motor.

4) Pull the headlight motor straight away from the bucket and off the shaft. Remove it from the car by lifting the hood over center and snaking the motor out through the gap between the nose and the hood.
And then if you need info on how to rebuild them once they are out, go here:
http://www.lbfun.com/warehouse/tech_...%20Rebuild.pdf

Advanced

Joined: Aug 2013
Posts: 67
Likes: 0
From: Rowayton CT
First I put a small mirror down in the nose of the car so that I could look down at it and see the motors in the reflection.
Then I just visualized where things were and worked by feel.
I posted these instructions for a member yesterday, perhaps they will assist you as well.
1) Remove the wiring (off-white connector) from the motor by pulling straight out. This photo shows the passenger side motor.
2) Remove the small screw on the support bracket, shown in the photo above holding on a ground wire, and remove the bracket from the car. The other end you can see just slips into a rubber grommet - although in this photo it's almost out of that grommet.
3) Remove the clip (circled in red) that locates the motor on the bucket shaft. This clip is normally shaped more like a bobby pin, but in this photo it's an "e" clip. This photo shows the driver's side motor.
4) Pull the headlight motor straight away from the bucket and off the shaft. Remove it from the car by lifting the hood over center and snaking the motor out through the gap between the nose and the hood.
And then if you need info on how to rebuild them once they are out, go here:
http://www.lbfun.com/warehouse/tech_...%20Rebuild.pdf
Le Mans Master


Joined: Nov 2009
Posts: 5,442
Likes: 64
From: 50 kilometers outside Oslo Norway

Team Owner

Joined: Aug 2007
Posts: 58,061
Likes: 7,146
Army
Once installed, though the lights work magically. Snap up in unison and shut just as quickly. The kit is beautifully designed and thought out and worth the cost/effort if your old motors are kaput.
Safety Car


Joined: May 2012
Posts: 3,913
Likes: 211
From: APO AE
Wow... this actually worked! Got my right side working... it wasn't before. Now it makes the working good side look like a sloth!
Took about an hour to get it out and apart, cleaned and back together. Then it took another 30 minutes to get it back in.
ughhh.
I was almost, just about, ready to take the hood off to get it back in. Then I thought that the motor "slot" where the headlight bucket arm enters the motor may have gotten turned... so I opened the headlight bucket and it slipped in in about 10 seconds.
I'll do the other one "later"... bigger fish to fry before my German inspection.
Cheers!

Instructor

Joined: Aug 2018
Posts: 129
Likes: 27
St. Jude Donor '21
Brake cleaner, not brake fluid.
If you choose to pull them and look into this yourself, here's an article telling you how. I went from 2 non-functional motors, to 2 working motors in a matter of hours by simply following the instructions in this link:
http://www.lbfun.com/warehouse/tech_...%20Rebuild.pdf
If you choose to pull them and look into this yourself, here's an article telling you how. I went from 2 non-functional motors, to 2 working motors in a matter of hours by simply following the instructions in this link:
http://www.lbfun.com/warehouse/tech_...%20Rebuild.pdf
Corvette Stories
The Best of Corvette for Corvette Enthusiasts

5 Best & 5 Worst Corvette Daily Drivers
Joe Kucinski
The Headlights of Every Corvette Generation Explained
Joe Kucinski
5 Best & 5 Most Overrated Corvette Track Packages of All Time!
Joe Kucinski
Every 2027 Corvette Engine Explained
Joe Kucinski
Designer Imagines A Corvette That Looks More Like a Corvette Than the Corvette
Verdad Gallardo
10 Ugly Corvettes That We Still Kinda Love
Joe Kucinski
Top 10 Most Expensive Corvettes Ever Sold on Bring A Trailer
Brett Foote
10 Things Every Corvette Owner Needs (2026 Edition)
Michael S. Palmer
