When you click on links to various merchants on this site and make a purchase, this can result in this site earning a commission. Affiliate programs and affiliations include, but are not limited to, the eBay Partner Network.
The easiest way to test the stainless lines, the flex lines in the engine bay and your two flex lines to the tank is to connect the two lines in the engine bay with a double male AN connector. Then use a AN fuel gauge fitting (double male with a 1/8 npt female made for a fuel gauge to screw in to) and install a 1/8 to 1/4 npt adapter and an air tool quick disconnect fitting on to that adapter (use sealant on the npt fittings). All these fittings are less than $20. Now connect your air compressor fully charged, but not running with the output regulator set to zero. Slowly increase the output pressure to 100 psi listening for leaks. If you hear none, pour some soapy water over every joint looking for bubbles. The whole thing will take you 15 minutes, but give you huge piece of mind. Oh, and the reason you can�t reliably let it sit and check for bleed down is that the quick disconnects are notoriously leaky making it difficult to assess. I�ll post mine next weekend when I get home (travel this week). Best of luck!
Awesome, I was thinking of something similar but was considering running the pump with fuel. I like your idea but won't all the air escape right out the return in the tank?
I finally got the fiberglass resin lump ground out of the right side fender. I was then able to get the new inner fender up in there. The upper lip on this part is a little deformed, but I think that I can work with it. I am still waiting to hear from the manufacturer on the messed up left side inner fender, so I am holding with the body work until I get that side figured out.
Right side inner fender fitment at the upper lip. -- -- Right side inner fender from the wheel side. -- -- Right side inner fender looking forward from the wheel well. This is where the large fiberglass risen lump was.
Awesome, I was thinking of something similar but was considering running the pump with fuel. I like your idea but won't all the air escape right out the return in the tank?
No, you disconnect the flex lines from the tank and connect them to each side of the fuel gauge fitting. The tank is out of the test loop. Your real leakage concerns are at the ss tubing flares and flex lines that you assembled. As long as you sealed and torqued the 1/4� npt to AN fittings at the tank supply/return properly, they very rarely leak.
BTW, excellent fiberglass work! Your diagnostic and repair approach is spot on.
So I am kind of a neat freak. I know that things get dirty, but I hate it when it gets too bad. Fiberglass dust and paint dust go everywhere and I don't want my entire shop covered with a thick layer of dust while doing the body work on the car. I actually thought about buying one of those cheap outdoor shelters and setting it up in the shop to do the body work in. That would have been somewhat of a pain, but would have worked and was do able. Then I was in the shop brain storming with my wife and she asked about taping plastic to the ceiling and making curtains around an area. That had also crossed my mind but I knew from experience that the tape would come loose and that I would be battling falling plastic walls all the time. Tape to the ceiling is a good temporary solution. Something for a couple days of work, but not a 3, 4, 6 months or more project.
I thought about it a little more and came up with a solution that will work very well I think. It will work for as long as I need it to, come down easily when I am dome, but also go back up if needed for another project later. It also cost less than the $300 for the cheapest shelter I could find. That shelter was 8' tall, 10' wide. and 20' long. A little bigger than I would need, but anything smaller would be way to small. Also, the 8" tall for the shelter is in the center of the shelter. The height at the outer walls would be shorter.
My Solution: I basically built a room out of cheap tarps. I bought 4 tarps at Harbor Freight for less than $40. I have 9' ceilings in my shop and these were 9'-4" by either 11'-4" or 18'-4" long. I bought two of each. There are also other size options. I then bought 50' of 1/2" steel conduit. 50' of 3/4" and 10' of 1" steel conduit. I also bought a few 1/2" copper pipe hangers or mounts. I used the 1/2" conduit and copper pipe hangers to basically create a shower or curtain rod assembly along the ceiling in the size and shape of the area that I wanted. It ended up being 10'-4" wide and 18' long. This size is due to truss spacing in the attic and a few other obstacles that I had to miss or go around. Doing this I get the benefit of the 9' ceilings, the lights that are already there, and the air hoses that are already there for air tools. I zip tied the tarps to these rods. The zip ties can easily be cut later when I am done with the room. The rods will always be on the ceiling for later use if needed. I zip tied the 3/4" conduit to the bottom of the tarps to hold them down and help keep them from moving or floating around. The 1" conduit went on the ceiling with two 1" copper hangers (one at each end) to serve as an actual curtain rod. I used cheap shower curtain hooks to hang the last tarp to this rod as a door/curtain that can be opened or closed. The room is in front of my two post lift so that I will easily be able to roll the car out and remove the body and place it on the cart or vice versa and roll it back into the room. I had an old dust collector that I ran a couple of dusts to to create a draft to keep dust in the room. I am not sure how much dust will be collected. Only time will tell. The room its self cost less than $200 and the duct work pieces was another $70.
This is how I used the 1/2" copper hangers and the 1/2" steel conduit to make curtain rods for hanging the tarps. Two walls up. You can see the two post lift in the middle of the shop. Three walls up. Three lights and two air hoes inside. I probably move in a portable light also. The old dust collector. I ran two ducts from it into the walls in the back of the room.
No, you disconnect the flex lines from the tank and connect them to each side of the fuel gauge fitting. The tank is out of the test loop. Your real leakage concerns are at the ss tubing flares and flex lines that you assembled. As long as you sealed and torqued the 1/4� npt to AN fittings at the tank supply/return properly, they very rarely leak.
BTW, excellent fiberglass work! Your diagnostic and repair approach is spot on.
I am still busy with my side project out of state but have been collecting parts to have ready for when I have time and get back to the car.
I was not happy at all with the fitment of the front inner fenders that I had bought, so I ended up sending those back. I managed to find some custom parts that I like a whole lot better. Details below.
I happened to pay a visit to my friend Steve Snow up in Saginaw MI looking for widened rear quarters. He owns "Dynamic Corvettes" and does a lot of custom cars and works on nothing but corvettes. I went up there looking for widened rear quarter panels. The drivers rear quarter on my car had been damaged and repaired but did not match well with the exhaust valance for my car. So I decided to look for widened rear quarters. I figured that if I had to replace the drivers side, why not replace both sides and make them wider. I found that Steve has a mold and makes a set of C2 quarter panels that are 1.5" wider than stock. While I was up there I found out that he also makes the front inner fenders as well as a number of other custom parts ( That is when I decided to send the other inner fenders back). What I liked about his inner fenders is that they delete the rubber seals on the inside tops and replace them with bonding strips. Also the flange that bonds to the bottom of the hood surround is changed to bond to the back side of the hood drip edge on the hood surround. This makes for a cleaner look under the hood. The third thing is that you can get custom panels that go from the back of the inner fender to the fire wall to smooth the engine compartment out. These panels can be made to be removable and can be used to hide things like the battery on the passenger side or what ever else you want to hide behind them.
I also bought a custom firewall cover that smooths out the firewall and comes with a cover to hide the windshield wiper motor.
These parts are all hand laid fiberglass and are much thicker than any other hand laid parts that I have seen
So, I have now bought the two rear widened quarter panels, the two front inner fenders, the custom firewall, The front upper and lower nose pieces, and the custom panels that go between the inner fenders and the firewall. All waiting for me to get back to work.
Passenger side rear quarter panel with inner splash panels. Drivers side rear quarter panel taped to the car. Custom Firewall cover. On the right side is the cover for the wiper motor. I will need to cut that off and then fit it to the opening around the wiper motor which also needs to be cut out.
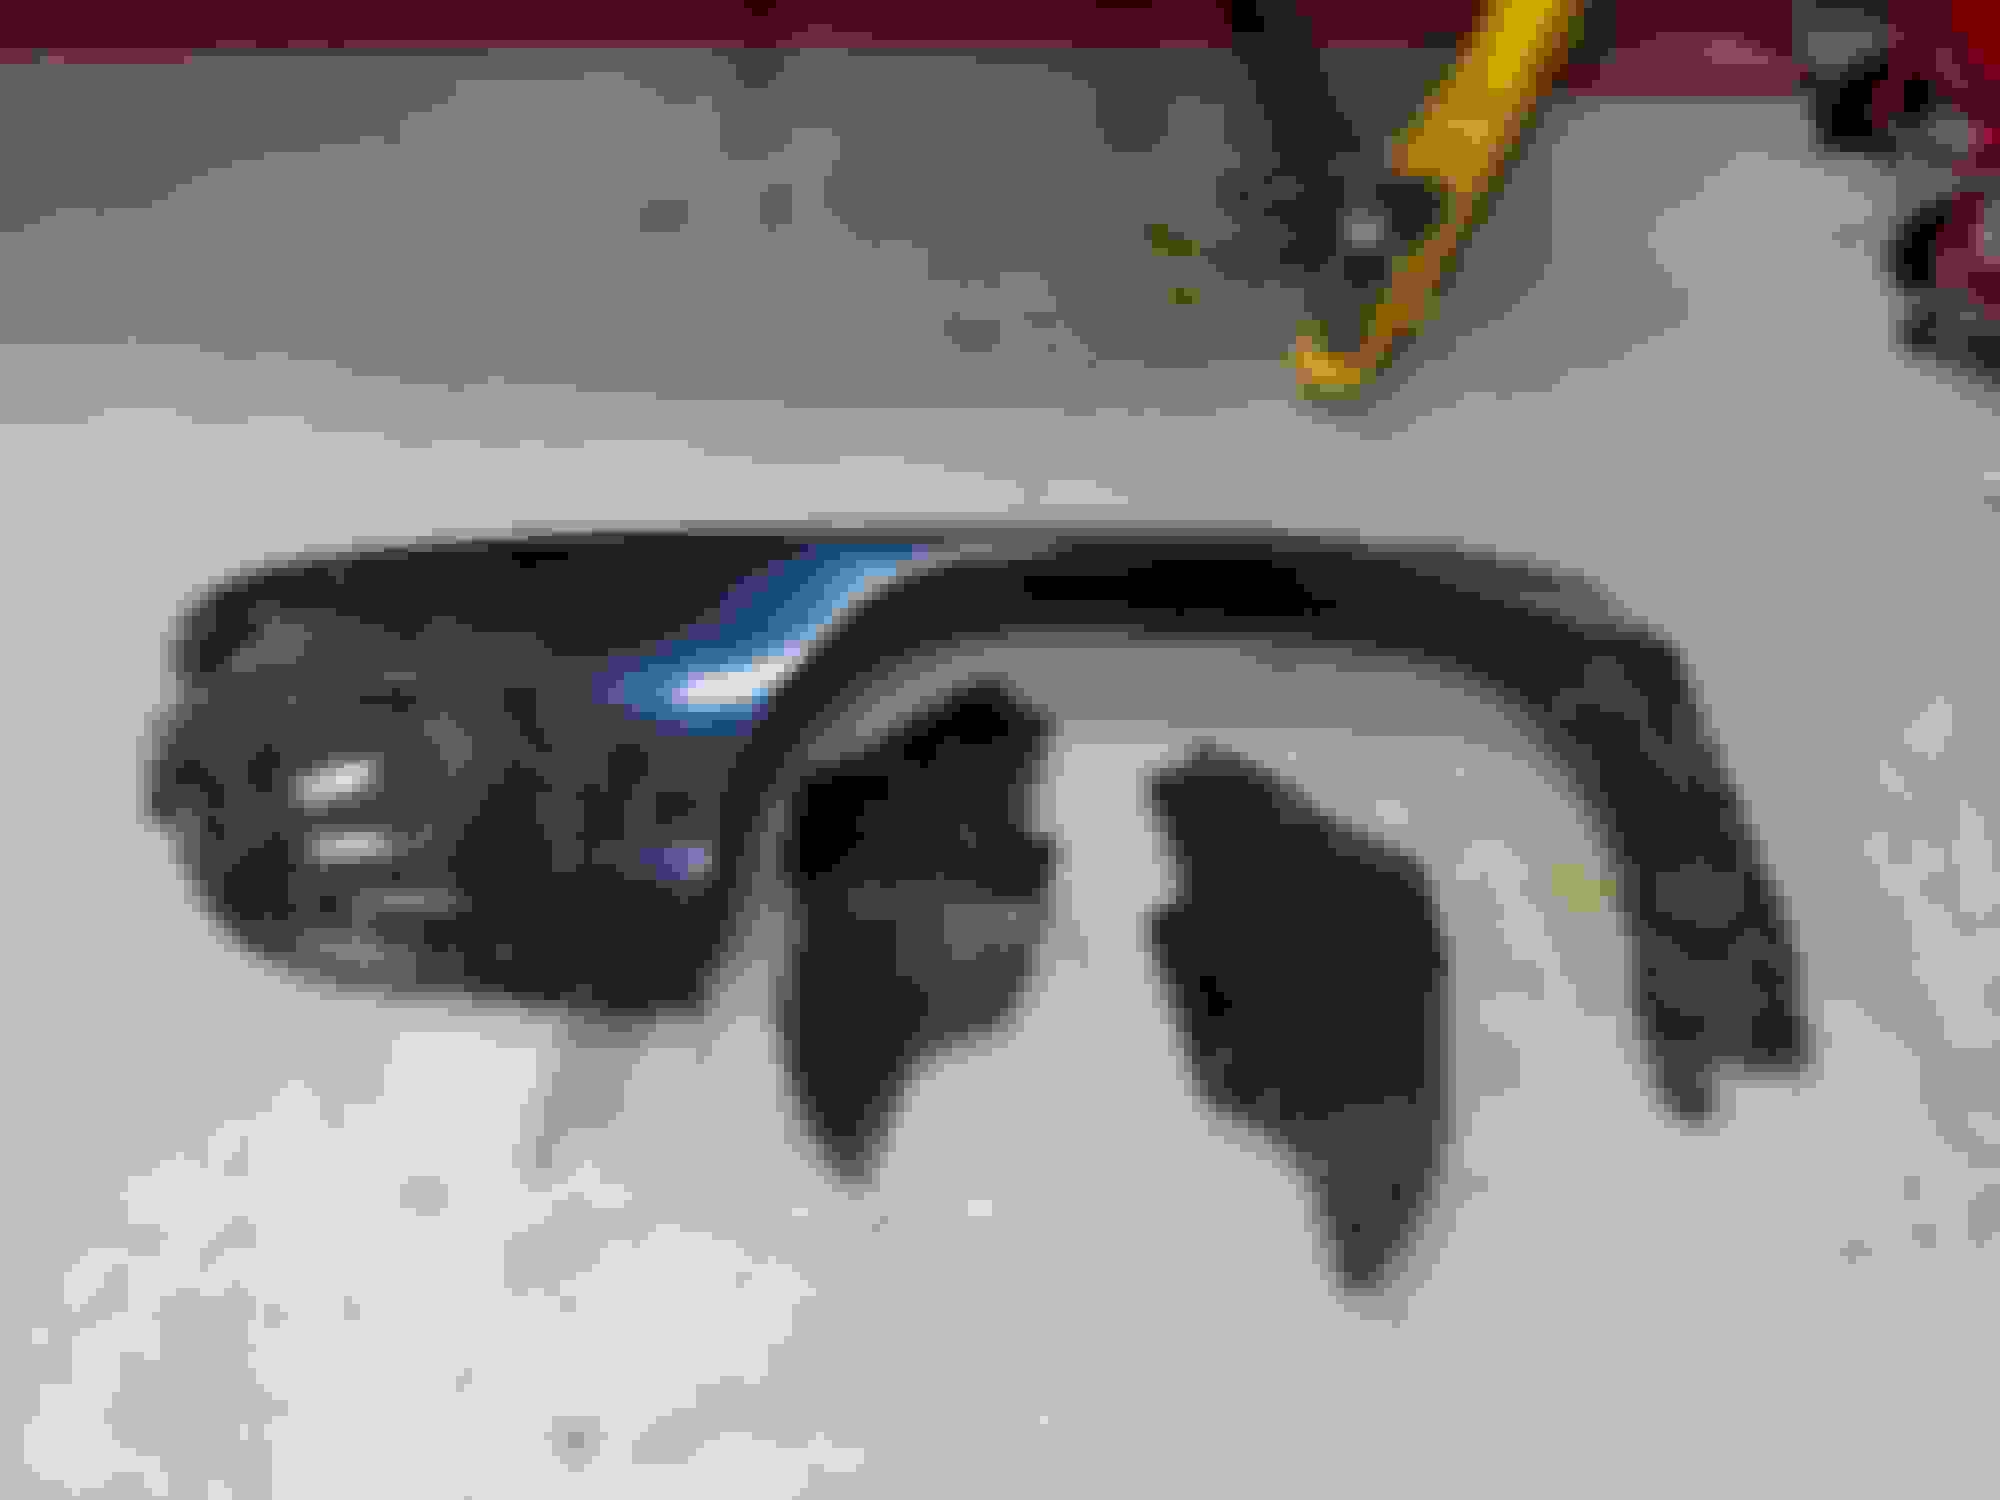
Below are pictures of my new front inner fenders and the custom side panels.
Left and right front inner fenders. I will need to cut the openings for the front suspension. Here you can see the flange that will go up behind the drip edge on the hood surround. You can also see the bonding flanges that replace the seals up under the fenders. These are the custom engine compartment panels. The two brackets on the left bond to the firewall and serve as a mounting points for the custom panels. Here you can see how the custom panels will mount to the inner fenders. Where you see my hand is where the fire wall will be. This will smooth out the engine compartment and will serve as great places to hide things out of sight.
I tend to believe that your funky looking block could be fixed. The internal condition seems like it may be key. Perhaps a sleeve on the inside and a proper cast iron weld on the outside?
I got them from "Dynamic Corvettes" in Saginaw MI. They have a website so give them a call. But, the panels work with their inner fenders which are also custom. You would really need their inner fenders, the panels, and the firewall. I believe that they sell all those parts as a kit.
Well, I have a few weeks before I have to travel again, so maybe I can get some things done. I already spent a week just catching up on the house and general maintenance. Now on to the car.
I am going to start fitting front inner fenders and will need to get the body and chassis is position for multiple "body on", "Body off" scenarios. But before I do that, I wanted to get the left side rear quarter off and fit the new one. This way when the body is back on the chassis, I can measure for wheels. I really really really want to order the custom wheels for the car.
I started by sanding off the primer to expose the seams. Then I ground out the panel adhesive and used a combination of wood chisels and a large scrapper to get the quarter panel off. About four hours later, the quarter panel is on the floor. The goal here was to get the quarter panel off without damaging any of the bonding strips or flanges. That was accomplished, and I didn't really damage the old quarter panel. Maybe it can be sold ?? I will have to grind down all that panel adhesive and clean up the bonding strips and flanges next. I also ordered new rear vertical bonding strips. The one on this side is damaged where the exhaust valance bolts on. This is what the repair looks like on the back. They pretty much filled in the areas for the bumper brackets and very sloppily threw some fiberglass matting on the back. If the rear exhaust valance had been fitted to this repair when it was made, I might have just cleaned this up and not messed with it. But the rear exhaust valance was off by more than a half inch and would have required that this repair be completely re-done.
I bought a very expensive "Billet Specialties" alternator and took it apart.
I did this to have it "Bright Clear Anodized". I like the look of that finish and just do not like polished aluminum. Polished aluminum is just to hard to take care of. If you touch it, it scratches. The bright clear anodizing cleans very well with soap and water. I had all the polished aluminum parts for my serpentine belt kit clear anodized so now the alternator matches. I assembled it today.
The alternator in about 20 pieces. The two alternator housing halves and the little access cover were "Bright Clear Anodized" The finished / assembled product.
Way way back I had bought a serpentine belt kit for my big block. When I did, I didn't think that I would want air conditioning, so I bought a kit that did not support it. Stupid me. I guess that I am allowed to change my mine a few times.
Instead of buying a new kit, I called Billet Specialties and they were able to sell me the parts needed to convert the system over. Along with the alternator, I had these parts bright clear anodized also. I managed to get the brackets changed over the other day when I had a little spare time.
Here is a picture with the old setup. The wood piece going across the front is a mockup for a spreader bar that I am thinking about making. The only different parts are a couple of brackets and the idler pulley which is not picture here. The new brackets are pictured at the top. The new setup minus the alternator and the air conditioning compressor.
I managed to get one of the new rear quarters hung. (Nothing bonded yet, a long ways off for that) I ordered two new rear vertical bonding strips and am waiting for those. Those are the bonding strips that go between the rear of the rear quarter and the tail light panel.
Also, I have ran into a snag that I need to investigate. I was thinking that the stock bumpers would still work with these panels. I may have been wrong. I currently have a large gap between the quarter panel and the tail light panel and exhaust valance which make the rear of the car wider. Which makes sense, but also means that stock bumpers will not fit around the corners now.
FYI: My temporary room that I made for bodywork works really works well for containing the dust. The old dust collection system that I used works very well but I had to change it so that it exhausted directly outside instead of using the dust collector bags.
I have also hung the new inner front fenders. These fit very well and I am very happy with their appearance. These also are clamped in place right now. My next step will be to get the body in a position that I can set it back on the chassis. I need to be able to lift the body off and set it on the chassis several times. If you notice, the new inner fenders do not have clearance openings for the front suspension in them. This was done so that they could be used with any suspension system or custom chassis. Those openings will be first. Then get the radiator support in. Then the hood. Get everything lined up and fitted, then I can think about bonding stuff.
Passenger side Drivers side. Notice how these look so much cleaner under the drip edge on the hood surround.


 02-27-2019, 08:22 AM