




Middle Console
Safety Car


Joined: Nov 2006
Posts: 4,449
Likes: 0

on my 74 Ive got to take the top section out first (3 screws) its got the wiper controle on it, Im really not sure what yours looks like, once the top section with the wiper controle and the vents is out there are 3-4 screws on each side and one on the top holding it to either side of the dash pad and the top pad, at that point its "free" but it still a b!tch to get out, you need to push that top air duct back (it connected to the vents that you took out first, just make sure it dosent hold the gague bezzel back) pull the top forward then TRY to lift it all out, mine has a couple bolts that stick down twards the transmition that get hung up EVERY time, and thats what you need to pull over the center shift plate
once you have it out it goes back in super easy, at least mine does, now there could be, and more than likely is, a diffrence in our years, but that should get you started, it should just be held in with a few screws, you dont need to pull anything else out to get it out
Hope that helped a little bit,
Miles
once you have it out it goes back in super easy, at least mine does, now there could be, and more than likely is, a diffrence in our years, but that should get you started, it should just be held in with a few screws, you dont need to pull anything else out to get it out
Hope that helped a little bit,
Miles
Safety Car


Joined: Jun 2004
Posts: 4,364
Likes: 221
From: Beecher Illinois
A bit different on 77-82.
Remove the carpeted console side panels, 3 screws each side.
2 screws up from below, console to gauge bezel. 1 each side.
Remove the 4 screws from the cluster face, one each side, 2 at the top.(all those allen screws are cosmetic!)
Pull the ***** off the radio and remove the retaining nuts for the radio(they're probably round with slots in them, needlenose pliers works)
Now, I like to remove the screws from the console too, just the screws. Gives you a little wiggle room to work the gauge cluster out. I've even dropped the defroster switch for more room.
Lay a rag over the console under the edge of the cluster to avoid scratching and CAREFULLY pull the gauge cluster forward keeping in mind there's a light housing at the top. When it's free of the dash, reach in back and pull the one large connector from the printed circuit and the connector at the top for the light(heater floodlite).
Remember, it's OLD plastic. Very brittle!
Remove the carpeted console side panels, 3 screws each side.
2 screws up from below, console to gauge bezel. 1 each side.
Remove the 4 screws from the cluster face, one each side, 2 at the top.(all those allen screws are cosmetic!)
Pull the ***** off the radio and remove the retaining nuts for the radio(they're probably round with slots in them, needlenose pliers works)
Now, I like to remove the screws from the console too, just the screws. Gives you a little wiggle room to work the gauge cluster out. I've even dropped the defroster switch for more room.
Lay a rag over the console under the edge of the cluster to avoid scratching and CAREFULLY pull the gauge cluster forward keeping in mind there's a light housing at the top. When it's free of the dash, reach in back and pull the one large connector from the printed circuit and the connector at the top for the light(heater floodlite).
Remember, it's OLD plastic. Very brittle!
Last edited by KapsSA; Mar 28, 2009 at 06:56 PM.

Race Director

Joined: Dec 2007
Posts: 14,345
Likes: 4
From: Hartselle AL
St. Jude Donor '09
A bit different on 77-82.
Remove the carpeted console side panels, 3 screws each side.
2 screws up from below, console to gauge bezel. 1 each side.
Remove the 4 screws from the cluster face, one each side, 2 at the top.(all those allen screws are cosmetic!)
Pull the ***** off the radio and remove the retaining nuts for the radio(they're probably round with slots in them, needlenose pliers works)
Now, I like to remove the screws from the console too, just the screws. Gives you a little wiggle room to work the gauge cluster out. I've even dropped the defroster switch for more room.
Lay a rag over the console under the edge of the cluster to avoid scratching and CAREFULLY pull the gauge cluster forward keeping in mind there's a light housing at the top. When it's free of the dash, reach in back and pull the one large connector from the printed circuit and the connector at the top for the light(heater floodlite).
Remember, it's OLD plastic. Very brittle!
Remove the carpeted console side panels, 3 screws each side.
2 screws up from below, console to gauge bezel. 1 each side.
Remove the 4 screws from the cluster face, one each side, 2 at the top.(all those allen screws are cosmetic!)
Pull the ***** off the radio and remove the retaining nuts for the radio(they're probably round with slots in them, needlenose pliers works)
Now, I like to remove the screws from the console too, just the screws. Gives you a little wiggle room to work the gauge cluster out. I've even dropped the defroster switch for more room.
Lay a rag over the console under the edge of the cluster to avoid scratching and CAREFULLY pull the gauge cluster forward keeping in mind there's a light housing at the top. When it's free of the dash, reach in back and pull the one large connector from the printed circuit and the connector at the top for the light(heater floodlite).
Remember, it's OLD plastic. Very brittle!

Been there, done that, got the tee-shirt.
Will add that is it a bit easier to remove the carpet side panels with the seats removed. Also, if needed, removing/loosening/shifting the center console/shifter section.

Thread Starter
Heel & Toe

Joined: Oct 2008
Posts: 21
Likes: 0
i unscrewed everything that you guys told me to, but it is catchin on the sides and i dont want to put too much force because i will break it. If anyone knows how to fix my problem feel free to respond.
Corvette Stories
The Best of Corvette for Corvette Enthusiasts

Top 10 Most Explosive Corvettes Ever Made: Power-to-Weight Ratio Ranked!
Joe Kucinski
150 hp to 1,250 hp: Every Corvette Generation Compared by the Specs That Matter
Joe Kucinski
8 Coolest Corvette Pace Cars (and Replicas) of All Time
Verdad Gallardo
Top 10 Corvette Engines RANKED by Peak Torque (70+ Years of Muscle!)
Joe Kucinski
Corvette ZR1X Will Be Pacing the Indy 500, And Could Probably Race, Too!
Verdad Gallardo
Top 10 Corvettes Coming to Mecum Indy 2026!
Brett Foote
Top 10 C9 Corvette MUST-HAVES to Fix These C8 Generation Flaws!
Michael S. Palmer
10 Revolutionary 'Corvette Firsts' Most People Don't Know
Joe Kucinski
5 Reasons to Upgrade to an LS6-Powered Corvette; 5 Reasons to Stay LT2
Michael S. Palmer
Intermediate
Joined: Aug 2007
Posts: 36
Likes: 0
From: Las Vegas Nevada



Race Director

Joined: Apr 1999
Posts: 11,520
Likes: 13
From: CORVETTE 77 385 C.I. TEXAS
Originally Posted by KapsSA
The radio retaining nuts? On the 2 shafts for the *****.
For the stereo, I normally remove the pass. side console panel, just the 1 screw in the front will do.

Last edited by Ganey; May 17, 2009 at 06:29 PM.
Safety Car
Joined: Jun 2004
Posts: 4,364
Likes: 221
From: Beecher Illinois
Did you read my entire post, number 3?
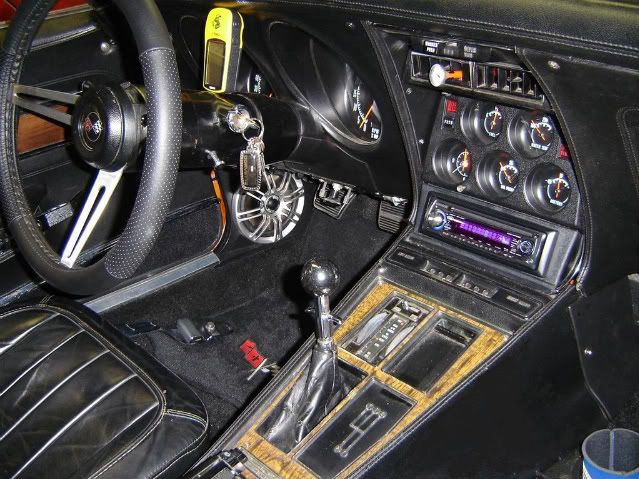
The console is the bottom part with the shifter and heater controls. You're trying to remove the center cluster.
Remove just the screws in the console, 2 each side and 2 from the rear into the parking brake cover. That should give you some additional wiggle room to get the cluster out. Might even help to unscrew the heater control and defroster switch.
My intent is to gain as much access so as to not crack anything.
You DID get the 2 screws from the shifter console going upward into the gauge cluster housing?
