
Whatcha think about them lights?
 05-20-2009, 01:40 PM
#21

They're not nearly as bad as those factory stock Acuras (which are the worst) or BMW's or the like. I had my dad drive it in one direction while I drove another car in the other direction, and they're not blinding to other drivers at all.
Alright, there's no way I'm doing a separate PM write up to everyone, so I'll so it right here. Unfortunately, I don't have pictures of everything, but I'll write this out as clearly as I can so if you decide to do it, these should serve as instructions pretty well.
Here are the actual headlights themselves-> http://cgi.ebay.com/ebaymotors/58-82...ht_1884wt_1183
This kit includes the headlight housings, 4 Fezo 6000k H4 bulbs, and some rubber housings on the back that you're going to throw away because the headlights would never fit if you used them.
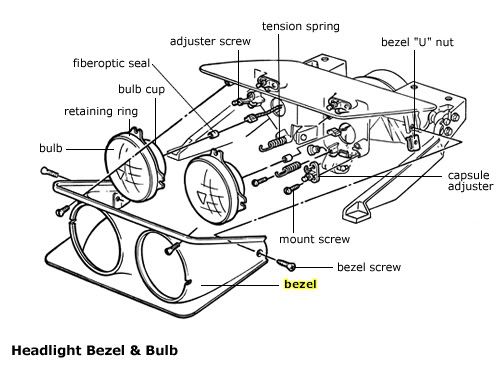
First thing you need to know, these lights do not bolt right in. You WILL need to do some cutting and grinding on your headlight housings (not the painted bezels, but the actual headlight flippy object itself) to get them to fit. If you don't like the idea of doing that, stop reading now. The reason you need to cut is because these housings are quite a bit deeper than a stock bulb (which doesn't have a housing). Step one is to remove the headlight bezels and the original bulbs. Then refer to the diagram below.
This diagram should be useful:
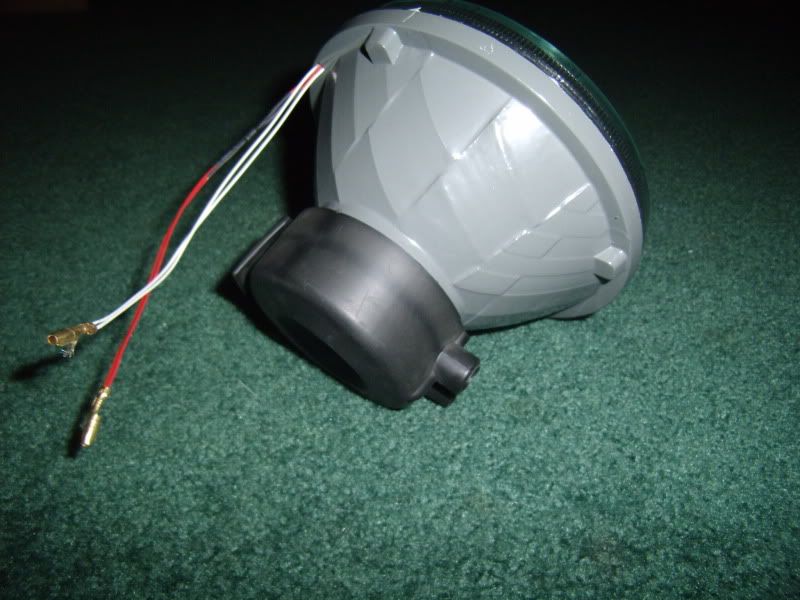
As you can see, the stock bulb is just that, a bulb with no housing.
This is what we'll be trying to mount there. Remember, we're not using the black rubber thing. You'll never get it to fit that way:
Looking at the exploded diagram, you can see the two holes in the actual headlight assembly that the plugs come through. Those two holes need to be expanded in diameter to at least the size of the back of the new housings. This is without a doubt the hardest part of the job. I tried using a die grinder, but the material was too soft and ended up melting in between the blades on the grinder. The best technique I found was to trace the diameter of the new housings onto the headlight assembly with a marker, then drill out as many holes as I could using a hand drill, and then come through with a combination of the die grinder and a hand file to clear out what was left. This part is up to you. Do whatever you think would work best. This will take some time, sweat, and patience.
After you have the holes drilled, it's now a wiring game. We'll tackle the low/high beams first.
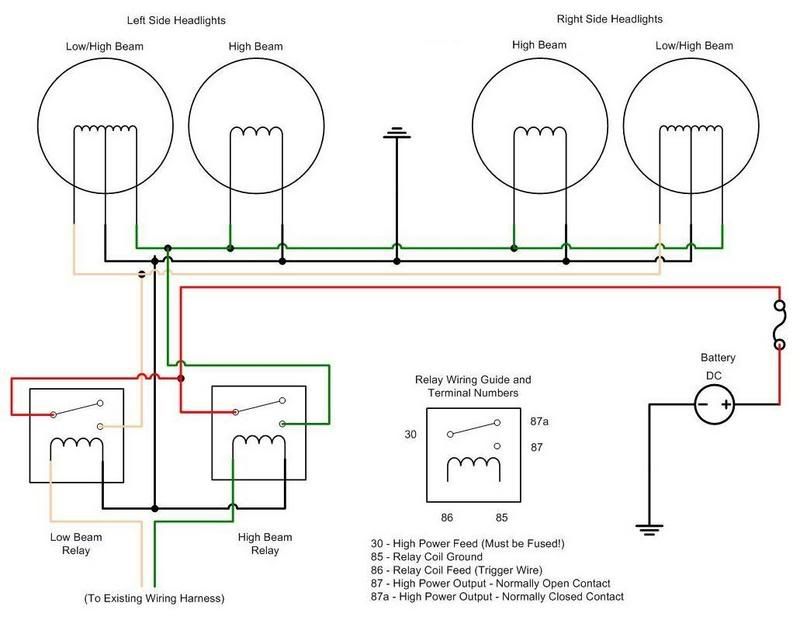
You could probably run the headlights off of the existing harness, but i didn't want to risk a fire since these pull so much more current, so I put in some separate relays. This is the diagram for the low/high beams:
You can pick up the relay at any parts store. They're just standard fog light / accessory relays. You'll need 3 for the whole job. You'll also need butt connectors, crimpers, strippers, an in-line fuse holder with a 20 Amp fuse, 12 gauge and 18 gauge wire on a spool, 12 and 18 gauge female terminals, and 12 gauge ring terminals. Lots of electrical tape helps, too.
What you need to find is the bundle of wires coming through the firewall on the drivers side that goes all the way up the inner fender to the headlights. Inside this bundle you'll find a beige wire and a green wire (see the diagram). Pull these two wires out of the plastic tube that they are in far enough to be able to work on them. The best place to pull them is right next to the alternator, since that's where you'll be pulling your power from. Cut these two wires, strip them, and place female terminals on all of the ends (you should have 4).
::NOTE:: For the next two steps, I tell you to splice your lines into 3 sections. 2 are for the low/high beam relays, and the third is for the halos. Just plan on having one extra positive and ground lead for now.
Next, you'll need to get your power source. We'll be getting it from the battery terminal on the alternator. For this, attach a 12 gauge ring terminal to your 12 gauge wire, and attach it to the alternator. This wire is also where you'll want to splice in your 20 amp fuse. On the other side of the fuse, you need to splice the single wire into 3 separate wires (to give power to all 3 of your relays). There are a few techniques for this. I ran one long wire and spliced in 2 shorter leads coming off of it, for a total of 3. Attach a female terminal at the end of each wire.
Next, we need a ground. I got mine from a bolt on the core support just in front of the hood prop. Any ground will work, but this one was the closest. Again, take your 12 gauge wire, attach a ring terminal, and put it under the bolt. Do the same thing with the other end of the wire, splicing it into 3 leads for all 3 relays.
Now it's just a matter of following the diagram and plugging everything in. The factory harness's plugs that go into the bulbs are the same for the new ones, so no cutting or splicing there.
Now we can do the halos. Here is the diagram:
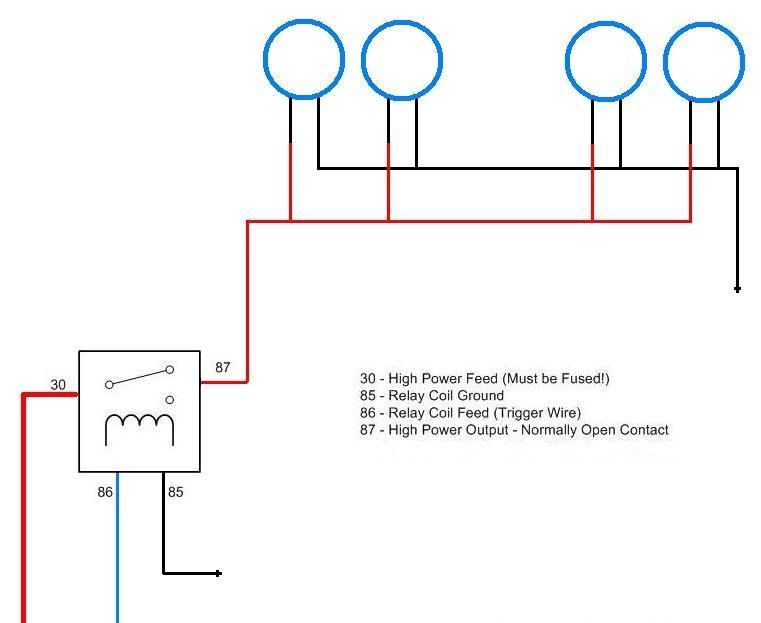
This harness is a bit different, because you need to create your own, since there is no existing one. You'll also need a switch to trigger the halos.
This is the one I used:
You can buy it here:
http://cgi.ebay.com/ebaymotors/ws/eB...#ht_500wt_1198
I mounted my switch in the consul in between the window switches (where power mirror switch would normally be, but I don't have that option). You can put it wherever you want, really. That was the best spot for me.
Okay, so we already have our existing power source and ground from the previous steps, so we can connect those to the third relay. Next you need to run your trigger wire (18 gauge. Halos don't pull much current) from wherever you mount the switch to the relay. Attach an 18 gauge female terminal on both ends of this wire. One will connect to the relay, the other to the switch. Since mine was mounted in the consul, I ran it along the trans tunnel and through the firewall. This allowed me to put the wire in the same bundle as the other headlight wires.
Next, run another 18 gauge wire from the trigger output on the relay (connected with a female terminal) to all of the positive leads on the halos. Just a bunch of cutting, splicing, and crimping here. You also need to run all of the negatives from all of the halos. I ran mine to the same ground we used before. Again, just 18 gauge here with a ring terminal.
Okay, the last thing we need to do is give power and ground to the switch. Since mine was mounted in the consul, it was right next to the harness for the rear window defogger. You can draw your power and ground from wherever you want. That's up to you.
I think that's about it. Good luck!
Alright, there's no way I'm doing a separate PM write up to everyone, so I'll so it right here. Unfortunately, I don't have pictures of everything, but I'll write this out as clearly as I can so if you decide to do it, these should serve as instructions pretty well.
Here are the actual headlights themselves-> http://cgi.ebay.com/ebaymotors/58-82...ht_1884wt_1183
This kit includes the headlight housings, 4 Fezo 6000k H4 bulbs, and some rubber housings on the back that you're going to throw away because the headlights would never fit if you used them.
First thing you need to know, these lights do not bolt right in. You WILL need to do some cutting and grinding on your headlight housings (not the painted bezels, but the actual headlight flippy object itself) to get them to fit. If you don't like the idea of doing that, stop reading now. The reason you need to cut is because these housings are quite a bit deeper than a stock bulb (which doesn't have a housing). Step one is to remove the headlight bezels and the original bulbs. Then refer to the diagram below.
This diagram should be useful:
As you can see, the stock bulb is just that, a bulb with no housing.
This is what we'll be trying to mount there. Remember, we're not using the black rubber thing. You'll never get it to fit that way:
Looking at the exploded diagram, you can see the two holes in the actual headlight assembly that the plugs come through. Those two holes need to be expanded in diameter to at least the size of the back of the new housings. This is without a doubt the hardest part of the job. I tried using a die grinder, but the material was too soft and ended up melting in between the blades on the grinder. The best technique I found was to trace the diameter of the new housings onto the headlight assembly with a marker, then drill out as many holes as I could using a hand drill, and then come through with a combination of the die grinder and a hand file to clear out what was left. This part is up to you. Do whatever you think would work best. This will take some time, sweat, and patience.
After you have the holes drilled, it's now a wiring game. We'll tackle the low/high beams first.
You could probably run the headlights off of the existing harness, but i didn't want to risk a fire since these pull so much more current, so I put in some separate relays. This is the diagram for the low/high beams:
You can pick up the relay at any parts store. They're just standard fog light / accessory relays. You'll need 3 for the whole job. You'll also need butt connectors, crimpers, strippers, an in-line fuse holder with a 20 Amp fuse, 12 gauge and 18 gauge wire on a spool, 12 and 18 gauge female terminals, and 12 gauge ring terminals. Lots of electrical tape helps, too.
What you need to find is the bundle of wires coming through the firewall on the drivers side that goes all the way up the inner fender to the headlights. Inside this bundle you'll find a beige wire and a green wire (see the diagram). Pull these two wires out of the plastic tube that they are in far enough to be able to work on them. The best place to pull them is right next to the alternator, since that's where you'll be pulling your power from. Cut these two wires, strip them, and place female terminals on all of the ends (you should have 4).
::NOTE:: For the next two steps, I tell you to splice your lines into 3 sections. 2 are for the low/high beam relays, and the third is for the halos. Just plan on having one extra positive and ground lead for now.
Next, you'll need to get your power source. We'll be getting it from the battery terminal on the alternator. For this, attach a 12 gauge ring terminal to your 12 gauge wire, and attach it to the alternator. This wire is also where you'll want to splice in your 20 amp fuse. On the other side of the fuse, you need to splice the single wire into 3 separate wires (to give power to all 3 of your relays). There are a few techniques for this. I ran one long wire and spliced in 2 shorter leads coming off of it, for a total of 3. Attach a female terminal at the end of each wire.
Next, we need a ground. I got mine from a bolt on the core support just in front of the hood prop. Any ground will work, but this one was the closest. Again, take your 12 gauge wire, attach a ring terminal, and put it under the bolt. Do the same thing with the other end of the wire, splicing it into 3 leads for all 3 relays.
Now it's just a matter of following the diagram and plugging everything in. The factory harness's plugs that go into the bulbs are the same for the new ones, so no cutting or splicing there.
Now we can do the halos. Here is the diagram:
This harness is a bit different, because you need to create your own, since there is no existing one. You'll also need a switch to trigger the halos.
This is the one I used:
You can buy it here:
http://cgi.ebay.com/ebaymotors/ws/eB...#ht_500wt_1198
I mounted my switch in the consul in between the window switches (where power mirror switch would normally be, but I don't have that option). You can put it wherever you want, really. That was the best spot for me.
Okay, so we already have our existing power source and ground from the previous steps, so we can connect those to the third relay. Next you need to run your trigger wire (18 gauge. Halos don't pull much current) from wherever you mount the switch to the relay. Attach an 18 gauge female terminal on both ends of this wire. One will connect to the relay, the other to the switch. Since mine was mounted in the consul, I ran it along the trans tunnel and through the firewall. This allowed me to put the wire in the same bundle as the other headlight wires.
Next, run another 18 gauge wire from the trigger output on the relay (connected with a female terminal) to all of the positive leads on the halos. Just a bunch of cutting, splicing, and crimping here. You also need to run all of the negatives from all of the halos. I ran mine to the same ground we used before. Again, just 18 gauge here with a ring terminal.
Okay, the last thing we need to do is give power and ground to the switch. Since mine was mounted in the consul, it was right next to the harness for the rear window defogger. You can draw your power and ground from wherever you want. That's up to you.
I think that's about it. Good luck!
well. this is a keeper!


 if nothing happens in the next 24 hours, ill post one where i got mine (dont want to hijack his thread)
  05-20-2009, 05:23 PM
#24
Drifting

Thread Starter
Member Since: May 2007
Location: North Royaton Ohio
Posts: 1,491
Likes: 0
Received 2 Likes
on
2 Posts

mrmarchuk, I saw your thread on this earlier. Did you do anything any differently? I'd be interesting in hearing how you did.
Irconcross, those are aircraft landing lights, right? How did you install them? They've got to draw a ton more current. I'd love to see a shot of them at night. I was going for better low beams, too, but I bet the ones you have are nuts.
Irconcross, those are aircraft landing lights, right? How did you install them? They've got to draw a ton more current. I'd love to see a shot of them at night. I was going for better low beams, too, but I bet the ones you have are nuts.
05-20-2009, 08:29 PM
#25
Race Director

I cut a small slot in the headlight bucket to make the filaments show on the outsides. Otherwise the bulb sets funny, {barely visible in the center} of the aircraft bulb. My 62 has a better picture to view the filament below
I have had zero headlight switch problems and they are wired into the original harness by unsoldering the lugs from the aircraft bulb and soldering the original high beam connectors {lugs} back on the aircraft bulb. This is a optional method and I guess I didn`t have anything better to do. The aircraft lights have screws as the connector and not a spade connector.....
No, I did not use any extra relays. And yes the low beams are a problem. Haligen bulbs help H5002 if I recall correctly
05-20-2009, 08:35 PM
#26
Safety Car

05-20-2009, 09:17 PM
#27
Instructor

Member Since: Sep 2007
Location: Norton MA
Posts: 197
Likes: 0
Received 0 Likes
on
0 Posts
I didn't get to do a full read-through but are these just new bulb setups in factory housings or are they new housings altogether? The reason I ask is because factory HID's on cars like Acura, BMW, Audi, etc. use D2S/D2R bulbs that have a crisp cutoff line to keep from blinding other drivers. It may seem like they are super bright, but if you get below the cutoff line you can really tell a difference. It's on cars like luxury SUV's that are a bit brighter because they're higher up. HID's in headlights not designed for them throws a lot of extra light outside of where it's supposed to be, and even though it may not seem it from the driver's seat, there is a lot of extra glare to other drivers. A good website to check out is www.danielsternlighting.com - that guy is a bigtime lighting guru who can point anyone in the right direction lighting-wise. That said, I think the halos are pretty neat looking - clean install.
05-20-2009, 09:29 PM
#28
Drifting
Thread Starter
Member Since: May 2007
Location: North Royaton Ohio
Posts: 1,491
Likes: 0
Received 2 Likes
on
2 Posts
I didn't get to do a full read-through but are these just new bulb setups in factory housings or are they new housings altogether? The reason I ask is because factory HID's on cars like Acura, BMW, Audi, etc. use D2S/D2R bulbs that have a crisp cutoff line to keep from blinding other drivers. It may seem like they are super bright, but if you get below the cutoff line you can really tell a difference. It's on cars like luxury SUV's that are a bit brighter because they're higher up. HID's in headlights not designed for them throws a lot of extra light outside of where it's supposed to be, and even though it may not seem it from the driver's seat, there is a lot of extra glare to other drivers. A good website to check out is www.danielsternlighting.com - that guy is a bigtime lighting guru who can point anyone in the right direction lighting-wise. That said, I think the halos are pretty neat looking - clean install.
05-21-2009, 12:43 AM
#30
Instructor
Member Since: Nov 2007
Location: Corpus Christi TX
Posts: 183
Likes: 0
Received 0 Likes
on
0 Posts

Ironcross where did you find the aircraft landing lights what kind did you use and how expensive are they
Last edited by Recon12thman; 05-21-2009 at 12:46 AM.
05-21-2009, 10:14 AM
#31
Racer
Member Since: Jan 2009
Location: portland or
Posts: 422
Likes: 0
Received 0 Likes
on
0 Posts
hey GC, no i havent even done em yet. i'm going to be swapping my engine so ill save the wiring work till then. as for the headlights, they run off the stock wires, plug right in
05-21-2009, 12:48 PM
#32
Instructor
Member Since: Sep 2007
Location: Norton MA
Posts: 197
Likes: 0
Received 0 Likes
on
0 Posts
These aren't HID lights. They're just plain old halogens. What's special about this installation is that it is a sealed housing, which allows you to use whatever kind of H4 bulb you wish, like those Silverstar ones on TV (They are a lot brighter, but they're still just halogens). With the factory ones, you needed to purchase the entire bulb if it burned out. With the new ones, you only need to replace the filament inside.
05-21-2009, 04:55 PM
#33
Racer
Member Since: Aug 2005
Location: Poconos PA
Posts: 380
Likes: 0
Received 0 Likes
on
0 Posts
 maybe I need to get a set to show them what its like to be blind
  .
. They do look really nice though I feel bad for anyone on the other end
