


steering column lower bearing replacement
Race Director


Joined: Dec 1999
Posts: 19,610
Likes: 778
From: Forked River NJ
I have done this on a few columns. Most of the time the bearing is pretty rusted to the shaft. I take a Dremel with a abrasive wheel and cut the bearing off. Polish up the shaft so the install will go together easier. I have always had the column out of the car which makes it easier. Get yourself a new bearing and plastic retainer as you will probably destroy both taking it apart.

Thread Starter
Intermediate

Joined: Aug 2008
Posts: 27
Likes: 0
Thanks. I am in the middle of a body off restoration. The lower column is readily available. Based on your input my bearing is rusted to the shaft. I thought it was part of the shaft. When I rotate the steering shaft it does not appear that there are any bearings left in the race. I have ordered all new parts for the bearing replacement.
Race Director
Joined: Dec 1999
Posts: 19,610
Likes: 778
From: Forked River NJ
There is probably only the race still left on the shaft. The shaft should be smooth all the way up. be careful if you cut it. You do not want to get into the shaft. I have one all aprt right now if you need any pictures of it.

Le Mans Master


Joined: Jul 2000
Posts: 6,001
Likes: 113
From: Saginaw Michigan
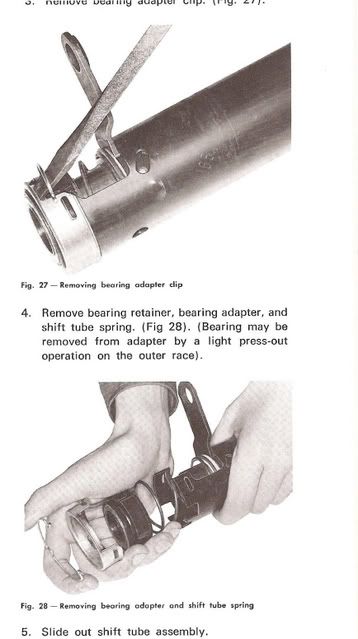
You didn't mention if you had a standard (non-adjustable) column or a T&T. The standard column has the big spring loading the shift tube back up into the column (shown in the above picture). The T&T column does not have a spring.
Jim

Burning Brakes

Joined: Jun 2008
Posts: 1,086
Likes: 1
From: Michigan
I have done this on a few columns. Most of the time the bearing is pretty rusted to the shaft. I take a Dremel with a abrasive wheel and cut the bearing off. Polish up the shaft so the install will go together easier. I have always had the column out of the car which makes it easier. Get yourself a new bearing and plastic retainer as you will probably destroy both taking it apart.
Gordonm, did you have to press together your plastic retainer to the bearing? I bought two bearings and retainers and both had a snap fit.
Corvette Stories
The Best of Corvette for Corvette Enthusiasts

Top 10 Most Expensive Corvettes Ever Sold on Bring A Trailer
Brett Foote
10 Things Every Corvette Owner Needs (2026 Edition)
Michael S. Palmer
8 Most "Only Corvette Owners Understand" Quirks and Problems
Pouria Savadkouei
10 Reasons the C6 Z06 is Still A Performance Benchmark After 20 Years
Joe Kucinski
How Much Horsepower Every Corvette Engine "LOST" in 1972
Joe Kucinski
Top 10 DOs and DON'Ts for Protecting Your Convertible Top!
Michael S. Palmer
Top 10 Most Explosive Corvettes Ever Made: Power-to-Weight Ratio Ranked!
Joe Kucinski
150 hp to 1,250 hp: Every Corvette Generation Compared by the Specs That Matter
Joe Kucinski
8 Coolest Corvette Pace Cars (and Replicas) of All Time
Verdad Gallardo
Thread Starter
Intermediate
Joined: Aug 2008
Posts: 27
Likes: 0
Well I got the old bearing off tonight. I cleaned up the shaft and will replace all of the parts tomorrow including the spring. Is the fit of the new bearing tight which requires it to be driven on with a pipe that fits over the shaft or do I have more work at cleaning up the shaft?
Race Director
Joined: Dec 1999
Posts: 19,610
Likes: 778
From: Forked River NJ
Well I got the old bearing off tonight. I cleaned up the shaft and will replace all of the parts tomorrow including the spring. Is the fit of the new bearing tight which requires it to be driven on with a pipe that fits over the shaft or do I have more work at cleaning up the shaft?
Burning Brakes
Joined: Jun 2008
Posts: 1,086
Likes: 1
From: Michigan
Well I got the old bearing off tonight. I cleaned up the shaft and will replace all of the parts tomorrow including the spring. Is the fit of the new bearing tight which requires it to be driven on with a pipe that fits over the shaft or do I have more work at cleaning up the shaft?
I hope you are using Jim Shea's papers as a guide. There are many opportunities to go wrong if you are rebuilding the complete column. I don't think I could have done it without his papers.
Last edited by 08vycpe; Jan 6, 2010 at 10:13 AM.
Thread Starter
Intermediate
Joined: Aug 2008
Posts: 27
Likes: 0
Well I did a test fit on the bearing, it did slide on by hand with some force but I was able to get it on the shaft. That is the good news. The bad news is I screwed up the plastic retainer trying to press the bearing into it.
How do can I get a copy of Jim's paper. He did paste a part of it on this post. I am only doing the lower bearing. I thought this would be a no brainer. I have several manuals including the shop manual and assembly manual for the 71. All of them avoid directions for replacing the lower bearing. My email is snmnjones@comcast.net. Any help will be greatly appreciated.
How do can I get a copy of Jim's paper. He did paste a part of it on this post. I am only doing the lower bearing. I thought this would be a no brainer. I have several manuals including the shop manual and assembly manual for the 71. All of them avoid directions for replacing the lower bearing. My email is snmnjones@comcast.net. Any help will be greatly appreciated.
Burning Brakes
Joined: Jun 2008
Posts: 1,086
Likes: 1
From: Michigan
Here is the link to Jim's papers. Scroll down and find the one that includes the lower bearing. It's also important to be sure you have the bearing and retainer facing in the correct direction before trying to snap them together. I put some lube on the two parts and used a vice to snap them together. It took some force but not so much that you would damage the bearing. It wouldn't be possible to snap them together by hand. I tried that. assemble them onto the shaft as a subassembly.
http://jimshea.corvettefaq.com/?page_id=4
http://jimshea.corvettefaq.com/?page_id=4
Le Mans Master
Joined: Jul 2000
Posts: 6,001
Likes: 113
From: Saginaw Michigan
Here is the address for the standard column disassembly & repair paper #2 in pdf format.
http://jimshea.corvettefaq.com/wp-co...2rev30jn07.pdf
Unfortunately, I don't think that there is any more information on assembling the lower bearing than you already have here. In fact, I am considering adding some of the comments (such as) using a Dremel grinder to remove the inner race, etc to my paper.
Jim
Thread Starter
Intermediate
Joined: Aug 2008
Posts: 27
Likes: 0
Thanks Jim. I tried pressing the bearing in a replacement seat that I got from Corvette America. The bearing would only go in partially then slid back out. I finally but it in a vice. The pressure applied using the vice cracked the seat. I tried putting the bearing in the original seat and it when in without a problem with a very pronounced click. Since I was able to remove the original seat without damaging it, I am going to stay with it. I guess the new seat was not an exact fit.

Pro


Joined: Dec 2003
Posts: 676
Likes: 36
From: Usa
I have done this on a few columns. Most of the time the bearing is pretty rusted to the shaft. I take a Dremel with a abrasive wheel and cut the bearing off. Polish up the shaft so the install will go together easier. I have always had the column out of the car which makes it easier. Get yourself a new bearing and plastic retainer as you will probably destroy both taking it apart.
 they went together without much pressure from the vise.
Le Mans Master
Joined: Jul 2000
Posts: 6,001
Likes: 113
From: Saginaw Michigan
I am adding a lot of your comments on assembly of the lower bearing to the steering columns to my Disassembly & Repair Papers #2. Here is the text that I am adding. Thanks for all of the tips.
Jim
-----------------------
Replace Lower Column Bearing (Continued)
The previous description on replacing the lower steering column bearing takes into account new old stock (NOS) bearings, plastic adapters, and corrosion free parts. Now that our cars are in the range of thirty to forty years old, NOS is most likely not available. Enterprising suppliers have found their own sources for bearings and possibly the plastic adapter has been retooled. Because of this fact, you may find that parts do not easily slide up the steering shaft nor do they easily snap together. The following are recent comments posted on the Corvette Forum with respect to assembly of the lower bearing.
Sometimes the corrosion on the shaft and bearing is so advanced that there is only the bearing race that remains and it is corroded onto the steering shaft. Take a Dremel type tool with an abrasive wheel and cut the bearing off. Polish up the shaft so that it will go together easier. Obtain a new bearing and plastic adapter as you will most likely destroy both when taking them apart.
Make sure that you assemble the new bearing in the correct orientation to the adapter. Apply some grease to the inside diameter of the adapter to aid in the assembly of the bearing to it.
Original bearings and plastic adapters were a light snap fit. You would hope that obtaining your replacement parts from the same source would result in parts that snap together fairly easily. However, today there may be a slight mismatch of parts and you may have to use a vise to force them together. If the press fit is too great, some people have cracked the plastic adapter when forcing them together. One method would be to freeze the bearing and warm up the adapter. This will greatly reduce the interference fit.
The next area of concern is the fit of the inner bearing race to the steering shaft. Clean up the corrosion on the shaft first. Some people have reported that the inside diameter of the bearing inner race has an o-ring. This could cause the bearing to have fairly high press on forces to the steering shaft. Apply some grease to the shaft and o-ring to aid in the assembly.
Other people have reported no o-ring inside the bearing but that it still needs to be hand forced up the shaft.
Still other people have reported a minor press fit to the shaft that requires the bearing and adapter to be lightly tapped to slide it up the shaft. Obtain a pipe with a one inch ID and tap the bearing so that the tapping force is directly on the inner race to get it up the shaft.

Burning Brakes
Joined: Mar 2004
Posts: 816
Likes: 1
From: Finland
What is your quess, what is nwrong with my steering...
I have 1 year old manual Steeroids R&P system in my standard steering colomn -73 vette.
Today when driving suddenly the steering became very heavy and also a small noise is now there when turning the wheel like a bearing failure...???
I have 1 year old manual Steeroids R&P system in my standard steering colomn -73 vette.
Today when driving suddenly the steering became very heavy and also a small noise is now there when turning the wheel like a bearing failure...???