When you click on links to various merchants on this site and make a purchase, this can result in this site earning a commission. Affiliate programs and affiliations include, but are not limited to, the eBay Partner Network.
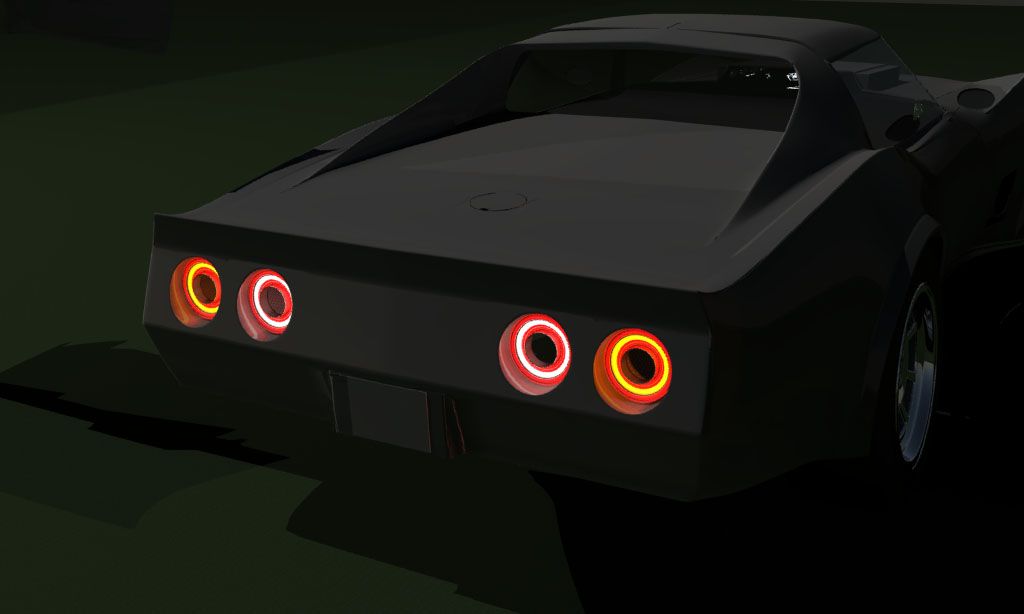
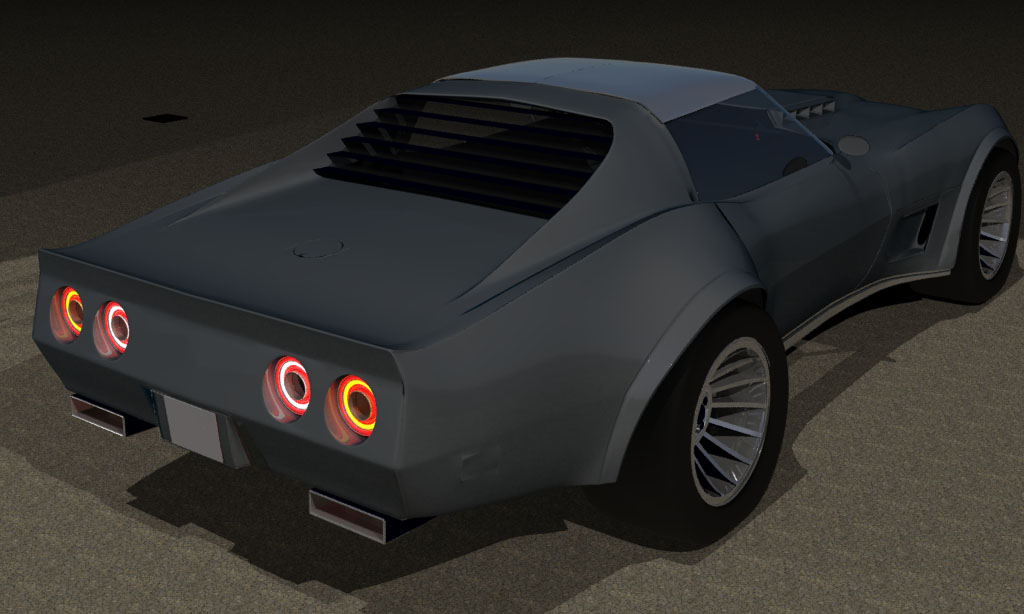
Since I had the 3D software up and running I took the time to pack together the existing mods (exhaust tips, flare and western wheels), with those coming (slanted window, hollow taillight) and those that are dreamed about (rear window louver).
This is what the back should look if I have all the time and resources I need this winter.
Note: current hood shape is irrelevant.
That is really cool. What software are you using for the renders?
The cars gonna be really sweet, and definitely unique.
Thanks Brent.
3DS max is my weapon of choice when to come to CG.
Yesterday I toyed with the rear diffuser idea, and to be frank, all I tried looked goofy.
That's what's cool with 3D, you got all the carbon fiber you want.
I spend most of the night fitting giant spoiler, wings and whatnot, that was gory.
Funny how things come full circle.
The differential was the only part that got transferred from the rotten frame to the donor frame without any restoration.
Back then I considered the state of the whole assembly good enough.
As I had to remove the cross member to drill it, I took the time to finally restore it. unsurprisingly, under the paint I found a lot of rust. As usual, I ground to metal, phosphoric acid treatment and POR15 coating.
That'll kick butt in Autocross and it's also handy knowing whether the quarter you ran over, is going to be heads or tails!
But really, that's a pretty neat setup that is adjustable. Also, what does it take to change the adjustment?
Jack up the rear, release the clamping force of the 4 bolts on each side, then install the clamping block on another of the 4 holes.
Another virtue of the dual mount is that it act like a natural antiroll bar, so I don't need one installed in the back.
That lead me to question whether I need to keep the front antiroll bar, or install a smaller one. I gonna need to look this up.
Yeah that's a cool looking setup, the one I always wanted, so may I repeat, I feel like Xmass
Maybe some of you did notice, in my lastest picture you could see I was missing two bolt for the gas tank shield (top of picture).
I spotted them after posting, and now it's fixed.
I finished the back, installed long TA bolt.
The dual mount spring seems to be smaller than the single one, and I'm pleasantly surprised by how much clearance I get from the tire.
Then I had the chance to see expected stance of the car for the first time.
Driver side:
Passenger side:
The passenger side tire seems to stick out a little more.
It's been doing that since the beginning, I try not to worry about that, betting it would get resolved after an alignment and some rolling.
I did not take it into account when flaring, it's 1.4" on each sides.
The fenders look great! You've made a lot of progress on it lately. Keep it up. We enjoy the pics.
Thank you mpride.
I'm having good feelings, things are coming together nicely, pace is good.
In two months or so snow will show up, and snow means more garage time
Driver side weatherstrip and striker pin installed.
I have to sand some area that actually had overbuild.
Once fixed, door closes nicely.
In the meantime I rehearsed the back window cut on the spare back clip.
I'm glad I did, the area is more complicated than it seems, and yeah I didn't bother reading the AIM, the spare part was there to be sacrified anyway.
It's been hanging in the garden for a couple of years to my SO's dismay.
No pictures, way to gory.
Now I feel prepared on the procedure.
It's like the front clip, it can take time until I decide to jump in.
Looking really good there, with the flares and the front suspension, but I'm looking at the bolts hanging down on the outsides, next to the front tires on the bottom. Does that cinch up and rise higher, later on in the build?
Looking really good there, with the flares and the front suspension, but I'm looking at the bolts hanging down on the outsides, next to the front tires on the bottom. Does that cinch up and rise higher, later on in the build?
So far it's not supposed to get raised. I will if the ride is deemed to low for Montreal roads.
Good call on the bolt, when I installed them they seemed sufficiently away from the tire, away enough to let the tire deform under load, but I'll give it a second inspection just to be sure.
Originally Posted by RBrid
Looking good Denpo. So you glued weather stripping onto the door before painting it? I thought you'd paint first, no?
It's just a dry fit, installed with double side sticky tape. The whole point of the procedure is what happened to me last night, when I had to sand stuff down, with the paint on, I'd be screwed, probably bitching about weatherstrip quality


 09-14-2014, 03:41 PM


 Also, what does it take to change the adjustment?