
My '76 restoration (long post)
 10-25-2011, 01:41 AM
#161
Drifting


Thread Starter
Member Since: Aug 2010
Location: Kanuckistan
Posts: 1,618
Received 127 Likes
on
68 Posts
2022 C3 of the Year Finalist - Modified

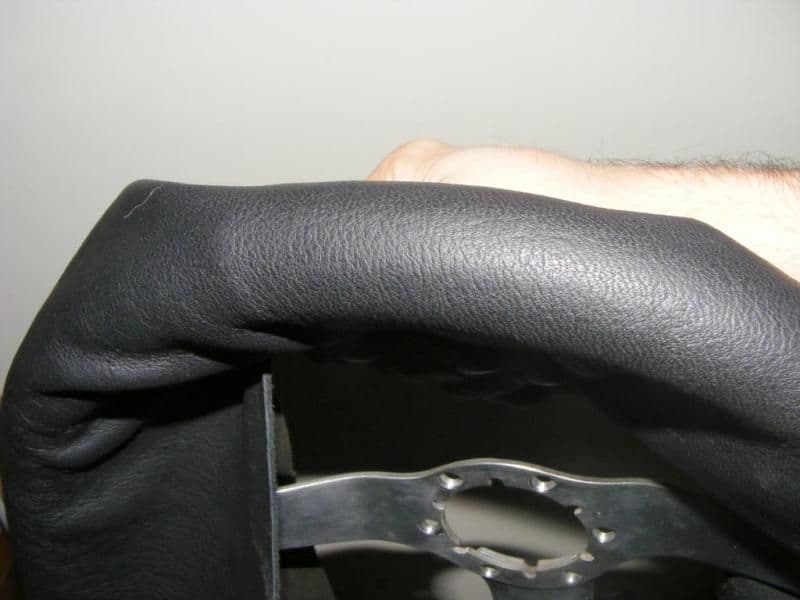
Here's the famous Moose leather, don't trust my camera's crappy colors skills, it can't be darker.
Here's how it should look on the wheel :
Today I bought a leather punch and some waxed flax thread and gave the herringbone stitching method a try on a scrap piece:
Not too bad for a first time. The technique tends to twist the leather, I'll have to watch it.
The touch is just gorgeous and the stitchings are as stealthy as you could get, time to do it for real.
 10-25-2011, 11:10 AM
#162
TheCorvetteBen


Here's the famous Moose leather, don't trust my camera's crappy colors skills, it can't be darker.
Here's how it should look on the wheel :
Today I bought a leather punch and some waxed flax thread and gave the herringbone stitching method a try on a scrap piece:
Not too bad for a first time. The technique tends to twist the leather, I'll have to watch it.
The touch is just gorgeous and the stitchings are as stealthy as you could get, time to do it for real.
Here's how it should look on the wheel :
Today I bought a leather punch and some waxed flax thread and gave the herringbone stitching method a try on a scrap piece:
Not too bad for a first time. The technique tends to twist the leather, I'll have to watch it.
The touch is just gorgeous and the stitchings are as stealthy as you could get, time to do it for real.
10-25-2011, 12:22 PM
#163
Drifting
Thread Starter
Member Since: Aug 2010
Location: Kanuckistan
Posts: 1,618
Received 127 Likes
on
68 Posts
2022 C3 of the Year Finalist - Modified
It will take a significant amount of time to get one done, if I do this for someone else it would probably be at loss, as a gift.
10-25-2011, 12:57 PM
#164
TheCorvetteBen
True, but check out the prices for the restored or new leather wrapped steering wheels. they are pretty pricey
10-31-2011, 12:19 AM
#165
Drifting
Thread Starter
Member Since: Aug 2010
Location: Kanuckistan
Posts: 1,618
Received 127 Likes
on
68 Posts
2022 C3 of the Year Finalist - Modified
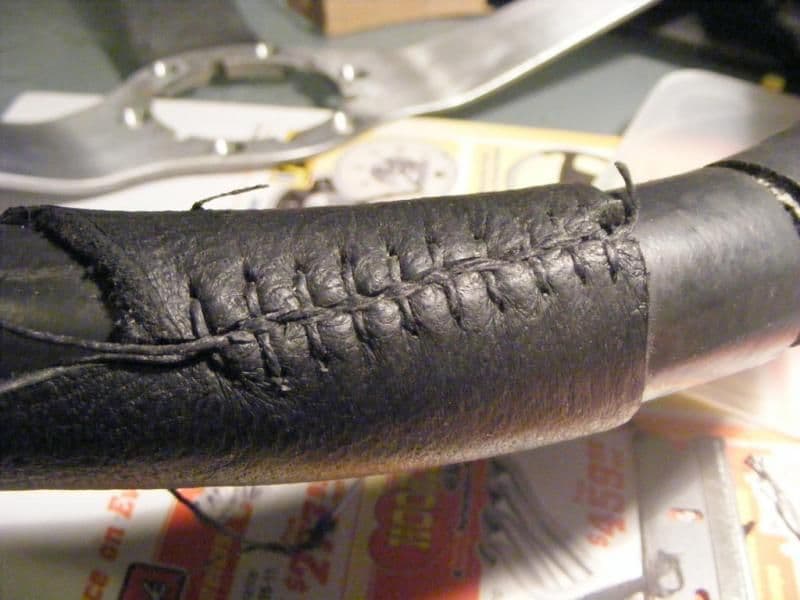
Mission "save the skeleton wheel" accomplished

At the last minute I opted for waxed nylon thread, much thinner, thus easier to sew. Still, my finger are all numb, this take a hell lot of time, I didn't really count but I'd say something like 8 hours.
I broke three needles in the process and the fourth one is begging for death.
When jumping the spoke, this stitch technique just came to me naturally, It has the same sewing pattern and really gives the border the strength to stick to the spoke.
You can notice the wrinkles on the left, my leather piece did to have the same "thread" all along.
The junction cut have been dictated by structural strength considerations, and I didn't want it at the top of the wheel.
I boosted the contrast range for you to see the stitch, because under natural light, it's black on black.
11-13-2011, 09:07 PM
#166
Drifting
Thread Starter
Member Since: Aug 2010
Location: Kanuckistan
Posts: 1,618
Received 127 Likes
on
68 Posts
2022 C3 of the Year Finalist - Modified
Hi everyone.
Thanks to a nasty flu I've been grounded for a full week.
But this weekend I felt better and I spent this sunday at my buddy's shop to complete my T5 rebuild.
To make it short, I saved his *ss pretty big time, so he owns me all the reasonably simple machining work I could ask.
Since a lot of parts are new I couldn't expect everything to be right within the tolerances.
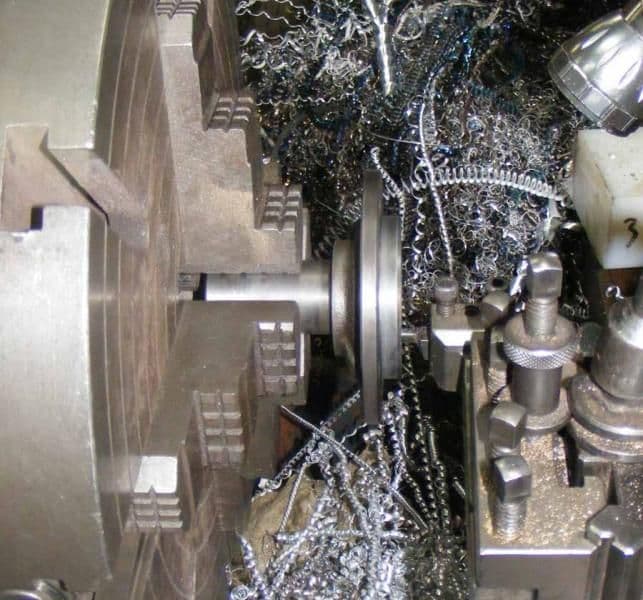
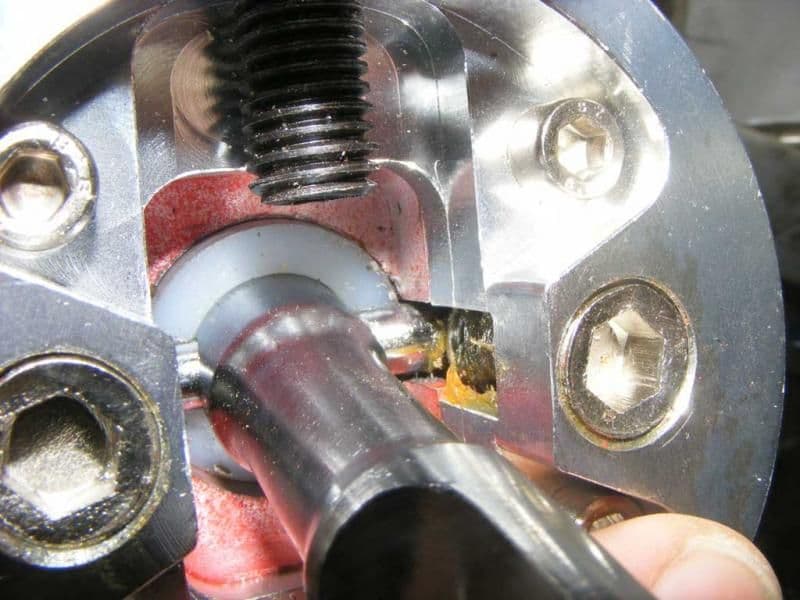
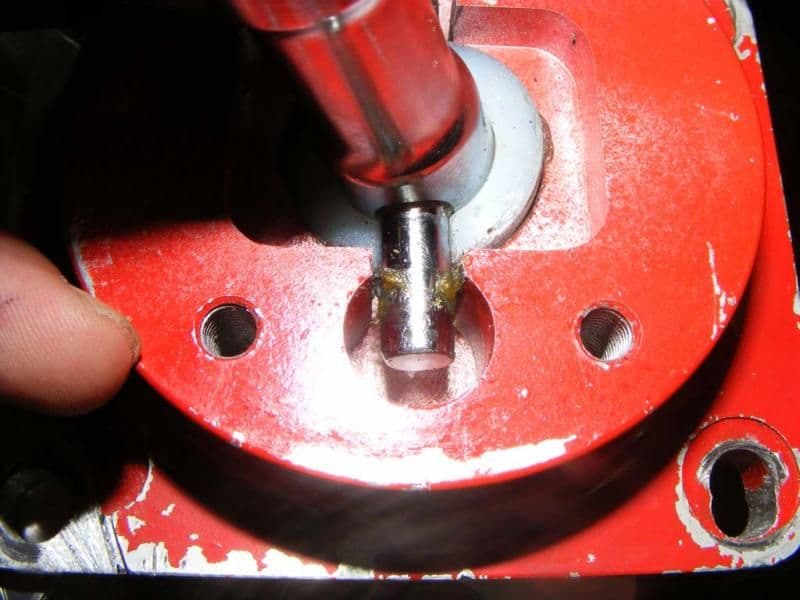
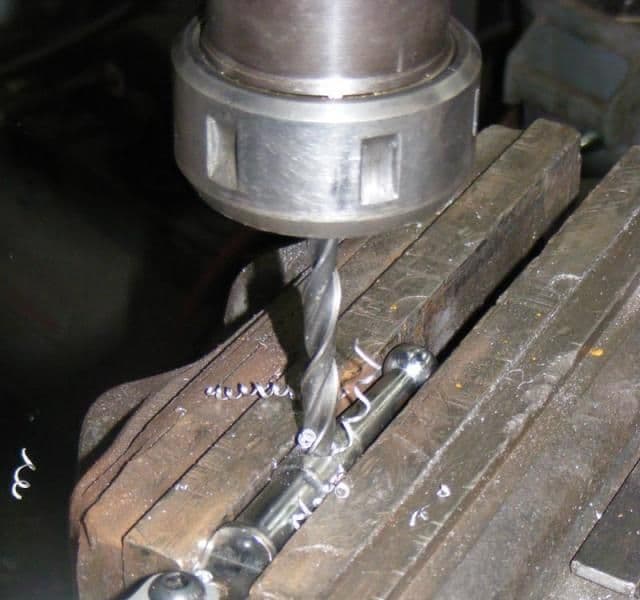
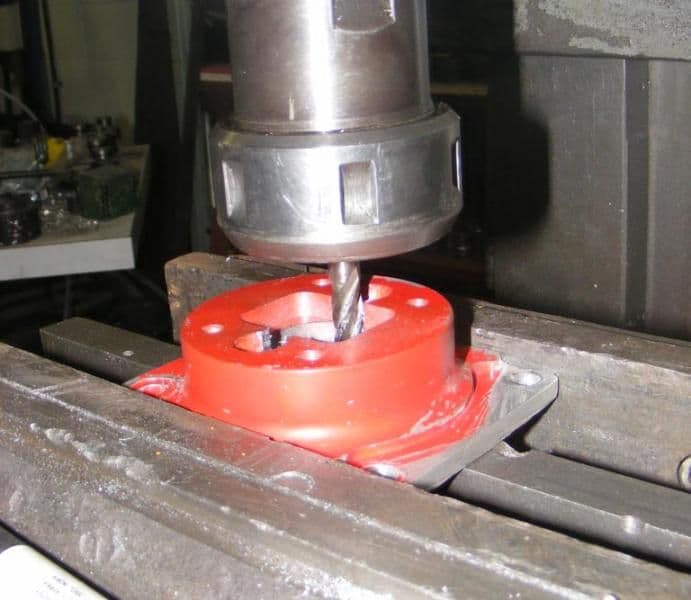
First of all, we had to drill the case for the GM part, it only had the Ford pattern. So we cut the old case's face, surfaced it and used it as a pattern bolted and the new case by the bearing retained bolts.
For the cluster gear we had to make a new thrust plate shim....
And a couple of surface grinding
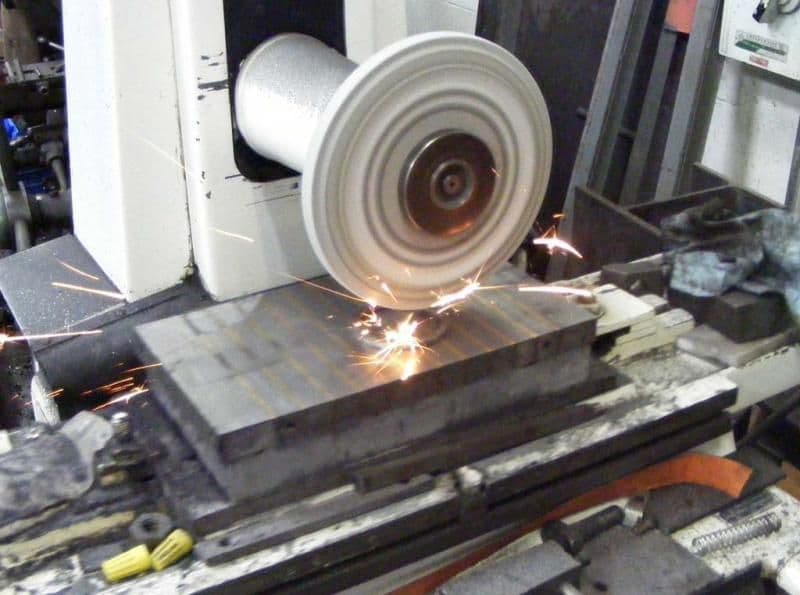
to reach a perfect zero endplay on the countershaft.
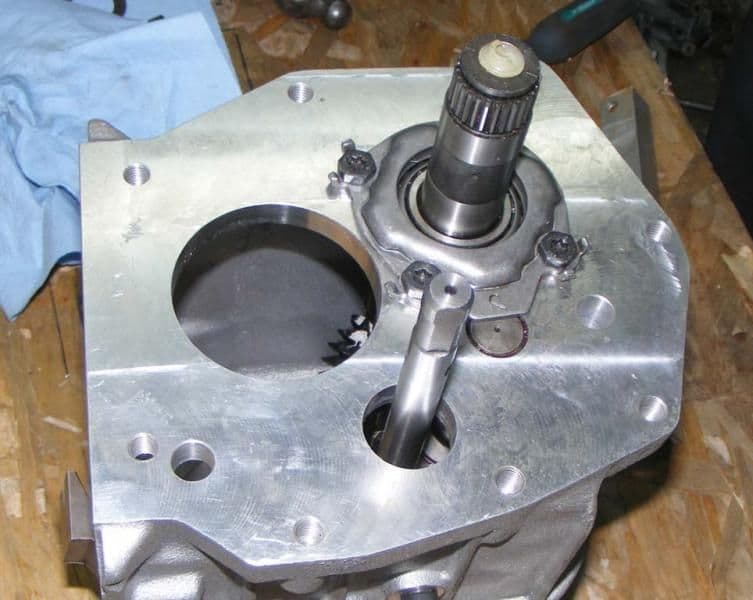
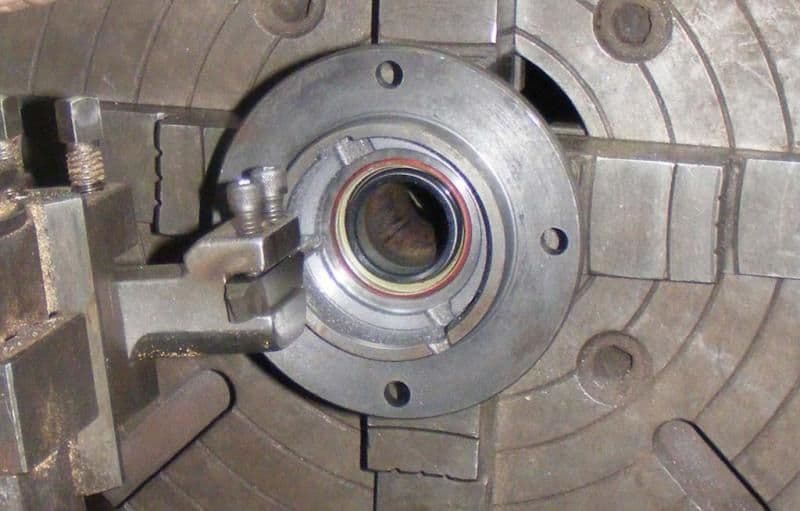
For the main shaft this was the complete opposite, instead of having to put a shim, we had to remove .002 to the inside of the retainer to obtain zero endplay and a shaft that turn nice and free.
Here is the 5th gear installed :
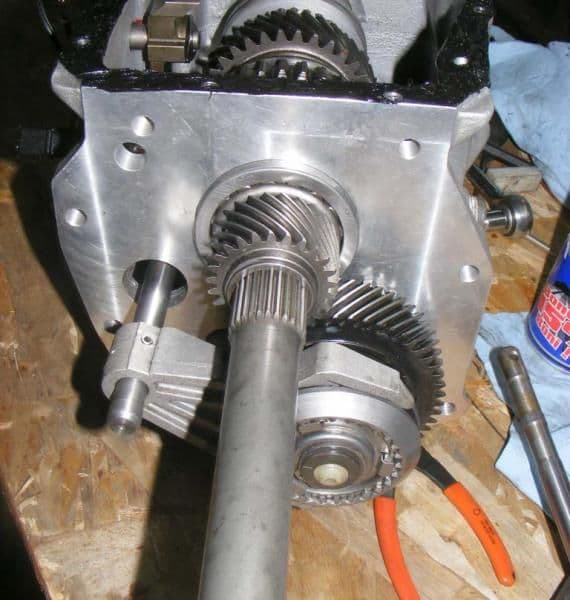
A last view of the inside before sealing this up
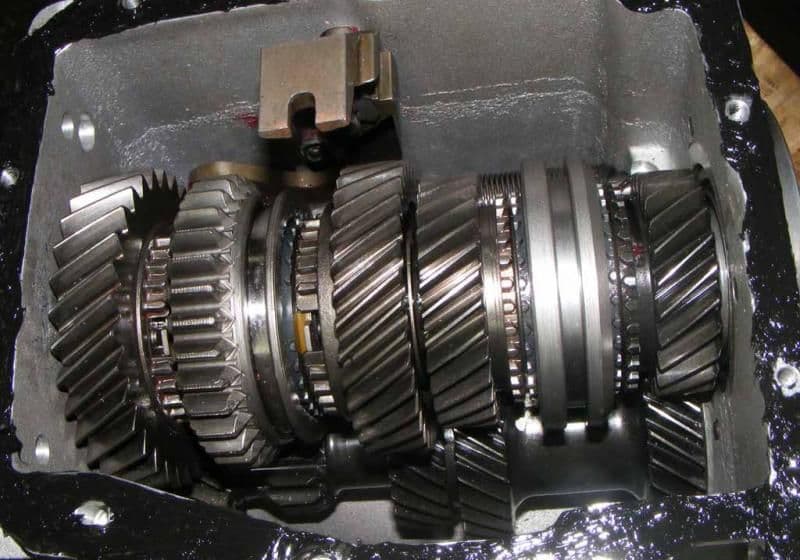

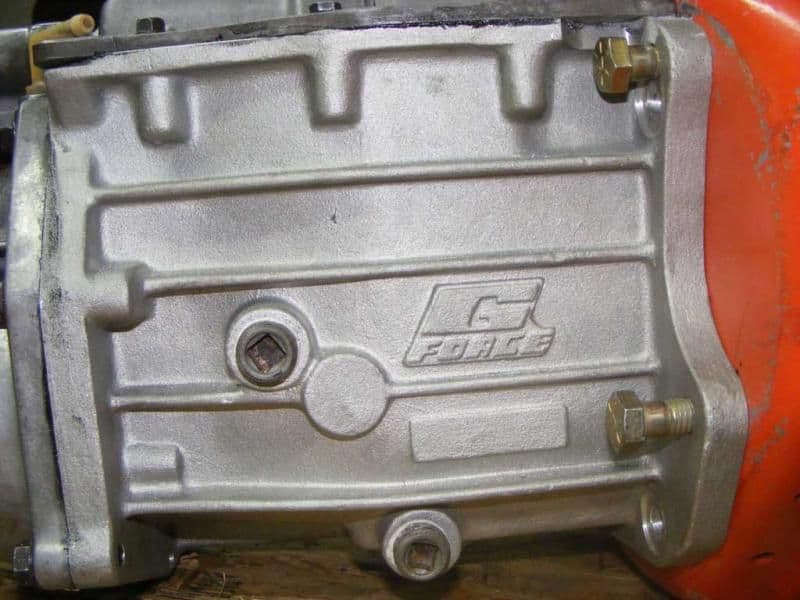
I hope this Gforce case strenght is worth the effort.
Here is it done, with the 30$ ebay mustand shifter and the scatter shield.

It shifts nice and smooth, mission accomplished.
It feels good to have this giant puzzle back in one piece, the video instructions proved to be invaluably helpful.
I bough a Zoom clutch/pressure plate kit, nothing fancy.
I'm going to weld the shifter offset just like here, but I still have no idea about the shifter handle I'm gonna use.
Do all shifter handles come with the same bolt pattern? Is there any standard? I would like to get everything welded before I have to worry about an handle.
Since the front clip it not glued yet, I think I'm gonna pull the whole engine, it will be much easier to work on.
Thanks to a nasty flu I've been grounded for a full week.
But this weekend I felt better and I spent this sunday at my buddy's shop to complete my T5 rebuild.
To make it short, I saved his *ss pretty big time, so he owns me all the reasonably simple machining work I could ask.
Since a lot of parts are new I couldn't expect everything to be right within the tolerances.
First of all, we had to drill the case for the GM part, it only had the Ford pattern. So we cut the old case's face, surfaced it and used it as a pattern bolted and the new case by the bearing retained bolts.
For the cluster gear we had to make a new thrust plate shim....
And a couple of surface grinding
to reach a perfect zero endplay on the countershaft.
For the main shaft this was the complete opposite, instead of having to put a shim, we had to remove .002 to the inside of the retainer to obtain zero endplay and a shaft that turn nice and free.
Here is the 5th gear installed :
A last view of the inside before sealing this up
I hope this Gforce case strenght is worth the effort.
Here is it done, with the 30$ ebay mustand shifter and the scatter shield.
It shifts nice and smooth, mission accomplished.
It feels good to have this giant puzzle back in one piece, the video instructions proved to be invaluably helpful.
I bough a Zoom clutch/pressure plate kit, nothing fancy.
I'm going to weld the shifter offset just like here, but I still have no idea about the shifter handle I'm gonna use.
Do all shifter handles come with the same bolt pattern? Is there any standard? I would like to get everything welded before I have to worry about an handle.
Since the front clip it not glued yet, I think I'm gonna pull the whole engine, it will be much easier to work on.


 11-14-2011, 01:29 PM
#169
Drifting
Thread Starter
Member Since: Aug 2010
Location: Kanuckistan
Posts: 1,618
Received 127 Likes
on
68 Posts
2022 C3 of the Year Finalist - Modified
I'm going to weld the shifter offset just like here, but I still have no idea about the shifter handle I'm gonna use.
Do all shifter handles come with the same bolt pattern? Is there any standard? I would like to get everything welded before I have to worry about an handle.
Do all shifter handles come with the same bolt pattern? Is there any standard? I would like to get everything welded before I have to worry about an handle.
I've looked up on Internet and it looks a lot of levers use the same 2 bolt pattern, or maybe I'm just only stumbling on Hurst lever pictures.
Could life be that easy? You tell me.
11-19-2011, 09:49 PM
#170
Drifting
Thread Starter
Member Since: Aug 2010
Location: Kanuckistan
Posts: 1,618
Received 127 Likes
on
68 Posts
2022 C3 of the Year Finalist - Modified
Today I went on upgrading my 30$ ebay short throw shifter.
The stop screws are junk (to be changed), but the rest is pretty decent quality.
The only default is that the cross pin is much smaller than the grooves it's supposed to slide in. So there is a play when you rotate the shifter along its axis.
Press out the pin, and machine everything to 3/8, press in new pin, and the play is gone.
I spend a lot of time adjusting the half-sphere-shaped plastic bushing, if the cross pin is not perfectly centered on the rotation axis it won't move freely.
My guess is that the smaller cross pin is here to compensate with the original poor fitting of this plastic piece.
My machinist welded me a offset bracket. I'm a little concerned about its strength, this steel piece looks flimsy.
On tricky thing, the cross pin had to be pressed in after the bracket is welded.
I'll drill the holes for the shifter after a first fitting test.
Now the shifter is smooth and tight. I don't know how it would compare to Hurst's or Pro's, but I don't think I'm that far off.
12-03-2011, 05:05 AM
#171
Drifting
Thread Starter
Member Since: Aug 2010
Location: Kanuckistan
Posts: 1,618
Received 127 Likes
on
68 Posts
2022 C3 of the Year Finalist - Modified
I made good progress those two last week.
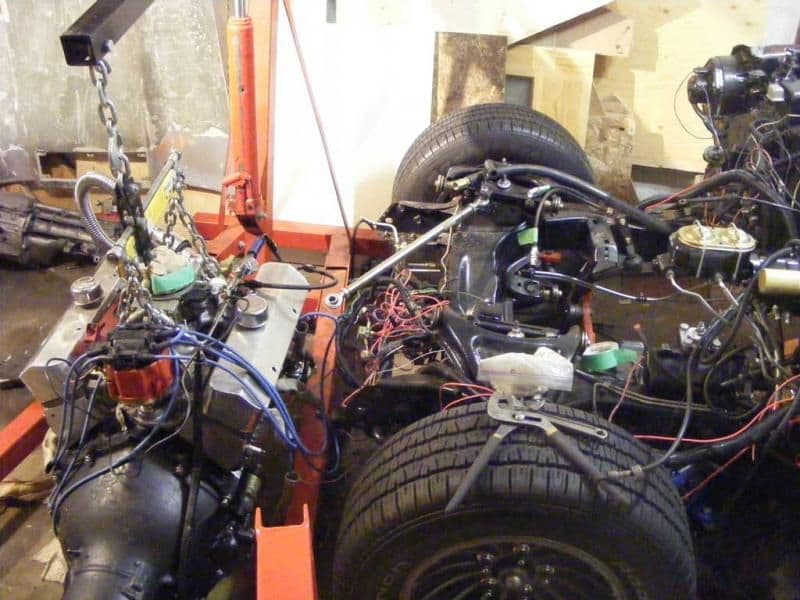
I removed the front clip and hanged it to the ceiling

removed the engine.
Even if I knew how to propertly pullout/put back a distributor, I didn't want to do that. So I tried to remove the engine with the distri still on. To my surprise it was totally doable.
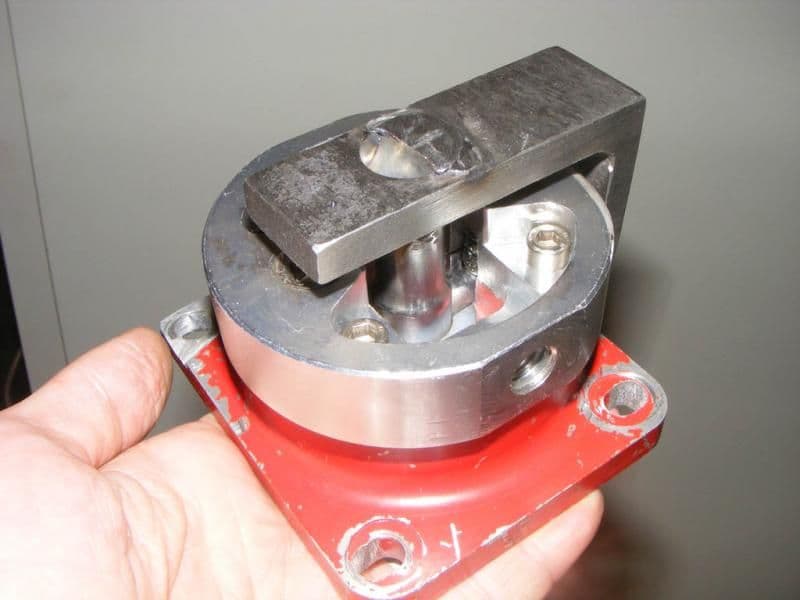
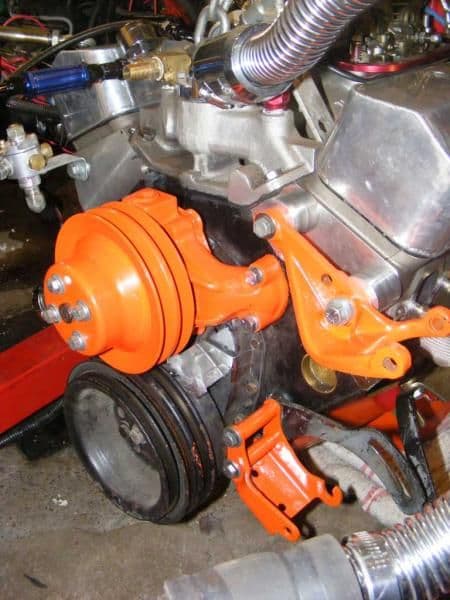
While the motor was out I started refreshing the front accessories, they was quiet an eyesore compared to the rest of the engine, the main pulley and the PS bracket will get the same fate shortly.
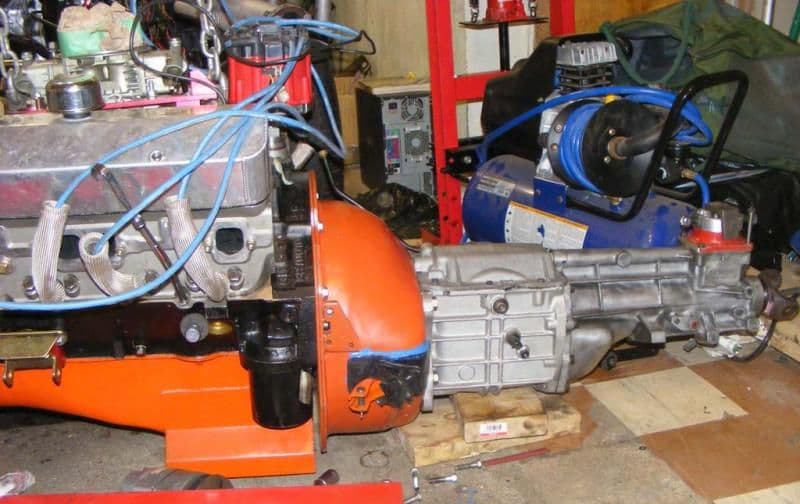
The TH350 is down, let's put my T5
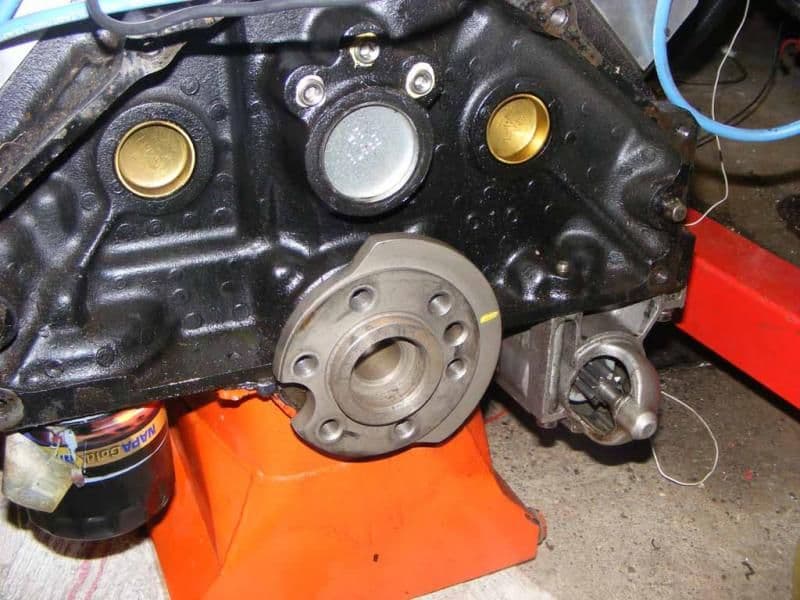
Engine protection shield pilot bearing and flywheel installed. I checked the specs of those ARP bolt, no lock washer require, an little oil and a 85 lb/ft torquing and they should be fine.
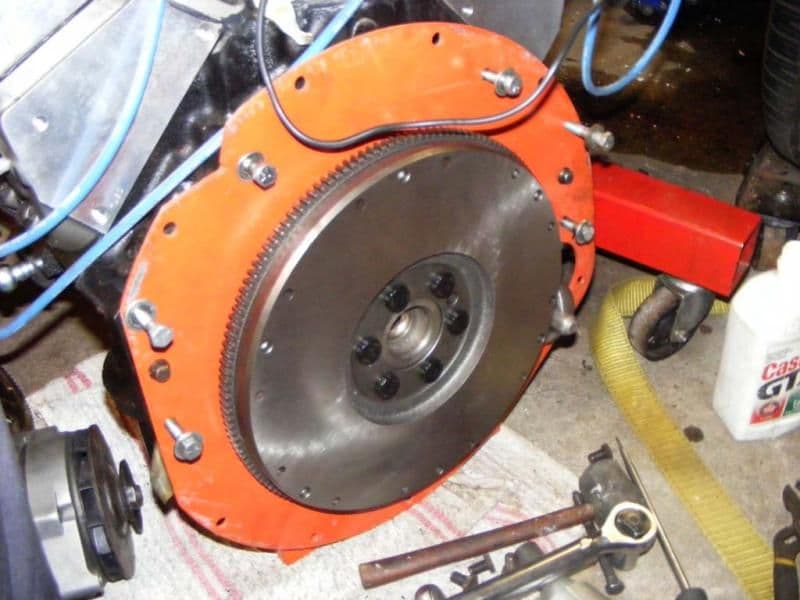
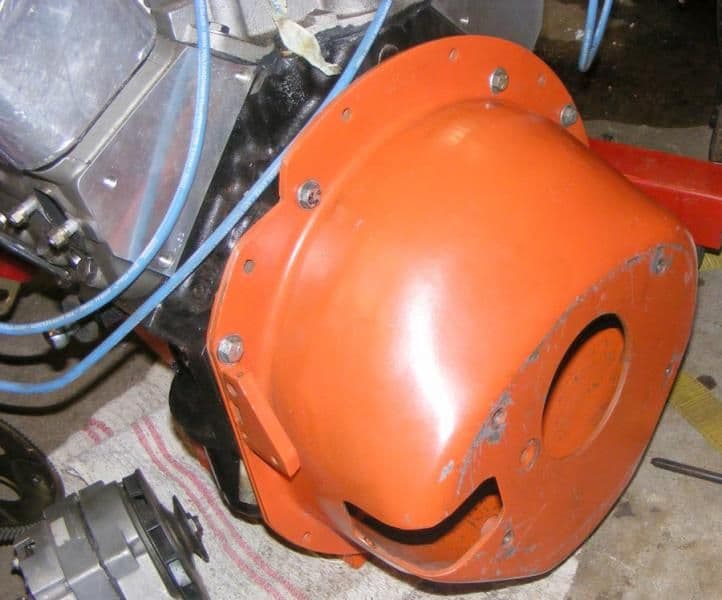
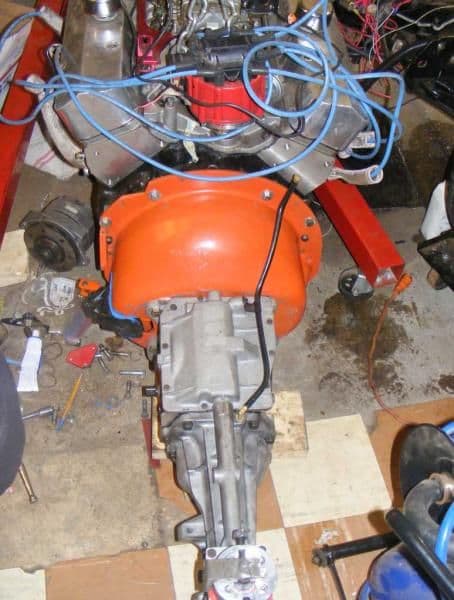
Test fitting of the bellhousing
I was then pleased of a "why not" purchase I made : long dowel pin.

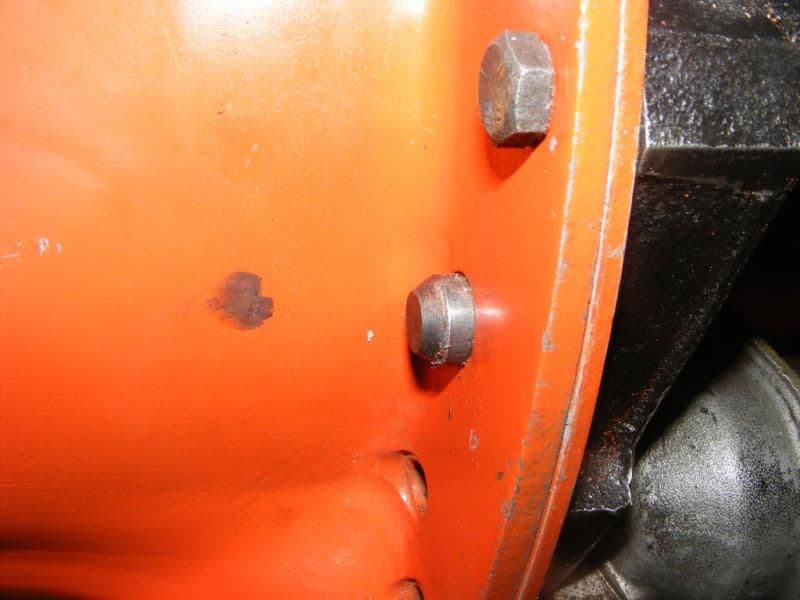
The automatic dowel pins are way to short to align the bellhousing.
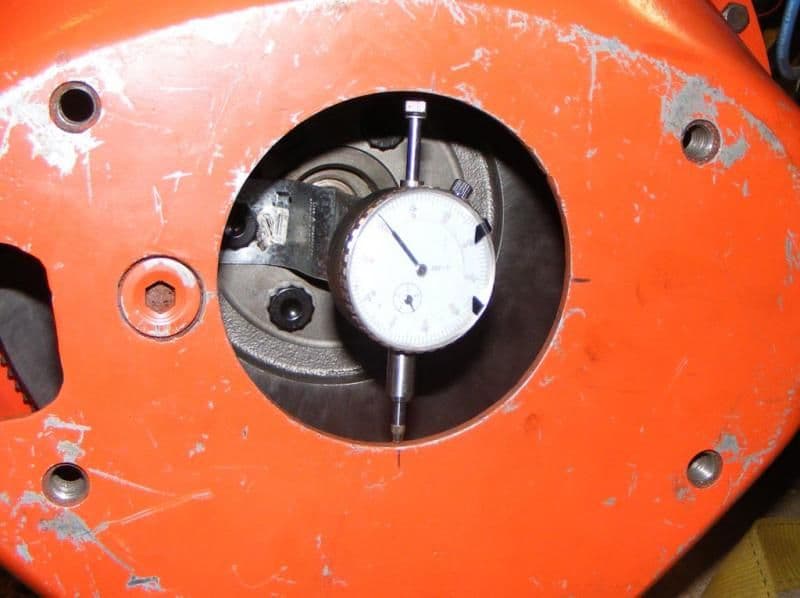
Tested the runout, 0.0025 at worst, well within the required 0.005. Phew.
The Zoom pressure plate, ARP bolt again torqued a 35 lbs/ft with red loctite.
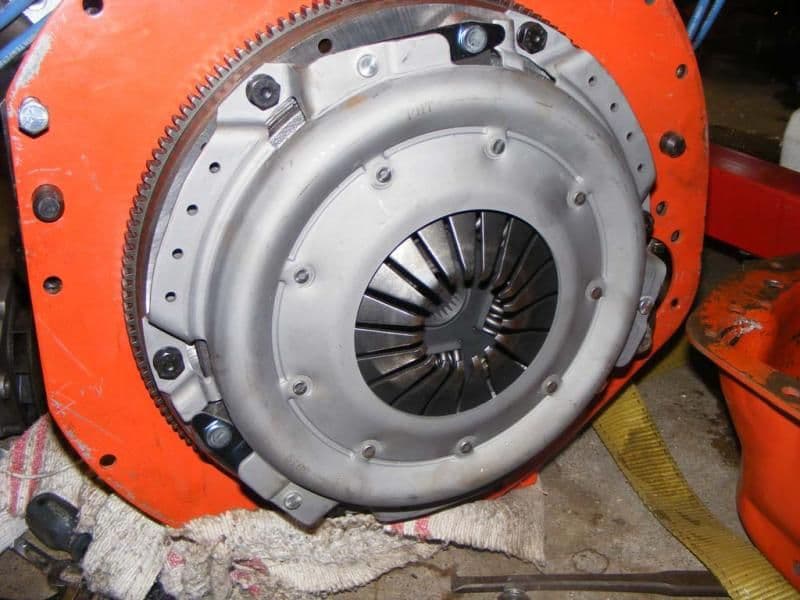
Put the bellhousing back and the trans, et voila.
Next steps : shortening the driveshaft an fab the crossmember bracket.
I removed the front clip and hanged it to the ceiling
removed the engine.
Even if I knew how to propertly pullout/put back a distributor, I didn't want to do that. So I tried to remove the engine with the distri still on. To my surprise it was totally doable.
While the motor was out I started refreshing the front accessories, they was quiet an eyesore compared to the rest of the engine, the main pulley and the PS bracket will get the same fate shortly.
The TH350 is down, let's put my T5
Engine protection shield pilot bearing and flywheel installed. I checked the specs of those ARP bolt, no lock washer require, an little oil and a 85 lb/ft torquing and they should be fine.
Test fitting of the bellhousing
I was then pleased of a "why not" purchase I made : long dowel pin.
The automatic dowel pins are way to short to align the bellhousing.
Tested the runout, 0.0025 at worst, well within the required 0.005. Phew.
The Zoom pressure plate, ARP bolt again torqued a 35 lbs/ft with red loctite.
Put the bellhousing back and the trans, et voila.
Next steps : shortening the driveshaft an fab the crossmember bracket.
12-03-2011, 12:29 PM
#173
Drifting
Thread Starter
Member Since: Aug 2010
Location: Kanuckistan
Posts: 1,618
Received 127 Likes
on
68 Posts
2022 C3 of the Year Finalist - Modified
The T5 swap is my very first foray into the engine mechanic field (I didn't anything about car just 1 year and half ago). Seeing all there part, some used some new, bought from so many sources fitting nicely all together is great feeling.
12-05-2011, 10:10 AM
#174
Navigator


Member Since: Aug 2011
Posts: 9
Likes: 0
Received 0 Likes
on
0 Posts
Just read the whole swap star to finish, and WOW.
Great work man! love what you did to your steering wheel, are you going to re-do your stock seats? Why not,looks like youve got that stitch down.
Great work man! love what you did to your steering wheel, are you going to re-do your stock seats? Why not,looks like youve got that stitch down.
12-05-2011, 09:03 PM
#175
Drifting
Thread Starter
Member Since: Aug 2010
Location: Kanuckistan
Posts: 1,618
Received 127 Likes
on
68 Posts
2022 C3 of the Year Finalist - Modified
The seats, huh, that's another story.
The pair I have are original leather, some would call them tired, for me it's a great patina. Problem it that they have a lot of scuff and cuts.
My original plan it to stitch the cuts and call it a day. Redoing seat it opening yet another can of worm.
We'll see where is will end up, but for sure it will take a walking foot sewing machine to do proper work.
12-12-2011, 02:12 AM
#176
Drifting
Thread Starter
Member Since: Aug 2010
Location: Kanuckistan
Posts: 1,618
Received 127 Likes
on
68 Posts
2022 C3 of the Year Finalist - Modified
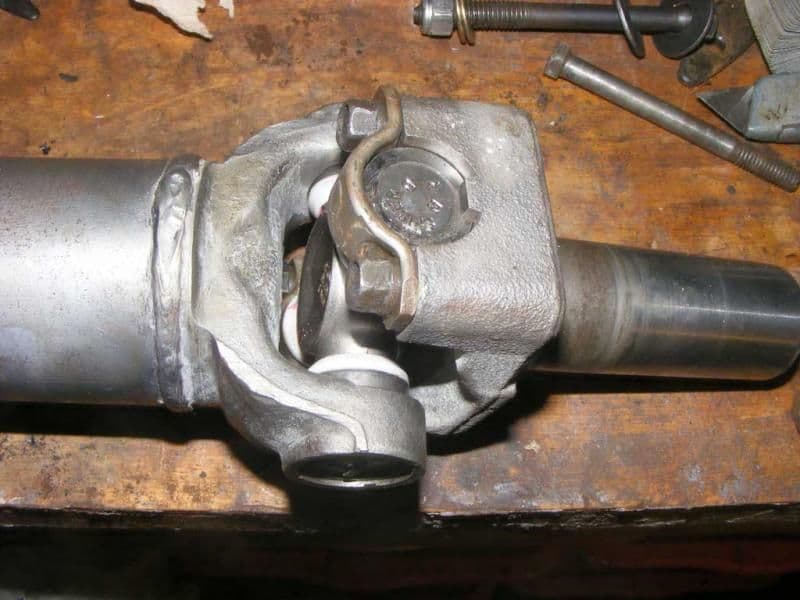
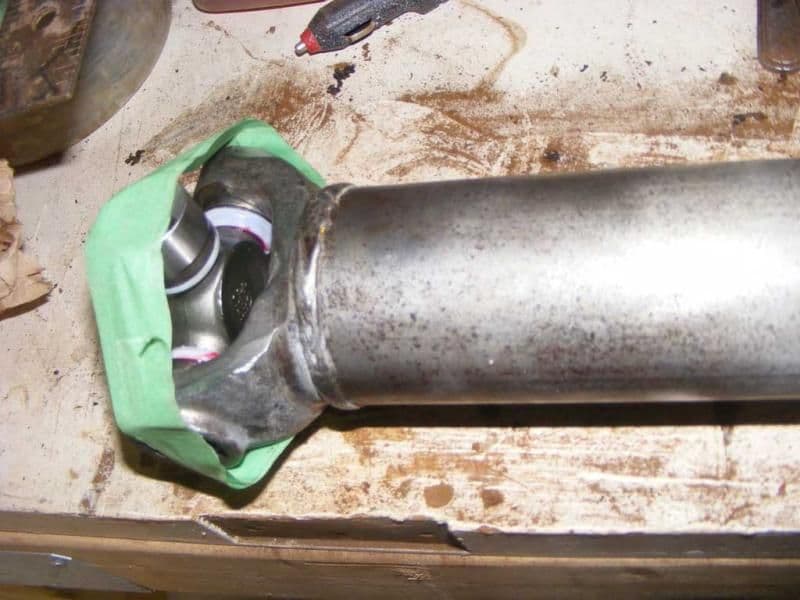
This week I took care of my driveshaft, cleaned it and pressed in some new non greasable U-joint. They are structurally stronger than those with a greasing zerg. It's now reading to head to the shop for a 3" reduction and a balancing.
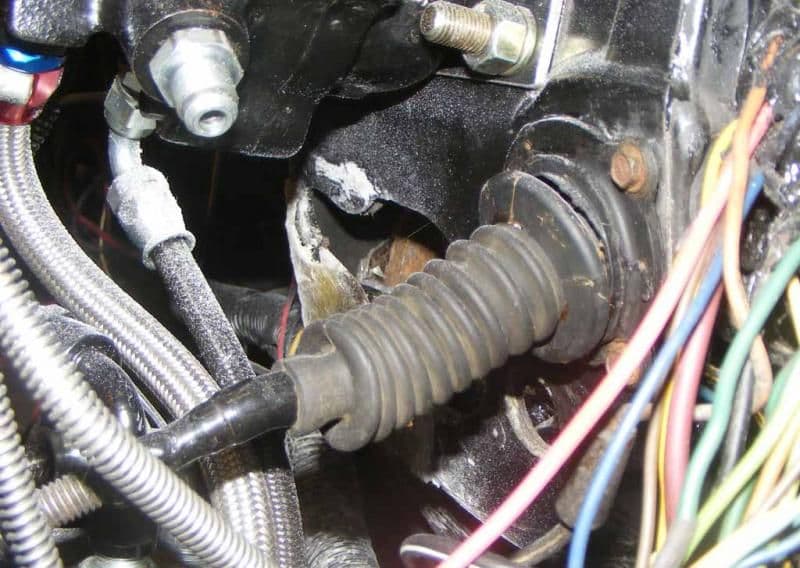
I was kindof pissed having to fork out yet another 20$ for a new clutch rod boot, so I went to the scrapyard and picked a bunch of random boot and made a new one. Cost : 3$
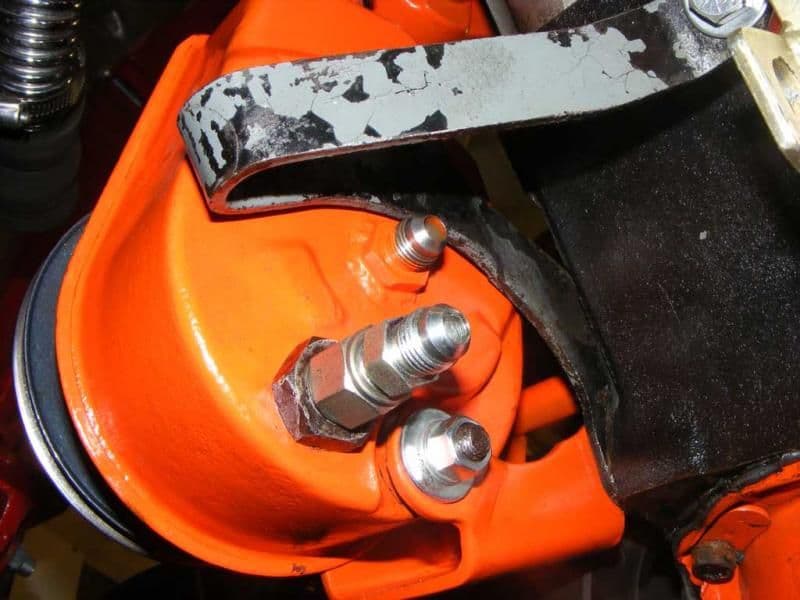
I also had a -AN6 plug welded to the return port of my PS pump, so I can finish the plumping of my hydraulic setup once for good once the engine is back in place.
To finish, a pic of the press I bought a couple of month ago, it's small, only 6tons but at 70$ it's the best bang for the buck you could expect, I could press my U-joint, my transmission parts and my wheel stud.
Anyway a 10 or 20 ton press would have been too big for my cramped garage. I wish I bought that earlier.

I was kindof pissed having to fork out yet another 20$ for a new clutch rod boot, so I went to the scrapyard and picked a bunch of random boot and made a new one. Cost : 3$
I also had a -AN6 plug welded to the return port of my PS pump, so I can finish the plumping of my hydraulic setup once for good once the engine is back in place.
To finish, a pic of the press I bought a couple of month ago, it's small, only 6tons but at 70$ it's the best bang for the buck you could expect, I could press my U-joint, my transmission parts and my wheel stud.
Anyway a 10 or 20 ton press would have been too big for my cramped garage. I wish I bought that earlier.
12-12-2011, 06:14 PM
#178
Drifting
Thread Starter
Member Since: Aug 2010
Location: Kanuckistan
Posts: 1,618
Received 127 Likes
on
68 Posts
2022 C3 of the Year Finalist - Modified
If your garage is what I see in you profile pic I wish I had your garage to put my press in 
Mine is one vette wide, 1.75 vette long, when I had both my 76 and the donor car was in, the only way to reach the other side of the room was the interior of the car or the engine bay
Mine is one vette wide, 1.75 vette long, when I had both my 76 and the donor car was in, the only way to reach the other side of the room was the interior of the car or the engine bay
12-12-2011, 07:54 PM
#179
Drifting
Member Since: Jun 2011
Location: iowa city iowa
Posts: 1,540
Received 253 Likes
on
139 Posts
2020 Corvette of the Year Finalist (appearance mods)
C3 of Year Winner (appearance mods) 2019
I have been following your build all along and am amazed at how you manage to do so much in the given space. I have my car taking over a 3 stall garage and it still seems like I can't move. Keep up the good work!
-brent
-brent

