



 I was hoping there was away around not having to cut the glass.
Floor Pan Replacement

Thread Starter
Intermediate

Joined: Nov 2010
Posts: 32
Likes: 0
From: Mt Airy Maryland
 Floor Pan Replacement
So now its time to tuck my Vette away for the winter and started to tear into it to replace things till spring. On my priority list is replacing the passenger floor pan, carpet/insulation and head light brackets. So I ripped the interior apart and got good visual of the floor pans. Driver isn't that bad but the passenger just hanging by few threads. I know it was caused by the heater core leaking cause previous owner put a low pressure radiator cap to stop it leaking and I found out when I replaced it with the correct PSI cap.
So heres a picture below

Now before I start cutting things got a question. As I drew on the picture the yellow line is a seem thats going around the pan. Should I cut along that seem? Pictures I find on the net not very well detailed as to how the new floor pan looks and how big the cut needs to be. Don't want to cut it out and end up with a big gap between the new floor pan and the body that I won't be able to weld back in.
So heres a picture below
Now before I start cutting things got a question. As I drew on the picture the yellow line is a seem thats going around the pan. Should I cut along that seem? Pictures I find on the net not very well detailed as to how the new floor pan looks and how big the cut needs to be. Don't want to cut it out and end up with a big gap between the new floor pan and the body that I won't be able to weld back in.

Burning Brakes


Joined: Mar 2012
Posts: 871
Likes: 73
From: Memphis Tennessee
1. Don't cut ANYTHING until you have the new pan. Like you said, you want to end up with any gaps.
2. Leave as much original metal as possible. Better to trim your new pan than to cut out more of floor than needed.
Here's my passenger pan. It was pretty far gone, and I ended up using an air chisel to seperate it from the rocker channel.

Passenger pan out.

2. Leave as much original metal as possible. Better to trim your new pan than to cut out more of floor than needed.
Here's my passenger pan. It was pretty far gone, and I ended up using an air chisel to seperate it from the rocker channel.
Passenger pan out.
Thread Starter
Intermediate
Joined: Nov 2010
Posts: 32
Likes: 0
From: Mt Airy Maryland
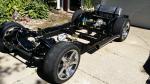
Pretty good pictures. All I need to do is cut out the foot section, the seat section isn't eaten away "yet". Looks like the previous owner attempted to repair it by just riveting a sheet of metal to it but the rivet sections are rusted gone. Looking at your picture looks like the side walls of the new pan goes up further than I need to cut out. So I can just cut it out just above the rust eats and sand it down to bare metal before i weld in the new pan. Going to order pan soon just wanted to prep it so I could just pop it in.
Drifting


Joined: Oct 2012
Posts: 1,524
Likes: 61
From: Medina Ohio
1. Don't cut ANYTHING until you have the new pan. Like you said, you want to end up with any gaps.
2. Leave as much original metal as possible. Better to trim your new pan than to cut out more of floor than needed.
Here's my passenger pan. It was pretty far gone, and I ended up using an air chisel to seperate it from the rocker channel.
Passenger pan out.
2. Leave as much original metal as possible. Better to trim your new pan than to cut out more of floor than needed.
Here's my passenger pan. It was pretty far gone, and I ended up using an air chisel to seperate it from the rocker channel.
Passenger pan out.

5th Gear
Joined: Nov 2012
Posts: 5
Likes: 0
The nice thing about floorpan replacement is that it's really not all that complicated, you disassemble what's left of the original, trim and fit the new one, and reverse your disassembly procedure. It's the perfect project to build your sheetmetal repair skills. The common repair method is to trim the old and new, create a stepped flange around the perimeter of the replacement panel, and install it with a lap weld, because butt-welding is difficult.
asset tags
asset tags
Last edited by shane23; Nov 10, 2012 at 05:07 AM.
Burning Brakes
Joined: Mar 2012
Posts: 871
Likes: 73
From: Memphis Tennessee
Is that a purchased pre-formed pan, or homemade? I'll be tackling this project soon and curious how far up the new pans go on the rocker side. My existing metal is pretty bad up to the rocker channel and trying to figure out how it's going to work. By the looks of yours it goes all the way to the rocker channel?
Pre formed (mostly). They took a bit of tweaking with a BFH, a portapower, etc. The driver side fit better than the passenger.
They are welded to the rocker. You will have to cut the fiberglass door sill, and expect to do a little glass work to it after to fit around your new weld.

Burning Brakes
Joined: Mar 2012
Posts: 871
Likes: 73
From: Memphis Tennessee
This project was from last winter, but I don't think I took any pictures of the glass sill plates. If you look at the pic, you'll see holes where the piece was originally riveted down. I just riveted it back an place, and layed glass matt over my cut.
Corvette Stories
The Best of Corvette for Corvette Enthusiasts

Top 10 Most Explosive Corvettes Ever Made: Power-to-Weight Ratio Ranked!
Joe Kucinski
150 hp to 1,250 hp: Every Corvette Generation Compared by the Specs That Matter
Joe Kucinski
8 Coolest Corvette Pace Cars (and Replicas) of All Time
Verdad Gallardo
Top 10 Corvette Engines RANKED by Peak Torque (70+ Years of Muscle!)
Joe Kucinski
Corvette ZR1X Will Be Pacing the Indy 500, And Could Probably Race, Too!
Verdad Gallardo
Top 10 Corvettes Coming to Mecum Indy 2026!
Brett Foote
Top 10 C9 Corvette MUST-HAVES to Fix These C8 Generation Flaws!
Michael S. Palmer
10 Revolutionary 'Corvette Firsts' Most People Don't Know
Joe Kucinski
5 Reasons to Upgrade to an LS6-Powered Corvette; 5 Reasons to Stay LT2
Michael S. Palmer
Racer
Joined: Jul 2012
Posts: 341
Likes: 2
From: Elderslie, Scotland
So now its time to tuck my Vette away for the winter and started to tear into it to replace things till spring. On my priority list is replacing the passenger floor pan, carpet/insulation and head light brackets. So I ripped the interior apart and got good visual of the floor pans. Driver isn't that bad but the passenger just hanging by few threads. I know it was caused by the heater core leaking cause previous owner put a low pressure radiator cap to stop it leaking and I found out when I replaced it with the correct PSI cap.
So heres a picture below
Now before I start cutting things got a question. As I drew on the picture the yellow line is a seem thats going around the pan. Should I cut along that seem? Pictures I find on the net not very well detailed as to how the new floor pan looks and how big the cut needs to be. Don't want to cut it out and end up with a big gap between the new floor pan and the body that I won't be able to weld back in.
So heres a picture below
Now before I start cutting things got a question. As I drew on the picture the yellow line is a seem thats going around the pan. Should I cut along that seem? Pictures I find on the net not very well detailed as to how the new floor pan looks and how big the cut needs to be. Don't want to cut it out and end up with a big gap between the new floor pan and the body that I won't be able to weld back in.
Instructor
Joined: May 2012
Posts: 105
Likes: 12
From: Rockford, IL
I just got my Willcox floor pans in the mail. I ordered the alternate source ones. They look pretty good, but one thing that I noticed is that for my '76, the seat belt retractor attaches to the bottom on the pan, while this pan has the nut for it on the side.
Since the nut on the side doesn't fit my bolt (wrong size), I'll probably end up removing it and I'll just cut out the old nuts from my old pan and weld them in the proper positions on the new one.
Since the nut on the side doesn't fit my bolt (wrong size), I'll probably end up removing it and I'll just cut out the old nuts from my old pan and weld them in the proper positions on the new one.
Instructor
Joined: May 2012
Posts: 105
Likes: 12
From: Rockford, IL
