


No action - Need help

Le Mans Master


Joined: Oct 2006
Posts: 6,842
Likes: 285
From: Palmdale CA
.086 ohms means almost zero resistance on the lowest ohm setting on your meter (it looks like a horseshoe, but is actually the greek omega sign) and says your positive cable is good. The second part is testing for ANY continuity or zero ohms (which means electricity can flow with no resistance) between the negative and positive cables and this is in reality, just testing out if there is any 'grounded' out or applied circuits between the positive and negative terminals "Connect the black lead on the volt/ohmmeter to the negative terminal on the battery and use the red lead to probe the now removed red positive terminal from the battery. The resistance should be infinite."
Then the final part is testing the cable between the battery and the solonoid. Remove the black lead from the battery terminal and connect it to the opposite end of the battery cable at the starter solenoid. Again touch the red lead to the battery side of the cable and the black lead to the solenoid side. The ohms should show zero (no resistance). If it shows more than 100 ohms, replace the wire.
Finally, I had a thought too. With everything hooked up as normal and you're in the car getting ready to start it, try this: Before you turn the key, turn on the lights. Take a look at them, they should be bright and preferably, shining on something right in front of them, like a garage door or wall. Leave the lights on and crank the starter. Do the lights dim a little? A lot? If they dim a lot, then something is pulling down the current.
I thought that this aircraft piston engine starter thread was interesting.
http://www.sacskyranch.com/eng39.htm
Operator must make several attempts before the starting motor will crank the engine.
1. Low voltage to starter. The addition of 1 or 2 ohms of resistance in the circuit caused by an oxidized connector is significant. For example, in a 12 volt starter circuit drawing 40 amperes of current, the addition of 0.2 ohms of resistance drops the current to the starter to 24 amperes. This drops the operating power from 480 to 288 watts. This is a 40% loss in operating power caused by a 0.2 ohm resistance. High current, low voltage circuits are resistance sensitive. High resistance causes heat. Check the battery terminal and see if it is hot. If it is then there is too much resistance in the cable connection --clean the wire terminals.
2. Poor ground. Check condition of ground at battery box. Carefully place your hand on the connections and see if they are warm or hot. Any resistance to starter causes heat. If the connection is warm then you need to clean the connection to reduce the electrical resistance. A few milliohms of resistance can cut your power by 1/3. Bob Nuckolls of Aero Electric Connection (full text of excellent article When a Ground is a Good Ground Not? at www.aeroelectric.com) gives us this example:
Battery resistance 10 milliohms
Contactors resistance 4 milliohms
15' of 2 AWG wire 3.2 milliohms
Joints & wire segments 8.0 milliohms
Total resistance 25.2 milliohms
If the starter draws 200 amps from Ohms law Volts=Amps x Ohms we have a 5.04 voltage drop or just 7.46 volts at the starter. We've lost 1/3 of our power! As Bob states: "Pushing 200+ amps makes every milliohm count" .
3. Weak battery. If the starter engages and the propeller moves and then stalls on the first compression stroke then:
A. If hot suspect bad cables or solenoids, or
B. If cold suspect a bad battery.
I'll be back from lunch in half an hour or so and I'd like to see your observations.
Le Mans Master
Joined: Oct 2006
Posts: 6,842
Likes: 285
From: Palmdale CA
I was talking to my shop partner and he reminded me of the same situation we had three weeks ago and I totally forgot till he did.
When I installed the new high torque starter, I used the WRONG bolt holes and the starter gear was actually hitting the flywheel! It sounded just like a bad starter (click and nothing). I had used the inside holes, because I thought that's where the gear is closest, but I was wrong. The outside hole is where that starter should mount. I remounted it and boom, the starter engaged and the car started.
When I installed the new high torque starter, I used the WRONG bolt holes and the starter gear was actually hitting the flywheel! It sounded just like a bad starter (click and nothing). I had used the inside holes, because I thought that's where the gear is closest, but I was wrong. The outside hole is where that starter should mount. I remounted it and boom, the starter engaged and the car started.
Thread Starter
Burning Brakes


Joined: Jan 2010
Posts: 884
Likes: 84
From: New Boston, NH
.086 ohms means almost zero resistance on the lowest ohm setting on your meter (it looks like a horseshoe, but is actually the greek omega sign) and says your positive cable is good. The second part is testing for ANY continuity or zero ohms (which means electricity can flow with no resistance) between the negative and positive cables and this is in reality, just testing out if there is any 'grounded' out or applied circuits between the positive and negative terminals "Connect the black lead on the volt/ohmmeter to the negative terminal on the battery and use the red lead to probe the now removed red positive terminal from the battery. The resistance should be infinite."
Then the final part is testing the cable between the battery and the solonoid. Remove the black lead from the battery terminal and connect it to the opposite end of the battery cable at the starter solenoid. Again touch the red lead to the battery side of the cable and the black lead to the solenoid side. The ohms should show zero (no resistance). If it shows more than 100 ohms, replace the wire.
Finally, I had a thought too. With everything hooked up as normal and you're in the car getting ready to start it, try this: Before you turn the key, turn on the lights. Take a look at them, they should be bright and preferably, shining on something right in front of them, like a garage door or wall. Leave the lights on and crank the starter. Do the lights dim a little? A lot? If they dim a lot, then something is pulling down the current.
I thought that this aircraft piston engine starter thread was interesting.
http://www.sacskyranch.com/eng39.htm
Operator must make several attempts before the starting motor will crank the engine.
1. Low voltage to starter. The addition of 1 or 2 ohms of resistance in the circuit caused by an oxidized connector is significant. For example, in a 12 volt starter circuit drawing 40 amperes of current, the addition of 0.2 ohms of resistance drops the current to the starter to 24 amperes. This drops the operating power from 480 to 288 watts. This is a 40% loss in operating power caused by a 0.2 ohm resistance. High current, low voltage circuits are resistance sensitive. High resistance causes heat. Check the battery terminal and see if it is hot. If it is then there is too much resistance in the cable connection --clean the wire terminals.
2. Poor ground. Check condition of ground at battery box. Carefully place your hand on the connections and see if they are warm or hot. Any resistance to starter causes heat. If the connection is warm then you need to clean the connection to reduce the electrical resistance. A few milliohms of resistance can cut your power by 1/3. Bob Nuckolls of Aero Electric Connection (full text of excellent article When a Ground is a Good Ground Not? at www.aeroelectric.com) gives us this example:
Battery resistance 10 milliohms
Contactors resistance 4 milliohms
15' of 2 AWG wire 3.2 milliohms
Joints & wire segments 8.0 milliohms
Total resistance 25.2 milliohms
If the starter draws 200 amps from Ohms law Volts=Amps x Ohms we have a 5.04 voltage drop or just 7.46 volts at the starter. We've lost 1/3 of our power! As Bob states: "Pushing 200+ amps makes every milliohm count" .
3. Weak battery. If the starter engages and the propeller moves and then stalls on the first compression stroke then:
A. If hot suspect bad cables or solenoids, or
B. If cold suspect a bad battery.
I'll be back from lunch in half an hour or so and I'd like to see your observations.
Then the final part is testing the cable between the battery and the solonoid. Remove the black lead from the battery terminal and connect it to the opposite end of the battery cable at the starter solenoid. Again touch the red lead to the battery side of the cable and the black lead to the solenoid side. The ohms should show zero (no resistance). If it shows more than 100 ohms, replace the wire.
Finally, I had a thought too. With everything hooked up as normal and you're in the car getting ready to start it, try this: Before you turn the key, turn on the lights. Take a look at them, they should be bright and preferably, shining on something right in front of them, like a garage door or wall. Leave the lights on and crank the starter. Do the lights dim a little? A lot? If they dim a lot, then something is pulling down the current.
I thought that this aircraft piston engine starter thread was interesting.
http://www.sacskyranch.com/eng39.htm
Operator must make several attempts before the starting motor will crank the engine.
1. Low voltage to starter. The addition of 1 or 2 ohms of resistance in the circuit caused by an oxidized connector is significant. For example, in a 12 volt starter circuit drawing 40 amperes of current, the addition of 0.2 ohms of resistance drops the current to the starter to 24 amperes. This drops the operating power from 480 to 288 watts. This is a 40% loss in operating power caused by a 0.2 ohm resistance. High current, low voltage circuits are resistance sensitive. High resistance causes heat. Check the battery terminal and see if it is hot. If it is then there is too much resistance in the cable connection --clean the wire terminals.
2. Poor ground. Check condition of ground at battery box. Carefully place your hand on the connections and see if they are warm or hot. Any resistance to starter causes heat. If the connection is warm then you need to clean the connection to reduce the electrical resistance. A few milliohms of resistance can cut your power by 1/3. Bob Nuckolls of Aero Electric Connection (full text of excellent article When a Ground is a Good Ground Not? at www.aeroelectric.com) gives us this example:
Battery resistance 10 milliohms
Contactors resistance 4 milliohms
15' of 2 AWG wire 3.2 milliohms
Joints & wire segments 8.0 milliohms
Total resistance 25.2 milliohms
If the starter draws 200 amps from Ohms law Volts=Amps x Ohms we have a 5.04 voltage drop or just 7.46 volts at the starter. We've lost 1/3 of our power! As Bob states: "Pushing 200+ amps makes every milliohm count" .
3. Weak battery. If the starter engages and the propeller moves and then stalls on the first compression stroke then:
A. If hot suspect bad cables or solenoids, or
B. If cold suspect a bad battery.
I'll be back from lunch in half an hour or so and I'd like to see your observations.
Le Mans Master
Joined: Oct 2006
Posts: 6,842
Likes: 285
From: Palmdale CA
This is a tough one for sure! Remember, I mentioned this:
I was talking to my shop partner and he reminded me of the same situation we had three weeks ago and I totally forgot till he did.
When I installed the new high torque starter, I used the WRONG bolt holes and the starter gear was actually hitting the flywheel! It sounded just like a bad starter (click and nothing). I had used the inside holes, because I thought that's where the gear is closest, but I was wrong. The outside hole is where that starter should mount. I remounted it and boom, the starter engaged and the car started.
What I'd like you to check for next, is to have someone start the car while it is up on jacks and you're underneath it. Of course, you should have it in Park and the car chocked and the footbrake locked.
I want you to remove the inspection cover for the torque converter so you can see what is going on. When the helper cranks the key, what is happening? Do you see the solonoid pushing the gear out? Is it hitting the flywheel dead on, for a no start condition, just a click? (like mine) or is it engaging the teeth on the outside of the flywheel like it should?
Le Mans Master
Joined: Oct 2006
Posts: 6,842
Likes: 285
From: Palmdale CA
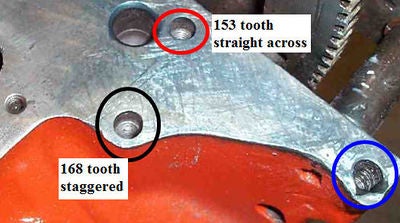
Basic information to know about flywheels/flexplates and starters
Flywheels/Flexplates with two different diameters are used on Chevrolet small-block V8, big-block V8, and V6/90� engines. Large flywheels/flexplates are 14” in diameter, and have 168 teeth on the starter ring gear. Small diameter flywheels/flexplates are 12-3/4” in diameter and have 153 teeth on the starter ring gear. Flywheels are used on manual transmissions and flexplates are used on automatic transmissions.
The difference in flywheel/flexplate diameters requires two distinct starter housings. Starter noses used with large diameter flywheels/flexplates have two offset bolt holes; starters for small flywheels/flexplates have two bolt holes which are parallel to the back of the block. Most Chevrolet blocks are drilled for both types of starters. If you are changing the diameter of your Chevrolet’s flywheel/flexplate, you can convert your present starter to fit the new flywheel/flexplate by installing the appropriate starter nose, starter motor housing, found within each engine classification.
Le Mans Master
Joined: Oct 2006
Posts: 6,842
Likes: 285
From: Palmdale CA
Another, very good thread
http://www.crankshaftcoalition.com/wiki/Starter_motors
The starter nose is bolted to the starter motor housing. It provides a means for the starter to be mounted to the block or bellhousing depending on the application. On block mounted starters the nose locates the starter gear in the correct location for proper engagement with the flywheel ring gear; closer to the flywheel for the 153 tooth flywheel or further from the flywheel for the 168 tooth flywheel. The nose can be cast iron, often seen on bellhousing-mounted starter applications, or more commonly aluminum for starters that mount to the block.
Thread Starter
Burning Brakes
Joined: Jan 2010
Posts: 884
Likes: 84
From: New Boston, NH
Starter positioning is not the problem. The starter does absolutely nothing when I turn the key. The gear doesn't come out and hit the fly wheel, nothing spins, nothing, nada, zip, zilch. The only way the starter shows any reaction is when power is applied directly from the battery via jumper cables. Then, and only then, does it respond. I have verified that I have power to the batt cable that attaches to the large post on the solenoid and that I have 12v to the purple/white wire that comes in to the neutral safety switch. When I connect the purple/white and purple wires from the neutral safety switch, I then get 12v in the purple wire that attaches to the S post on the solenoid. However, when I turn the key, nothing. Mind you, the starter during all of this is not mounted but under the car and wired. Now, if that makes a difference then I am a damn fool and have wasted a whole lot of your time, but I can't imagine that it does. It seems that resistance isn't a problem and that there doesn't appear to be a large drain on the system. So therein lies the problem, I have a starter that bench tests ok, I have power in all of the supply lines for the starter, but when attached, the starter doesn't work.
Corvette Stories
The Best of Corvette for Corvette Enthusiasts

Every 2027 Corvette Engine Explained
Joe Kucinski
Designer Imagines A Corvette That Looks More Like a Corvette Than the Corvette
Verdad Gallardo
10 Ugly Corvettes That We Still Kinda Love
Joe Kucinski
Top 10 Most Expensive Corvettes Ever Sold on Bring A Trailer
Brett Foote
10 Things Every Corvette Owner Needs (2026 Edition)
Michael S. Palmer
8 Most "Only Corvette Owners Understand" Quirks and Problems
Pouria Savadkouei
10 Reasons the C6 Z06 is Still A Performance Benchmark After 20 Years
Joe Kucinski
How Much Horsepower Every Corvette Engine "LOST" in 1972
Joe Kucinski
Top 10 DOs and DON'Ts for Protecting Your Convertible Top!
Michael S. Palmer

Thread Starter
Burning Brakes
Joined: Jan 2010
Posts: 884
Likes: 84
From: New Boston, NH

Bryan
Team Owner

Joined: Jul 2012
Posts: 34,479
Likes: 532
From: Central PA. - - My AR15 identifies as a muzzleloader
I believe in the Beer Fairy
Ok, I read this thread, and this really doesn't sound like an easy internet fix. Obviously, it's 3 pages long now.
Here's my $.02, and you'll get what you paid for.
Back in those days, they did have "fusible links" in the harness's. It's possible you've got one of them smoked, and if so, it' needs found and replaced. However, if that's the case, you'd have some wiring issue somewhere causing it to fail, and that's a higher priority than fixing the fuse. This all hypothetical of course.
Clearly you've got something simple here. You can always arc across the starter solenoid with a screwdriver you don't like, and see if the starter engages then. That would eliminate all insufficient current questions. From there, all you'd need is to find out why there's no start signal getting down there, and that's as simple as following all the wiring from point to point. Time consuming, yea, but, I think it's reduced to that at this point.
Grab your meter and a 6 pack, it's gonna be a while...
Instructor


Joined: Sep 2008
Posts: 200
Likes: 6
From: Palmer, Alaska
I am actually pretty curious to see this resolved, I pulled the starter to install a new set of headers and when I went to fire her back up, this very same thing is happening to my 69 BB. I had no time to look into it before I left on this oil field tour, but I have been thinking about it for the last couple of weeks. I have heard that the harness can get unpluged when pulling on the wires to remove the starter, and the weak current will let the solenoid "click" but not kick out the bendix drive. I'll be lurking to see how it turns out, good luck
Thread Starter
Burning Brakes
Joined: Jan 2010
Posts: 884
Likes: 84
From: New Boston, NH
As it turns out, the problem was with the ground. I had been operating under the assumption that the small black wire in the starter bundle was the ground and that the large ground cable running from near the engine mount to the block, connecting through the starter shield, was strictly to ground the motor. Turns out that the small black wire is a power supply for something and the large ground cable acts as a ground for the starter too. I commented in one of the posts that I had been trying to get the starter to work, wired to the car but not actually mounted and that I didn't think that should matter. Turns out that it in fact does matter. The threaded post on the back of the starter motor connects to the shield which connects to the ground. Without this, as someone said, current and volts mean nothing.
So there you have it. I hope this experience helps someone else because it is entirely possible that it gave me a few more grey hairs. Thanks to all who contributed their ideas.
So there you have it. I hope this experience helps someone else because it is entirely possible that it gave me a few more grey hairs. Thanks to all who contributed their ideas.
Melting Slicks


Joined: Sep 2011
Posts: 3,372
Likes: 215
From: Peoria Arizona
Well, I'm glad you figured it out! I have to say, from your last post here, it sounds like the info I gave you about the small black wire in the starter harness being a ground was incorrect. My apologies for that. I'm now wondering why I followed this advice from someone on the forums (doesn't matter who) and my car runs. If in fact the small black wire is a power supply (odd it would be black as well), what does it power, and why was that keeping your car from starting but I have no issues because of it.
Things that make you go Hmmmm...
Adam
Things that make you go Hmmmm...
Adam
Thread Starter
Burning Brakes
Joined: Jan 2010
Posts: 884
Likes: 84
From: New Boston, NH
Well, I'm glad you figured it out! I have to say, from your last post here, it sounds like the info I gave you about the small black wire in the starter harness being a ground was incorrect. My apologies for that. I'm now wondering why I followed this advice from someone on the forums (doesn't matter who) and my car runs. If in fact the small black wire is a power supply (odd it would be black as well), what does it power, and why was that keeping your car from starting but I have no issues because of it.
Things that make you go Hmmmm...
Adam
Things that make you go Hmmmm...
Adam

Melting Slicks
Joined: May 2011
Posts: 2,753
Likes: 119
From: Springfield Missouri
I think the small black wire is the ground for other things like the blower motor, etc. It is bolted to a transmission or bell housing bolt. It doesn't ground the starter. All black wiries are usually a ground wire on a vet.
Thread Starter
Burning Brakes
Joined: Jan 2010
Posts: 884
Likes: 84
From: New Boston, NH