


Replacing speakers

Le Mans Master


Joined: Oct 2006
Posts: 6,842
Likes: 285
From: Palmdale CA
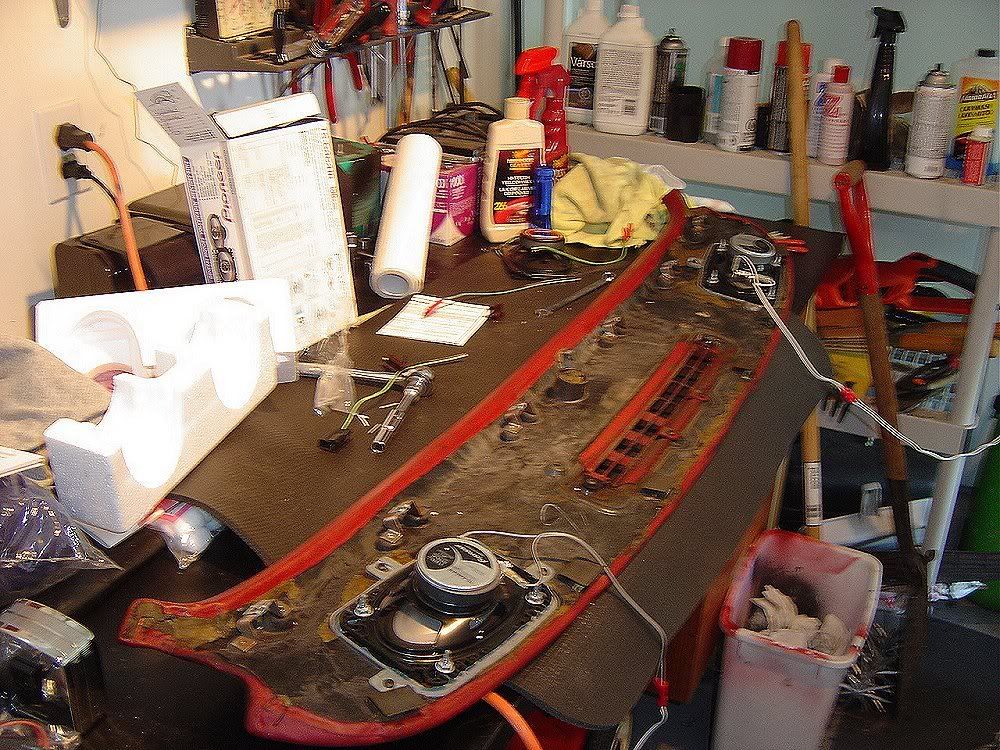
On my 74, the dash was already out and installed 4x6 plate speakers underneath. The only problem was the two 'grill' areas that have all those little holes, totally turned to chunky dust! So I gutted the holes and installed plastic and metal speaker grills, on top, with the dash in between and the speakers undereath.
The curvature of the dash makes for some problems too, but they were overcome and it looks sanitary. Also soldered ten feet of wire to each terminal, so it's ready to route and hookup later on.
The curvature of the dash makes for some problems too, but they were overcome and it looks sanitary. Also soldered ten feet of wire to each terminal, so it's ready to route and hookup later on.
Racer


Joined: Jul 2004
Posts: 441
Likes: 1
From: Windsor Ontario
It's a huge job, especially if it is just to change the speakers. If you are changing the dash then it is worth it. the other option is putting speakers in the kick panels, and buying new kick panels with the speaker hoes in them.

Instructor
Joined: Oct 2009
Posts: 230
Likes: 4
From: Woodbridge VA
The job is not difficult, however I would recommend you place the removed screws in a bag and label them so make re-assembly easier. And sometimes screw holes just don't seem to line up when you're ready to put back together. Standard C3 stuff.
The passenger side is much easier to complete, the lower dash pad can be removed entirely. I lowered the driver side lower dash pad without removal, and barely had enough room to work without total removal (remember gauge cluster etc it attached). I did unbolt the steering column and let it hang to get a few extra inches.
Many talked about removing the upper dash pad to remove/replace the speakers, but this is not necessary. This was my major concern, as its difficult to remove the upper dash pad without causing damage (many are 40+ years old and are fragile).
Have fun!
Last edited by BeansWorld; Mar 2, 2013 at 11:33 AM.

Instructor
Joined: Apr 2005
Posts: 169
Likes: 1
From: East Haddam CT
I've been 'Corvette-less' for 17 years and just got another one (that makes this Corvette number eleven). The last was a new LT-4 convertible which explains my dismal post count.
The stock stereo and the dash speakers in the '75 I just got work but the entire package sounds awful (speakers and radio are preparing to die I think). I am not in a hurry to jump through all the hoops needed to change the speakers in the dash but will likely go the kick panel route. A 38 year old Corvette is not an ideal listing environment anyway so quality kick panel speakers should be just fine in this car. I also intend to change the head unit which leads me to this question. Almost all the "it looks stock" aftermarket replacement radios are for a four speaker installation. Short of using the fader to not send signal to two non exsistant speakers can these aftermarket radios be ordered to sum their output to just two speakers? I'm not a fan of hacking up an interior to add speakers that weren't available when the car was manufactured. The entire radio redo can be returned to stock very easily should I sell the car so the factory Delco and its amp will go in an airtight plastic bag and adorn a shelf in the garage until that day arrives.
Nice to be back.
RB
Last edited by Commodore; Mar 4, 2013 at 08:36 AM.

Advanced
Joined: Jun 2012
Posts: 85
Likes: 0
From: verona va
I sent my orig radio out to get cleand and refreshed. I also went with stock speakers back in the dash. Drop the column like you said and you can do it. Had to do a little prying, and your arm will get scraped up a little but be patient and you can get it done. Took me maybe a half hour total to get the drivers side one in. I will say out of the 4 studs I did break one off because I just couldn't get it to work with all 4. Is that a Bubba thing?
This was a 72, couldn't imaging there would be much difference if any
on a 74.
This was a 72, couldn't imaging there would be much difference if any
on a 74.
Corvette Stories
The Best of Corvette for Corvette Enthusiasts

Top 10 Most Explosive Corvettes Ever Made: Power-to-Weight Ratio Ranked!
Joe Kucinski
150 hp to 1,250 hp: Every Corvette Generation Compared by the Specs That Matter
Joe Kucinski
8 Coolest Corvette Pace Cars (and Replicas) of All Time
Verdad Gallardo
Top 10 Corvette Engines RANKED by Peak Torque (70+ Years of Muscle!)
Joe Kucinski
Corvette ZR1X Will Be Pacing the Indy 500, And Could Probably Race, Too!
Verdad Gallardo
Top 10 Corvettes Coming to Mecum Indy 2026!
Brett Foote
Top 10 C9 Corvette MUST-HAVES to Fix These C8 Generation Flaws!
Michael S. Palmer
10 Revolutionary 'Corvette Firsts' Most People Don't Know
Joe Kucinski
5 Reasons to Upgrade to an LS6-Powered Corvette; 5 Reasons to Stay LT2
Michael S. PalmerDrifting


Joined: Jan 2012
Posts: 1,734
Likes: 276
From: Port Huron MI
Hey Redwhitekat,
Good advise above, to be certain. Labeled bags with screws is a must or the reconstrcution stage will have you pulling out hairs and taking forever. MrJr's advice about the passenger side is actually very good. That side is EASY. I think it's four screws that hold that passenger side dash pad, a little jockeying to get the heat/air duct work out of the way, then another four screws to remove the bottom of the speaker support, and there it is.
BUT. Here's the problem with the driver side: Yes, you need to drop the steering column which is only a slight pain in the keester, getting under the dash down by the pedals, probably upside down in you seat, feet up through the t-tops opening. But then you need patience and luck and HEAT. The driver's side dash pad will not be easily removed above the steering column, so that arched opening in the pad that sits on the steering column (which is thin and fairly fragile) will have to be delicately pulled out, after disconnecting the wiring to the back of the speedo and tach (this is a royal PITA because you have very little room to blindly work). Once that panel is removed, the speaker is as easily accessible as it is on the passenger side. If you are removing the dash to work as well that makes it easier, but again you will want a WARM environment, because as with the drivers side dash panel, it will be even more brittle in the cold, it won't flex and for the attempt to find better sound you will be rewarded with a cracked drivers side pad and / or dash.
I replaced the speakers and re-dyed the entire interior, so it made sense when I had eveything out to do both speakers, but I -- in hindsight-- if I had to do it again, I wouldn't even think of the drivers side. I'd just build a speaker box for the back and correct the problem with richer sound that way. And drop some speakers below in the kick plates as someone suggested above.
Good luck. And if you go that route of under the dash, take your time and be gentle with those REALLY old pieces... They're crazy expensive to replace.

Team Owner

Joined: Aug 1999
Posts: 30,995
Likes: 98
From: Ontario
I wouldn't start pulling the driver's side dash apart. You can do more damage than good. The upper dash pad will come out if you work carefully and with a bit of heat (e.g. low setting on a hair dryer) as Stroh suggests. Then you have lots of room to work. Replacing one speaker (passenger side) without a technical match on the other side does not make sense.
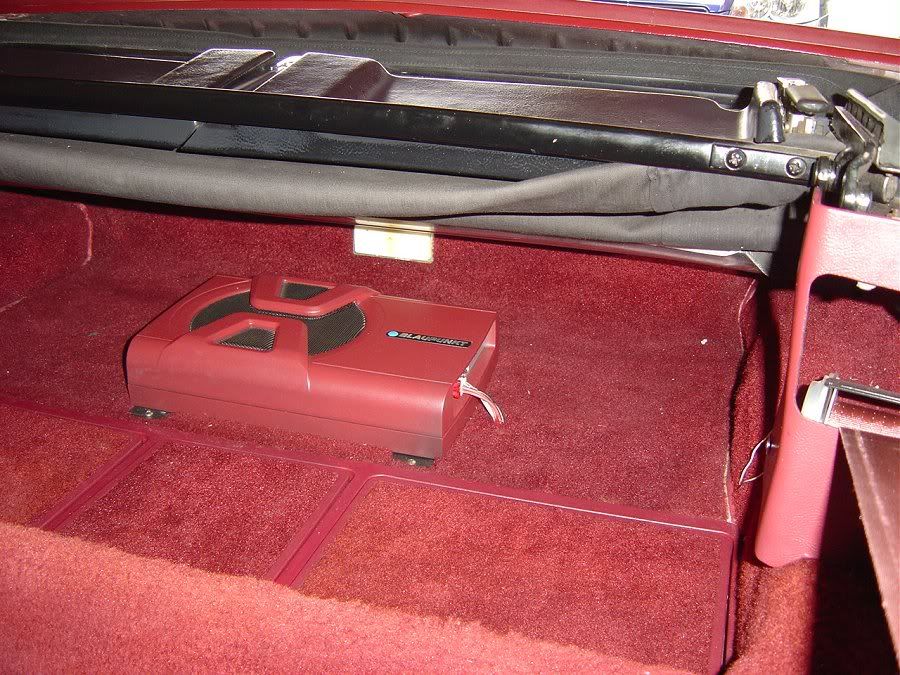
This was my choice for the kick panels and some bass in the back.
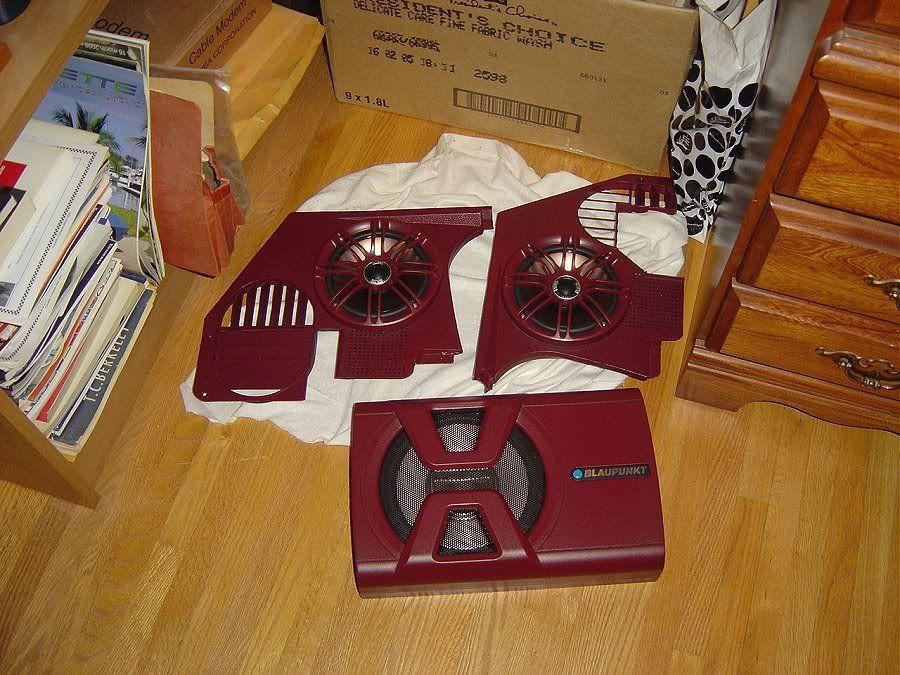

This was my choice for the kick panels and some bass in the back.
Last edited by Paul L; Mar 4, 2013 at 02:30 PM.
Team Owner
Joined: Aug 1999
Posts: 30,995
Likes: 98
From: Ontario

The Blaupunkt sub-woofer has a self-powered amp connected directly to the battery.
Last edited by Paul L; Mar 4, 2013 at 05:30 PM.
Melting Slicks

Joined: Mar 2008
Posts: 2,023
Likes: 6
From: Austin Tx
There is no reason I can think to remove the drivers side dash, pull the passenger side dash, and then remove the top dash.
This is how I do it.
1) Remove header moldings, sun visors, and a pilliar moldings.
2) Remove passenger side dash pad.
3) Remove top pad support screw from bottom of top dash pab.
4) Remove wiper switch.
5) Remove screw holding driver side dash - 2 on each side, and 3 on top.
6) Disconnect passenger side speaker.
7) Pull the top dash pad gently towards you, away from the windshield. While doing this, lift the edge (the one facing you) of the dash pad a little. This is done to disengage the clips on the front of the pad from the birdcage. Be carefull the pad can catch on the defroster vent - I pull down on the vent when I do this part, and when I'm putting the pad back in.
8) Now the part to be very carefull. It's easiest to have some help here. The pad can not be removed without bending it slightly. With a helper holding the passenger side of the pad down, gently lift up the center of the pad, while gently pressing down on the passenger side. Do this very gently, and only enough to clear the passenger side a-pilliar.
9) Disconnect the drivers side speaker, and remove the dash.
I also remove the steering wheel, removing it provides a lot more room to work in. Also, In the list I had the screws on the sides of the drivers dash being removed. This is to allow the drivers dash to move slightly. If you need it to move more than a sliver, loosen the two bolts holding the column to the firewall, and the two bolts holding the column to the supports. This will allow you to wiggle the dash a little more. Try not to move the dirvers dash to much, the bottom can break on the steering column.
Last edited by Mashman; Mar 4, 2013 at 05:40 PM.