Body dolly plans and advice.
 11-05-2013, 09:28 PM
#1
Drifting

Thread Starter
Member Since: Feb 2007
Location: Pearland Texas
Posts: 1,498
Received 205 Likes
on
122 Posts
St. Jude Donor '09

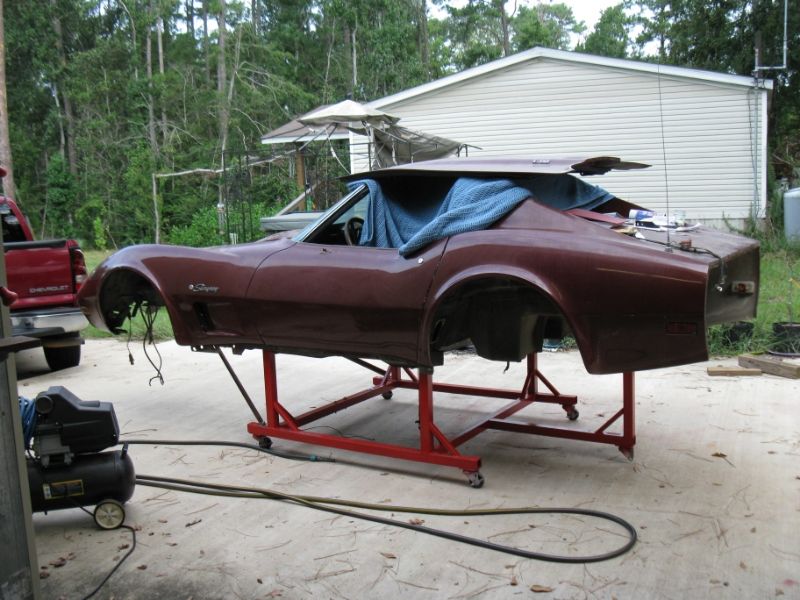
I'm afraid the time has come for body removal . During the Vintage air installation two weeks ago, I found Rust in the #2 and #6 Rocker mounts.the ones by the kick panels. From what I understand there is no way around this but to remove the body to repair the rust issue. Where can I get the plans to build a body dolly?. I will be most likely be using a engine hoist. Mounts #1,4,5 and 8 look in good shape visually. I still haven't looked at #3 and 7 yet since I haven't removed the access plate to get a look at them. Any advice and tips will be greatly appreciated since I have never done this type of work on my Vette before..

 11-05-2013, 10:20 PM
#2
Race Director

Doesn't look terrible to me just yet.
Start soaking them with penetrant now for a week or so squirting it on daily. If the bolts come out you're in luck. If they start spinning...not so lucky and you'll need the dolly.
I guess if you're worried with that amount of rust you can build a dolly...just be warned... my body off turned into an LSx swap and a entire paint and interior restore 3 years in the making now.
I've got a few different plans saved on my computer if you're interested just PM me.
I'm sure they're located somewhere on the net, but I don't know where.
I built one and it was a pretty crappy plan so made modifications that would have helped.
11-05-2013, 11:25 PM
#3
Drifting
Thread Starter
Member Since: Feb 2007
Location: Pearland Texas
Posts: 1,498
Received 205 Likes
on
122 Posts
St. Jude Donor '09
Doesn't look terrible to me just yet.
Start soaking them with penetrant now for a week or so squirting it on daily. If the bolts come out you're in luck. If they start spinning...not so lucky and you'll need the dolly.
I guess if you're worried with that amount of rust you can build a dolly...just be warned... my body off turned into an LSx swap and a entire paint and interior restore 3 years in the making now.
I've got a few different plans saved on my computer if you're interested just PM me.
I'm sure they're located somewhere on the net, but I don't know where.
I built one and it was a pretty crappy plan so made modifications that would have helped.
Start soaking them with penetrant now for a week or so squirting it on daily. If the bolts come out you're in luck. If they start spinning...not so lucky and you'll need the dolly.
I guess if you're worried with that amount of rust you can build a dolly...just be warned... my body off turned into an LSx swap and a entire paint and interior restore 3 years in the making now.
I've got a few different plans saved on my computer if you're interested just PM me.
I'm sure they're located somewhere on the net, but I don't know where.
I built one and it was a pretty crappy plan so made modifications that would have helped.
Thanks
11-06-2013, 06:37 AM
#5
Race Director
You can see in the plans you end up widdling a 4x4 down 3/4 for your 2x4's to screw to it...
Plus the caster wheels I put on didn't clear my engine hoist so I had to put like 3 extra corner plywood spacers to get everything to clear.
It works and I use it all the time but...
Last edited by PUNISHER VETTE; 11-06-2013 at 06:42 AM.
11-06-2013, 07:09 AM
#6
Pro


Member Since: Nov 2012
Location: Chesapeake Virginia
Posts: 672
Likes: 0
Received 0 Likes
on
0 Posts
I built the same dolly but had to modify it some to work right, I had to take some 2x6's and stand them on edge on the long sides so they would go into the "frame tracks" that run under the doors. if you plan on doing any work under the body while it's off, I would also build it taller so you can get under it easier.
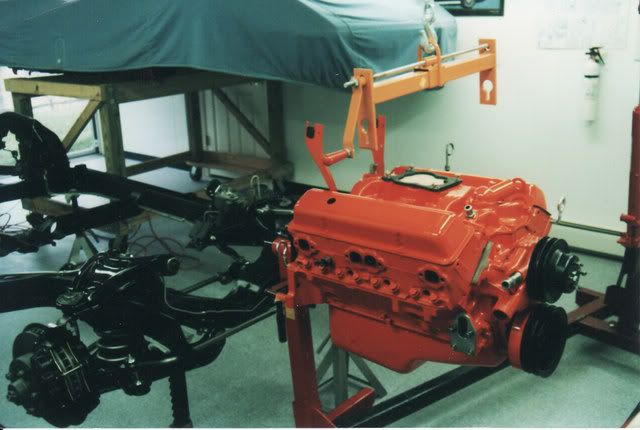
for lifting the body, I used an engine lift but I did have the interior gutted, the doors off and the windshield out. I used a load balancer and attached four ratchet straps. I used the outside seat belt bolt holes for the two rear straps and hooked the two front straps into the #2 body mount openings.
for lifting the body, I used an engine lift but I did have the interior gutted, the doors off and the windshield out. I used a load balancer and attached four ratchet straps. I used the outside seat belt bolt holes for the two rear straps and hooked the two front straps into the #2 body mount openings.
11-06-2013, 08:46 AM
#7
Melting Slicks

Anything can be fixed....my Camaro was gone, a mess, the more I got into it the worse it was, replaced every panel including the roof, all floors, roof understructure etc..in the end I have a laser straight car, that is ready for paint.
Mig and Tig welding is great, but also look into body panel adhesive for birdcage repairs, it is often much stronger than welding in new metal and is easier to work with, sand etc, you can make nice steel patch panels and after you treat the other rust glue un patches and blend them in...
Mig and Tig welding is great, but also look into body panel adhesive for birdcage repairs, it is often much stronger than welding in new metal and is easier to work with, sand etc, you can make nice steel patch panels and after you treat the other rust glue un patches and blend them in...
11-06-2013, 08:59 AM
#8
Le Mans Master


Member Since: Jul 2006
Location: charlotte north carolina
Posts: 8,117
Likes: 0
Received 100 Likes
on
92 Posts

if garage space is critical, consider lifting the body higher and supporting it on stands, rather than a dolly. two 2x10 running from front to back using the floors, battery/storage compartments and rad support will allow great access to the body mount and rocker channels. knowledge gained from experience.
11-06-2013, 05:10 PM
#10


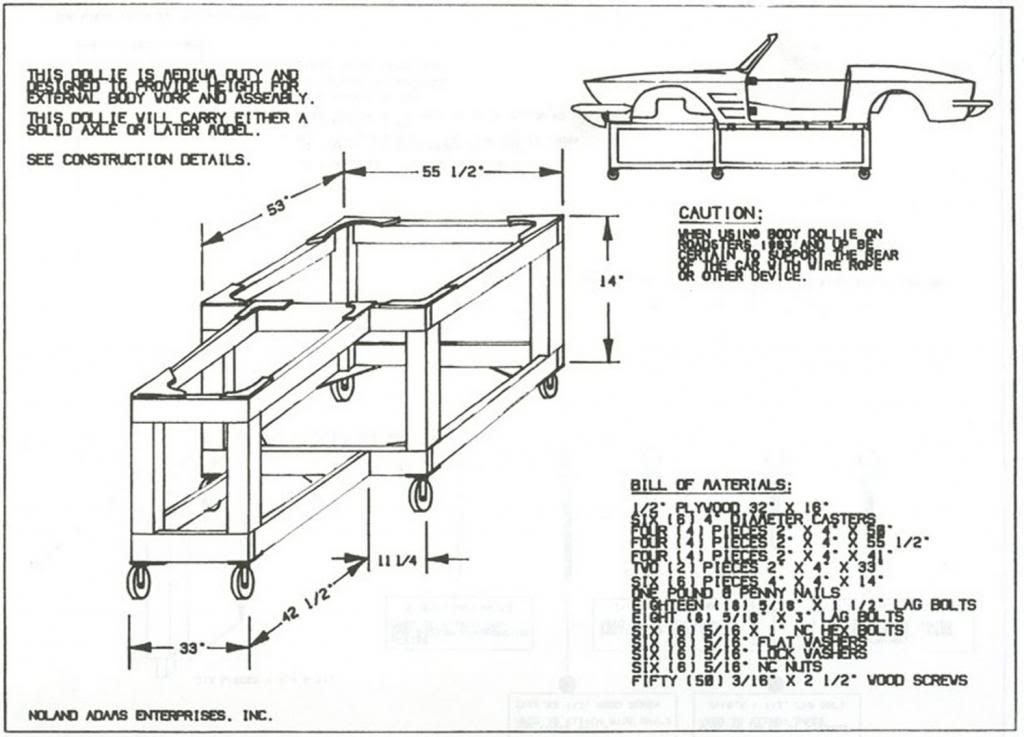
I used Nolans (sp?) body dolly plans.
I built this one and it was horrible.
I doesn't support the side channels properly and there is no provision for supporting the nose piece. Also, it is way too low. I need to get under the body to replace a lot of reinforcements. I used these plans, not knowing better, but raised all the vertically pieces around 3 ft so I could get under the body. Large steel castor wheels are also required to be able to move it around easier, not those tiny 2 inch ones.
Also, if you need to work on the rocker channels, you need to raise the body by the floor pans at the front and the battery/jack box at the back with 4 cheap scissor jacks, so you need the body dolly to support these jacks at these spots.
I made a lot of changes to the body dolly shown. But they were changes that I made to try and make it work. I would scrap this design and start over again if I were to do it again.
There needs to be a vertically piece at the front to support the nose at the middle of the body. This body dolly is not long enough to have a vertical piece at the front. Without this piece, the entire weight of the front clip, including the heavy headlight assembly is hanging off the glue joints at the firewall. There is not a lot of glue joints there and if the front clip is anything like my C3, about 1/3 of the glue joints were not even attached properly right from the factory. For those familiar with this glue joints, the joint at the front of the plenum lower side had glue on the plenum side but it didn't reach the clip itself.
This body dolly design should be banished from the face of the earth....period. I was in a panic and majorily P*****d when I had the body held up by an engine hoist and trying to lower it on this body dolly when I realized that the rocker channels were not being supported properly at all, the distance between the wood side rails and the rocker channels are completely incompatable. I had to get a 2x6 placed flat side on under the channels so that is was somewhat supported. I was mad at myself for blindly following the plans without checking the body dolly dimensions.
Also, it is complicated to build, there are a bunch of notches to be cut out and little plywood pieces of reinforcement that are near useless. This isn't a piece of furniture. It should be designed to be easily built with no notching and no reinforcement pieces.
For a C3,,,,don't build this as is. You can use it for a guide but change it to accommodate the above.
I'm surprised that with all the C3's that have been restored, no one has published a good body dolly. I've have seen some steel ones that were good but it required metal fabricating. I have not seen a good one made from wood.
I'll probably not restore another one or else I would redo the body dolly and publish better plans.
Steve L
73 coupe since new
11-06-2013, 05:23 PM
#11
Hi,
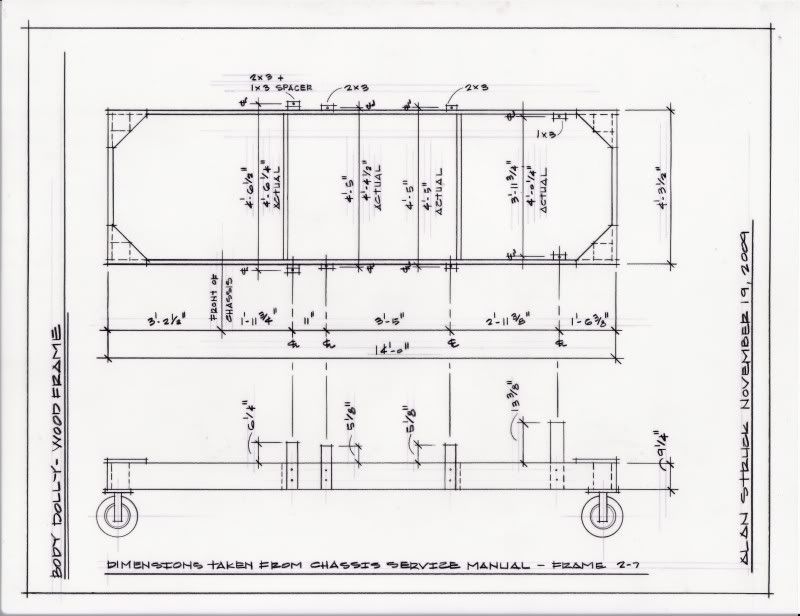
I designed this one to be quick and easy to build.
It supports the body at the 8 body mount positions.
I too built a taller stand as jnb mentions to store the body, but not to work on it.
If I built another dolly I think I'd use 2x12s rather than 2x0s so the dolly would be a little more rigid.
You can't/shouldn't do the door and hood gaps while the body is on the dolly, the body should be back on the frame to do that work.
Regards,
Alan
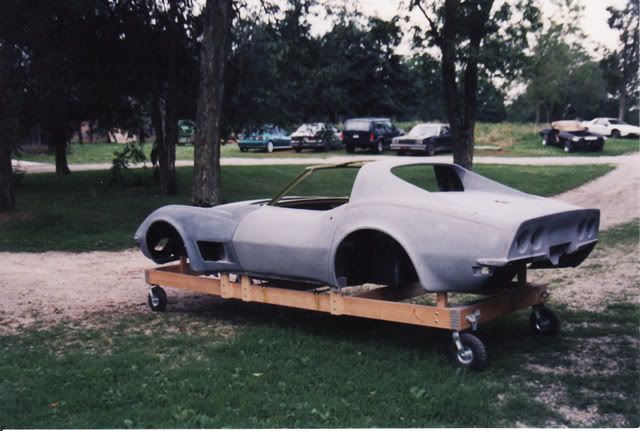
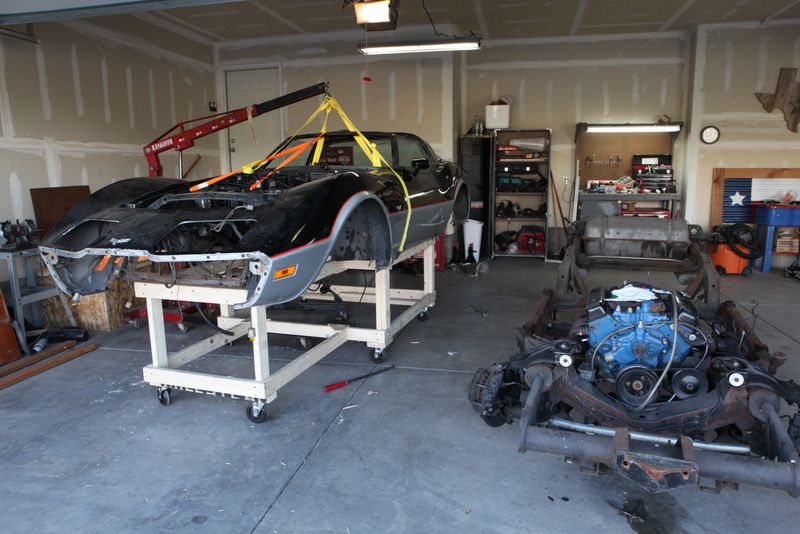
Here's the stand I built to store the body while I restored the frame and running gear.

I think it is one of the better ones I've seen, but it wouldn't have served my purpose mostly because you can't get under it to do reinforcements. The vertical pieces need to be a lot higher and more robust which means another set of wood side rails all around. Also if you are replacing or repairing the rocker channels, you need another set of supports but these supports need to be temporary since you do not want to support the body for any length of time by the floor and battery/jack boxes.
Also, if you need to do firewall repairs like I did, because the factory didn't put enough adhesive between the A pillar and firewall. This let go and caused a huge gap between the top of the door and front clip. Supporting under the #1 body mount will preclude you from removing the firewall.
I notice in the picture that you have a vertical piece at the front to support the nose, but I don't see it in your plans.
In your second picture, you have some sort of dolly in the background, that looks like about the height that I build the Noland body so I could get under it. I certainly was glad I built it to that height since I spent a lot of time under the body.
Also, once I took the front clip off, the back of the body seemed to upset the balance on the body dolly, so I ratcheted down the front to make sure that it wasn't going to slip off.
Steve L
73 coupe since new
Last edited by stevelischynsky; 11-06-2013 at 05:28 PM.
11-06-2013, 08:19 PM
#12
Heel & Toe


Member Since: May 2012
Posts: 20
Likes: 0
Received 0 Likes
on
0 Posts
I am making one out of steel (40mmX40X2.5 RHS). It is based on the measurements from Alan71's plans (thanks Alan!) but it stands a little further off the main frame. I plan on mounting it on a rotisserie so I doubled up the thickness for the main frame. I need to remove my front clip so I have not incorporated any support for this and will only re-bond it once body back on the frame.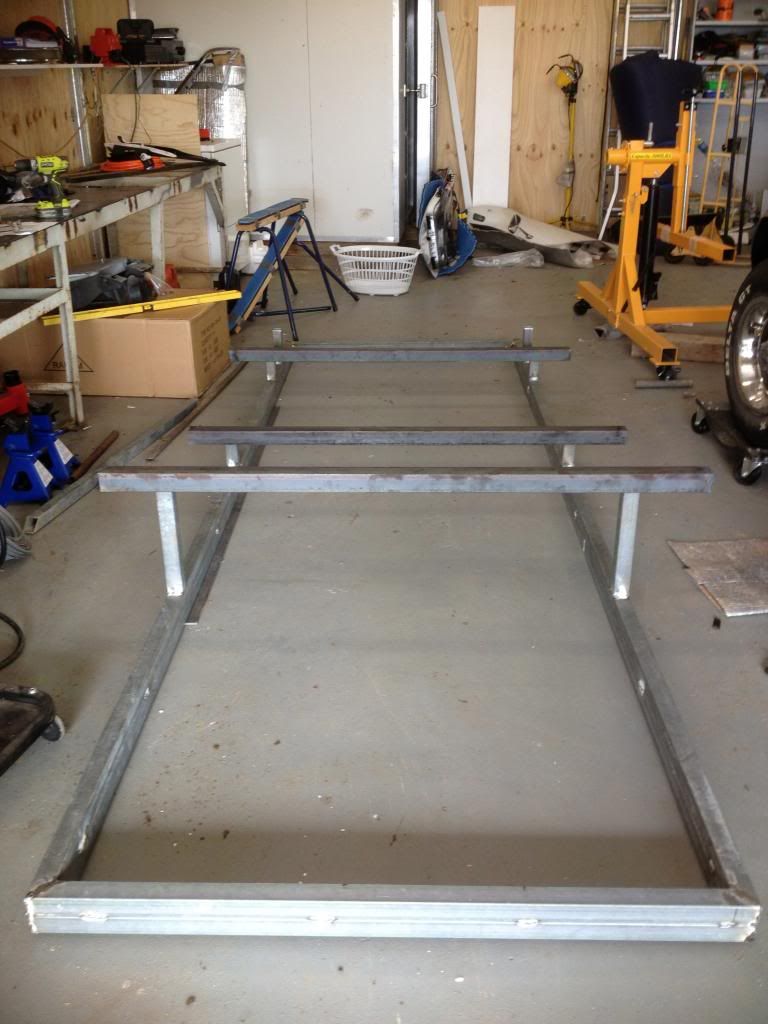
 11-06-2013, 08:31 PM
#13
Race Director
I am making one out of steel (40mmX40X2.5 RHS). It is based on the measurements from Alan71's plans (thanks Alan!) but it stands a little further off the main frame. I plan on mounting it on a rotisserie so I doubled up the thickness for the main frame. I need to remove my front clip so I have not incorporated any support for this and will only re-bond it once body back on the frame.
It would have made my current body off so much easier. Fiberglass repairs, paint stripping, and undercarriage cleaning would all be way easier facing up.
11-06-2013, 08:41 PM
#14
Heel & Toe
Member Since: May 2012
Posts: 20
Likes: 0
Received 0 Likes
on
0 Posts
Picked mine up NEW for $700. I have 2 other projects for it already and figure I can unload it for about $500 when done (they rarely come up on ebay used). Kids might even want it when I am done...

 11-08-2013, 11:46 AM
#16
Advanced

I purchased this locally, not sure who built it. I gives excellent access to the body. It is made from thin steel square tubing and is very light.
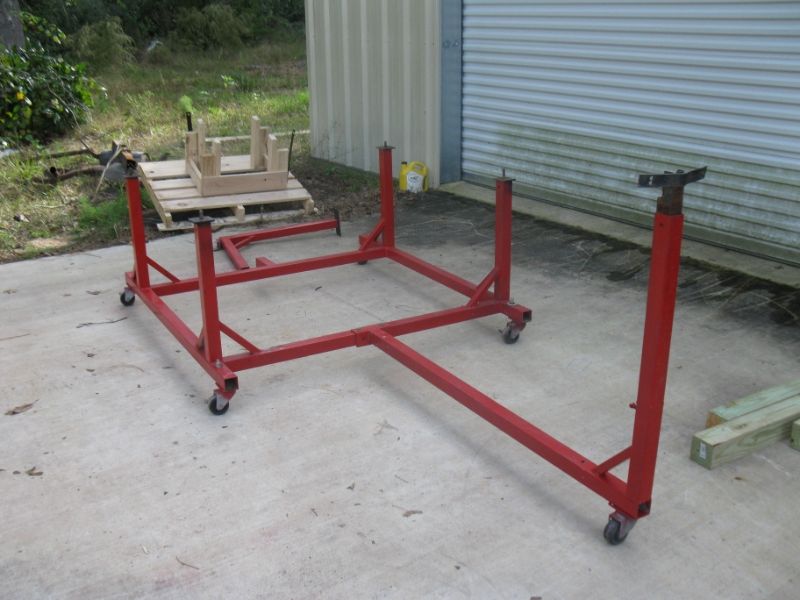
The legs that support the body can be raised for more working height.

The nose support is removable and braces support the nose.
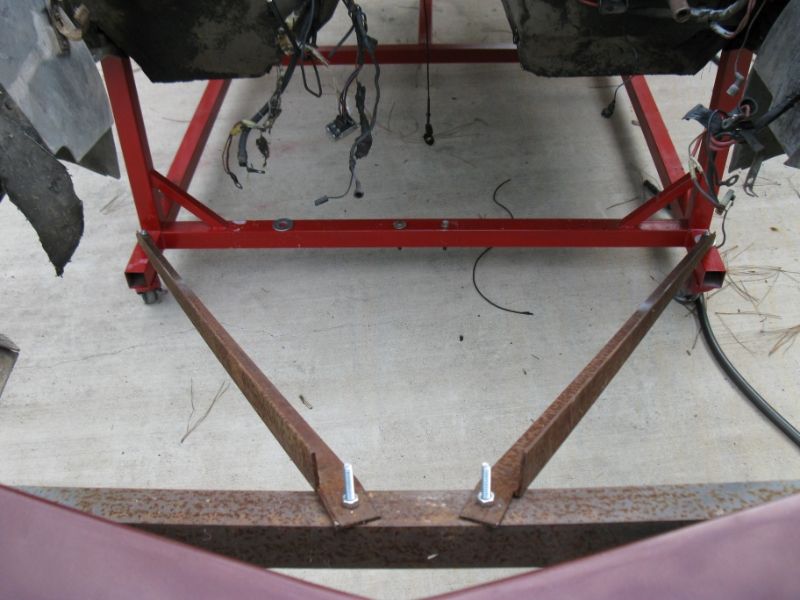
I cut off this rear support as it caused issues going over slopes in pavement. I don't have pics of the body on without the rear brace.
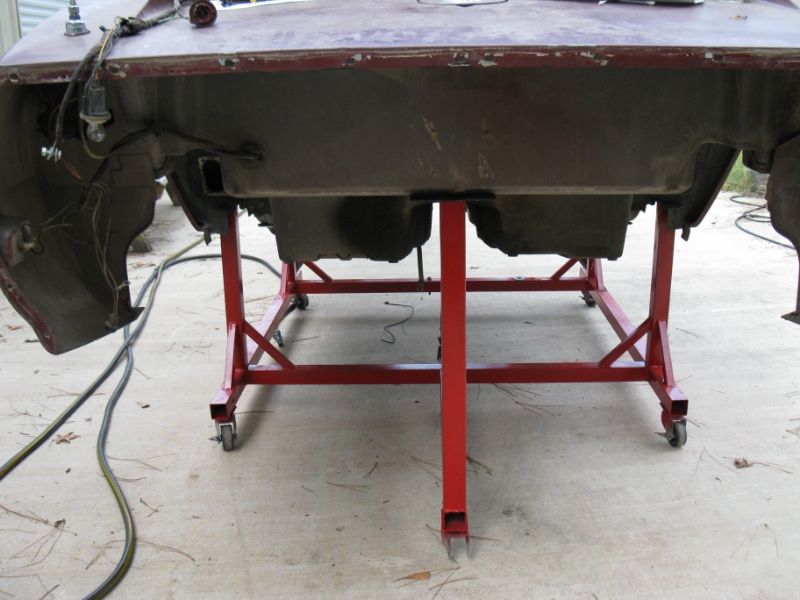
Here is the body on the dolly.

The legs that support the body can be raised for more working height.

The nose support is removable and braces support the nose.

I cut off this rear support as it caused issues going over slopes in pavement. I don't have pics of the body on without the rear brace.

Here is the body on the dolly.
 11-08-2013, 03:34 PM
#17
Drifting
I purchased this locally, not sure who built it. I gives excellent access to the body. It is made from thin steel square tubing and is very light.
The legs that support the body can be raised for more working height.
The nose support is removable and braces support the nose.
I cut off this rear support as it caused issues going over slopes in pavement. I don't have pics of the body on without the rear brace.
Here is the body on the dolly.
The legs that support the body can be raised for more working height.
The nose support is removable and braces support the nose.
I cut off this rear support as it caused issues going over slopes in pavement. I don't have pics of the body on without the rear brace.
Here is the body on the dolly.
 11-09-2013, 11:23 PM
#19
I built the wooding one from plans similar to what was posted in the beginning of this post. I had to also modify it by using spacers under the caster wheels to get my hoist under, adding a 2X4 along the top sides and I did double the height to give plenty of room to get under it. I plan to save it and reuse it for a restoration on a 71 Chevy C10.
A rotisserie would be cool if budget would allow for it.
A rotisserie would be cool if budget would allow for it.