







Hidden Subwoofer Build
Thread Starter
Pro

Joined: Nov 2013
Posts: 730
Likes: 37
From: Catoosa Okla
 Totally Consealed Subwoofer Build-Never Know It's There
After much deliberation (and some great ideas from you guys) I've decided to try and follow through with the rest of my goals-keeping the Vette looking close to stock, but with some of life's modern conveniences all while trying to integrate seamlessly into GM's original plans, and do the upgrades to look as if it came from Chevrolet that way. That is my goal with the sub build.
I decided to use the jack storage for the project of not only the subwoofer, but the amp as well. First decision to make is whether to create a sealed box or a ported one. The ported is certainly more efficient and would offer a lot more "boom" for the buck, however they require a LOT more box airspace than my little 74 convertible can muster. I needed a subwoofer that could work in a small environment. Sealed box is the only way to go. Now I needed to find a good subwoofer. A little measuring indicated an 8" sub was the absolute biggest I could get and still achieve my goal of making it invisible, or hidden so to speak. After a week or so of researching 8" subwoofers, I decided on the Infinity Reference 860w 8-Inch subwoofer for several reasons. First, it has stellar reviews, and a lot of them. Secondly, it won't break the bank. Less than 50 bucks shipped to your door. Third, and most important, it is DESIGNED to work in a very small environment.
[IMG] http://[/IMG]
How small? .34 cu ft which just happens to be perfect for our little jack storage unit and still allow me to keep the jack under the removable subwoofer box. The first thing I needed to do was design a box that ties into what's already there. A carpeted cover. I removed the door over the jack storage area and took it apart. The thickness of the factory lid is right at 1/2". I intend to use the factory ring around the box lid of the new subwoofer door.
[IMG] [/IMG]
I ended up using a 2'x2' piece of Birch plywood for the lid. I used the original door as a template and cut out a new door from the Birch plywood.
[IMG] [/IMG]
A little sanding and trial fitting and it was done.
[IMG] [/IMG]
[IMG] [/IMG]
Now comes the tricky part. A square box simply won't fit into the hole. There is about a 30 deg angle at the back, so this angle needs to be incorporated into the design. Also, the front corner of the box is hatched at about a 45 deg angle. This as well has to be incorporated into the design, all while never losing sight of the .34 cu. ft. we require. No more. No less. This way we KNOW our speaker will indeed perform the way it was created to perform. Tight and powerful. I ended up using a plumb bob (string and a nut) to figure out the initial angle. 30 degrees is pretty close, and that's what I went with. I had planned on using 3/4" MDF for the entire box as a I had some MDF scraps from a previous build left over, but the 3/4" was too thick to accept the door trim ring without a lot of miter work and that 1/4" difference probablt would have set the box too low for the jack to fit under it. I used Playdough to guage my clearances as this is a TIGHT fit! Keep in mind, I still have an amp to contend with, and it is going in this same area as well. The rest of the box I created using the 3/4" MDF with the goal of securing it to the soon to be carpeted Birch replacement door.
[IMG] [/IMG]
[IMG] [/IMG]
[IMG] [/IMG]
[IMG] [/IMG]
[IMG] [/IMG]
*Note that before final assembly of box with liquid nails, all holes securing the pieces have been pre-drilled and test fitted prior to final assembly.
[IMG] [/IMG]
[IMG] [/IMG]
[IMG] [/IMG]
After gluing and securing, I cut some 90 deg angles and glued them along the bottom and all corners. The box needs to be bulletproof as far as sound pressures go.
[IMG] [/IMG]
[IMG] [/IMG]
With the enclosure created, it was time to secure it to the new door (lid).
[IMG] [/IMG]
This is about as far as I can go until I get the ordered speaker in. As soon as it arrives, I'll complete the series
I decided to use the jack storage for the project of not only the subwoofer, but the amp as well. First decision to make is whether to create a sealed box or a ported one. The ported is certainly more efficient and would offer a lot more "boom" for the buck, however they require a LOT more box airspace than my little 74 convertible can muster. I needed a subwoofer that could work in a small environment. Sealed box is the only way to go. Now I needed to find a good subwoofer. A little measuring indicated an 8" sub was the absolute biggest I could get and still achieve my goal of making it invisible, or hidden so to speak. After a week or so of researching 8" subwoofers, I decided on the Infinity Reference 860w 8-Inch subwoofer for several reasons. First, it has stellar reviews, and a lot of them. Secondly, it won't break the bank. Less than 50 bucks shipped to your door. Third, and most important, it is DESIGNED to work in a very small environment.
[IMG]
 http://[/IMG]
 How small? .34 cu ft which just happens to be perfect for our little jack storage unit and still allow me to keep the jack under the removable subwoofer box. The first thing I needed to do was design a box that ties into what's already there. A carpeted cover. I removed the door over the jack storage area and took it apart. The thickness of the factory lid is right at 1/2". I intend to use the factory ring around the box lid of the new subwoofer door.
[IMG]
 [/IMG]
 I ended up using a 2'x2' piece of Birch plywood for the lid. I used the original door as a template and cut out a new door from the Birch plywood.
[IMG]
 [/IMG]
A little sanding and trial fitting and it was done.
[IMG]
 [/IMG]
[IMG]
 [/IMG]
Now comes the tricky part. A square box simply won't fit into the hole. There is about a 30 deg angle at the back, so this angle needs to be incorporated into the design. Also, the front corner of the box is hatched at about a 45 deg angle. This as well has to be incorporated into the design, all while never losing sight of the .34 cu. ft. we require. No more. No less. This way we KNOW our speaker will indeed perform the way it was created to perform. Tight and powerful. I ended up using a plumb bob (string and a nut) to figure out the initial angle. 30 degrees is pretty close, and that's what I went with. I had planned on using 3/4" MDF for the entire box as a I had some MDF scraps from a previous build left over, but the 3/4" was too thick to accept the door trim ring without a lot of miter work and that 1/4" difference probablt would have set the box too low for the jack to fit under it. I used Playdough to guage my clearances as this is a TIGHT fit! Keep in mind, I still have an amp to contend with, and it is going in this same area as well. The rest of the box I created using the 3/4" MDF with the goal of securing it to the soon to be carpeted Birch replacement door.
[IMG]
 [/IMG]
[IMG]
 [/IMG]
[IMG]
 [/IMG]
[IMG]
 [/IMG]
[IMG]
 [/IMG]
*Note that before final assembly of box with liquid nails, all holes securing the pieces have been pre-drilled and test fitted prior to final assembly.
[IMG]
 [/IMG]
[IMG]
 [/IMG]
[IMG]
 [/IMG]
After gluing and securing, I cut some 90 deg angles and glued them along the bottom and all corners. The box needs to be bulletproof as far as sound pressures go.
[IMG]
 [/IMG]
[IMG]
 [/IMG]
With the enclosure created, it was time to secure it to the new door (lid).
[IMG]
 [/IMG]
This is about as far as I can go until I get the ordered speaker in. As soon as it arrives, I'll complete the series
Last edited by Patro46; Jan 30, 2014 at 04:26 AM. Reason: Completed Build Series

Melting Slicks


Joined: Apr 2010
Posts: 2,793
Likes: 1,194
From: Canberra Australia
2025 C3 of the Year Finalist - Modified
This is great, look forward to next installment.
I hope you have the patterns/sizes for all the wood you used as i am sure there would be a number of us interested in following.
I hope you have the patterns/sizes for all the wood you used as i am sure there would be a number of us interested in following.

Racer


Joined: Nov 2008
Posts: 366
Likes: 7
From: Mobile Al
I put a 10" Solo Barick Kicker L7 speaker back in the same place but with no jack I didn't have to make it removeable. I have the amp mounted on a platform up high in the back so I still have some storage room. Just be careful of anything that you might put behind the seats, it might somehow wind up on the speaker and ruin it.
Thread Starter
Pro
Joined: Nov 2013
Posts: 730
Likes: 37
From: Catoosa Okla
Your right as rain on being proactive as far as damage to speaker. I'm using stainless steel mesh to cover the 8 inch speaker opening before the carpet goes down. This should provide the required protection for the speaker.
Corvette Stories
The Best of Corvette for Corvette Enthusiasts

Top 10 Most Explosive Corvettes Ever Made: Power-to-Weight Ratio Ranked!
Joe Kucinski
150 hp to 1,250 hp: Every Corvette Generation Compared by the Specs That Matter
Joe Kucinski
8 Coolest Corvette Pace Cars (and Replicas) of All Time
Verdad Gallardo
Top 10 Corvette Engines RANKED by Peak Torque (70+ Years of Muscle!)
Joe Kucinski
Corvette ZR1X Will Be Pacing the Indy 500, And Could Probably Race, Too!
Verdad Gallardo
Top 10 Corvettes Coming to Mecum Indy 2026!
Brett Foote
Top 10 C9 Corvette MUST-HAVES to Fix These C8 Generation Flaws!
Michael S. Palmer
10 Revolutionary 'Corvette Firsts' Most People Don't Know
Joe Kucinski
5 Reasons to Upgrade to an LS6-Powered Corvette; 5 Reasons to Stay LT2
Michael S. Palmer
Thread Starter
Pro
Joined: Nov 2013
Posts: 730
Likes: 37
From: Catoosa Okla
[IMG]
 [/IMG]
It's VERY small and has a regulator of some sorts to prevent overheating. Will see. The reviews on this little amp, like the Infinity subwoofer chosen for the project also have stellar reviews. This two channel little dynamo can operate in bridged, one channel mode and provide a REAL TRUE 288 watts x1 @ 4ohms! A lot of Chinese amps the size of a large suitcase that claim 6000 watts probably cant touch this amp. As far as placement goes, right up against the passenger seat back is the fiberglass backboard leading into the area where the subwoofer box is located. There is a factory relay and some wiring located in this area. This is where I'll locate the amp. IF heat ends up being an issue, I'll take a 3 or 4 inch 12 volt fan triggered by the amp and cut a hole in the fiberglass area behind the passenger seat, mount a small grill and duct it over the amp and call it a day. But I'm HOPING it wont end up being an issue.

Burning Brakes

Joined: Apr 2012
Posts: 1,084
Likes: 96
From: Bowmanville Ontario
Hmm, never thought of re-using the cover door frame over the jack door.
Since I have to pull mine out for some fine adjustment on the size, I may see if I can use the door.
Good idea Patro46.
Are you planning on wrapping the carpet, or just gluing it to the top? If you just glue it, I would worry the carpet would lift. If you plan on wrapping it, then you will need to leave more space around the cover to get the carpet inside the door frame.
Ken
Since I have to pull mine out for some fine adjustment on the size, I may see if I can use the door.
Good idea Patro46.
Are you planning on wrapping the carpet, or just gluing it to the top? If you just glue it, I would worry the carpet would lift. If you plan on wrapping it, then you will need to leave more space around the cover to get the carpet inside the door frame.
Ken




Burning Brakes


Joined: Jul 2002
Posts: 849
Likes: 10
From: Bayfield, Ontario
2016 C2 of Year Finalist
Thread Starter
Pro
Joined: Nov 2013
Posts: 730
Likes: 37
From: Catoosa Okla
Last night I was pondering what to do with the subwoofer lid as far as the carpet goes. I finished the entire door assemblies and re-carpeted them well over a month ago. This was long before I'd given much thought into sound, much less a subwoofer. This is a lesson in hindsight and 20/20. Now, with the newly build custom sub box, I'm left with the perfect cutout in the carpet for both the pushbutton latch assembly and the leather pull ring, neither of which do my subwoofer box now have or need. Well, maybe the pull ring but not the latch. It would be in the way of the lower sub box anyway. I contacted Corvette USA (thanks Jason) informing them I needed a new carpet for the jack box only. After checking and getting back to me, I found the best they could do was sell me a yard @ 40 bucks. This car is draining me in every direction. Determined to find another solution and even more determined to follow along with the look of factory and not a bunch of aftermarket looking clutter, I came up with this solution.
[IMG] [/IMG]
The heart of the solution is what is called an "Elevator Bolt". It has a very thin flat round head just about the size of my new Corvette door handle inserts. I've already restored one handle but haven't got around the the passenger side. Drastic times call for drastic measures, so I robbed the emblem and started putting the project together. The elevator bolt was too long for the 1/2" plywood so I grabbed my trusty Dremel and went to work. I also had to round the square shank of the bolt to slip through the fender washer.
[IMG] [/IMG]
[IMG] [/IMG]
[IMG] [/IMG]
Since the elevator bolt isn't a large enough diameter to properly cover our carpet cutout, I had to get a larger diameter way to cover the carpet cutout and here is my solution.
[IMG] [/IMG]
Note I had to chop off the top part of the washer to line up with the plastic trim ring around the door. I painted this fender washer the correct Medium Saddle for my interior. It now looks about the same as the factory trim ring for the pushbutton latch assembly on the other two doors. YAY! In other words, it will look as if it belongs with the two storage doors to it's right.
[IMG] [/IMG]
Now we need to add threads to secure this project that serves no other purpose than to cover a carpet boo-boo. This is what I came up with. Keep in mind, it may seem like overkill to hold a darned emblem in place, but I don't want it falling off and I don't wish to do this again
[IMG] [/IMG]
[IMG] [/IMG]
...And when I put her together, she looked like someone designed this back in 74 at the GM research facility! (Well...maybe not THAT good, but good enough for me) More pleased now than if I had re-carpeted the door. Still loving the stock look!
[IMG] [/IMG]
[IMG] [/IMG]
Now I have one more tiny carpet cut to contend with. The leather pull for the original door has left a bolt hole and blem in the carpet. But you know, if I ever need to get to my jack...I need a way to lift the box high enough to get a grip and get it out. It's already a tad heavy and it doesn't have the 8" Infinity which weighs more than my box does installed yet. So....
[IMG] [/IMG]
[IMG] [/IMG]
DONE! (With this part anyway) Tomorrow, Amazon is due to deliver the Infinity subwoofer, speaker box terminal plate and 8 gauge amp wiring kit. I should be able to sew this project up by the weekend!
[IMG] [/IMG]
[IMG]
 [/IMG]
The heart of the solution is what is called an "Elevator Bolt". It has a very thin flat round head just about the size of my new Corvette door handle inserts. I've already restored one handle but haven't got around the the passenger side. Drastic times call for drastic measures, so I robbed the emblem and started putting the project together. The elevator bolt was too long for the 1/2" plywood so I grabbed my trusty Dremel and went to work. I also had to round the square shank of the bolt to slip through the fender washer.
[IMG]
 [/IMG]
[IMG]
 [/IMG]
[IMG]
 [/IMG]
Since the elevator bolt isn't a large enough diameter to properly cover our carpet cutout, I had to get a larger diameter way to cover the carpet cutout and here is my solution.
[IMG]
 [/IMG]
Note I had to chop off the top part of the washer to line up with the plastic trim ring around the door. I painted this fender washer the correct Medium Saddle for my interior. It now looks about the same as the factory trim ring for the pushbutton latch assembly on the other two doors. YAY! In other words, it will look as if it belongs with the two storage doors to it's right.
[IMG]
 [/IMG]
Now we need to add threads to secure this project that serves no other purpose than to cover a carpet boo-boo. This is what I came up with. Keep in mind, it may seem like overkill to hold a darned emblem in place, but I don't want it falling off and I don't wish to do this again
[IMG]
 [/IMG]
[IMG]
 [/IMG]
...And when I put her together, she looked like someone designed this back in 74 at the GM research facility! (Well...maybe not THAT good, but good enough for me) More pleased now than if I had re-carpeted the door. Still loving the stock look!
[IMG]
 [/IMG]
[IMG]
 [/IMG]
Now I have one more tiny carpet cut to contend with. The leather pull for the original door has left a bolt hole and blem in the carpet. But you know, if I ever need to get to my jack...I need a way to lift the box high enough to get a grip and get it out. It's already a tad heavy and it doesn't have the 8" Infinity which weighs more than my box does installed yet. So....
[IMG]
 [/IMG]
[IMG]
 [/IMG]
DONE! (With this part anyway) Tomorrow, Amazon is due to deliver the Infinity subwoofer, speaker box terminal plate and 8 gauge amp wiring kit. I should be able to sew this project up by the weekend!
[IMG]
 [/IMG]
Thread Starter
Pro
Joined: Nov 2013
Posts: 730
Likes: 37
From: Catoosa Okla
Well, my Infinity speaker arrived from Amazon today. After work, I couldn't wait to get home and put this baby together! I unboxed it and promptly set it into the sub box and was hit with one of those those gut wrenching uh ohs. The magnet was larger than anticipated.
[IMG] [/IMG]
But I didn't find that out until I had already found this out. Note the speaker is SO large in diameter it wont even fit into the box. This entire project has such tight clearances there is little room for error....or failure at this stage. I spent some time yesterday figuring how to do the top lid to match the surroundings. Now this?
[IMG]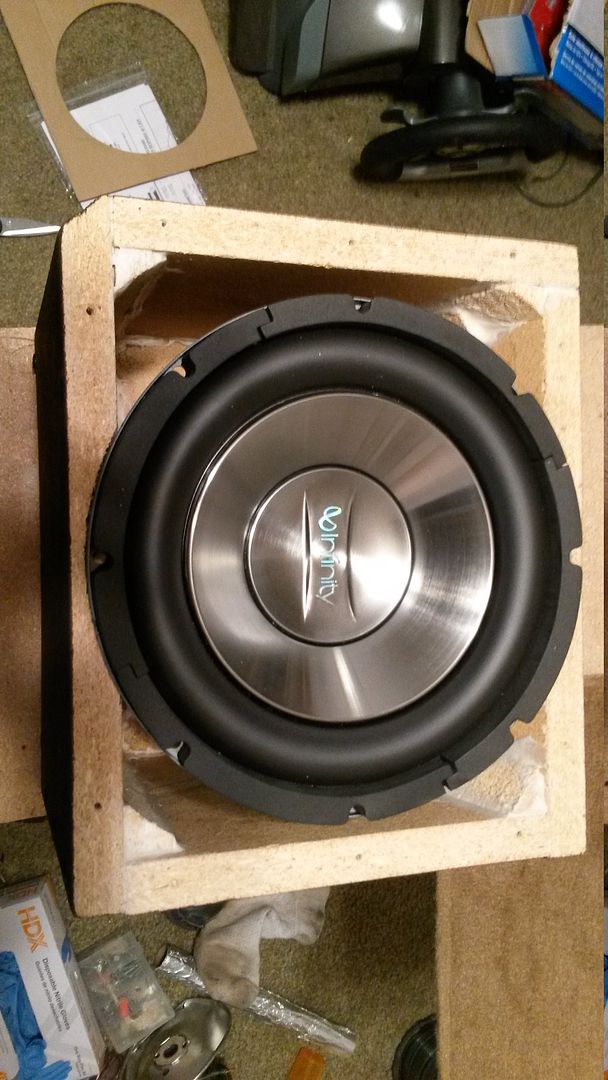 [/IMG]
OK. More than one way to skin a cat, right? Or as we've heard, if it doesn't fit, get a bigger hammer. Sort of. Anyway, to get over this hurtle, I grabbed my trusty Dremmel and went to work.
[IMG] [/IMG]
[IMG] [/IMG]
...and just as I slipped the speaker into it's new home, it wouldn't go deep enough. It's here I realized that massive planetary magnet was too large in diameter. Some trial and error with the trusty Dremmel and I had hogged about 3/8" clearance I needed to insure NOTHING was hitting. FINALLY a perfect fit!
[IMG]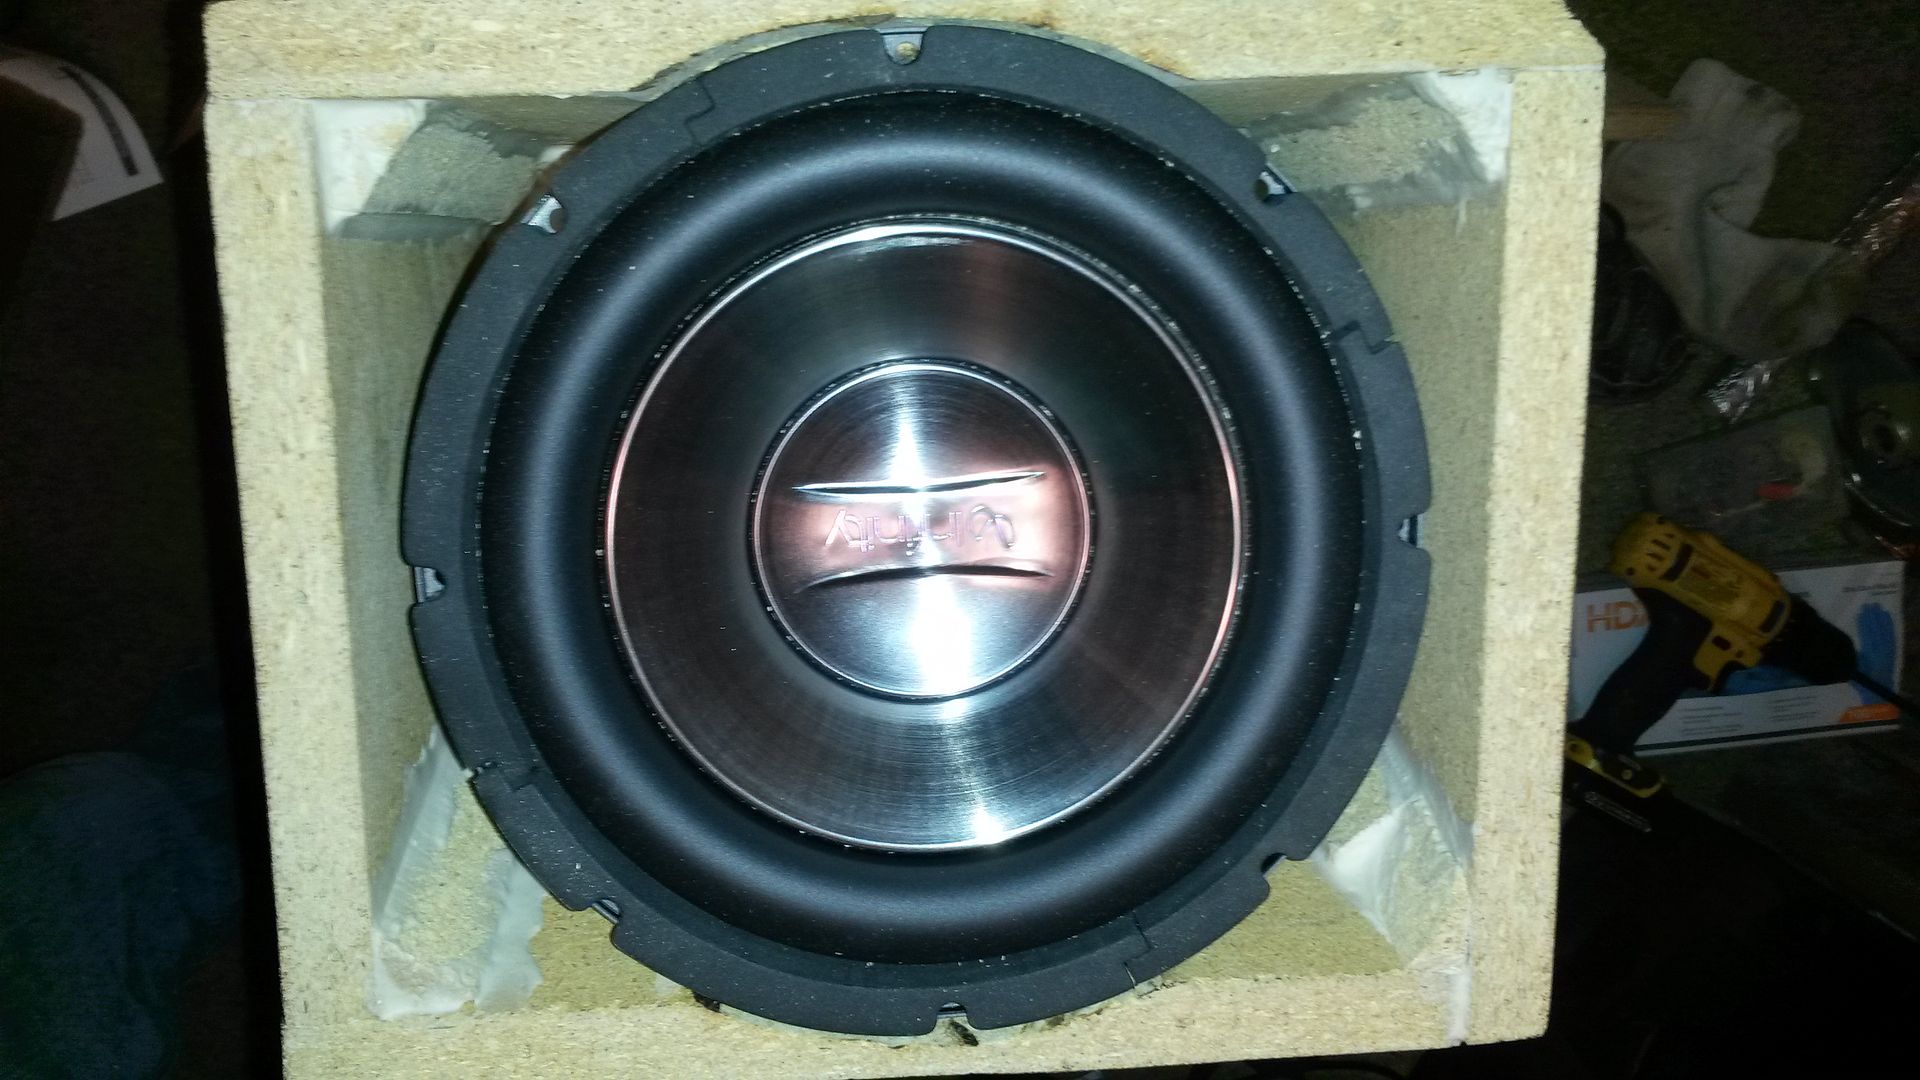 [/IMG]
Moving on, I cut the hole in the lid after CAREFUL measurement. The speaker not only has to line up perfectly with the lid, but now after having to recess the speaker in the box itself, all pieces must line up perfectly. I used wet black paint on the speaker compression ring, screwed the lid in place before it dried, took it apart and went off the paint mark. This insured a perfect fit. I then took an 1/8" drill bit and pre-drilled the six countersunk machine screws and mounted the speaker to the lid.
[IMG] [/IMG]
Everything on the lid must be countersunk and even with the surface. The speaker grill cloth will be the Medium Saddle carpet.
[IMG] [/IMG]
I then mounted the sub to the lid. *I suggest taking a dab of superglue on each thread where is goes into the nut after you've evenly tightened them. This will also work better than using a threadlocker in this environment. Also, this will break loose if I need to access the speaker
[IMG] [/IMG]
Speaker mounted to the lid finally! Note the dip at the top of the lid. That's no accident. That just happens to be the exact spot where the push button latch on the original lid was...and right where the carpet cutout was. This is also the exact spot our new Corvette emblem I stole from the passenger side door handle will reside, covering that carpet cutout.
[IMG] [/IMG]
Now we have to mount the speaker wiring pod. It will go on the far right passenger side of the sub box.
[IMG] [/IMG]
[IMG] [/IMG]
That nasty looking black that you will never see is actually rubberized undercoating, 2 coats. Isolation insurance.
[IMG] [/IMG]
Now it's time to wire up the subwoofer! I chose this 8 gauge kit from Amazon. Cheaper than I could have assembled on my own. Less than 10 bucks.
[IMG] [/IMG]
Here is what your 10 bucks buys.
[IMG] [/IMG]
Not a very good picture, but this is the speaker wire that came with the kit. It's about like lamp cord, but looks to have less copper in it. I used thicker wire than this on the four front speakers with only 75 watts per channel on them. This will not do.
[IMG] [/IMG]
This is the red 8 gauge amp power wire used to power the amp directly from the battery. I have plenty. My battery is less than 2 foot away so I have plenty. I think I'll use it for the internal sub wire on both positive and negative....
[IMG] [/IMG]
I'm also a BIG believer in solder and a mini torch. You don't have the regrets you have with crimp fittings, and this would be a pain in the keester to have to re-do when a wire vibrated off due to excess boom-boom. Yes, it takes a little longer, but you will never have to look back.
[IMG] [/IMG]
You simply cant get a better connection. Period. Take the time
[IMG] [/IMG]
A little shrink sleeve and volo!
[IMG] [/IMG]
Yes...that's a dreaded crimp connector...but wait. Remove the yellow plastic and you have the fixings of a great connection. (I didn't solder the wire directly to the speaker for future warranty purposes should they arise.
[IMG] [/IMG]
This is as good as it gets for a female spade terminal. Not as good as a direct solder connection, but best for this scenario.
[IMG] [/IMG]
*Note I used the 8 gauge red for both speaker terminals, and marked the negative wire with a black sharpie to prevent incorrect wiring due to no color code on wires.
[IMG] [/IMG]
Time to think about protecting our investment. Face it. At some time in the future someone is going to toss something in the back of your Vette that shouldn't have been tossed. We don't want this tossage going through our speaker. This will prevent this.
*On another note, I took heavy duty Scotch Guard to the carpet piece that is to cover the speaker to prevent any spillage from entering that beautiful Infinity speaker you will never be able to see again...only hear.
[IMG] [/IMG]
[IMG] [/IMG]
I used my trusty Dremmel and a cut off wheel to trim the stainless steel cover. Had I used snips, the ends wouldn't have been so smooth and I didn't want anything poking the thin carpet up.
[IMG] [/IMG]
Make note of the various partial diamond cut outs. I have to be able to access the bottom of the lid for final hardware installation before carpeting. The mesh grate must be secured in front of this. the cut outs give me access to the lid screws with the grate in place. What a pain!
[IMG] [/IMG]
To secure the grill to the lid, I used 3/8" staples. This will also prevent any sounds from the grill rattling a tune resembling the old guy on HeeHa with a pickle fork in his mouth...
I'm almost there! More to come!
[IMG]
 [/IMG]
But I didn't find that out until I had already found this out. Note the speaker is SO large in diameter it wont even fit into the box. This entire project has such tight clearances there is little room for error....or failure at this stage. I spent some time yesterday figuring how to do the top lid to match the surroundings. Now this?
[IMG]
 [/IMG]
OK. More than one way to skin a cat, right? Or as we've heard, if it doesn't fit, get a bigger hammer. Sort of. Anyway, to get over this hurtle, I grabbed my trusty Dremmel and went to work.
[IMG]
 [/IMG]
[IMG]
 [/IMG]
...and just as I slipped the speaker into it's new home, it wouldn't go deep enough. It's here I realized that massive planetary magnet was too large in diameter. Some trial and error with the trusty Dremmel and I had hogged about 3/8" clearance I needed to insure NOTHING was hitting. FINALLY a perfect fit!
[IMG]
 [/IMG]
Moving on, I cut the hole in the lid after CAREFUL measurement. The speaker not only has to line up perfectly with the lid, but now after having to recess the speaker in the box itself, all pieces must line up perfectly. I used wet black paint on the speaker compression ring, screwed the lid in place before it dried, took it apart and went off the paint mark. This insured a perfect fit. I then took an 1/8" drill bit and pre-drilled the six countersunk machine screws and mounted the speaker to the lid.
[IMG]
 [/IMG]
Everything on the lid must be countersunk and even with the surface. The speaker grill cloth will be the Medium Saddle carpet.
[IMG]
 [/IMG]
I then mounted the sub to the lid. *I suggest taking a dab of superglue on each thread where is goes into the nut after you've evenly tightened them. This will also work better than using a threadlocker in this environment. Also, this will break loose if I need to access the speaker
[IMG]
 [/IMG]
Speaker mounted to the lid finally! Note the dip at the top of the lid. That's no accident. That just happens to be the exact spot where the push button latch on the original lid was...and right where the carpet cutout was. This is also the exact spot our new Corvette emblem I stole from the passenger side door handle will reside, covering that carpet cutout.
[IMG]
 [/IMG]
Now we have to mount the speaker wiring pod. It will go on the far right passenger side of the sub box.
[IMG]
 [/IMG]
[IMG]
 [/IMG]
That nasty looking black that you will never see is actually rubberized undercoating, 2 coats. Isolation insurance.
[IMG]
 [/IMG]
Now it's time to wire up the subwoofer! I chose this 8 gauge kit from Amazon. Cheaper than I could have assembled on my own. Less than 10 bucks.
[IMG]
 [/IMG]
Here is what your 10 bucks buys.
[IMG]
 [/IMG]
Not a very good picture, but this is the speaker wire that came with the kit. It's about like lamp cord, but looks to have less copper in it. I used thicker wire than this on the four front speakers with only 75 watts per channel on them. This will not do.
[IMG]
 [/IMG]
This is the red 8 gauge amp power wire used to power the amp directly from the battery. I have plenty. My battery is less than 2 foot away so I have plenty. I think I'll use it for the internal sub wire on both positive and negative....
[IMG]
 [/IMG]
I'm also a BIG believer in solder and a mini torch. You don't have the regrets you have with crimp fittings, and this would be a pain in the keester to have to re-do when a wire vibrated off due to excess boom-boom. Yes, it takes a little longer, but you will never have to look back.
[IMG]
 [/IMG]
You simply cant get a better connection. Period. Take the time
[IMG]
 [/IMG]
A little shrink sleeve and volo!
[IMG]
 [/IMG]
Yes...that's a dreaded crimp connector...but wait. Remove the yellow plastic and you have the fixings of a great connection. (I didn't solder the wire directly to the speaker for future warranty purposes should they arise.
[IMG]
 [/IMG]
This is as good as it gets for a female spade terminal. Not as good as a direct solder connection, but best for this scenario.
[IMG]
 [/IMG]
*Note I used the 8 gauge red for both speaker terminals, and marked the negative wire with a black sharpie to prevent incorrect wiring due to no color code on wires.
[IMG]
 [/IMG]
Time to think about protecting our investment. Face it. At some time in the future someone is going to toss something in the back of your Vette that shouldn't have been tossed. We don't want this tossage going through our speaker. This will prevent this.
*On another note, I took heavy duty Scotch Guard to the carpet piece that is to cover the speaker to prevent any spillage from entering that beautiful Infinity speaker you will never be able to see again...only hear.
[IMG]
 [/IMG]
[IMG]
 [/IMG]
I used my trusty Dremmel and a cut off wheel to trim the stainless steel cover. Had I used snips, the ends wouldn't have been so smooth and I didn't want anything poking the thin carpet up.
[IMG]
 [/IMG]
Make note of the various partial diamond cut outs. I have to be able to access the bottom of the lid for final hardware installation before carpeting. The mesh grate must be secured in front of this. the cut outs give me access to the lid screws with the grate in place. What a pain!
[IMG]
 [/IMG]
To secure the grill to the lid, I used 3/8" staples. This will also prevent any sounds from the grill rattling a tune resembling the old guy on HeeHa with a pickle fork in his mouth...
I'm almost there! More to come!
Last edited by Patro46; Jan 30, 2014 at 02:41 AM. Reason: Added Picture
Thread Starter
Pro
Joined: Nov 2013
Posts: 730
Likes: 37
From: Catoosa Okla
Didn't think I'd get her done tonight, but was SO close simply had to finish. Time to seal her up and put her back together!
[IMG] [/IMG]
This was pretty soft foam tape. I made a gasket for the lid and a gasket for the box. This should provide a tight seal.
[IMG] [/IMG]
[IMG] [/IMG]
[IMG] [/IMG]
[IMG] [/IMG]
[IMG] [/IMG]
[IMG] [/IMG]
[IMG] [/IMG]
Next up: Amplifier placement and wiring
[IMG]
 [/IMG]
This was pretty soft foam tape. I made a gasket for the lid and a gasket for the box. This should provide a tight seal.
[IMG]
 [/IMG]
[IMG]
 [/IMG]
[IMG]
 [/IMG]
[IMG]
 [/IMG]
[IMG]
 [/IMG]
[IMG]
 [/IMG]
[IMG]
 [/IMG]
Next up: Amplifier placement and wiring


Melting Slicks
Joined: Feb 2009
Posts: 2,797
Likes: 608
From: Dallas Georgia
2020 Corvette of the Year Finalist (track prepared)
C3 of Year Winner (track prepared) 2019
When you finish I am either doing this myself, or printing your photos and taking it to my local stereo shop to have them do this for me!
Very nice install!
Very nice install!
Thread Starter
Pro
Joined: Nov 2013
Posts: 730
Likes: 37
From: Catoosa Okla
First, the front corner of the speaker box is rubbing on about 2 inches of the jack. I could cut and notch, but I'm not going to. I'll leave the jack out. So my disclaimer is don't bet on the jack fitting.

Second. After looking at the replacement trunk carpet, it became apparent that the back of the carpet has a rubbery/plastic film. Not sure how well sound will go through it so I plan on taking it and laying it carpet side down on a piece of thick cardboard that is on a 2x12 board, take an awl and drive few hundred holes in it. I don't think it will be noticeable on the frontside, and it's sure to allow a lot more through it. I hadn't giving that any consideration nor have I had the opportunity to try it.
[IMG]
 [/IMG]
[IMG]
 [/IMG]
[IMG]
 [/IMG]