When you click on links to various merchants on this site and make a purchase, this can result in this site earning a commission. Affiliate programs and affiliations include, but are not limited to, the eBay Partner Network.
Bad *** thread.... And a great evolution on the vette... Nice work. You'll always find something to do on them, that's for sure.
Thanks, and yeah that is no joke! Everytime I drive it, I park with a list of things I want to fix or improve!
Next on the list is going to be some interior updates:
Painting dash and dyeing door panels
LED Speedo and Tach lights
White face speedo and tach (to match the center console gauges)
New shift boot
So.... was feeling some bad wheel wobble the other day. Barely limped the car home. Turns out my wheel bearing was coming apart. My trailing arm bushings don't look great either, so I'm in for a full trailing arm rebuild. Unfortunately, money is really tight right now so I can't afford rebuilt trailing arms. Plan to just tackle it myself, so if anyone has the tools (bearing setup tool, spindle knocker, spindle install tool etc...) and would be willing to lend them to me I would appreciate it!
So.... was feeling some bad wheel wobble the other day. Barely limped the car home. Turns out my wheel bearing was coming apart. My trailing arm bushings don't look great either, so I'm in for a full trailing arm rebuild. Unfortunately, money is really tight right now so I can't afford rebuilt trailing arms. Plan to just tackle it myself, so if anyone has the tools (bearing setup tool, spindle knocker, spindle install tool etc...) and would be willing to lend them to me I would appreciate it!
My dad recently got a set of rebuilt Trailing arms from Lonestar Calipers for $372 each....I thought that was very reasonable, if you can swing that, its probably the way to go...
Setting up the rear wheel bearing requires special tools and skill to make them last. Good luck either way you go.
Trailing arm rebuild is rolling along, as free time allows. Not much of that free time around here lately, so it's kind of "an hour here, an hour there". But making steady progress!
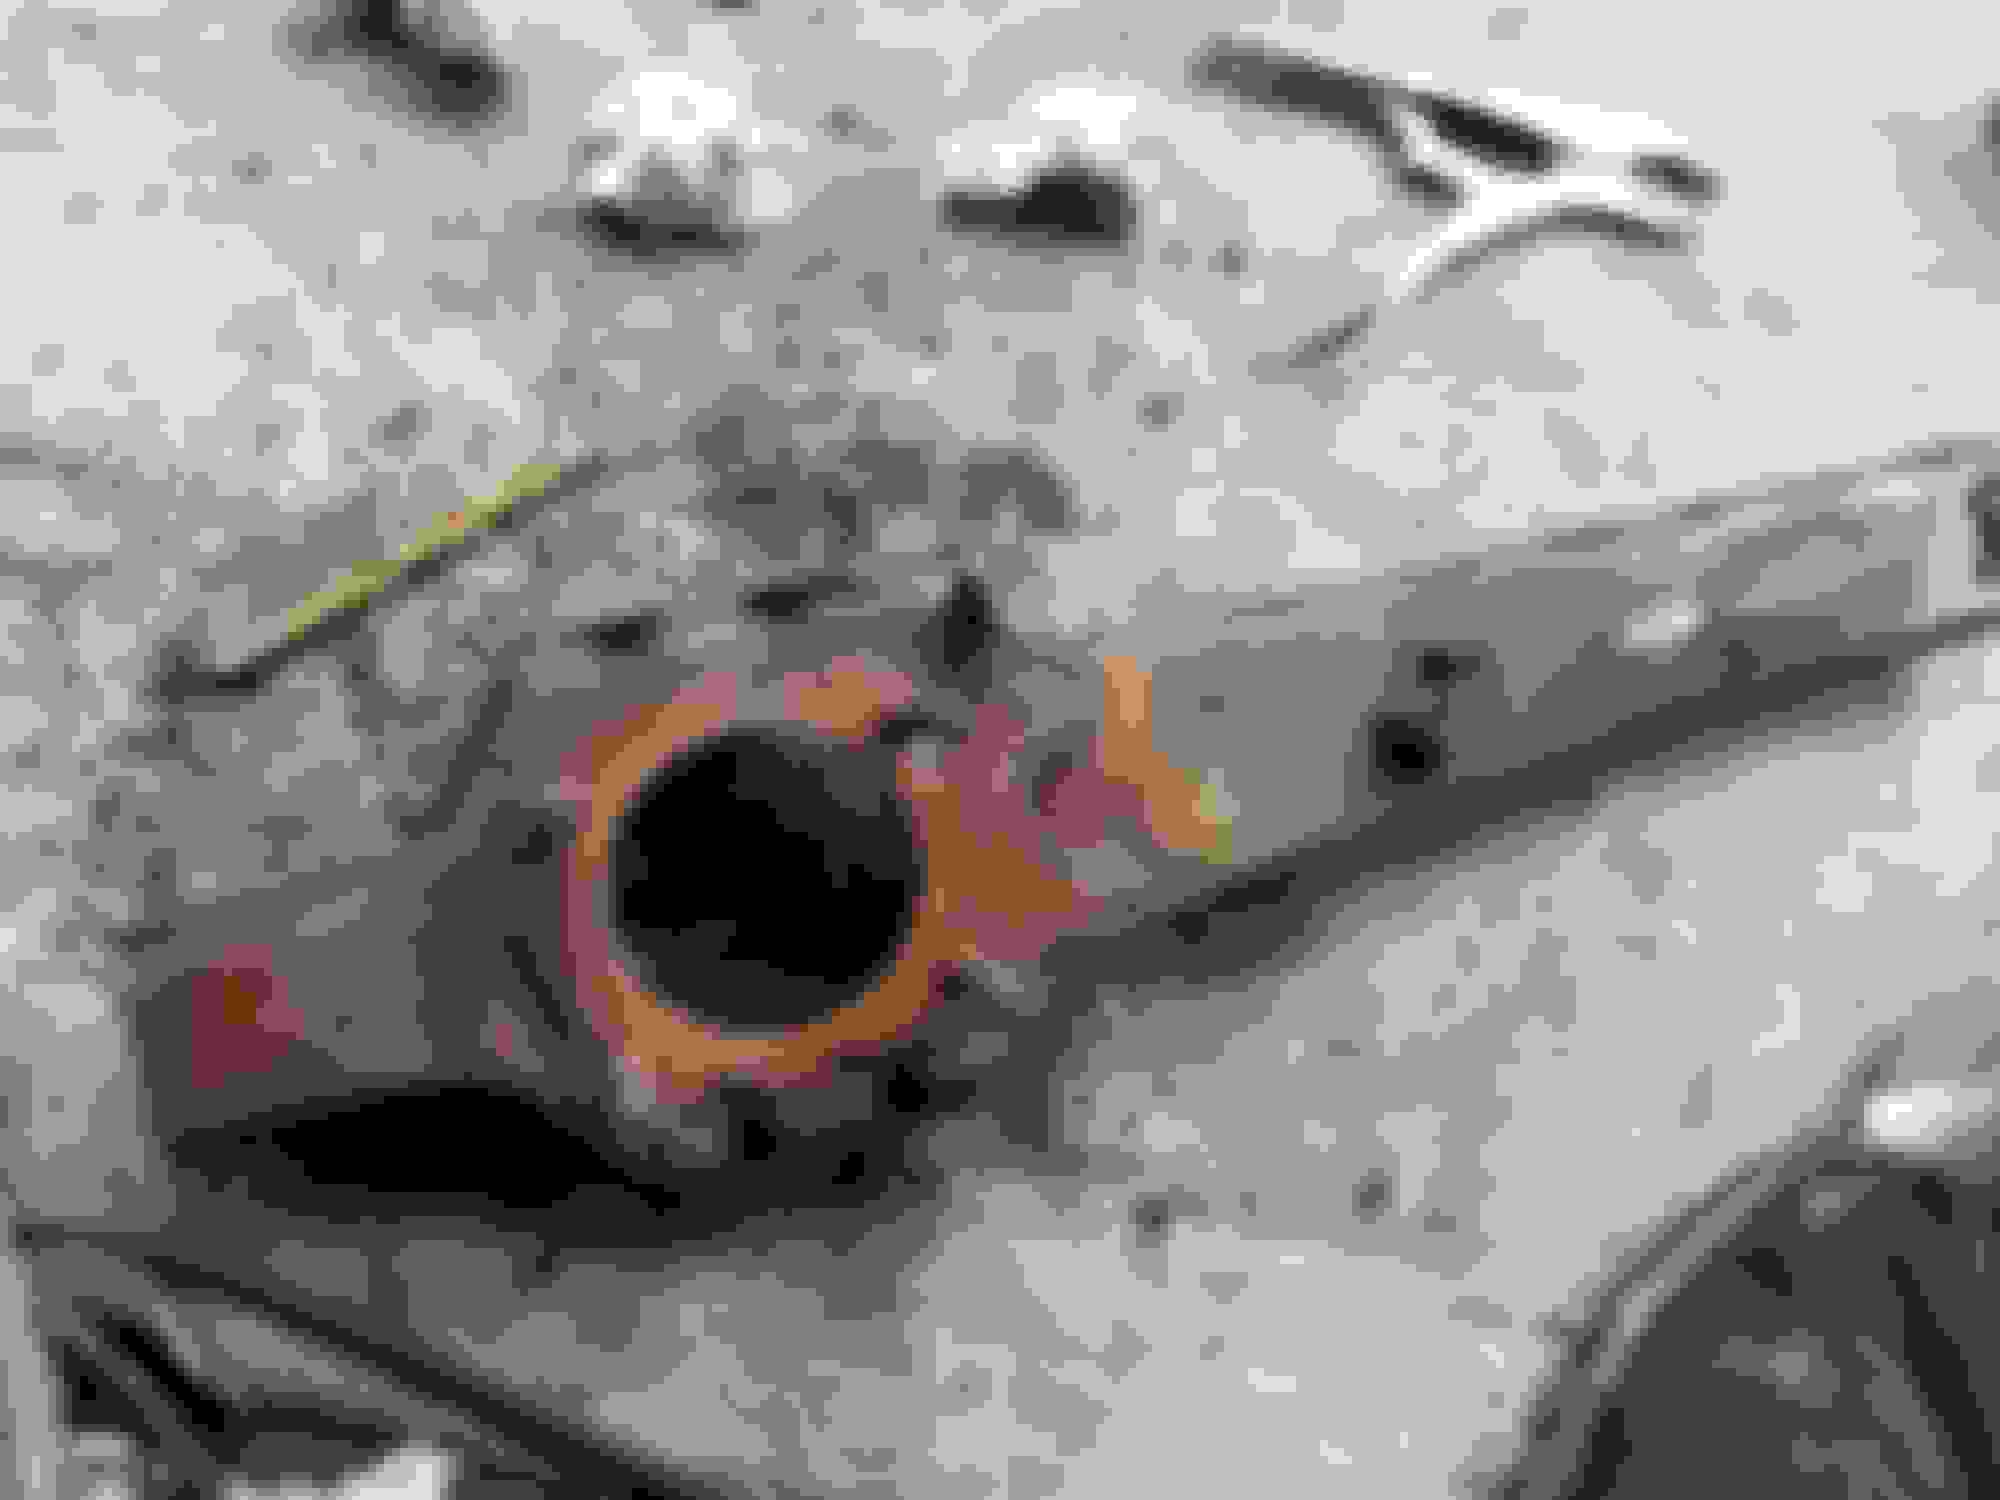
First off, here's the absolutely trashed trailing arm bushing, and the reason I decided i needed a full trailing arm rebuild instead of just a bearing replacement:
Taking the trailing arm apart (sorry about the lack of detailed pictures, kinda forgot to snap some once I got my hands dirty):
So I love getting new tools, but the name of the game on this trailing arm rebuild (and this whole car to be honest) is BUDGET! That said, rebuilding trailing arms (and other rear ends components) is easier with access to a hydraulic press. When I started this, I was planning to make a tool (similar to the spindle install tool offered by many of the vendors. Basically a big threaded socket and spacer that pushes against the housing and "pulls" the spindle into the bearing). Obviously the press is a better way to do it, but my local machine shops that I called wanted $20-$40 just to press the spindles in. So I jumped on my local craigslist, and waddya know! Someone had this 12 ton press in great shape for sale for $50. So really didn't spend much more than I would have having someone else do it, plus I know own a hydraulic press which I have a feeling will come in handy in the future.
And here are the trailing arm parts after sanding/wire wheeling and painting and priming:
So this is interesting. After taking apart the trailing arms, discovered the the drivers side bearing/spindle had been replaced before (interestingly, this is the one that failed, so I can only presume it was replaced poorly). It was obviously replaced as the grease inside was a bright red color (clearly a newer synthetic, not the old brown/tan that was in the other side) and the spindle is way nicer and newer (as seen below):
Working a couple 13 hour days in a row . So I won't have time to put into this project till middle of the week, but I'll try to take better pictures on reassembly. Next up, I plan to install the trailing arm bushing (and flare it) and start figuring out the bearing endplay using the setup tool (thanks to Jim_81 for letting me borrow that!).
What a great thread! Just stumbled across it, lots of similarities between your approach to your 79 and my 78. I also started with a 4 speed and Goodwrench 350. Haven't changed anything internal on the 350, but did a TBI swap last year and a 5 speed swap the year before that .Both more make the car so much more fun to drive. I really like the OD because the 3.70 rear gears made highway cruising a chore.
The fuel injection swap also was a big jump ahead .I had the car tuned fairly well with the Qjet, but hated the long cranking times to fill the float bowls. Probably have a total of $500 in my swap, and based on what you've posted it would be totally within you capabilities. I'm starting a TPI swap mainly because I like how the intake looks.
Any chance you have more pics of tips for the in-car cam swap? I may end up going that route in the future as that would be the next step along with a better set of years.
Great project!
Thanks for the comment!
I've looked into the TPI swap, for the same two reasons as you: it looks awesome! And fuel injection would be really nice. Most of what I've read though is that it is only good up to 4500 RPM or so without mods, and once well ported, it kinda tops out around 400hp. What has your experience been with it? What kind of power are you (roughly) making and did it feel like it affected it? Jealous that you have fuel injection!
I will dig around and see what pictures I have of the cam swap. It was a couple years ago now, but as I recall I didn't need to remove the front bumper. Just the radiator, fan, and radiator support and that gave me JUST enough room to slide the cam in there.
I haven't started the TPI swap yet. Have the pieces and spending the time to sand, buff and polish while the are off the car. You are right about the higher rpm limitations of TPI - just inherent in the long runner design. Was always planned for the low end torque grunt,but will starve out at the top end. There are aftermarket options that flow better. The limiting factor is the lower base manifold.
My Goodwrench is the plane Jane type, no big horsepower. Stock cam and heads. I might get to the point in the next couple of years of doing a comprehensive cam and head swap - really liked the photo you posted of the process halfway thru!
Have you considered a 5 speed swap? The TKO600 was fairly simple and totally changed the personality of the car. Lots more fun to drive. Expensive, but what a difference!
Cool, I love the idea of running TPI, not quite right for my application, but a stealth ram isn't necessarily out of the question some day.
Yeah mine was 100% stock when I got it as well! It's a good reliable motor, and has halfway decent torque, but it's frustrating to have such a cool looking car that doesn't have much grunt. The camshaft and heads woke it up in an unbelievable way. It's nuts how much some compression and flow will do to those bottom ends! It can be done pretty cheaply too, you can have like 90% of the performance by just finding some Vortec heads and getting a basic cam kit (~$200) to match, highly reccomend it as it completely changed the car for me.
Definitely want a transmission with an overdrive gear someday! I haven't done much research on them yet because it isn't in the budget, and it will depend on where i go with the motor. For now, the 4-speed and 3.55 rear gears work fine as I don't spend much time just highway cruising. But as I get farther along with the car, a 5 or 6 speed is definitely planned! There is still the possibility that I will go for a junkyard 6.0 LS motor, and use the factory LS fuel injection. If I go that way, I will probably source a T56 6-speed.
Let me know when you get rolling on your TPI swap, I'd love to follow along!
Trailing arm progress update: both trailing arms are now rebuilt. That was easier than I expected, but also way more time consuming. In hindsight, it makes more sense to have a vendor (like Van Steel, Bairs, etc...) rebuild the arms. Although rebuilding them myself ultimately saved me money, it also cost me a good 20 hours of my life (I'm kinda a slow moving worker and triple check things as I go). Thanks to GTR1999 and DUB for the help! Also thanks to Jim_81 for letting me borrow his bearing setup tool!
Setting bearing endplay. I was probably most intimidated by this part of rebuilding the trailing arms. In reality, this was really easy. Just required alot of patience. Started with the biggest shim, torqued the nut to 100 foot pounds, and measured the end play. Had roughly .030". Found a shim that was .027" smaller, installed it and torqued the nut again. This gave me .003" end play, which is pretty good and probably just fine, but I wanted it more like .001. So (using a method I found somewhere else) I put a piece of rough sand paper flat on the concrete and dragged the shim over it, counting how many time I drag it each direction and rotating it every few drags. Measured often until I got the desired thickness (only taking off .002"). Reinstalled the shim and checked the endplay. .001"! I'm good with that
Did the same on the other side. Feels good knowing both bearings are setup about as good as they could be end play wise.
Trailing arm with SS parking brake hardware installed.
Assembled trailing arm with spindle pressed in. I didn't get any pictures of the last part, but I also set my rotor runout. Got both rotors under .003" runout which should be well within the specs for lip seal calipers.
That's it for the moment! Started trying to reinstall them in the car last night and realized I could use another pair of arms. trailing arms are heavy and it's tough to sneak that trailing arm bolt in there while also holding up the arm. So gotta wait till the wife has some free time to help! Hopefully back on the road later this week.
Back on the road! Trailing arms are in and all suspension is bolted back up.
I started out by putting the same width of stainless shims in as the original rusty stock shims. Took the car around the block to settle the suspension and let the engine run that hadn't run in a month.
Started doing my home alignment because to get it done at an alignment shop that actually works on old cars and knows how to adjust the trailing arms with shims was gonna cost a couple hundred dollars.
I was nervous about doing the home alignment, but after doing some reading and some testing on my own, it's actually really simple! Just gotta be patient and careful. I ended up only having to adjust the driver's side shims once, but the passenger side took 5 adjustments before I got the shim stack exactly right to achieve 0 degree thrust angle and 1/8" toe. And between each adjustment I had to drive it a little to make sure everything was settled, and then setup my measuring tools again. Since then, I've driven the car a few times and remeasured my toe and thrust angle just to make sure that my measurements are repeatable. And I am pleasantly surprised to report that I get the exact same measurements everytime! That's good enough for me to say the alignment is good!
I did make a stupid mistake over the weekend. I have a quick disconnect on my battery, and I usually remember to flip the disconnect off when I work on the car. For some reason I forgot, and while adjusting some wiring, I shorted the postitive alternator wire against the case of the alternator. Didn't think much of it, till I went to start the car and had no electrical power whatsoever. Turns out, I burned up a fusible link picking them up after work to solder in and hopefully be back on the road!
I have a pretty large list of small items I want to fix, change, or upgrade on the car in the near future. Most of the fuel injection and forced induction plans are probably gonna wait till winter time. In the mean time, I will be dyeing some of the interior components, making a custom center console and switch panel, running some LED strips for the speedo and tach backlights, and just enjoying the car!
Also, finally gonna install that weatherstripping kit....
I am running Doug's headers and side pipes with JCL (STS) baffles. I have kept my baffles fully capped since they are plenty loud (some report that they aren't loud enough unless you uncap them, but I can only imagine that those people have stock compression, cam, and heads because my motor is about as loud as I would like it on a daily basis with the baffles capped).
I was doing some measuring and research, and realized that I am probably costing my motor some decent horsepower with the capped baffles in place. Someone did some proper caluclations, and if you don't drill out the baffle, you only have something like 2" exhaust flow per pipe. Not sure how true that measurement is, but I do know that there is a proven dyno test on the forum (albeit with a motor making about 100 more hp than mine which would make the results more dramatic) that shows that the difference between capped baffles and uncapped baffles was about 75 hp.
I'm always looking for a little more horsepower, so I'm going to try running the baffles uncapped this weekend, but I anticipate that it will be louder than I want (alot of the goal this year has been to make the car more liveable and reliable everyday so I will drive it more. Being honest with myself, everytime I make a vehicle "the way I want it" to look and sound, I don't drive it as much because it is uncomfortable or inconvenient as heck. The motorcycle I posted above is a great example!).
So that brings us to this idea I'm having. I want the power of the uncapped baffles, but I don't want them to be loud all day everyday. I like to be able to just start the car and not annoy the neighbors like crazy, and not give myself a headache from the volume. I don't mind if they are loud when I'm going WOT (they are already pretty dang loud at that point, and I can control the volume with my right foot). I have two potential ideas I'm pursuing:
#1 manual cutout. If you are familiar with the STS baffles, they have a long 1 1/4" (I believe, I'll have to measure) stainless pipe running down the center (this is the part that is "capped" . You can remove the cap, or drill holes in it to adjust the volume/flow). My idea would be to use something like an old CV carb or throttle body butterfly valve ( I have a couple in my garage) ground to about the same diameter as the 1 1/4" tube. I could then weld a nut to the shaft of the valve. Drill a small hole in the back of the sidepipe where it would be seen, and run a 3" long bolt threaded into the nut on the valve (most likely using a nut on either side of the sidepipe wall to hold it snug, and gotta figure out a good way to seal it). In this way, I could use a wrench to turn the bolt and open or close that middle STS baffle tube by having the butterfly valve obstructing flow (just like the cap is now) or have the small edge facing flow, essentially uncapping it. So I could drive it around with the valve closed to keep it quiet. Then it should just be like a 5 second adjustment on either side of the car with a box wrench to Open the valve and have the extra power/volume.
#2 So this idea is maybe a little more far-fetched, but I'm interested to at least dig into it more and see if it's feasible. I was thinking something along the lines of a flapper valve (similar to what you might see on an older tractor exhaust). If I could find or make one small enough, and then adjust the spring tension so that it stays closed at normal engine speeds, but when the exhaust flow is more demanding (at WOT) it would have enough pressure to push the flapper up.
I think idea #1 will work well as its used on some new cars nowadays. #2 has the potential to work but I think it will be a lot of screwing around to get the right tension and so on so it opens when you want and not when you don't.
I think idea #1 will work well as its used on some new cars nowadays. #2 has the potential to work but I think it will be a lot of screwing around to get the right tension and so on so it opens when you want and not when you don't.
Cool, yeah I was thinking that #1 is definitely easier, but I also like the idea of not having to reach down and turn the valve with a wrench. I might be able to fab up a small electric motor setup and basically have my own custom electric cutout...
I misread you comment about the cutouts, I thought you were talking about an electrically operated cutout in #1. I think the electrically operated cutout would work pretty well as that's what the have on the newer cars, although as you say it would be even nicer to have a system that opens automatically at a certain engine rpm/backpressure.
I would think that if you can do the servo control for #1, you could get automatic mode for #2.
Have a big switch that controls setpoints:
No ticket, cutouts stay closed.
Sport, cutouts open with the secondaries (vacuum signal and RPM)
Race, always open, or above a certain RPM
If you get really clever, you can mark out zones where the cutouts close, like near the school, police station, and the sound-check area of the track. You'd need some clever GPS magic for that.
Last edited by Bikespace; Aug 10, 2018 at 01:01 PM.
Wow - just read this whole thread! Nice job. Funny because it is very similar to what I did to my car. Mine started with a GM Goodwrench motor as well and I ended up putting in Comp XE268 cam, Vortec heads, intake etc... Then this past spring I upgraded the heads to Dart Pro1 180s. Also added side pipes - Dougs as well! Lots of stuff you can do to these cars.
I misread you comment about the cutouts, I thought you were talking about an electrically operated cutout in #1. I think the electrically operated cutout would work pretty well as that's what the have on the newer cars, although as you say it would be even nicer to have a system that opens automatically at a certain engine rpm/backpressure.
If I could make the electric cutouts work, I wouldn't mind not having it automatic! In fact, I think I would prefer an electric cutout that I can manually control with a switch in the cabin (like the modern cars have).


 . So I won't have time to put into this project till middle of the week, but I'll try to take better pictures on reassembly. Next up, I plan to install the trailing arm bushing (and flare it) and start figuring out the bearing endplay using the setup tool (thanks to Jim_81 for letting me borrow that!).